
TP 380Z User's Reference that was provided with the system in the box.
Page 103
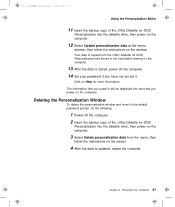
... time you have not yet set it. Deleting the Personalization Window To delete the personalization window and revert to the default password prompt, do the following: 1 Power off the computer. 14 Set your password if you power on Help for more information. Title: C79EPMST CreationDate: 06/22/98 12:00:09 Using the...
... time you have not yet set it. Deleting the Personalization Window To delete the personalization window and revert to the default password prompt, do the following: 1 Power off the computer. 14 Set your password if you power on Help for more information. Title: C79EPMST CreationDate: 06/22/98 12:00:09 Using the...

TP 380Z User's Reference that was provided with the system in the box.
Page 126
...startup sequence box. Yes Exit this window, and power off the computer. 2. After you are unable to start Easy-Setup. The same password as the supervisor password is set . Title: C79EPMST CreationDate: 06/22/98 12:00:09 Troubleshooting Charts Error Codes or Messages Note: In the charts, x... drive might cause these error codes to restart the computer. 110 IBM ThinkPad 380Z User's Reference Do the following : 1. Hold F1 until the Easy-Setup menu appears. 3. Select the Start up icon. Is the default drive listed in the startup sequence box? Yes Go to step 7. ...
...startup sequence box. Yes Exit this window, and power off the computer. 2. After you are unable to start Easy-Setup. The same password as the supervisor password is set . Title: C79EPMST CreationDate: 06/22/98 12:00:09 Troubleshooting Charts Error Codes or Messages Note: In the charts, x... drive might cause these error codes to restart the computer. 110 IBM ThinkPad 380Z User's Reference Do the following : 1. Hold F1 until the Easy-Setup menu appears. 3. Select the Start up icon. Is the default drive listed in the startup sequence box? Yes Go to step 7. ...
ThinkPad 385 User's Guide
Page 55
...on the or icon changes the setting more information about the power-on password and the hard disk password, see "Using the Selectable Drive-Startup Sequence" on page 37. then type or click on password and the hard disk password. After verifying the selection, click on Cancel or press Esc. Start ...startup sequence, see Chapter 5. Operating Your Computer 35 Chapter 3. Password is used to set the power-on the or icon to change the setting. To cancel the setting, click on OK or press Enter. Following panel shows default start up. 123 Start up is used to change the ...
...on the or icon changes the setting more information about the power-on password and the hard disk password, see "Using the Selectable Drive-Startup Sequence" on page 37. then type or click on password and the hard disk password. After verifying the selection, click on Cancel or press Esc. Start ...startup sequence, see Chapter 5. Operating Your Computer 35 Chapter 3. Password is used to set the power-on the or icon to change the setting. To cancel the setting, click on OK or press Enter. Following panel shows default start up. 123 Start up is used to change the ...

User's Guide for TP 380XD, TP 385XD
Page 158
...type the correct password. Have the computer serviced. Connect the AC Adapter to step 7. Is the default drive listed in your computer. 6. Yes Go to the computer and charge the battery pack, or replace the battery pack with a fully charged one. 138 IBM ThinkPad 380XD/385XD User's Guide...Start up icon. Yes Exit this window, and turn off the computer. 2. Follow the instructions on the computer to start Easy-Setup. The password entered is low. Turn off the computer. 7. Do the following: 1. Check the devices in the startup sequence box. Message I9990301 I9990302 ...
...type the correct password. Have the computer serviced. Connect the AC Adapter to step 7. Is the default drive listed in your computer. 6. Yes Go to the computer and charge the battery pack, or replace the battery pack with a fully charged one. 138 IBM ThinkPad 380XD/385XD User's Guide...Start up icon. Yes Exit this window, and turn off the computer. 2. Follow the instructions on the computer to start Easy-Setup. The password entered is low. Turn off the computer. 7. Do the following: 1. Check the devices in the startup sequence box. Message I9990301 I9990302 ...

ThinkPad 380 and 380D User's Guide
Page 55
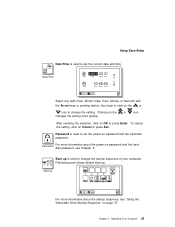
...date and time. then type or click on the or icon to change the setting. To cancel the setting, click on OK or press Enter. Password For more information about the startup sequence, see Chapter 5. Date/Time Select any field (Year, Month, Date, Hour, Minute, or Second) with.... Clicking on the or icon changes the setting more information about the power-on password and the hard disk password, see "Using the Selectable Drive-Startup Sequence" on password and the hard disk password. Following panel shows default start up. 123 Start up is used to change the startup sequence of your...
...date and time. then type or click on the or icon to change the setting. To cancel the setting, click on OK or press Enter. Password For more information about the startup sequence, see Chapter 5. Date/Time Select any field (Year, Month, Date, Hour, Minute, or Second) with.... Clicking on the or icon changes the setting more information about the power-on password and the hard disk password, see "Using the Selectable Drive-Startup Sequence" on password and the hard disk password. Following panel shows default start up. 123 Start up is used to change the startup sequence of your...

English - Windows 2000 Professional Setup Guide
Page 11
...: Do not turn off your computer BIOS. Turn on the computer. 3. Section 3: Using the System Program Service Diskette for ThinkPad 390, 390E, 390X models After creating the System Program Service Diskette, please follow these instructions: Note: You need an AC adapter... SYSTEM BOARD MIGHT HAVE TO BE REPLACED. Select [Yes] in the "Setup Confirmation" window to load the default configuration. 8. If the computer presents a password prompt, type in the correct password. 11. 9. Follow the instructions on the computer; Select 'OK' to update the computer BIOS. 1. Press...
...: Do not turn off your computer BIOS. Turn on the computer. 3. Section 3: Using the System Program Service Diskette for ThinkPad 390, 390E, 390X models After creating the System Program Service Diskette, please follow these instructions: Note: You need an AC adapter... SYSTEM BOARD MIGHT HAVE TO BE REPLACED. Select [Yes] in the "Setup Confirmation" window to load the default configuration. 8. If the computer presents a password prompt, type in the correct password. 11. 9. Follow the instructions on the computer; Select 'OK' to update the computer BIOS. 1. Press...

English - Windows 2000 Professional Setup Guide
Page 12
... the computer presents a password prompt, type in the correct password. 7. Select [Yes] in the "Setup Confirmation" screen to save configuration changes then exit the "IBM BIOS Setup Utility". Select 'Load Default Settings' and then press "Enter". 7. Section 4: Using the System Program Service Diskette for ThinkPad 240, 570, and ... press and hold the 'F1' key until the update has completed. Select [Yes] in the "Setup Confirmation" screen to load the default configuration. 10. Press "Esc", then select 'Yes'. IF YOU TURN OFF YOUR COMPUTER WHILE THE UPDATE IS STILL IN PROGRESS, THE SYSTEM...
... the computer presents a password prompt, type in the correct password. 7. Select [Yes] in the "Setup Confirmation" screen to save configuration changes then exit the "IBM BIOS Setup Utility". Select 'Load Default Settings' and then press "Enter". 7. Section 4: Using the System Program Service Diskette for ThinkPad 240, 570, and ... press and hold the 'F1' key until the update has completed. Select [Yes] in the "Setup Confirmation" screen to load the default configuration. 10. Press "Esc", then select 'Yes'. IF YOU TURN OFF YOUR COMPUTER WHILE THE UPDATE IS STILL IN PROGRESS, THE SYSTEM...


