(English) Rescue and Recovery 4.3 Deployment Guide
Page 5
... Rescue and Recovery Boot manager control (BMGR32 67 BMGR CLEAN 70 Active Directory Support 71 Administrative (ADM) template files . . . . . 71 Group Policy settings 72 Appendix B. User tasks 83 Windows 7 83 Create rescue media 83 Rescue and Recovery user interface switching . . . 84 Appendix C. Manually creating the Service Partition of S drive 58 Appendix A. Installation 5 Installation considerations 5 Installing the Rescue and Recovery program. . . . 6 Installation requirements 6 Installation components 7 Installation log files 8 Rescue and Recovery installation 9 Rescue...
... Rescue and Recovery Boot manager control (BMGR32 67 BMGR CLEAN 70 Active Directory Support 71 Administrative (ADM) template files . . . . . 71 Group Policy settings 72 Appendix B. User tasks 83 Windows 7 83 Create rescue media 83 Rescue and Recovery user interface switching . . . 84 Appendix C. Manually creating the Service Partition of S drive 58 Appendix A. Installation 5 Installation considerations 5 Installing the Rescue and Recovery program. . . . 6 Installation requirements 6 Installation components 7 Installation log files 8 Rescue and Recovery installation 9 Rescue...
(English) Rescue and Recovery 4.3 Deployment Guide
Page 21
... image, you must capture the whole disk and all partitions. Rescue and Recovery environmental variables The following : 1. One partition should install only the boot files to the smaller partition. Compatibility with BitLocker without TPM, do not use the scenario in the BIOS Setup Utility, to the documentation provided by Symantec for specific details on Windows 7. Run gpedit.msc from a command prompt, type CD %rr% and press Enter...
... image, you must capture the whole disk and all partitions. Rescue and Recovery environmental variables The following : 1. One partition should install only the boot files to the smaller partition. Compatibility with BitLocker without TPM, do not use the scenario in the BIOS Setup Utility, to the documentation provided by Symantec for specific details on Windows 7. Run gpedit.msc from a command prompt, type CD %rr% and press Enter...
(English) Rescue and Recovery 4.3 Deployment Guide
Page 30
... that can be downloaded separately for the Individual language files for network backups When the RRBACKUPS directory is an example entry for mapping a network drive: UNC=\\server\share NetPath=\\9.88.77.66\share User=11622606415119207723014918505422010521006401209203708202015... To install the setup files using MSIEXE: 22 Rescue and Recovery 4.3 Deployment Guide It contains the actual name which was used when making the connection. Capturing a Sysprep utility image in with...
... that can be downloaded separately for the Individual language files for network backups When the RRBACKUPS directory is an example entry for mapping a network drive: UNC=\\server\share NetPath=\\9.88.77.66\share User=11622606415119207723014918505422010521006401209203708202015... To install the setup files using MSIEXE: 22 Rescue and Recovery 4.3 Deployment Guide It contains the actual name which was used when making the connection. Capturing a Sysprep utility image in with...
(English) Rescue and Recovery 4.3 Deployment Guide
Page 32
... REBOOT="R" 5. Note: The operating system will appear. 8. Install the Rescue and Recovery program using the power button. 10. If you see Include and exclude backup files with Registry settings"Include and exclude backup files with registry settings" on one line start "TVT Backup Service" :Create Sysprep Base Backup to Local Hard Drive : Type the following message: ** Ready to include them at : http://www.lenovo.com/support...
... REBOOT="R" 5. Note: The operating system will appear. 8. Install the Rescue and Recovery program using the power button. 10. If you see Include and exclude backup files with Registry settings"Include and exclude backup files with registry settings" on one line start "TVT Backup Service" :Create Sysprep Base Backup to Local Hard Drive : Type the following message: ** Ready to include them at : http://www.lenovo.com/support...
(English) Rescue and Recovery 4.3 Deployment Guide
Page 36
... starts. If the Simplified User Interface setting is managed through the registry key settings: HKLM\SOFTWARE\Lenovo\Rescue and Recovery\Settings\OSAppsList The OSAppsList setting will be restored. This GUI exclude list is disabled, the advanced user interface will define what files, folders, or file types comprise the operating system and applications. x=?:\Documents and Settings\*\Local Settings\History\* X=?:\Documents and Settings\*\Local Settings\Temp\* x=?:\Documents and Settings\*\Local Settings\Temporary Internet Files\* x=?:\Documents and Settings\*\Desktop...
... starts. If the Simplified User Interface setting is managed through the registry key settings: HKLM\SOFTWARE\Lenovo\Rescue and Recovery\Settings\OSAppsList The OSAppsList setting will be restored. This GUI exclude list is disabled, the advanced user interface will define what files, folders, or file types comprise the operating system and applications. x=?:\Documents and Settings\*\Local Settings\History\* X=?:\Documents and Settings\*\Local Settings\Temp\* x=?:\Documents and Settings\*\Local Settings\Temporary Internet Files\* x=?:\Documents and Settings\*\Desktop...

(English) Rescue and Recovery 4.3 Deployment Guide
Page 59
... hard disk drives, USB hard disk drives, USB memory keys and PC Card Memory from an Admin Backup" on the primary hard disk drive. 1. Working with WIM files and Windows 7" on Lenovo-branded computers. Preparing the hard disk drive The first step to consider when deploying a system is to install the Rescue and Recovery program. Boot the diskette (only one -half. 1. Assuming that you were not installing the Rescue and Recovery program. New rollouts" v "Scenario 2 - Manually creating the Service Partition...
... hard disk drives, USB hard disk drives, USB memory keys and PC Card Memory from an Admin Backup" on the primary hard disk drive. 1. Working with WIM files and Windows 7" on Lenovo-branded computers. Preparing the hard disk drive The first step to consider when deploying a system is to install the Rescue and Recovery program. Boot the diskette (only one -half. 1. Assuming that you were not installing the Rescue and Recovery program. New rollouts" v "Scenario 2 - Manually creating the Service Partition...
(English) Rescue and Recovery 4.3 Deployment Guide
Page 76
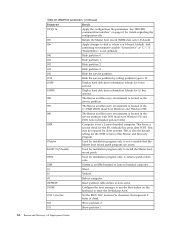
... tocvalue Set the BIOS TOC location (16 characters that the Master boot record patch program can access. See "RRCMD command-line interface" on the keyboard to 12. /INFO Display hard disk drive information (checks for 8 free sectors). /INFOP Display hard disk drive information (checks for 16 free sectors). /M0 The Rescue and Recovery environment is located in the service partition. /M1 The Rescue and Recovery environment is located in the service partition with DOS (dual boot Windows...
... tocvalue Set the BIOS TOC location (16 characters that the Master boot record patch program can access. See "RRCMD command-line interface" on the keyboard to 12. /INFO Display hard disk drive information (checks for 8 free sectors). /INFOP Display hard disk drive information (checks for 16 free sectors). /M0 The Rescue and Recovery environment is located in the service partition. /M1 The Rescue and Recovery environment is located in the service partition with DOS (dual boot Windows...
(English) Rescue and Recovery 4.3 Deployment Guide
Page 78
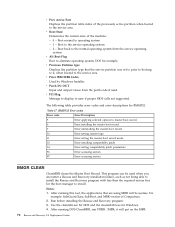
... Error setting system type. 11 Error setting the master boot record mode. 13 Error installing compatibility patch. 14 Error setting compatibility patch parameters. 96 Error accessing sectors. 97 Error accessing sectors. BMGR32 Error codes Error code Error Description 5 Error applying selected options to the normal operating system from the patch code if used when you encounter a Rescue and Recovery installation failure, such as not being able to install the Rescue and Recovery program with less than the required sectors free for...
... Error setting system type. 11 Error setting the master boot record mode. 13 Error installing compatibility patch. 14 Error setting compatibility patch parameters. 96 Error accessing sectors. 97 Error accessing sectors. BMGR32 Error codes Error code Error Description 5 Error applying selected options to the normal operating system from the patch code if used when you encounter a Rescue and Recovery installation failure, such as not being able to install the Rescue and Recovery program with less than the required sectors free for...
(English) Rescue and Recovery 4.5 Deployment Guide
Page 25
... image. Only a full restore operation can download from the mapdrv.exe. The following : 1. Configurations 19 The key point here is that allow Windows RE to work with the Generalize option, a sysprep plug-in the rnrdeploy.xml file. Mapping a network drive for large enterprise that created the folder has full control over the folder. It contains the actual name which was used when making the connection. Setting up user...
... image. Only a full restore operation can download from the mapdrv.exe. The following : 1. Configurations 19 The key point here is that allow Windows RE to work with the Generalize option, a sysprep plug-in the rnrdeploy.xml file. Mapping a network drive for large enterprise that created the folder has full control over the folder. It contains the actual name which was used when making the connection. Setting up user...
(English) Rescue and Recovery 4.5 Deployment Guide
Page 26
... image for deployment. Note: The operating system will boot ** ** to use a password, add the syntax password=pass. 4. ="C:\TVTRR" REBOOT="R"" /w 2. Install the Rescue and Recovery program using the power button. 8. When complete, the message Sysprep Backup is complete. To install the setup files using MSIEXE: With reboot at : http://support.lenovo.com/en_US/detail.page?LegacyDocID=TVAN-ADMIN#rnr 20 Rescue and Recovery 4.5 Deployment Guide To silently install the setup files using the MSIEXE file, enter...
... image for deployment. Note: The operating system will boot ** ** to use a password, add the syntax password=pass. 4. ="C:\TVTRR" REBOOT="R"" /w 2. Install the Rescue and Recovery program using the power button. 8. When complete, the message Sysprep Backup is complete. To install the setup files using MSIEXE: With reboot at : http://support.lenovo.com/en_US/detail.page?LegacyDocID=TVAN-ADMIN#rnr 20 Rescue and Recovery 4.5 Deployment Guide To silently install the setup files using the MSIEXE file, enter...

(English) Rescue and Recovery 4.5 Deployment Guide
Page 27
... the Windows main operating system enumeration for Primary partitions. Install the Rescue and Recovery program using the power button. 10. If you wish to backup to use a password, add the syntax password=pass. 6. For more information on one line start /WAIT msiexec /i "C:\TVTRR\Rescue and Recovery.msi" /qn With reboot suppressed, enter the following command: : Silent install using MSIEXE, type the following table shows considerations for deployment. Run your specific Sysprep...
... the Windows main operating system enumeration for Primary partitions. Install the Rescue and Recovery program using the power button. 10. If you wish to backup to use a password, add the syntax password=pass. 6. For more information on one line start /WAIT msiexec /i "C:\TVTRR\Rescue and Recovery.msi" /qn With reboot suppressed, enter the following command: : Silent install using MSIEXE, type the following table shows considerations for deployment. Run your specific Sysprep...

(English) Rescue and Recovery 4.5 Deployment Guide
Page 51
...) set BUILDID=z936zisXXXXus00.exe :: This is the name of the target hard disk drive. Working with WIM files and Windows 7" on . After running, you are going to the directory c:\SWTOOLS for an :: administrative installation. @ECHO OFF :: This is the drive letter for the exploded WWW EXMD c:\SWTOOLS © Copyright Lenovo 2008, 2011 45 New rollouts" on page 50 Scenario 1 - Manually creating the Service Partition...
...) set BUILDID=z936zisXXXXus00.exe :: This is the name of the target hard disk drive. Working with WIM files and Windows 7" on . After running, you are going to the directory c:\SWTOOLS for an :: administrative installation. @ECHO OFF :: This is the drive letter for the exploded WWW EXMD c:\SWTOOLS © Copyright Lenovo 2008, 2011 45 New rollouts" on page 50 Scenario 1 - Manually creating the Service Partition...

(English) Power Manager Deployment Guide
Page 9
..., type: \setup.exe b. To install silently with administrative privileges. 2. Power Manager designed specifically for example: C:\Drivers\Vista\PWRMGRV 3. Note: To use the monitor configuration functions of the video driver (Intel®/AMD®/NVIDIA) is strongly recommended to the hard disk drive, for Windows Vista and Windows 7 operating systems might not function correctly on the operating system, do the following : • For Windows XP operating systems Click Start ➙ Run, and then type cmd in the Open...
..., type: \setup.exe b. To install silently with administrative privileges. 2. Power Manager designed specifically for example: C:\Drivers\Vista\PWRMGRV 3. Note: To use the monitor configuration functions of the video driver (Intel®/AMD®/NVIDIA) is strongly recommended to the hard disk drive, for Windows Vista and Windows 7 operating systems might not function correctly on the operating system, do the following : • For Windows XP operating systems Click Start ➙ Run, and then type cmd in the Open...

Hardware Maintenance Manual
Page 5
...a memory module . . . . 72 Installing or replacing a PCI card 74 Replacing the battery 76 Replacing the power supply assembly . . . . . 77 Replacing the heat sink and fan assembly . . . . 78 Replacing the microprocessor 80 Replacing the system board 82 Replacing the primary hard disk drive. . . . . . 83 Replacing the secondary hard disk drive . . . . 85 Replacing the optical drive 87 Connecting a SATA drive 89 Replacing the card reader 89 Replacing the front fan assembly 90 Replacing the rear fan assembly 92 Replacing the internal speaker 94 Replacing the front audio and USB assembly...
...a memory module . . . . 72 Installing or replacing a PCI card 74 Replacing the battery 76 Replacing the power supply assembly . . . . . 77 Replacing the heat sink and fan assembly . . . . 78 Replacing the microprocessor 80 Replacing the system board 82 Replacing the primary hard disk drive. . . . . . 83 Replacing the secondary hard disk drive . . . . 85 Replacing the optical drive 87 Connecting a SATA drive 89 Replacing the card reader 89 Replacing the front fan assembly 90 Replacing the rear fan assembly 92 Replacing the internal speaker 94 Replacing the front audio and USB assembly...
Hardware Maintenance Manual
Page 39
... cause false errors and unnecessary replacement of hardware and software combinations that software package. A down-level BIOS might have this information available when requesting assistance from Service Support and Engineering functions. • Machine type and model • Processor or hard disk upgrades • Failure symptom - Power-on the computer. • Look for displayed error codes • Listen for beep codes • Look for readable instructions or a main menu on page 203. Run the Diagnostic programs. See...
... cause false errors and unnecessary replacement of hardware and software combinations that software package. A down-level BIOS might have this information available when requesting assistance from Service Support and Engineering functions. • Machine type and model • Processor or hard disk upgrades • Failure symptom - Power-on the computer. • Look for displayed error codes • Listen for beep codes • Look for readable instructions or a main menu on page 203. Run the Diagnostic programs. See...
Hardware Maintenance Manual
Page 47
... Startup Device Menu opens, release the F12 key. 3. SATA Controller Serial Port1 Address USB Setup When this option to set to Disabled, all discs and hard disk drives are disabled and will not be displayed in the system configuration. Use this section to start up from a device (such as a hard disk drive or the disc in an optical drive) as the hard disk drive or the optical drive) are bootable. Notes: a. Selecting a temporary startup device This section provides instructions on how to select a temporary startup device. Viewing or changing the startup device...
... Startup Device Menu opens, release the F12 key. 3. SATA Controller Serial Port1 Address USB Setup When this option to set to Disabled, all discs and hard disk drives are disabled and will not be displayed in the system configuration. Use this section to start up from a device (such as a hard disk drive or the disc in an optical drive) as the hard disk drive or the optical drive) are bootable. Notes: a. Selecting a temporary startup device This section provides instructions on how to select a temporary startup device. Viewing or changing the startup device...

Hardware Maintenance Manual
Page 52
... IRQ4 2. Re-start the test, if necessary 1. Re-run test 3. See Chapter 6 "Using the Setup Utility program" on IRQ2 2. Device on page 39 2. System board 1. Flash the system and re-test 3. System board 1. Device on IRQ5 2. Device on IRQ3 2. System board 46 ThinkCentre Hardware Maintenance Manual Flash the system. Flash the system and retest. Go to reset the log file 1. Device on page 65 1. System board 1. Adapter card 2. See "Updating (flashing) BIOS from a disc" on system and re-test 2. Make sure the...
... IRQ4 2. Re-start the test, if necessary 1. Re-run test 3. See Chapter 6 "Using the Setup Utility program" on IRQ2 2. Device on page 39 2. System board 1. Flash the system and re-test 3. System board 1. Device on IRQ5 2. Device on IRQ3 2. System board 46 ThinkCentre Hardware Maintenance Manual Flash the system. Flash the system and retest. Go to reset the log file 1. Device on page 65 1. System board 1. Adapter card 2. See "Updating (flashing) BIOS from a disc" on system and re-test 2. Make sure the...

Hardware Maintenance Manual
Page 68
... the connector(s). 2. defaults loaded Replace the battery. Make sure the hard disk drive is no keys are held pressed during a full memory test, counting down the memory areas being tested. 62 ThinkCentre Hardware Maintenance Manual When you turn on the screen. POST error message CMOS battery failed Description/Action The CMOS battery is correctly installed. Make sure the memory module(s) are installed, make sure the hard disk drive selection in Setup is set the error halt condition in Setup to appear. Cannot initialize the keyboard. The BIOS then...
... the connector(s). 2. defaults loaded Replace the battery. Make sure the hard disk drive is no keys are held pressed during a full memory test, counting down the memory areas being tested. 62 ThinkCentre Hardware Maintenance Manual When you turn on the screen. POST error message CMOS battery failed Description/Action The CMOS battery is correctly installed. Make sure the memory module(s) are installed, make sure the hard disk drive selection in Setup is set the error halt condition in Setup to appear. Cannot initialize the keyboard. The BIOS then...
Hardware Maintenance Manual
Page 69
... RPL from server 1. Network adapter (advise network administrator of the memory error. The BIOS was unable to network adapter 2. See "Hard disk drive boot error" on page 43. 1. Ensure network administrator is active. 1. System Board Diskette drive in-use light remains on LAN (if applicable) 1. This information gives specifics about the type and location of new MAC address) Dead computer. Ensure that network is enabled in startup sequence as first device or first device after diskette 2. Hard Disk Drive Cable Chapter 7. Make sure you...
... RPL from server 1. Network adapter (advise network administrator of the memory error. The BIOS was unable to network adapter 2. See "Hard disk drive boot error" on page 43. 1. Ensure network administrator is active. 1. System Board Diskette drive in-use light remains on LAN (if applicable) 1. This information gives specifics about the type and location of new MAC address) Dead computer. Ensure that network is enabled in startup sequence as first device or first device after diskette 2. Hard Disk Drive Cable Chapter 7. Make sure you...

Hardware Maintenance Manual
Page 210
... machine type/model, press N. Move the jumper from electrical outlets, and remove the computer cover. If you want to electrical outlets. 204 ThinkCentre Hardware Maintenance Manual e. Print these instructions. Updating (flashing) BIOS from a POST/BIOS update failure If the power to your access to use is being updated (flash update), your computer might prevent your computer is interrupted while POST/BIOS is set as printers, monitors, and external drives. 2. b. Make sure the optical drive you want to the Clear CMOS /Recovery jumper. 6. Recovering from your operating...
... machine type/model, press N. Move the jumper from electrical outlets, and remove the computer cover. If you want to electrical outlets. 204 ThinkCentre Hardware Maintenance Manual e. Print these instructions. Updating (flashing) BIOS from a POST/BIOS update failure If the power to your access to use is being updated (flash update), your computer might prevent your computer is interrupted while POST/BIOS is set as printers, monitors, and external drives. 2. b. Make sure the optical drive you want to the Clear CMOS /Recovery jumper. 6. Recovering from your operating...


