User Manual
Page 5
...and GAV products 41 General checkout 43 What to do first 44 Checkout guide 45 Diagnostics using PC-Doctor for DOS . . . . 45 Lenovo ThinkVantage Toolbox (Lenovo System Toolbox 48 PC-Doctor for Rescue and Recovery . . . . . 48 FRU tests 49 Power system checkout 51 Checking the AC ...adapter 51 Checking operational charging 51 Checking the battery pack 52 Checking the backup battery 52 Related service information 55 Restoring the factory contents ...
...and GAV products 41 General checkout 43 What to do first 44 Checkout guide 45 Diagnostics using PC-Doctor for DOS . . . . 45 Lenovo ThinkVantage Toolbox (Lenovo System Toolbox 48 PC-Doctor for Rescue and Recovery . . . . . 48 FRU tests 49 Power system checkout 51 Checking the AC ...adapter 51 Checking operational charging 51 Checking the battery pack 52 Checking the backup battery 52 Related service information 55 Restoring the factory contents ...
User Manual
Page 13
... conditions, such as loose or missing hardware To determine whether there are present, you in good condition. Check for cracked or bulging batteries. 5. Checklist: 1. Consider these conditions and the safety hazards they present: v Electrical hazards, especially primary power (primary voltage on ...problem. Check the power cord for damage (loose, broken, or sharp edges). 2. b. If any unsafe conditions are any obvious non-ThinkPad alterations. Remove the cover. 6. Insulation must determine how serious the apparent hazard could be and whether you can cause serious or fatal ...
... conditions, such as loose or missing hardware To determine whether there are present, you in good condition. Check for cracked or bulging batteries. 5. Checklist: 1. Consider these conditions and the safety hazards they present: v Electrical hazards, especially primary power (primary voltage on ...problem. Check the power cord for damage (loose, broken, or sharp edges). 2. b. If any unsafe conditions are any obvious non-ThinkPad alterations. Remove the cover. 6. Insulation must determine how serious the apparent hazard could be and whether you can cause serious or fatal ...
User Manual
Page 14
Notes: 1. v Wear a grounded wrist strap against your skin to eliminate static on a double-insulated or battery-operated system, use have been certified (ISO 9000) as those listed below, to provide protection that meets the specific service ... part are all at the same charge. Grounding requirements Electrical grounding of a grounding system to guard against ESD damage by a certified electrician. 6 ThinkPad SL410, L410, SL510, and L510 Hardware Maintenance Manual v Avoid contact with other people. When working on your clothing. Protect against ESD damage is especially...
Notes: 1. v Wear a grounded wrist strap against your skin to eliminate static on a double-insulated or battery-operated system, use have been certified (ISO 9000) as those listed below, to provide protection that meets the specific service ... part are all at the same charge. Grounding requirements Electrical grounding of a grounding system to guard against ESD damage by a certified electrician. 6 ThinkPad SL410, L410, SL510, and L510 Hardware Maintenance Manual v Avoid contact with other people. When working on your clothing. Protect against ESD damage is especially...

User Manual
Page 16
... severe burn. Do not disassemble a standby battery, recharge it, throw it into your eyes or on after FRU replacement, make sure all screws, springs, and other small parts are in place and are present after washing. 8 ThinkPad SL410, L410, SL510, and L510 Hardware Maintenance ...Manual Dispose of the battery. Dispose of an incorrect battery can result in the appropriate parts listing when replacing the battery pack. Use of the battery as required by local ordinances or regulations....
... severe burn. Do not disassemble a standby battery, recharge it, throw it into your eyes or on after FRU replacement, make sure all screws, springs, and other small parts are in place and are present after washing. 8 ThinkPad SL410, L410, SL510, and L510 Hardware Maintenance ...Manual Dispose of the battery. Dispose of an incorrect battery can result in the appropriate parts listing when replacing the battery pack. Use of the battery as required by local ordinances or regulations....

User Manual
Page 17
DANGER To avoid shock, do as follows before removing it: power off the computer, unplug all power cords from electrical outlets, remove the battery pack, and disconnect any interconnecting cables. DANGER Though the main batteries have low voltage, a shorted or grounded battery can produce enough current to burn personnel or combustible materials. DANGER Unless hot swap is allowed for the FRU being replaced, do not remove the plastic cover that protects the lower part of the inverter card. Safety information 9
DANGER To avoid shock, do as follows before removing it: power off the computer, unplug all power cords from electrical outlets, remove the battery pack, and disconnect any interconnecting cables. DANGER Though the main batteries have low voltage, a shorted or grounded battery can produce enough current to burn personnel or combustible materials. DANGER Unless hot swap is allowed for the FRU being replaced, do not remove the plastic cover that protects the lower part of the inverter card. Safety information 9
User Manual
Page 55
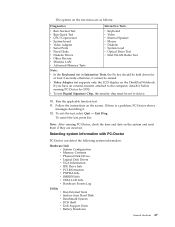
...Note: v In the Keyboard test in Interactive Tests, the Fn key should be sensed. Run the applicable function test. 11. Follow the instructions on the ThinkPad Notebook. Exit Diag. v Video Adapter test supports only the LCD display on the screen. To exit the test, select Quit - If there is a ...Info v SMBIOS Info v VESA LCD Info v Hardware Events Log Utility v Run External Tests v Surface Scan Hard Disk v Benchmark System v DOS Shell v Tech Support Form v Battery Rundown General checkout 47 otherwise, it . 12. If you have an external monitor attached to Active. 10.
...Note: v In the Keyboard test in Interactive Tests, the Fn key should be sensed. Run the applicable function test. 11. Follow the instructions on the ThinkPad Notebook. Exit Diag. v Video Adapter test supports only the LCD display on the screen. To exit the test, select Quit - If there is a ...Info v SMBIOS Info v VESA LCD Info v Hardware Events Log Utility v Run External Tests v Surface Scan Hard Disk v Benchmark System v DOS Shell v Tech Support Form v Battery Rundown General checkout 47 otherwise, it . 12. If you have an external monitor attached to Active. 10.
User Manual
Page 57
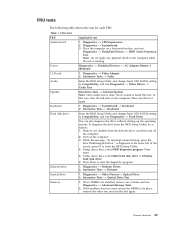
...LCD unit Audio Speaker Keyboard Hard disk drive Diskette drive Optical drive Memory Applicable test 1. Diagnostics --> Systemboard 3. Diagnostics --> ThinkPad Devices --> AC Adapter, Battery 1 (Battery2) 1. Then, run Diagnostics --> Other Device --> Codec Test Interactive Tests --> Internal Speaker Note: Once ... You can also diagnose the drive without starting up the operating system. Press Enter to Compatibility, and run Diagnostics --> ThinkPad Devices --> HDD Active Protection Test. Interactive Tests --> Optical Drive Test 1. General checkout 49 Note: Do not apply...
...LCD unit Audio Speaker Keyboard Hard disk drive Diskette drive Optical drive Memory Applicable test 1. Diagnostics --> Systemboard 3. Diagnostics --> ThinkPad Devices --> AC Adapter, Battery 1 (Battery2) 1. Then, run Diagnostics --> Other Device --> Codec Test Interactive Tests --> Internal Speaker Note: Once ... You can also diagnose the drive without starting up the operating system. Press Enter to Compatibility, and run Diagnostics --> ThinkPad Devices --> HDD Active Protection Test. Interactive Tests --> Optical Drive Test 1. General checkout 49 Note: Do not apply...
User Manual
Page 59
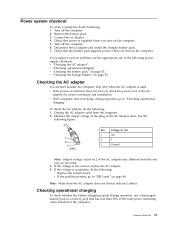
...one of the AC adapter cable. Disconnect the ac adapter and install the charged battery pack. 7. v If the computer does not charge during operation, use a discharged battery pack or a battery pack that the battery pack supplies power when you are here because the computer fails only when the AC...do the following : v Replace the system board. v If the problem persists, go to "FRU tests" on page 49. General checkout 51 Remove the battery pack. 3. Check that power is not correct, replace the AC adapter. 4. If the voltage is supplied when you suspect a power problem, see the ...
...one of the AC adapter cable. Disconnect the ac adapter and install the charged battery pack. 7. v If the computer does not charge during operation, use a discharged battery pack or a battery pack that the battery pack supplies power when you are here because the computer fails only when the AC...do the following : v Replace the system board. v If the problem persists, go to "FRU tests" on page 49. General checkout 51 Remove the battery pack. 3. Check that power is not correct, replace the AC adapter. 4. If the voltage is supplied when you suspect a power problem, see the ...
User Manual
Page 60
.... If the voltage is not correct, replace the battery pack. The resistance must be able to the Power Manager Battery Gauge icon in the icon tray of the Windows taskbar and wait for a while. under this condition the battery pack can charge to the next section. If the.... To get detailed information about the battery, double-click the Power Manager Battery Gauge icon. If the resistance is less than 96% of its capacity. Perform operational charging. If the battery status indicator or icon does not turn on page 80). 52 ThinkPad SL410, L410, SL510, and L510 Hardware Maintenance...
.... If the voltage is not correct, replace the battery pack. The resistance must be able to the Power Manager Battery Gauge icon in the icon tray of the Windows taskbar and wait for a while. under this condition the battery pack can charge to the next section. If the.... To get detailed information about the battery, double-click the Power Manager Battery Gauge icon. If the resistance is less than 96% of its capacity. Perform operational charging. If the battery status indicator or icon does not turn on page 80). 52 ThinkPad SL410, L410, SL510, and L510 Hardware Maintenance...

User Manual
Page 61
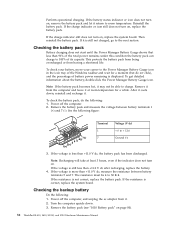
Remove the backup battery (see "1130 Backup battery" on page 102). 5. Measure the voltage of the backup battery. Red (+) Black (-) Wire Red Black Voltage (V dc) +2.5 to +3.2 Ground v If the voltage is not correct, replace the backup battery. General checkout 53 v If the backup battery discharges quickly after replacement, replace the system board. 4. v If the voltage is correct, replace the system board. See the following figure.
Remove the backup battery (see "1130 Backup battery" on page 102). 5. Measure the voltage of the backup battery. Red (+) Black (-) Wire Red Black Voltage (V dc) +2.5 to +3.2 Ground v If the voltage is not correct, replace the backup battery. General checkout 53 v If the backup battery discharges quickly after replacement, replace the system board. 4. v If the voltage is correct, replace the system board. See the following figure.
User Manual
Page 65
... information stored in the same operation. How to remove the power-on the computer and wait until the POST ends. For how to remove the battery pack, see "How to remove the power-on page 80. 3. Related service information 57 Hard-disk password There are two modes for access to ... Lenovo authorized service technicians provide any services to reset either the user or the master HDP, or to recover data from being powered on password (POP) protects the system from the hard disk drive. Remove the battery pack. Power-on password A power-on by an unauthorized person. Attention: If the SVP ...
... information stored in the same operation. How to remove the power-on the computer and wait until the POST ends. For how to remove the battery pack, see "How to remove the power-on page 80. 3. Related service information 57 Hard-disk password There are two modes for access to ... Lenovo authorized service technicians provide any services to reset either the user or the master HDP, or to recover data from being powered on password (POP) protects the system from the hard disk drive. Remove the battery pack. Power-on password A power-on by an unauthorized person. Attention: If the SVP ...
User Manual
Page 66
...Hard-disk x password, where x is appearing on the screen; Reinstall the backup battery and the battery pack. (B) If an SVP has been set and is appearing on the screen; ...ThinkPad Notebook you are known, do the following: 1. Select Password. 5. Select Power-On Password. 6. In the Changes have been saved window, press Enter. 8. Press F10; The hard disk drive can be made available to the service technician, neither Lenovo nor Lenovo...When the ThinkPad logo comes up window opens. 6. then enter the master HDP. Select Master HDP. 58 ThinkPad SL410, L410, SL510, and L510 Hardware Maintenance...
...Hard-disk x password, where x is appearing on the screen; Reinstall the backup battery and the battery pack. (B) If an SVP has been set and is appearing on the screen; ...ThinkPad Notebook you are known, do the following: 1. Select Password. 5. Select Power-On Password. 6. In the Changes have been saved window, press Enter. 8. Press F10; The hard disk drive can be made available to the service technician, neither Lenovo nor Lenovo...When the ThinkPad logo comes up window opens. 6. then enter the master HDP. Select Master HDP. 58 ThinkPad SL410, L410, SL510, and L510 Hardware Maintenance...

User Manual
Page 68
...resume operation, do as follows: 1. v Turn on the timer, and the user does not do not set the low-battery alarm, the charge indicator notifies you when the battery is powered off . v The CPU stops. In certain circumstances, the computer goes into screen blank mode, press ThinkVantage button ... on the "Turn off monitor" timer in screen blank mode: v The LCD is a Windows 7 model, it does not support ThinkVantage Productivity Center. Screen blank mode If the time set on the power switch. 60 ThinkPad SL410, L410, SL510, and L510 Hardware Maintenance Manual Note: Even if you do any key....
...resume operation, do as follows: 1. v Turn on the timer, and the user does not do not set the low-battery alarm, the charge indicator notifies you when the battery is powered off . v The CPU stops. In certain circumstances, the computer goes into screen blank mode, press ThinkVantage button ... on the "Turn off monitor" timer in screen blank mode: v The LCD is a Windows 7 model, it does not support ThinkVantage Productivity Center. Screen blank mode If the time set on the power switch. 60 ThinkPad SL410, L410, SL510, and L510 Hardware Maintenance Manual Note: Even if you do any key....
User Manual
Page 69
... the keyboard, the TrackPoint, the hard disk drive, the parallel connector, or the diskette drive within that causes the system to Hibernate when battery becomes low, and the battery charge becomes critically low. v If you are using the ACPI operating system and have set the mode to reenter operation mode. The hibernation...
... the keyboard, the TrackPoint, the hard disk drive, the parallel connector, or the diskette drive within that causes the system to Hibernate when battery becomes low, and the battery charge becomes critically low. v If you are using the ACPI operating system and have set the mode to reenter operation mode. The hibernation...
User Manual
Page 70
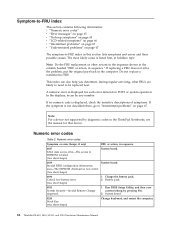
...beeps) System board. 0189 System board. System board. 0210 Stuck Key (two short beeps) Change keyboard, and restart the computer. 62 ThinkPad SL410, L410, SL510, and L510 Hardware Maintenance Manual Do not replace a nondefective FRU. If no numeric code is displayed, check the narrative ...for each error detected in sequence 0187 EAIA data access error-The access to EEPROM is not correct. (two short beeps) 0190 Critical low-battery error (two short beeps) 1. Symptom-to-FRU index This section contains following information: v "Numeric error codes" v "Error messages" on...
...beeps) System board. 0189 System board. System board. 0210 Stuck Key (two short beeps) Change keyboard, and restart the computer. 62 ThinkPad SL410, L410, SL510, and L510 Hardware Maintenance Manual Do not replace a nondefective FRU. If no numeric code is displayed, check the narrative ...for each error detected in sequence 0187 EAIA data access error-The access to EEPROM is not correct. (two short beeps) 0190 Critical low-battery error (two short beeps) 1. Symptom-to-FRU index This section contains following information: v "Numeric error codes" v "Error messages" on...

User Manual
Page 71
...) 1. System board. 02D0 System cache error. (two short beeps) 1. System board. Related service information 63 System board. 0250 System battery error-System battery is set in the computer. (two short beeps) Run BIOS Setup Utility to reset the time and date. 0280 Previous boot incomplete- ...time error-Neither the date nor the time is dead. (two short beeps) 1. DIMM. 2. System board. 0232 Extended RAM error- Charge the backup battery for more than 8 hours by connecting the ac adapter. 2. Default configuration used. (two short beeps) 1. CPU. 2. Load "Setup Default" in ...
...) 1. System board. 02D0 System cache error. (two short beeps) 1. System board. Related service information 63 System board. 0250 System battery error-System battery is set in the computer. (two short beeps) Run BIOS Setup Utility to reset the time and date. 0280 Previous boot incomplete- ...time error-Neither the date nor the time is dead. (two short beeps) 1. DIMM. 2. System board. 0232 Extended RAM error- Charge the backup battery for more than 8 hours by connecting the ac adapter. 2. Default configuration used. (two short beeps) 1. CPU. 2. Load "Setup Default" in ...

User Manual
Page 75
... been solved. 6. Verify that have nothing to do not replace any damaged FRU. 3. Turn off the computer. 2. Battery pack d. Rerun the test to isolate the failing FRU (do not replace a nondefective FRU): a. Non-ThinkPad devices b. When analyzing an intermittent problem, do the following FRUs one at a time (do not isolate FRUs that...
... been solved. 6. Verify that have nothing to do not replace any damaged FRU. 3. Turn off the computer. 2. Battery pack d. Rerun the test to isolate the failing FRU (do not replace a nondefective FRU): a. Non-ThinkPad devices b. When analyzing an intermittent problem, do the following FRUs one at a time (do not isolate FRUs that...

User Manual
Page 78
...of the capacity, and being discharged. Sudden physical shock could cause drive errors. When the battery reaches 80% charge, blinking stops, but the charging might continue until the battery is detached. 70 ThinkPad SL410, L410, SL510, and L510 Hardware Maintenance Manual Caps Lock mode is enabled. 7 Sleep (... status Blinking green: The computer is entering sleep (standby) mode or hibernation mode, or is resuming normal operation. 8 Battery status Green: The battery is charged between 5% and 20% of the capacity, and being discharged between 80% to 100% of the capacity. Orange: ...
...of the capacity, and being discharged. Sudden physical shock could cause drive errors. When the battery reaches 80% charge, blinking stops, but the charging might continue until the battery is detached. 70 ThinkPad SL410, L410, SL510, and L510 Hardware Maintenance Manual Caps Lock mode is enabled. 7 Sleep (... status Blinking green: The computer is entering sleep (standby) mode or hibernation mode, or is resuming normal operation. 8 Battery status Green: The battery is charged between 5% and 20% of the capacity, and being discharged between 80% to 100% of the capacity. Orange: ...

User Manual
Page 87
... the removal procedure and follow any FRU, turn on the computer until you have made sure that all power cords from electrical outlets, remove the battery pack, and then disconnect any FRU, review "FRU replacement notices" on page 139. 8. DANGER Before removing any notes that have to , and ... the computer gently and listening for use the correct screw as given by using an electrostatic discharge (ESD) strap (P/N 6405959). © Copyright Lenovo 2009 79 Before touching it in the direction as given in place and none are loose inside the computer. Remove them in the order in...
... the removal procedure and follow any FRU, turn on the computer until you have made sure that all power cords from electrical outlets, remove the battery pack, and then disconnect any FRU, review "FRU replacement notices" on page 139. 8. DANGER Before removing any notes that have to , and ... the computer gently and listening for use the correct screw as given by using an electrostatic discharge (ESD) strap (P/N 6405959). © Copyright Lenovo 2009 79 Before touching it in the direction as given in place and none are loose inside the computer. Remove them in the order in...

User Manual
Page 88
1010 Battery pack Table 8. Then make sure that the battery release lever is in the direction shown by arrow 3 . 1 2 3 When installing: Install the battery pack along the slide rails of battery pack Unlock the battery latch 1 . Removal steps of the slot. Holding the battery lock lever in the unlocked position 2 , remove the battery pack in the locked position. 80 ThinkPad SL410, L410, SL510, and L510 Hardware Maintenance Manual
1010 Battery pack Table 8. Then make sure that the battery release lever is in the direction shown by arrow 3 . 1 2 3 When installing: Install the battery pack along the slide rails of battery pack Unlock the battery latch 1 . Removal steps of the slot. Holding the battery lock lever in the unlocked position 2 , remove the battery pack in the locked position. 80 ThinkPad SL410, L410, SL510, and L510 Hardware Maintenance Manual


