User Guide
Page 5
... . . . . 16 Installing internal drives 18 Replacing the hard disk drive 22 Replacing the optical drive 25 Replacing the battery 27 Replacing the power supply assembly . . . . 29 Replacing the heat sink and fan assembly . . . 31 Replacing the card reader 33 Replacing the keyboard 34... . 52 Chapter 6. Notices 65 Television output notice 66 Trademarks 66 Index 67 © Copyright Lenovo 2009 iii Troubleshooting and diagnostics 55 Basic troubleshooting 55 Diagnostic programs 57 Lenovo System Toolbox 57 PC-Doctor for Windows PE 57 PC-Doctor for service 63 Using other services 64...
... . . . . 16 Installing internal drives 18 Replacing the hard disk drive 22 Replacing the optical drive 25 Replacing the battery 27 Replacing the power supply assembly . . . . 29 Replacing the heat sink and fan assembly . . . 31 Replacing the card reader 33 Replacing the keyboard 34... . 52 Chapter 6. Notices 65 Television output notice 66 Trademarks 66 Index 67 © Copyright Lenovo 2009 iii Troubleshooting and diagnostics 55 Basic troubleshooting 55 Diagnostic programs 57 Lenovo System Toolbox 57 PC-Doctor for Windows PE 57 PC-Doctor for service 63 Using other services 64...
User Guide
Page 11
... this publication goes to change. The operating systems listed here are being certified or tested for compatibility1 (varies by Lenovo as compatible with your computer following the publication of an integrated cable lock (Kensington lock) v Trusted Platform Module ... included. Operating system, preinstalled Microsoft® Windows Vista® Notes: 1. Chapter 1. Power v 280-watt auto-sensing power supply v Automatic 50/60 Hz input frequency switching v Advanced Configuration and Power Interface (ACPI) support Security features v Computrace v Cover presence switch (also called intrusion...
... this publication goes to change. The operating systems listed here are being certified or tested for compatibility1 (varies by Lenovo as compatible with your computer following the publication of an integrated cable lock (Kensington lock) v Trusted Platform Module ... included. Operating system, preinstalled Microsoft® Windows Vista® Notes: 1. Chapter 1. Power v 280-watt auto-sensing power supply v Automatic 50/60 Hz input frequency switching v Advanced Configuration and Power Interface (ACPI) support Security features v Computrace v Cover presence switch (also called intrusion...
User Guide
Page 17
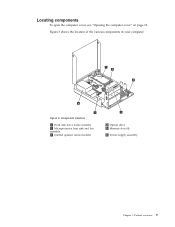
Locating components To open the computer cover, see "Opening the computer cover" on page 12. Component locations 1 Hard disk drive (some models) 2 Microprocessor, heat sink and fan assembly 3 Internal speaker (some models) 4 Optical drive 5 Memory slots (4) 6 Power supply assembly Chapter 1. Figure 3. Product overview 9 Figure 3 shows the location of the various components in your computer.
Locating components To open the computer cover, see "Opening the computer cover" on page 12. Component locations 1 Hard disk drive (some models) 2 Microprocessor, heat sink and fan assembly 3 Internal speaker (some models) 4 Optical drive 5 Memory slots (4) 6 Power supply assembly Chapter 1. Figure 3. Product overview 9 Figure 3 shows the location of the various components in your computer.
User Guide
Page 37
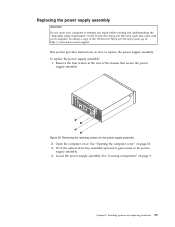
... of the ThinkCentre Safety and Warranty Guide, go to: http://www.lenovo.com/support This section provides instructions on how to the power supply assembly. 4. Open the computer cover. See "Locating components" on page 12. 3. Removing the retaining screws for the power supply assembly 2.... the "Important safety information" in the ThinkCentre Safety and Warranty Guide that secure the power supply assembly. Pivot the optical drive bay assembly upward to gain access to replace the power supply assembly. Replacing the power supply assembly Attention Do not open your computer....
... of the ThinkCentre Safety and Warranty Guide, go to: http://www.lenovo.com/support This section provides instructions on how to the power supply assembly. 4. Open the computer cover. See "Locating components" on page 12. 3. Removing the retaining screws for the power supply assembly 2.... the "Important safety information" in the ThinkCentre Safety and Warranty Guide that secure the power supply assembly. Pivot the optical drive bay assembly upward to gain access to replace the power supply assembly. Replacing the power supply assembly Attention Do not open your computer....
User Guide
Page 38
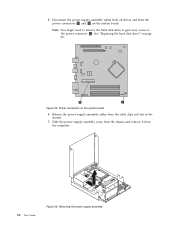
Release the power supply assembly cables from the computer. 30 User Guide Figure 26. Removing the power supply assembly 5. Slide the power supply assembly away from the chassis and remove it from the cable clips and ties in the chassis. 7. Figure 25. See "Replacing the hard disk drive" on the system board 6. Power connectors on page 22. Note: You might need to remove the hard disk drive to gain easy access to the power connector 2 . Disconnect the power supply assembly cables from all drives and from the power connectors 1 and 2 on the system board.
Release the power supply assembly cables from the computer. 30 User Guide Figure 26. Removing the power supply assembly 5. Slide the power supply assembly away from the chassis and remove it from the cable clips and ties in the chassis. 7. Figure 25. See "Replacing the hard disk drive" on the system board 6. Power connectors on page 22. Note: You might need to remove the hard disk drive to gain easy access to the power connector 2 . Disconnect the power supply assembly cables from all drives and from the power connectors 1 and 2 on the system board.
User Guide
Page 39
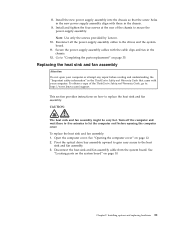
...Lenovo. 10. Reconnect all the power supply assembly cables to the heat sink and fan assembly. 3. CAUTION: The heat sink and fan assembly might be very hot. To obtain a copy of the chassis to let the computer cool before reading and understanding the "Important safety information" in the ThinkCentre... Safety and Warranty Guide that the screw holes in the new power supply assembly align with the cable clips and ties in the chassis. 9. Secure the power supply assembly cables with those in the chassis. 12....
...Lenovo. 10. Reconnect all the power supply assembly cables to the heat sink and fan assembly. 3. CAUTION: The heat sink and fan assembly might be very hot. To obtain a copy of the chassis to let the computer cool before reading and understanding the "Important safety information" in the ThinkCentre... Safety and Warranty Guide that the screw holes in the new power supply assembly align with the cable clips and ties in the chassis. 9. Secure the power supply assembly cables with those in the chassis. 12....
User Guide
Page 44
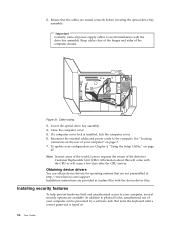
...the hinges and sides of the defective Customer Replaceable Unit (CRU). Note: In most areas of the world, Lenovo requires the return of the computer chassis. Important Correctly route all power supply cables to the computer. If a computer cover lock is typed in readme files with the CRU or will ...come a few days after the CRU arrives. Obtaining device drivers You can be prevented by a software lock that are not preinstalled at: http://www.lenovo.com/support ...
...the hinges and sides of the defective Customer Replaceable Unit (CRU). Note: In most areas of the world, Lenovo requires the return of the computer chassis. Important Correctly route all power supply cables to the computer. If a computer cover lock is typed in readme files with the CRU or will ...come a few days after the CRU arrives. Obtaining device drivers You can be prevented by a software lock that are not preinstalled at: http://www.lenovo.com/support ...

User Guide
Page 76
...(continued) memory module 14 security features 36 internal drives 1 K keyboard connector 8 keyboard, replacing 34 L Lenovo System Toolbox 57 Lenovo Web site 62 Lenovo Welcome 62 locating components 9 M media, creating and using rescue 42 memory module installing 14 system board 14...erasing 38 lost or forgotten 38 passwords, using 47 physical specifications 4 power Advanced Configuration and Power Interface (ACPI) support 3 features 3 68 User Guide power supply assembly, replacing 29 power-on self-test (POST) 51 Power-On, Password 48 Privileged Access, password 48 product recovery disc, creating...
...(continued) memory module 14 security features 36 internal drives 1 K keyboard connector 8 keyboard, replacing 34 L Lenovo System Toolbox 57 Lenovo Web site 62 Lenovo Welcome 62 locating components 9 M media, creating and using rescue 42 memory module installing 14 system board 14...erasing 38 lost or forgotten 38 passwords, using 47 physical specifications 4 power Advanced Configuration and Power Interface (ACPI) support 3 features 3 68 User Guide power supply assembly, replacing 29 power-on self-test (POST) 51 Power-On, Password 48 Privileged Access, password 48 product recovery disc, creating...


