IdeaPad Z570 Keyboard - Lenovo
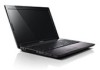
IdeaPad Z570 Keyboard
View Results Below
Free Lenovo IdeaPad Z570 manuals!
Problems with Lenovo IdeaPad Z570?
Ask a Question
Free Lenovo IdeaPad Z570 manuals!
Problems with Lenovo IdeaPad Z570?
Ask a Question
Related Manual Pages


Related Videos

Lenovo Ideapad Z570 full review ( FULL HD 1080p)
Duration: 12:36
Total Views: 2,657
Duration: 12:36
Total Views: 2,657
Similar Questions

Lenovo Ideapad Z370 Keyboard How To Disassemble
(Posted by mfitcbbrumf 9 years ago)


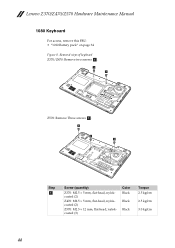
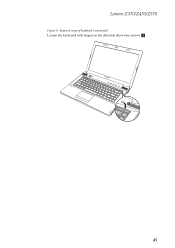
Keyboard
How do I activate the backlighting on the keyboard? or does this model not have one?
How do I activate the backlighting on the keyboard? or does this model not have one?
(Posted by tayhinton55 10 years ago)

Keyboard Removal
I am replacing the keyboard on a nearly new z750 1024. The 3 screws are out. How do I pop out the ke...
I am replacing the keyboard on a nearly new z750 1024. The 3 screws are out. How do I pop out the ke...
(Posted by bfinstad 11 years ago)

Keyboard Issues
Hello. I've recently acquired a lenovo G780. My operating system has been installed without fault, a...
Hello. I've recently acquired a lenovo G780. My operating system has been installed without fault, a...
(Posted by silviuvanaero 11 years ago)
Related Terms
The following terms were also used when searching for IdeaPad Z570 Keyboard - Lenovo:- ideapad z570
- ideapad z570 1024
- ideapad z570 1024 x 2
- ideapad z570 1024-3vu
- ideapad z570 1024-a3u
- ideapad z570 15.6
- ideapad z570 15.6 laptop review
- ideapad z570 ac adapter
- ideapad z570 adapter
- ideapad z570 amazon
- ideapad z570 at best buys
- ideapad z570 battery
- ideapad z570 battery life
- ideapad z570 battery power problem
- ideapad z570 battery replacement
- ideapad z570 best price
- ideapad z570 bios
- ideapad z570 bios update
- ideapad z570 bluetooth
- ideapad z570 case
- ideapad z570 charger
- ideapad z570 cnet
- ideapad z570 configuration
- ideapad z570 core i5 reviews
- ideapad z570 costco
- ideapad z570 coupon
- ideapad z570 crashed m
- ideapad z570 disk drive
- ideapad z570 docking station
- ideapad z570 driver
- ideapad z570 driver download
- ideapad z570 drivers
- ideapad z570 drivers download
- ideapad z570 drivers for windows 8.1
- ideapad z570 drivers windows 7
- ideapad z570 energy management
- ideapad z570 extended battery
- ideapad z570 f12
- ideapad z570 factory restore
- ideapad z570 graphics card
- ideapad z570 graphics card upgrade
- ideapad z570 hard drive
- ideapad z570 hard drive replacement
- ideapad z570 i3
- ideapad z570 i3 processor
- ideapad z570 i3 specs
- ideapad z570 i5
- ideapad z570 i5 review
- ideapad z570 i7
- ideapad z570 i7 review
- ideapad z570 india
- ideapad z570 intel i3 review
- ideapad z570 internet connection problems
- ideapad z570 isn't work wifi
- ideapad z570 keyboard
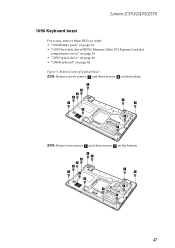
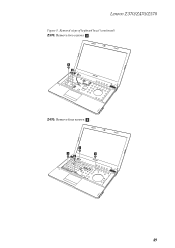
- ideapad z570 keyboard bezel
- ideapad z570 keyboard not working
- ideapad z570 laptop
- ideapad z570 laptop - 1024
- ideapad z570 laptop multimedia
- ideapad z570 laptop review
- ideapad z570 laptop reviews
- ideapad z570 manual
- ideapad z570 max ram
- ideapad z570 maximum ram
- ideapad z570 memory
- ideapad z570 model 1024
- ideapad z570 model 1024 specification
- ideapad z570 model 20095
- ideapad z570 motherboard
- ideapad z570 motherboard price
- ideapad z570 not turning on
- ideapad z570 notebook
- ideapad z570 notebook i5 processor
- ideapad z570 notebook reviews
- ideapad z570 parts
- ideapad z570 parts number
- ideapad z570 power adapter
- ideapad z570 power supply
- ideapad z570 price
- ideapad z570 price in india
- ideapad z570 ram
- ideapad z570 ram upgrade
- ideapad z570 rating
- ideapad z570 recovery
- ideapad z570 recovery disk
- ideapad z570 replacement screen
- ideapad z570 reset
- ideapad z570 reset disk
- ideapad z570 restore
- ideapad z570 restore factory settings
- ideapad z570 restore to factory
- ideapad z570 review
- ideapad z570 reviews
- ideapad z570 screen
- ideapad z570 screen replacement
- ideapad z570 screenshot
- ideapad z570 service manual
- ideapad z570 skins
- ideapad z570 slow
- ideapad z570 spec
- ideapad z570 specification
- ideapad z570 specifications
- ideapad z570 specs
- ideapad z570 support
- ideapad z570 ubuntu
- ideapad z570 user manual
- ideapad z570 weight
- ideapad z570 wifi driver
- ideapad z570 wifi drivers
- ideapad z570 wifi not working
- ideapad z570 wifi switch
- ideapad z570 windows 10
- ideapad z570 windows 7
- ideapad z570 windows 8
- ideapad z570 windows 8.1
- ideapad z570 windows 8.1 drivers
- ideapad z570 windows home premium
- ideapad z570 wireless driver
- ideapad z570 wireless drivers
- ideapad z570 wireless not working
- ideapad z570 wireless switch not working
- ideapad z570 wont turn on
- ideapad z570-1024
- ideapad z570-i5
- ideapad z575 or ideapad z570
- lenovo ideapad z570
- lenovo ideapad z570 1024
- lenovo ideapad z570 1024 x 2
- lenovo ideapad z570 1024-3vu
- lenovo ideapad z570 1024-a3u
- lenovo ideapad z570 15.6
- lenovo ideapad z570 15.6 laptop review
- lenovo ideapad z570 ac adapter
- lenovo ideapad z570 adapter
- lenovo ideapad z570 amazon
- lenovo ideapad z570 at best buys
- lenovo ideapad z570 battery
- lenovo ideapad z570 battery life
- lenovo ideapad z570 battery replacement
- lenovo ideapad z570 bios
- lenovo ideapad z570 bios update
- lenovo ideapad z570 case
- lenovo ideapad z570 charger
- lenovo ideapad z570 cnet
- lenovo ideapad z570 core i5 reviews
- lenovo ideapad z570 costco
- lenovo ideapad z570 crashed m
- lenovo ideapad z570 disk drive
- lenovo ideapad z570 docking station
- lenovo ideapad z570 driver
- lenovo ideapad z570 driver download
- lenovo ideapad z570 drivers
- lenovo ideapad z570 drivers download
- lenovo ideapad z570 drivers for windows 8.1
- lenovo ideapad z570 drivers windows 7
- lenovo ideapad z570 energy management
- lenovo ideapad z570 f12
- lenovo ideapad z570 factory restore
- lenovo ideapad z570 graphics card
- lenovo ideapad z570 graphics card upgrade
- lenovo ideapad z570 hard drive
- lenovo ideapad z570 hard drive replacement
- lenovo ideapad z570 i3
- lenovo ideapad z570 i3 processor
- lenovo ideapad z570 i5
- lenovo ideapad z570 i5 review
- lenovo ideapad z570 i7
- lenovo ideapad z570 i7 review
- lenovo ideapad z570 india
- lenovo ideapad z570 intel i3 review
- lenovo ideapad z570 keyboard
- lenovo ideapad z570 keyboard not working
- lenovo ideapad z570 laptop
- lenovo ideapad z570 laptop review
- lenovo ideapad z570 manual
- lenovo ideapad z570 maximum ram
- lenovo ideapad z570 memory
- lenovo ideapad z570 model 1024
- lenovo ideapad z570 model 1024 specification
- lenovo ideapad z570 motherboard
- lenovo ideapad z570 motherboard price
- lenovo ideapad z570 not turning on
- lenovo ideapad z570 notebook
- lenovo ideapad z570 notebook i5 processor
- lenovo ideapad z570 notebook reviews
- lenovo ideapad z570 parts
- lenovo ideapad z570 power adapter
- lenovo ideapad z570 power supply
- lenovo ideapad z570 price
- lenovo ideapad z570 price in india
- lenovo ideapad z570 rating
- lenovo ideapad z570 recovery
- lenovo ideapad z570 recovery disk
- lenovo ideapad z570 replacement screen
- lenovo ideapad z570 reset
- lenovo ideapad z570 reset disk
- lenovo ideapad z570 restore
- lenovo ideapad z570 restore factory settings
- lenovo ideapad z570 restore to factory
- lenovo ideapad z570 review
- lenovo ideapad z570 reviews
- lenovo ideapad z570 screen
- lenovo ideapad z570 screen replacement
- lenovo ideapad z570 screenshot
- lenovo ideapad z570 skins
- lenovo ideapad z570 slow
- lenovo ideapad z570 specification
- lenovo ideapad z570 specifications
- lenovo ideapad z570 specs
- lenovo ideapad z570 support
- lenovo ideapad z570 user manual
- lenovo ideapad z570 wifi driver
- lenovo ideapad z570 wifi not working
- lenovo ideapad z570 wifi switch
- lenovo ideapad z570 windows 8.1 drivers
- lenovo ideapad z570 windows home premium
- lenovo ideapad z570 wireless drivers
- lenovo ideapad z570 wireless not working
- lenovo ideapad z570 wont turn on