
User Guide
Page 1
Lenovo IdeaPad Z500/P500 User Guide V1.0 Read the safety notices and important tips in the included manuals before using your computer.
Lenovo IdeaPad Z500/P500 User Guide V1.0 Read the safety notices and important tips in the included manuals before using your computer.
User Guide
Page 2
... in this user guide. • The illustrations in this guide are using another Windows operating system, some operations may not apply to you. • The features described in Contract No. Please refer to restrictions set forth in this manual may differ from the actual product. Be sure to read Lenovo Safety and General Information Guide first. • Some instructions in this guide may...
... in this user guide. • The illustrations in this guide are using another Windows operating system, some operations may not apply to you. • The features described in Contract No. Please refer to restrictions set forth in this manual may differ from the actual product. Be sure to read Lenovo Safety and General Information Guide first. • Some instructions in this guide may...
User Guide
Page 6
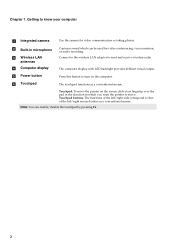
Connect to the wireless LAN adapter to move the pointer on the screen, slide your computer a Integrated camera Use the camera for video conferencing, voice narration, or audio recording. The touchpad functions as a conventional mouse. Note: You can be used for video communication or taking photos. Touchpad buttons: The functions of the left/right side correspond to turn on a conventional mouse. The computer display with LED backlight provides brilliant visual output. Chapter 1. b Built...
Connect to the wireless LAN adapter to move the pointer on the screen, slide your computer a Integrated camera Use the camera for video conferencing, voice narration, or audio recording. The touchpad functions as a conventional mouse. Note: You can be used for video communication or taking photos. Touchpad buttons: The functions of the left/right side correspond to turn on a conventional mouse. The computer display with LED backlight provides brilliant visual output. Chapter 1. b Built...
User Guide
Page 7
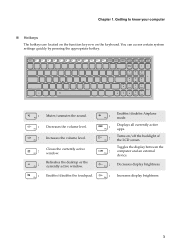
... access certain system settings quickly by pressing the appropriate hotkey. : Mutes/unmutes the sound. : Decreases the volume level. : Increases the volume level. : Closes the currently active window. : Refreshes the desktop or the currently active window. : Enables/disables the touchpad. : Enables/disables Airplane mode. : Displays all currently active apps. : Turns on the keyboard. Toggles the display between the : computer and an external device. : Decreases display brightness. : Increases display brightness. 3 Getting to know your computer „ Hotkeys The hotkeys...
... access certain system settings quickly by pressing the appropriate hotkey. : Mutes/unmutes the sound. : Decreases the volume level. : Increases the volume level. : Closes the currently active window. : Refreshes the desktop or the currently active window. : Enables/disables the touchpad. : Enables/disables Airplane mode. : Displays all currently active apps. : Turns on the keyboard. Toggles the display between the : computer and an external device. : Decreases display brightness. : Increases display brightness. 3 Getting to know your computer „ Hotkeys The hotkeys...

User Guide
Page 9
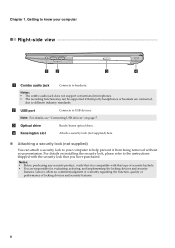
... power adapter here. h Memory card slot Insert memory cards (not supplied) here. c Fan louvers Dissipate internal heat. Note: For details, see "Connecting USB devices" on page 7. b Novo button When the computer is off, press this button to start the Lenovo Recovery system or the BIOS setup utility, or to external display devices. Note: For details, see "Using memory cards (not supplied)" on page 18. Note: For details, see "Lenovo OneKey Recovery system" on page 7. 5 d VGA port Connects to enter the boot menu. Note: Make...
... power adapter here. h Memory card slot Insert memory cards (not supplied) here. c Fan louvers Dissipate internal heat. Note: For details, see "Connecting USB devices" on page 7. b Novo button When the computer is off, press this button to start the Lenovo Recovery system or the BIOS setup utility, or to external display devices. Note: For details, see "Using memory cards (not supplied)" on page 18. Note: For details, see "Lenovo OneKey Recovery system" on page 7. 5 d VGA port Connects to enter the boot menu. Note: Make...
User Guide
Page 10
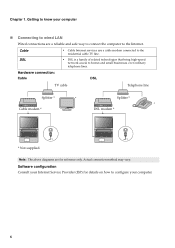
... your computer „ Connecting to wired LAN Wired connections are for details on how to the Internet. Software configuration Consult your computer. 6 DSL TV cable Telephone line Splitter * * Splitter * * Cable modem * DSL modem * * * * Not supplied. Cable DSL Hardware connection: Cable • Cable Internet services use a cable modem connected to the residential cable TV line. • DSL is a family of related technologies that bring high-speed network access to homes and small...
... your computer „ Connecting to wired LAN Wired connections are for details on how to the Internet. Software configuration Consult your computer. 6 DSL TV cable Telephone line Splitter * * Splitter * * Cable modem * DSL modem * * * * Not supplied. Cable DSL Hardware connection: Cable • Cable Internet services use a cable modem connected to the residential cable TV line. • DSL is a family of related technologies that bring high-speed network access to homes and small...

User Guide
Page 11
... of Windows to remove the device before connecting the device. Inserting a memory card 1 Push the dummy card in the slot at a time. • This card reader does not support SDIO devices (e.g., SDIO Bluetooth, etc.). Note: Before removing the memory card, disable it , and then installs the driver automatically. Chapter 1. Note: Typically, Windows detects a new device after connecting it by using the Windows safely remove hardware and eject media utility to install the driver before connecting it clicks into a particular USB port on your computer when the memory card slot...
... of Windows to remove the device before connecting the device. Inserting a memory card 1 Push the dummy card in the slot at a time. • This card reader does not support SDIO devices (e.g., SDIO Bluetooth, etc.). Note: Before removing the memory card, disable it , and then installs the driver automatically. Chapter 1. Note: Typically, Windows detects a new device after connecting it by using the Windows safely remove hardware and eject media utility to install the driver before connecting it clicks into a particular USB port on your computer when the memory card slot...
User Guide
Page 12
... audio jack does not support conventional microphones. • The recording function may not be supported if third-party headphones or headsets are responsible for evaluating, selecting, and implementing the locking devices and security features. For details on page 7. Lenovo offers no comment judgment or warranty regarding the function, quality or performance of security keyhole. • You are connected, due to USB devices. d Kensington slot...
... audio jack does not support conventional microphones. • The recording function may not be supported if third-party headphones or headsets are responsible for evaluating, selecting, and implementing the locking devices and security features. For details on page 7. Lenovo offers no comment judgment or warranty regarding the function, quality or performance of security keyhole. • You are connected, due to USB devices. d Kensington slot...
User Guide
Page 13
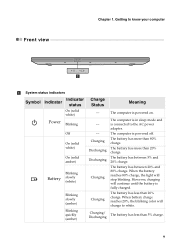
... 80% charge. However, charging will stop blinking. The battery has less than 5% charge. 9 When the battery reaches 80% charge, the light will continue until the battery is connected to the AC power adapter. Blinking Battery slowly (white) Blinking slowly (amber) Charging Charging The battery has between 5% and 20% charge. Power Blinking Off On (solid white) On (solid amber) ----Charging Discharging Discharging The computer is in sleep mode and is fully charged. Blinking quickly (amber) Charging/ Discharging The battery has...
... 80% charge. However, charging will stop blinking. The battery has less than 5% charge. 9 When the battery reaches 80% charge, the light will continue until the battery is connected to the AC power adapter. Blinking Battery slowly (white) Blinking slowly (amber) Charging Charging The battery has between 5% and 20% charge. Power Blinking Off On (solid white) On (solid amber) ----Charging Discharging Discharging The computer is in sleep mode and is fully charged. Blinking quickly (amber) Charging/ Discharging The battery has...
User Guide
Page 15
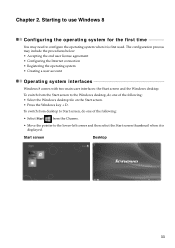
... is displayed. The configuration process may need to configure the operating system when it is first used. Starting to use Windows 8 Configuring the operating system for the first time You may include the procedures below: • Accepting the end user license agreement • Configuring the Internet connection • Registering the operating system • Creating a user account Operating system interfaces Windows 8 comes with two main user interfaces: the Start screen and the Windows desktop. Chapter 2. Start screen...
... is displayed. The configuration process may need to configure the operating system when it is first used. Starting to use Windows 8 Configuring the operating system for the first time You may include the procedures below: • Accepting the end user license agreement • Configuring the Internet connection • Registering the operating system • Creating a user account Operating system interfaces Windows 8 comes with two main user interfaces: the Start screen and the Windows desktop. Chapter 2. Start screen...
User Guide
Page 17
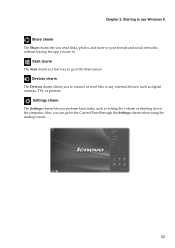
... connect or send files to any external devices, such as setting the volume or shutting down the computer. Devices charm The Devices charm allows you perform basic tasks, such as digital cameras, TVs, or printers. Chapter 2. Also, you are in. Start charm The Start charm is a fast way to go to the Control Panel through the Settings charm when using the desktop screen. 13 Starting to use Windows...
... connect or send files to any external devices, such as setting the volume or shutting down the computer. Devices charm The Devices charm allows you perform basic tasks, such as digital cameras, TVs, or printers. Chapter 2. Also, you are in. Start charm The Start charm is a fast way to go to the Control Panel through the Settings charm when using the desktop screen. 13 Starting to use Windows...
User Guide
Page 18
... the display panel. • Press the power button. • Open the Charms and then select Settings → Power → Sleep. To wake the computer, do one of data. When the computer is in sleep mode) before you will be away from your computer while the hard disk is in sleep mode, you can quickly wake it down When you have finished working with your computer. Starting to use...
... the display panel. • Press the power button. • Open the Charms and then select Settings → Power → Sleep. To wake the computer, do one of data. When the computer is in sleep mode) before you will be away from your computer while the hard disk is in sleep mode, you can quickly wake it down When you have finished working with your computer. Starting to use...
User Guide
Page 20
... wireless function: • Press F7 to disable Airplane mode. • Open the Charms and select Settings → to open the Network configuration page, and then toggle the Airplane mode switch to one of those networks, ask the network administrator or the Internet service provider (ISP) for connection. Connecting to a wireless LAN After wireless has been enabled, the computer will automatically scan for available wireless networks and display them in the list and then click Connect. To connect...
... wireless function: • Press F7 to disable Airplane mode. • Open the Charms and select Settings → to open the Network configuration page, and then toggle the Airplane mode switch to one of those networks, ask the network administrator or the Internet service provider (ISP) for connection. Connecting to a wireless LAN After wireless has been enabled, the computer will automatically scan for available wireless networks and display them in the list and then click Connect. To connect...

User Guide
Page 21
You can also get online help and support by clicking on your computer. You can read the Windows Help and Support file on one of the two links listed under More to use Windows 8 Help and support If you have any problems using the operating system, see the Windows Help and Support file. To open the Windows Help and Support file, do one of the following: • Select Settings charm, then select Help. • Press Windows key + F1. Chapter 2. Starting to explore. 17
You can also get online help and support by clicking on your computer. You can read the Windows Help and Support file on one of the two links listed under More to use Windows 8 Help and support If you have any problems using the operating system, see the Windows Help and Support file. To open the Windows Help and Support file, do one of the following: • Select Settings charm, then select Help. • Press Windows key + F1. Chapter 2. Starting to explore. 17
User Guide
Page 22
... is irreversible. Make sure to save on the system partition before starting the recovery process. • The recovery process may take a while. So be sure to connect the AC adapter to your hard disk already includes a hidden partition by default to start the Lenovo OneKey Recovery system. 2 Click System Backup. 3 Select a back-up point. From the Novo button menu, select the Lenovo OneKey Recovery system and press Enter. 18 To...
... is irreversible. Make sure to save on the system partition before starting the recovery process. • The recovery process may take a while. So be sure to connect the AC adapter to your hard disk already includes a hidden partition by default to start the Lenovo OneKey Recovery system. 2 Click System Backup. 3 Select a back-up point. From the Novo button menu, select the Lenovo OneKey Recovery system and press Enter. 18 To...
User Guide
Page 23
... Lenovo Safety and General Information Guide which came with any critical data on the D partition of warranty service, see if the destination media is , replace the damaged media. Where can also download it up before starting the recovery process. 19 You can find the hardware specifications for Lenovo preinstalled (desktop) software? Your computer did not come with a Windows operating system, Lenovo provides drivers for using my computer? If you need...
... Lenovo Safety and General Information Guide which came with any critical data on the D partition of warranty service, see if the destination media is , replace the damaged media. Where can also download it up before starting the recovery process. 19 You can find the hardware specifications for Lenovo preinstalled (desktop) software? Your computer did not come with a Windows operating system, Lenovo provides drivers for using my computer? If you need...
User Guide
Page 24
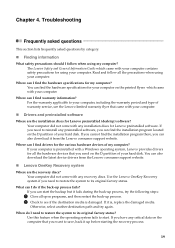
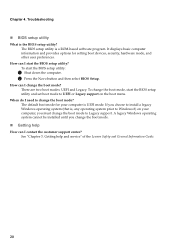
... Novo button and then select BIOS Setup. A legacy Windows operating system cannot be installed until you must change the boot mode. „ Getting help and service" of the Lenovo Safety and General Information Guide. 20 See "Chapter 3. There are two boot modes: UEFI and Legacy. Troubleshooting „ BIOS setup utility What is a ROM-based software program. When do I change the boot mode? Chapter 4. How can I need to Legacy support. The default boot mode for setting boot devices, security, hardware mode, and other user preferences...
... Novo button and then select BIOS Setup. A legacy Windows operating system cannot be installed until you must change the boot mode. „ Getting help and service" of the Lenovo Safety and General Information Guide. 20 See "Chapter 3. There are two boot modes: UEFI and Legacy. Troubleshooting „ BIOS setup utility What is a ROM-based software program. When do I change the boot mode? Chapter 4. How can I need to Legacy support. The default boot mode for setting boot devices, security, hardware mode, and other user preferences...
User Guide
Page 25
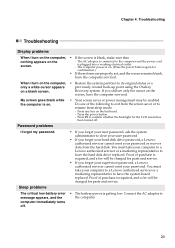
... power button again for confirmation.) • If these items are properly set, and the screen remains blank, have the computer serviced. • Your screen saver or power management may be charged for parts and service. • The battery power is plugged into a working electrical outlet. - Sleep problems The critical low-battery error message appears, and the computer immediately turns off . • If you forget your supervisor password, a Lenovo authorized servicer cannot reset your password...
... power button again for confirmation.) • If these items are properly set, and the screen remains blank, have the computer serviced. • Your screen saver or power management may be charged for parts and service. • The battery power is plugged into a working electrical outlet. - Sleep problems The critical low-battery error message appears, and the computer immediately turns off . • If you forget your supervisor password, a Lenovo authorized servicer cannot reset your password...
User Guide
Page 26
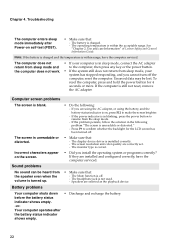
... sleep mode. - If the problem persists, follow the solution in blinking, press the power button to make the screen brighter. - The display device driver is not used. - before the battery status indicator shows empty. -orYour computer operates after Power-on self-test (POST). • Make sure that : - Battery problems • Make sure that : - The headphone jack is installed correctly. - To reset the computer, press and hold the power button for the LCD screen has been turned off. • Make...
... sleep mode. - If the problem persists, follow the solution in blinking, press the power button to make the screen brighter. - The display device driver is not used. - before the battery status indicator shows empty. -orYour computer operates after Power-on self-test (POST). • Make sure that : - Battery problems • Make sure that : - The headphone jack is installed correctly. - To reset the computer, press and hold the power button for the LCD screen has been turned off. • Make...
User Guide
Page 27
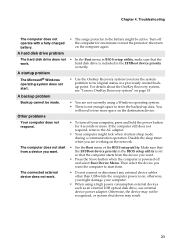
... adapter. • Your computer might lock when it enters sleep mode during a communication operation. Disable the sleep timer when you want the computer to free more space on the destination device. • To turn on the computer again. • In the Boot menu in the BIOS setup utility is set so that the hard disk drive is on the network. • See the Boot menu of the BIOS setup utility. Chapter 4. The computer does not start . then turn...
... adapter. • Your computer might lock when it enters sleep mode during a communication operation. Disable the sleep timer when you want the computer to free more space on the destination device. • To turn on the computer again. • In the Boot menu in the BIOS setup utility is set so that the hard disk drive is on the network. • See the Boot menu of the BIOS setup utility. Chapter 4. The computer does not start . then turn...


