
Lenovo H520s Hardware Maintenance Manual
Page 5
...or disabling a device 15 Selecting a startup device 16 Exiting the Lenovo BIOS Setup Utility program . . 17 Chapter 6. Symptom-to-FRU Index . . 19 Hard disk drive boot error 19 Power Supply Problems 19 POST error codes 20 Undetermined problems 20 Chapter 7. ...General information . . . . 53 Additional Service Information 53 © Copyright Lenovo 2012 iii About this manual 1 Important Safety Information 1 Chapter 2. Replacing...
...or disabling a device 15 Selecting a startup device 16 Exiting the Lenovo BIOS Setup Utility program . . 17 Chapter 6. Symptom-to-FRU Index . . 19 Hard disk drive boot error 19 Power Supply Problems 19 POST error codes 20 Undetermined problems 20 Chapter 7. ...General information . . . . 53 Additional Service Information 53 © Copyright Lenovo 2012 iii About this manual 1 Important Safety Information 1 Chapter 2. Replacing...
Lenovo H520s Hardware Maintenance Manual
Page 10
...The surface is near their normal operating places in the off the wall box that supplies power to the machine and to switch off . • Always look carefully for that power has been disconnected from grounds such as metal floor strips and machine frames. do... conditions or near power supplies - Working near equipment that another person, familiar with very high voltages; Removing or installing Field Replaceable Units (FRUs) • Before you may prevent a current from electrical shock. • Find the room emergency power-off power. 4 Lenovo H520sHardware Maintenance Manual...
...The surface is near their normal operating places in the off the wall box that supplies power to the machine and to switch off . • Always look carefully for that power has been disconnected from grounds such as metal floor strips and machine frames. do... conditions or near power supplies - Working near equipment that another person, familiar with very high voltages; Removing or installing Field Replaceable Units (FRUs) • Before you may prevent a current from electrical shock. • Find the room emergency power-off power. 4 Lenovo H520sHardware Maintenance Manual...
Lenovo H520s Hardware Maintenance Manual
Page 11
.... Protect against ESD damage by this inspection guide is a difference in the parts listings. Chapter 2. Safety information 5 Disconnect the power cord. 3. The power cord should be frayed or worn. 4. Check inside the unit for any obvious unsafe conditions, such as specified in charge between ...that the machine, the part, the work mat, and the person handling the part are inserted into the product. Make sure that the power-supply cover fasteners (screws or rivets) have been certified (ISO 9000) as to get medical aid. Check exterior covers for worn, frayed,...
.... Protect against ESD damage by this inspection guide is a difference in the parts listings. Chapter 2. Safety information 5 Disconnect the power cord. 3. The power cord should be frayed or worn. 4. Check inside the unit for any obvious unsafe conditions, such as specified in charge between ...that the machine, the part, the work mat, and the person handling the part are inserted into the product. Make sure that the power-supply cover fasteners (screws or rivets) have been certified (ISO 9000) as to get medical aid. Check exterior covers for worn, frayed,...
Lenovo H520s Hardware Maintenance Manual
Page 14
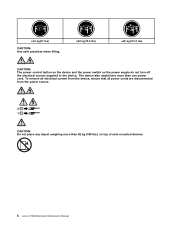
≥18 kg(37 lbs) CAUTION: Use safe practices when lifting. ≥32 kg(70.5 lbs) ≥55 kg(121.2 lbs) CAUTION: The power control button on the device and the power switch on top of rack-mounted devices. 8 Lenovo H520sHardware Maintenance Manual The device also might have more than one power cord. To remove all electrical current from the device, ensure that all power cords are disconnected from the power source. 2 1 CAUTION: Do not place any object weighing more than 82 kg (180 lbs.) on the power supply do not turn off the electrical current supplied to the device.
≥18 kg(37 lbs) CAUTION: Use safe practices when lifting. ≥32 kg(70.5 lbs) ≥55 kg(121.2 lbs) CAUTION: The power control button on the device and the power switch on top of rack-mounted devices. 8 Lenovo H520sHardware Maintenance Manual The device also might have more than one power cord. To remove all electrical current from the device, ensure that all power cords are disconnected from the power source. 2 1 CAUTION: Do not place any object weighing more than 82 kg (180 lbs.) on the power supply do not turn off the electrical current supplied to the device.
Lenovo H520s Hardware Maintenance Manual
Page 17
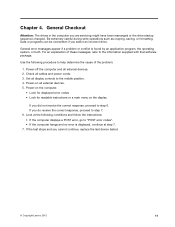
..., continue at the following procedure to help determine the cause of these messages, refer to the information supplied with that software package. Power-off the computer and all cables and power cords. 3. Chapter 4. Data or programs can be overwritten if you cannot continue, replace the last ...device tested. © Copyright Lenovo 2012 11 Use the following conditions and follow the instructions: • If the computer displays a POST error, go to step 6. Power-on the display. General Checkout Attention: The drives in the computer ...
..., continue at the following procedure to help determine the cause of these messages, refer to the information supplied with that software package. Power-off the computer and all cables and power cords. 3. Chapter 4. Data or programs can be overwritten if you cannot continue, replace the last ...device tested. © Copyright Lenovo 2012 11 Use the following conditions and follow the instructions: • If the computer displays a POST error, go to step 6. Power-on the display. General Checkout Attention: The drives in the computer ...
Lenovo H520s Hardware Maintenance Manual
Page 25
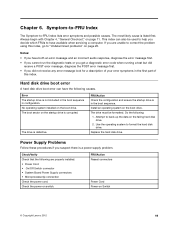
...Index The Symptom-to format the hard disk drive. The most likely cause is a power supply problem. This index can have the following causes. Error The startup drive is corrupted. ... causes. Replace the hard disk drive. Power Supply Problems Follow these procedures if you are properly installed: • Power Cord • On/Off Switch connector • System Board Power Supply connectors • Microprocessor(s) connection Check the power cord. Always begin with Chapter 4, "General... data on switch. Attempt to "Undetermined problems" on Switch © Copyright Lenovo 2012 19
...Index The Symptom-to format the hard disk drive. The most likely cause is a power supply problem. This index can have the following causes. Error The startup drive is corrupted. ... causes. Replace the hard disk drive. Power Supply Problems Follow these procedures if you are properly installed: • Power Cord • On/Off Switch connector • System Board Power Supply connectors • Microprocessor(s) connection Check the power cord. Always begin with Chapter 4, "General... data on switch. Attempt to "Undetermined problems" on Switch © Copyright Lenovo 2012 19
Lenovo H520s Hardware Maintenance Manual
Page 30
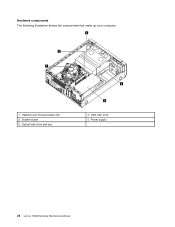
Heatsink and microprocessor fan 2. System board 3. Optical disk drive and bay 4 5 4. Hard disk drive 5. Hardware components The following illustration shows the components that make up your computer. 3 2 1 1. Power supply 24 Lenovo H520sHardware Maintenance Manual
Heatsink and microprocessor fan 2. System board 3. Optical disk drive and bay 4 5 4. Hard disk drive 5. Hardware components The following illustration shows the components that make up your computer. 3 2 1 1. Power supply 24 Lenovo H520sHardware Maintenance Manual
Lenovo H520s Hardware Maintenance Manual
Page 40
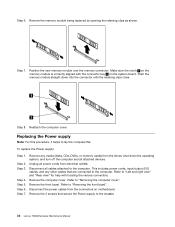
...the various connectors. Step 8. Reattach the computer cover. Step 2. Remove any other cables that secure the Power supply to "Removing the front bezel". This includes power cords, input/output (I/O) cables, and any media (disks, CDs, DVDs, or memory cards) from...on motherboard. Refer to the chassis. 34 Lenovo H520sHardware Maintenance Manual Remove the computer cover. Step 7. Step 4. Step 5. Refer to lay the computer flat. Disconnect the power cables from electrical outlets. Step 3. Replacing the Power supply Note: For this procedure, it helps to...
...the various connectors. Step 8. Reattach the computer cover. Step 2. Remove any other cables that secure the Power supply to "Removing the front bezel". This includes power cords, input/output (I/O) cables, and any media (disks, CDs, DVDs, or memory cards) from...on motherboard. Refer to the chassis. 34 Lenovo H520sHardware Maintenance Manual Remove the computer cover. Step 7. Step 4. Step 5. Refer to lay the computer flat. Disconnect the power cables from electrical outlets. Step 3. Replacing the Power supply Note: For this procedure, it helps to...
Lenovo H520s Hardware Maintenance Manual
Page 41
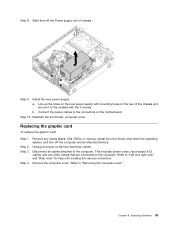
...Step 1. Disconnect all attached devices. Refer to the chassis with the 3 screws. Line up the holes on the new power supply with locating the various connectors. b. Refer to the connectors on the rear of chassis. Step 8. Step 9. Slide then lift the... Power supply out of the chassis and secure it to "Removing the computer cover". Reattach the front bezel, computer cover. Step 3. Step 4. This includes power cords, input/output (I/O) cables, and any media (disks, CDs, DVDs,...
...Step 1. Disconnect all attached devices. Refer to the chassis with the 3 screws. Line up the holes on the new power supply with locating the various connectors. b. Refer to the connectors on the rear of chassis. Step 8. Step 9. Slide then lift the... Power supply out of the chassis and secure it to "Removing the computer cover". Reattach the front bezel, computer cover. Step 3. Step 4. This includes power cords, input/output (I/O) cables, and any media (disks, CDs, DVDs,...
Lenovo H520s Hardware Maintenance Manual
Page 49
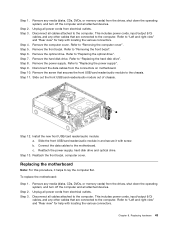
... from the drives, shut down the operating system, and turn off the computer and all attached devices. Remove the computer cover. Remove the power supply. Install the new front USB/card reader/audio module: a. To replace the motherboard: Step 1. Step 3. Step 3. Refer to the computer. Remove the... the data cables from the connectors on motherboard. Remove the screw that are connected to the computer. Step 11. Reattach the power supply, hard disk drive and optical drive. Disconnect all cables attached to lay the computer flat. Refer to the chassis.
... from the drives, shut down the operating system, and turn off the computer and all attached devices. Remove the computer cover. Remove the power supply. Install the new front USB/card reader/audio module: a. To replace the motherboard: Step 1. Step 3. Step 3. Refer to the computer. Remove the... the data cables from the connectors on motherboard. Remove the screw that are connected to the computer. Step 11. Reattach the power supply, hard disk drive and optical drive. Disconnect all cables attached to lay the computer flat. Refer to the chassis.
Lenovo H520s Hardware Maintenance Manual
Page 50
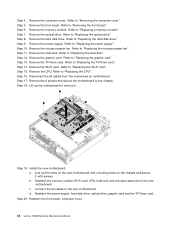
.... Step 17. Reattach the memory module, Wi-Fi card, CPU, heat-sink and microprocessor fan to "Removing the front bezel". Reattach the power supply, hard disk drive, optical drive, graphic card and the TV-Tuner card. Step 20. Remove the front bezel. Refer to the new motherboard..., computer cover. 44 Lenovo H520sHardware Maintenance Manual Remove the memory module. Remove the optical drive. Refer to "Replacing the microprocessor fan". Step 11. Step 14. Lift up the holes on the new motherboard with screws. Step 10. Refer to "Replacing the power supply". Disconnect the all cables...
.... Step 17. Reattach the memory module, Wi-Fi card, CPU, heat-sink and microprocessor fan to "Removing the front bezel". Reattach the power supply, hard disk drive, optical drive, graphic card and the TV-Tuner card. Step 20. Remove the front bezel. Refer to the new motherboard..., computer cover. 44 Lenovo H520sHardware Maintenance Manual Remove the memory module. Remove the optical drive. Refer to "Replacing the microprocessor fan". Step 11. Step 14. Lift up the holes on the new motherboard with screws. Step 10. Refer to "Replacing the power supply". Disconnect the all cables...
Lenovo H520s Hardware Maintenance Manual
Page 54
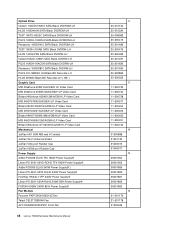
...-ROHS TFX 180W Power Supply® AcBel PC9053-EL0G 240W Power Supply(R) Liteon PS-5241-02VF-RoHS 240W Power Supply® HuntKey HK340-71FP 240W Power Supply® Liteon PS-5241-03VA-RoHS 240W 85%Power Supply® FSP240-50SBV 240W 85% Power Supply® Fan Module Foxconn PKP736G01K(D)12Z Fan Taisol CEL3172836A6 Fan AVC DS09225R12HP251 Front Fan 48 Lenovo H520sHardware Maintenance...
...-ROHS TFX 180W Power Supply® AcBel PC9053-EL0G 240W Power Supply(R) Liteon PS-5241-02VF-RoHS 240W Power Supply® HuntKey HK340-71FP 240W Power Supply® Liteon PS-5241-03VA-RoHS 240W 85%Power Supply® FSP240-50SBV 240W 85% Power Supply® Fan Module Foxconn PKP736G01K(D)12Z Fan Taisol CEL3172836A6 Fan AVC DS09225R12HP251 Front Fan 48 Lenovo H520sHardware Maintenance...
Lenovo H520s Hardware Maintenance Manual
Page 59
... system is allowed to control the power management features of the computer such as the system power supply, processor, hard disk drives, and some monitors. Automatic Power-On features The Automatic Power-On features within the Power Management menu allow you to enable and...find helpful. Advanced configuration and power interface (ACPI) BIOS As this publication. Additional Service Information This chapter provides additional information that applies to wake the System. © Copyright Lenovo 2012 53 Power management Power management reduces the power consumption of certain components of...
... system is allowed to control the power management features of the computer such as the system power supply, processor, hard disk drives, and some monitors. Automatic Power-On features The Automatic Power-On features within the Power Management menu allow you to enable and...find helpful. Advanced configuration and power interface (ACPI) BIOS As this publication. Additional Service Information This chapter provides additional information that applies to wake the System. © Copyright Lenovo 2012 53 Power management Power management reduces the power consumption of certain components of...
User Guide
Page 37
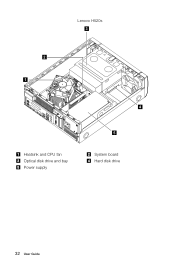
Lenovo H520s 3 2 1 Heatsink and CPU fan Optical disk drive and bay Power supply 4 5 System board Hard disk drive 32 User Guide
Lenovo H520s 3 2 1 Heatsink and CPU fan Optical disk drive and bay Power supply 4 5 System board Hard disk drive 32 User Guide


