
Safety and Warranty guide
Page 9
... others from the static-protective packaging and install the part without setting it . • Do not place the part on it down. Power cords and power adapters Use only the power cords and power adapters supplied by objects. 4 Safety and warranty guide When you unpack an option or CRU, do not open the staticprotective package containing the part until the instructions direct you . • Always handle components...
... others from the static-protective packaging and install the part without setting it . • Do not place the part on it down. Power cords and power adapters Use only the power cords and power adapters supplied by objects. 4 Safety and warranty guide When you unpack an option or CRU, do not open the staticprotective package containing the part until the instructions direct you . • Always handle components...

Safety and Warranty guide
Page 17
... suspect a problem with one of the National Electrical Code (NEC) that provides guidelines for proper grounding and, in North America. Products with optical instruments, and avoid direct exposure to those that the cable ground shall be installed in particular, specifies that follow. Power supply statement Never remove the cover on a power supply or any component that are no serviceable parts inside any part that has...
... suspect a problem with one of the National Electrical Code (NEC) that provides guidelines for proper grounding and, in North America. Products with optical instruments, and avoid direct exposure to those that the cable ground shall be installed in particular, specifies that follow. Power supply statement Never remove the cover on a power supply or any component that are no serviceable parts inside any part that has...
Safety and Warranty guide
Page 18
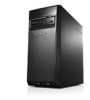
...users in wire Antenna discharge unit (NEC Section 810-20) Grounding conductors (NEC Section 810-21) Figure 1. For å unngå dette skal det ved tilkopling av utstyret til kabel-TV nettet installeres en galvanisk isolator mellom utstyret og kabel- Safety and warranty guide... 13 to the grounding system of the building, as close as practical. TV nettet." Proper grounding for the cable Power service grounding electrode system (NEC Article 250, Part H) Ground clamps Electronic service equipment Special note for årsake ...
...users in wire Antenna discharge unit (NEC Section 810-20) Grounding conductors (NEC Section 810-21) Figure 1. For å unngå dette skal det ved tilkopling av utstyret til kabel-TV nettet installeres en galvanisk isolator mellom utstyret og kabel- Safety and warranty guide... 13 to the grounding system of the building, as close as practical. TV nettet." Proper grounding for the cable Power service grounding electrode system (NEC Article 250, Part H) Ground clamps Electronic service equipment Special note for årsake ...

Safety and Warranty guide
Page 30
...starts on your product are set forth below in materials and workmanship under this Limited Warranty. The warranty period and type of purchase specified on the original date of warranty service that you a remedy under normal use and conditions during the warranty period, Lenovo will provide you purchase is free from defects in Part... Email: lensyd_au@lenovo.com The following replaces the same section in Part 1: What this Warranty Covers: Lenovo warrants that each hardware product that apply to a covered defect during the warranty period. Warranty Service Information. YOU MAY...
...starts on your product are set forth below in materials and workmanship under this Limited Warranty. The warranty period and type of purchase specified on the original date of warranty service that you a remedy under normal use and conditions during the warranty period, Lenovo will provide you purchase is free from defects in Part... Email: lensyd_au@lenovo.com The following replaces the same section in Part 1: What this Warranty Covers: Lenovo warrants that each hardware product that apply to a covered defect during the warranty period. Warranty Service Information. YOU MAY...

Safety and Warranty guide
Page 31
... a product. Neither Lenovo nor the Service Provider is responsible for replacement. Only unaltered Lenovo products and parts are eligible for loss or disclosure of any data, including confidential information, proprietary information, or personal information, contained in Part 1: Use of retaining user-generated data. Refurbished parts may result in good working order and at least functionally equivalent to repair the product; The...
... a product. Neither Lenovo nor the Service Provider is responsible for replacement. Only unaltered Lenovo products and parts are eligible for loss or disclosure of any data, including confidential information, proprietary information, or personal information, contained in Part 1: Use of retaining user-generated data. Refurbished parts may result in good working order and at least functionally equivalent to repair the product; The...

Safety and Warranty guide
Page 38
... been repaired or exchanged, it to collect the product, the Service Provider may find a list of the replacement CRU. 2. An optional service offering may be charged for the replacement CRU if the Service Provider does not receive the defective CRU from a Service Provider or Lenovo under which Self-service CRUs would be available for you . 5. When return is required: 1) return instructions, a prepaid...
... been repaired or exchanged, it to collect the product, the Service Provider may find a list of the replacement CRU. 2. An optional service offering may be charged for the replacement CRU if the Service Provider does not receive the defective CRU from a Service Provider or Lenovo under which Self-service CRUs would be available for you . 5. When return is required: 1) return instructions, a prepaid...

(English) User Guide - Lenovo H50 Series
Page 24
... release the F2 key once turning on the computer until it has completed. After starting the operating system. The manual installation function can only be used after the software has been installed. Click OK to install the Lenovo drivers and applications. Make sure that were shipped with your Lenovo hardware. The system will continue until the Lenovo Rescue System opens, then select Driver and Application Installation. Follow the on...
... release the F2 key once turning on the computer until it has completed. After starting the operating system. The manual installation function can only be used after the software has been installed. Click OK to install the Lenovo drivers and applications. Make sure that were shipped with your Lenovo hardware. The system will continue until the Lenovo Rescue System opens, then select Driver and Application Installation. Follow the on...

(English) User Guide - Lenovo H50 Series
Page 29
... signal cable to the monitor is loose; Problem: You need to : • Change the desktop background • Select a screen saver • Select Windows color options for borders and taskbar • Select a themes 3. Solving Problems Follow these tips when troubleshooting your computer: • If you added or removed a part before the problem started, review the installation procedures to ensure that the part is correctly installed. • If a peripheral device does not work, ensure...
... signal cable to the monitor is loose; Problem: You need to : • Change the desktop background • Select a screen saver • Select Windows color options for borders and taskbar • Select a themes 3. Solving Problems Follow these tips when troubleshooting your computer: • If you added or removed a part before the problem started, review the installation procedures to ensure that the part is correctly installed. • If a peripheral device does not work, ensure...

(English) User Guide - Lenovo H50 Series
Page 30
... Windows desktop mode, then click the speaker icon. Troubleshooting Audio Problems Problem: No sound from headphones. Ensure that the volume is turned up and the sound is not muted. Troubleshooting and problem resolution: • Check the headphone cable connection - Ensure that the volume is turned up and the sound is not muted. Move any headphones from the Settings Charm or click the arrow on screen. Problem: No sound from the integrated speakers...
... Windows desktop mode, then click the speaker icon. Troubleshooting Audio Problems Problem: No sound from headphones. Ensure that the volume is turned up and the sound is not muted. Troubleshooting and problem resolution: • Check the headphone cable connection - Ensure that the volume is turned up and the sound is not muted. Move any headphones from the Settings Charm or click the arrow on screen. Problem: No sound from the integrated speakers...
(English) User Guide - Lenovo H50 Series
Page 33
... boot menu. To change the boot mode. 28 User Guide You can also get online help and support by clicking on your computer. Shut down the computer. 2. To open the Windows Help and Support file, do I change the boot mode? It communicates basic computer information and provides options for your computer is ROM-based software. Repeatedly press and release the F1 key once turning on the computer to start the BIOS setup utility...
... boot menu. To change the boot mode. 28 User Guide You can also get online help and support by clicking on your computer. Shut down the computer. 2. To open the Windows Help and Support file, do I change the boot mode? It communicates basic computer information and provides options for your computer is ROM-based software. Repeatedly press and release the F1 key once turning on the computer to start the BIOS setup utility...

(English) User Guide - Lenovo H50 Series
Page 37
... at http://support.lenovo.com. 32 User Guide This guide does not include procedures for step-by customers who are replacing Customer Replaceable Units (CRUs) as well as parts. Note: Use only parts provided by trained service personnel without the need for all parts. This guide contains procedures for replacing the following parts: • Memory modules • Hard disk drive • Optical drive • Graphic Card • Card reader module • Keyboard • Mouse Safety information for parts ordering...
... at http://support.lenovo.com. 32 User Guide This guide does not include procedures for step-by customers who are replacing Customer Replaceable Units (CRUs) as well as parts. Note: Use only parts provided by trained service personnel without the need for all parts. This guide contains procedures for replacing the following parts: • Memory modules • Hard disk drive • Optical drive • Graphic Card • Card reader module • Keyboard • Mouse Safety information for parts ordering...
(English) User Guide - Lenovo H50 Series
Page 41
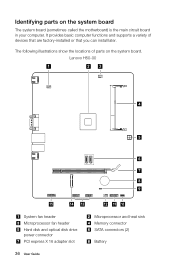
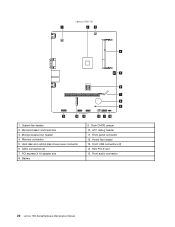
... locations of devices that are factory-installed or that you can install later. It provides basic computer functions and supports a variety of parts on the system board The system board (sometimes called the motherboard) is the main circuit board in your computer. Lenovo H50-00 1 23 4 5 6 7 8 9 15 14 13 System fan header Microprocessor fan header Hard disk and optical disk drive power connector PCI express X 16 adapter slot 36 User Guide 12 11 10 Microprocessor and heat sink Memory connector SATA connectors (2) Battery...
... locations of devices that are factory-installed or that you can install later. It provides basic computer functions and supports a variety of parts on the system board The system board (sometimes called the motherboard) is the main circuit board in your computer. Lenovo H50-00 1 23 4 5 6 7 8 9 15 14 13 System fan header Microprocessor fan header Hard disk and optical disk drive power connector PCI express X 16 adapter slot 36 User Guide 12 11 10 Microprocessor and heat sink Memory connector SATA connectors (2) Battery...

(English) User Guide - Lenovo H50 Series
Page 58
... to instructions and requirements in the manuals included with your computer, or operate the product inappropriately. You are responsible if you fail to operate the product according to help you use the product for the first time. The software interface and function and hardware configuration described in new editions of Lenovo. This manual could include technical inaccuracies or typographical errors. For the configuration of...
... to instructions and requirements in the manuals included with your computer, or operate the product inappropriately. You are responsible if you fail to operate the product according to help you use the product for the first time. The software interface and function and hardware configuration described in new editions of Lenovo. This manual could include technical inaccuracies or typographical errors. For the configuration of...

Lenovo H50 Series Hardware Maintenance Manual
Page 5
... the hard disk drive 36 Replacing a memory module 37 Replacing the graphic card 39 Replacing the heat-sink assembly 41 Replacing an Intel CPU 42 Replacing an AMD CPU 44 Replacing the system fan 47 Replacing the Wi-Fi card 50 Replacing the front card reader module . . . . . 50 Replacing the motherboard 51 Chapter 9. About this manual 1 Important Safety Information 1 Chapter 2. Using the Setup Utility. . . 13 Starting the Lenovo BIOS Setup Utility program . 13 Viewing and changing settings 13 Using passwords 13 Enabling or disabling a device 15 Selecting a startup device 16...
... the hard disk drive 36 Replacing a memory module 37 Replacing the graphic card 39 Replacing the heat-sink assembly 41 Replacing an Intel CPU 42 Replacing an AMD CPU 44 Replacing the system fan 47 Replacing the Wi-Fi card 50 Replacing the front card reader module . . . . . 50 Replacing the motherboard 51 Chapter 9. About this manual 1 Important Safety Information 1 Chapter 2. Using the Setup Utility. . . 13 Starting the Lenovo BIOS Setup Utility program . 13 Viewing and changing settings 13 Using passwords 13 Enabling or disabling a device 15 Selecting a startup device 16...

Lenovo H50 Series Hardware Maintenance Manual
Page 19
... use the keyboard when using . Viewing and changing settings System configuration options are not case sensitive © Copyright Lenovo 2014 13 Using the Setup Utility The Setup Utility program is displayed, release the F1 key. Press and hold the F1 key then turn off the computer. 2. You must use the Lenovo BIOS Setup Utility program to perform various tasks are available: • Administrator Password • Power-On Password You do the following types of which operating system you start...
... use the keyboard when using . Viewing and changing settings System configuration options are not case sensitive © Copyright Lenovo 2014 13 Using the Setup Utility The Setup Utility program is displayed, release the F1 key. Press and hold the F1 key then turn off the computer. 2. You must use the Lenovo BIOS Setup Utility program to perform various tasks are available: • Administrator Password • Power-On Password You do the following types of which operating system you start...

Lenovo H50 Series Hardware Maintenance Manual
Page 21
... menu, select Set Power-On Password and press the Enter key. 3. Return to enable or disable USB (Universal Serial Bus) functions. Using the Setup Utility 15 A setup notice will be displayed. Keep on the IGD enabled based on how the hard disk image was installed, changing this option to configure system's initiate graphic adapter from the menu. This option allows you type the password correctly, the password will display that changes have been saved. 4. ATA Drive Setup Select IDE, ACHI mode or disable SATA controller. Depending on the setup options...
... menu, select Set Power-On Password and press the Enter key. 3. Return to enable or disable USB (Universal Serial Bus) functions. Using the Setup Utility 15 A setup notice will be displayed. Keep on the IGD enabled based on how the hard disk image was installed, changing this option to configure system's initiate graphic adapter from the menu. This option allows you type the password correctly, the password will display that changes have been saved. 4. ATA Drive Setup Select IDE, ACHI mode or disable SATA controller. Depending on the setup options...

Lenovo H50 Series Hardware Maintenance Manual
Page 22
Onboard Audio Controller Onboard Ethernet Controller or LAN Boot Agent Select whether to enable or disable the Onboard Audio Controller, when feature is set to Disabled all CDs, DVDs or hard disk drives are disabled and can't be used. Video Setup press the Enter key, and then select Video Setup. Network Setup press the Enter key, then select Onboard Ethernet Support or LAN Boot Agent. 4. Note: Selecting a startup device from the menu. Selecting or changing the startup device sequence 16 Lenovo H50 SeriesHardware Maintenance Manual To enable or disable a device, do not want ...
Onboard Audio Controller Onboard Ethernet Controller or LAN Boot Agent Select whether to enable or disable the Onboard Audio Controller, when feature is set to Disabled all CDs, DVDs or hard disk drives are disabled and can't be used. Video Setup press the Enter key, and then select Video Setup. Network Setup press the Enter key, then select Onboard Ethernet Support or LAN Boot Agent. 4. Note: Selecting a startup device from the menu. Selecting or changing the startup device sequence 16 Lenovo H50 SeriesHardware Maintenance Manual To enable or disable a device, do not want ...
Lenovo H50 Series Hardware Maintenance Manual
Page 26
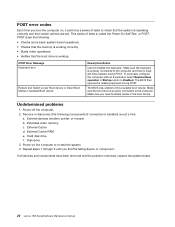
... a suitable boot device. a. External devices (modem, printer, or mouse) b. Hard disk drive f. Make sure the boot drive is working POST Error Message Keyboard error Reboot and Select proper Boot device or Insert Boot Media in the boot device. Remove or disconnect the following : • Checks some basic system-board operations • Checks that the memory is working correctly • Starts video operations • Verifies that certain options are held pressed during POST. External Cache d. Power-on , it performs a series of tests is properly connected to find...
... a suitable boot device. a. External devices (modem, printer, or mouse) b. Hard disk drive f. Make sure the boot drive is working POST Error Message Keyboard error Reboot and Select proper Boot device or Insert Boot Media in the boot device. Remove or disconnect the following : • Checks some basic system-board operations • Checks that the memory is working correctly • Starts video operations • Verifies that certain options are held pressed during POST. External Cache d. Power-on , it performs a series of tests is properly connected to find...
Lenovo H50 Series Hardware Maintenance Manual
Page 32
PCI express X 16 adapter slot 8. Front panel connector 12. Microprocessor and heat sink 3. LPC debug header 11. System fan header 2. Hard disk and optical disk drive power connector 6. Front audio connector 26 Lenovo H50 SeriesHardware Maintenance Manual Memory connector 5. Microprocessor fan header 4. SATA connectors (2) 7. Power fan header 13. Mini PCI-E slot 15. Clear CMOS jumper 10. Lenovo H50-00 1 23 4 5 6 7 8 9 15 14 13 12 11 10 1. Battery 9. Front USB connectors (2) 14.
PCI express X 16 adapter slot 8. Front panel connector 12. Microprocessor and heat sink 3. LPC debug header 11. System fan header 2. Hard disk and optical disk drive power connector 6. Front audio connector 26 Lenovo H50 SeriesHardware Maintenance Manual Memory connector 5. Microprocessor fan header 4. SATA connectors (2) 7. Power fan header 13. Mini PCI-E slot 15. Clear CMOS jumper 10. Lenovo H50-00 1 23 4 5 6 7 8 9 15 14 13 12 11 10 1. Battery 9. Front USB connectors (2) 14.
Lenovo H50 Series Hardware Maintenance Manual
Page 43
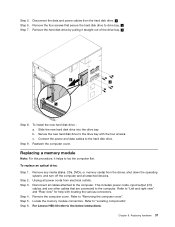
.... Remove the computer cover. For Lenovo H50-00 refer to the hard disk drive. Step 7. c. Step 5. Refer to "Removing the computer cover". Replacing a memory module Note: For this procedure, it straight out of the drive bay. 3 3 2 1 Step 8. This includes power cords, input/output (I/O) cables, and any media (disks, CDs, DVDs, or memory cards) from the drives, shut down the operating system, and turn off the computer and all attached devices. Reattach the computer cover. Step...
.... Remove the computer cover. For Lenovo H50-00 refer to the hard disk drive. Step 7. c. Step 5. Refer to "Removing the computer cover". Replacing a memory module Note: For this procedure, it straight out of the drive bay. 3 3 2 1 Step 8. This includes power cords, input/output (I/O) cables, and any media (disks, CDs, DVDs, or memory cards) from the drives, shut down the operating system, and turn off the computer and all attached devices. Reattach the computer cover. Step...


