Lenovo G770 Userguide V1.0
Page 6
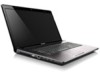
b Wireless module The built-in microphone (with LED backlight provides brilliant visual output. c Computer display The LCD display with noise reduction) can be used for video communication. d Power button Press this ... (If OneKey Rescue system has been preinstalled) when the computer is powered off. Note: For details, see "OneKey Rescue system" on the computer. f Built-in microphone g Touchpad The built-in antennas ensure optimal reception of wireless antennas radio. h System status indicators For details, see "Using the touchpad" on page 18. 2 Chapter...
b Wireless module The built-in microphone (with LED backlight provides brilliant visual output. c Computer display The LCD display with noise reduction) can be used for video communication. d Power button Press this ... (If OneKey Rescue system has been preinstalled) when the computer is powered off. Note: For details, see "OneKey Rescue system" on the computer. f Built-in microphone g Touchpad The built-in antennas ensure optimal reception of wireless antennas radio. h System status indicators For details, see "Using the touchpad" on page 18. 2 Chapter...
Lenovo G770 Userguide V1.0
Page 8
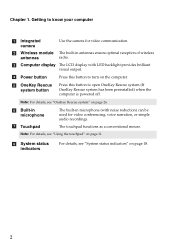
Connects to external microphones. Attention: • Listening to music at high volume over extended periods of time may damage your computer Right-side view 12 3 4 5 a Headphone jack Connects to know your hearing. b Microphone jack Connects to USB devices. Note: For details, see "Using AC adapter and battery" on page 15. c Optical drive d USB port Reads/Burns optical disks. e AC power adapter Connect the AC adapter here. Getting to external headphones. jack Note: For details, see "Connecting USB devices" on page 9. 4 Chapter 1.
Connects to external microphones. Attention: • Listening to music at high volume over extended periods of time may damage your computer Right-side view 12 3 4 5 a Headphone jack Connects to know your hearing. b Microphone jack Connects to USB devices. Note: For details, see "Using AC adapter and battery" on page 15. c Optical drive d USB port Reads/Burns optical disks. e AC power adapter Connect the AC adapter here. Getting to external headphones. jack Note: For details, see "Connecting USB devices" on page 9. 4 Chapter 1.

Lenovo G770 Hardware Maintenance Manual V1.0
Page 32
Lenovo G770 Hardware Maintenance Manual Table 1. Specifications (continued) Feature I/O port Audio Video Ethernet (on the system board) PCI Express Mini Card slot WLAN WWAN Bluetooth Keyboard Touch pad Integrated camera Battery AC adapter Pre-installed operating system Description • External monitor connector • Stereo headphone jack • Microphone jack • RJ45 x 1 • HDMI port...
Lenovo G770 Hardware Maintenance Manual Table 1. Specifications (continued) Feature I/O port Audio Video Ethernet (on the system board) PCI Express Mini Card slot WLAN WWAN Bluetooth Keyboard Touch pad Integrated camera Battery AC adapter Pre-installed operating system Description • External monitor connector • Stereo headphone jack • Microphone jack • RJ45 x 1 • HDMI port...
Lenovo G770 Hardware Maintenance Manual V1.0
Page 51
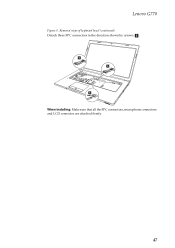
e G770 e e When installing: Make sure that all the FPC connectors, microphone connectors and LCD connector are attached firmly. 47 Removal steps of keyboard bezel (continued) Detach three FPC connectors in the direction shown by arrows e. Lenovo G770 Figure 9.
e G770 e e When installing: Make sure that all the FPC connectors, microphone connectors and LCD connector are attached firmly. 47 Removal steps of keyboard bezel (continued) Detach three FPC connectors in the direction shown by arrows e. Lenovo G770 Figure 9.

Lenovo G770 Hardware Maintenance Manual V1.0
Page 54
Removal steps of system board Remove five screws a . Unplug three microphone connectors in the direction shown by arrows b and the LCD connector in the direction shown by arrow c. Step Screw (quantity) a M2.5 × 4 mm, flat-head, nylok-coated (5) Color Torque Black 2.0 kgfcm 50 a G770 a a a a b b c When installing: Make sure that all the connectors are attached firmly. Lenovo G770 Hardware Maintenance Manual Figure 10.
Removal steps of system board Remove five screws a . Unplug three microphone connectors in the direction shown by arrows b and the LCD connector in the direction shown by arrow c. Step Screw (quantity) a M2.5 × 4 mm, flat-head, nylok-coated (5) Color Torque Black 2.0 kgfcm 50 a G770 a a a a b b c When installing: Make sure that all the connectors are attached firmly. Lenovo G770 Hardware Maintenance Manual Figure 10.
Lenovo G770 Hardware Maintenance Manual V1.0
Page 55
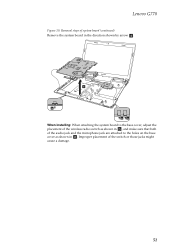
Improper placement of the audio jack and the microphone jack are attached to the base cover, adjust the placement of the wireless radio switch as shown in , and make sure that both of the switch or those jacks might cause a damage. 51 Lenovo G770 Figure 10. G770 d b aa When installing: When attaching the system board to the holes on the base cover as shown in the direction shown by arrow d. Removal steps of system board (continued) Remove the system board in .
Improper placement of the audio jack and the microphone jack are attached to the base cover, adjust the placement of the wireless radio switch as shown in , and make sure that both of the switch or those jacks might cause a damage. 51 Lenovo G770 Figure 10. G770 d b aa When installing: When attaching the system board to the holes on the base cover as shown in the direction shown by arrow d. Removal steps of system board (continued) Remove the system board in .
Lenovo G770 Hardware Maintenance Manual V1.0
Page 70
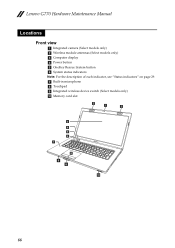
Lenovo G770 Hardware Maintenance Manual Locations Front view a Integrated camera (Select models only) b Wireless module antennas (Select models only) c Computer display d Power button e OneKey Rescue System button f System status indicators Note: For the description of each indicator, see "Status indicators" on page 29. g Built-in microphone h Touchpad i Integrated wireless device switch (Select models only) j Memory card slot 2 1 2 3 6 5 4 G770 7 8 i f j 66
Lenovo G770 Hardware Maintenance Manual Locations Front view a Integrated camera (Select models only) b Wireless module antennas (Select models only) c Computer display d Power button e OneKey Rescue System button f System status indicators Note: For the description of each indicator, see "Status indicators" on page 29. g Built-in microphone h Touchpad i Integrated wireless device switch (Select models only) j Memory card slot 2 1 2 3 6 5 4 G770 7 8 i f j 66


