Lenovo G460/G560 User Guide V1.0
Page 5
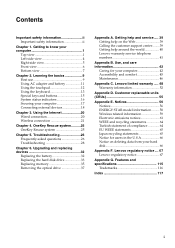
... C. Troubleshooting 26 Frequently asked questions 26 Troubleshooting 28 Chapter 6. Features and specifications 115 Trademarks 116 Index 117 i Lenovo limited warranty ..... 48 Warranty information 52 Appendix D. Using the Internet 20 Wired connection 20 Wireless connection 21 Chapter ... Bottom view 7 Chapter 2. Upgrading and replacing devices 32 Replacing the battery 32 Replacing the hard disk drive 33 Replacing memory 35 Removing the optical drive 37 Appendix A. Contents Important safety information ii Important safety information ii Chapter 1. Learning the ...
... C. Troubleshooting 26 Frequently asked questions 26 Troubleshooting 28 Chapter 6. Features and specifications 115 Trademarks 116 Index 117 i Lenovo limited warranty ..... 48 Warranty information 52 Appendix D. Using the Internet 20 Wired connection 20 Wireless connection 21 Chapter ... Bottom view 7 Chapter 2. Upgrading and replacing devices 32 Replacing the battery 32 Replacing the hard disk drive 33 Replacing memory 35 Removing the optical drive 37 Appendix A. Contents Important safety information ii Important safety information ii Chapter 1. Learning the ...

Lenovo G460/G560 User Guide V1.0
Page 14
Getting to know your computer Front view a b c a Integrated wireless device switch Use this switch to turn on/off the wireless radio of all wireless devices on page 16. b System status indicators For details, see "Using memory cards (not supplied)" on page 18. 6 c Memory card slot Insert memory cards (not supplied) here. (select models only) Note: For details, see "System status indicators" on your computer. Chapter 1.
Getting to know your computer Front view a b c a Integrated wireless device switch Use this switch to turn on/off the wireless radio of all wireless devices on page 16. b System status indicators For details, see "Using memory cards (not supplied)" on page 18. 6 c Memory card slot Insert memory cards (not supplied) here. (select models only) Note: For details, see "System status indicators" on your computer. Chapter 1.
Lenovo G460/G560 User Guide V1.0
Page 15
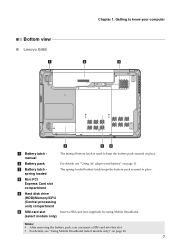
...b Battery pack For details, see "Using Mobile Broadband (select models only)" on page 11. d Mini PCI Express Card slot compartment e Hard disk drive (HDD)/Memory/CPU (Central processing unit) compartment f SIM card slot Insert a SIM card (not supplied) for using Mobile Broadband. (select models only) Notes: • After... slot. • For details, see "Using AC adapter and battery" on page 22. 7 Getting to know your computer Bottom view „ Lenovo G460 a b c d ef a Battery latch manual The manual battery latch is used to keep the battery pack secured in place.
...b Battery pack For details, see "Using Mobile Broadband (select models only)" on page 11. d Mini PCI Express Card slot compartment e Hard disk drive (HDD)/Memory/CPU (Central processing unit) compartment f SIM card slot Insert a SIM card (not supplied) for using Mobile Broadband. (select models only) Notes: • After... slot. • For details, see "Using AC adapter and battery" on page 22. 7 Getting to know your computer Bottom view „ Lenovo G460 a b c d ef a Battery latch manual The manual battery latch is used to keep the battery pack secured in place.
Lenovo G460/G560 User Guide V1.0
Page 16
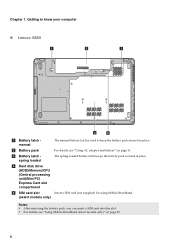
d Hard disk drive (HDD)/Memory/CPU (Central processing unit)/Mini PCI Express Card slot compartment e SIM card slot Insert a SIM card (not supplied) for using Mobile Broadband. (select models only) ... can insert a SIM card into this slot. • For details, see "Using AC adapter and battery" on page 22. 8 Getting to know your computer „ Lenovo G560 a b c 1 2 d e a Battery latch manual The manual battery latch is used to keep the battery pack secured in place. c Battery latch spring loaded The spring-loaded...
d Hard disk drive (HDD)/Memory/CPU (Central processing unit)/Mini PCI Express Card slot compartment e SIM card slot Insert a SIM card (not supplied) for using Mobile Broadband. (select models only) ... can insert a SIM card into this slot. • For details, see "Using AC adapter and battery" on page 22. 8 Getting to know your computer „ Lenovo G560 a b c 1 2 d e a Battery latch manual The manual battery latch is used to keep the battery pack secured in place. c Battery latch spring loaded The spring-loaded...
Lenovo G460/G560 User Guide V1.0
Page 26
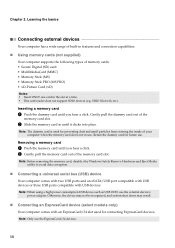
... Your computer has a wide range of built-in features and connection capabilities. „ Using memory cards (not supplied) Your computer supports the following types of the memory card slot. 2 Slide the memory card in the slot at a time. • This card reader does not support SDIO ...devices (e.g. Retain the dummy card for connecting ExpressCard devices. Gently pull the dummy card out of memory cards: • Secure Digital (SD) card • MultiMediaCard (MMC) • Memory Stick (MS) • Memory Stick PRO (MS PRO) • xD-Picture Card (xD) Notes: • Insert ONLY ...
... Your computer has a wide range of built-in features and connection capabilities. „ Using memory cards (not supplied) Your computer supports the following types of the memory card slot. 2 Slide the memory card in the slot at a time. • This card reader does not support SDIO ...devices (e.g. Retain the dummy card for connecting ExpressCard devices. Gently pull the dummy card out of memory cards: • Secure Digital (SD) card • MultiMediaCard (MMC) • Memory Stick (MS) • Memory Stick PRO (MS PRO) • xD-Picture Card (xD) Notes: • Insert ONLY ...
Lenovo G460/G560 User Guide V1.0
Page 34
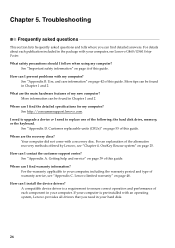
... did not come with my computer? How can I install the device drivers? A compatible device driver is pre-installed with your computer, see Lenovo G460/G560 Setup Poster. What safety precautions should I contact the customer support center? Use, and care information" on page ii of warranty service,... of this guide. More information can find warranty information? Where are the main hardware features of the following: the hard disk drive, memory, or the keyboard. See "Appendix A. If your hard disk. 26 OneKey Rescue system" on page 48. See "Appendix B. For...
... did not come with my computer? How can I install the device drivers? A compatible device driver is pre-installed with your computer, see Lenovo G460/G560 Setup Poster. What safety precautions should I contact the customer support center? Use, and care information" on page ii of warranty service,... of this guide. More information can find warranty information? Where are the main hardware features of the following: the hard disk drive, memory, or the keyboard. See "Appendix A. If your hard disk. 26 OneKey Rescue system" on page 48. See "Appendix B. For...
Lenovo G460/G560 User Guide V1.0
Page 36
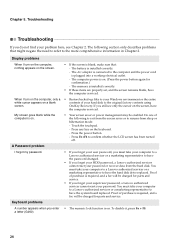
... items are properly set, and the screen remains blank, have the computer serviced. The memory is installed correctly. - When I turn on the computer, nothing appears on . (...Press the power button. - Proof of the following section only describes problems that : - a letter (G460). 28 Touch the touchpad. - A Password problem I turn on the computer, only a • Restore...adapter is plugged into a working electrical outlet. - You must take your computer to a Lenovo authorized servicer or a marketing representative to the computer and the power cord is connected to ...
... items are properly set, and the screen remains blank, have the computer serviced. The memory is installed correctly. - When I turn on the computer, nothing appears on . (...Press the power button. - Proof of the following section only describes problems that : - a letter (G460). 28 Touch the touchpad. - A Password problem I turn on the computer, only a • Restore...adapter is plugged into a working electrical outlet. - You must take your computer to a Lenovo authorized servicer or a marketing representative to the computer and the power cord is connected to ...
Lenovo G460/G560 User Guide V1.0
Page 41
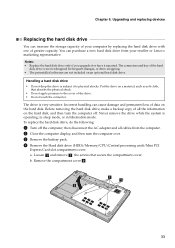
...the computer. 2 Close the computer display, and then turn the computer off the computer; You can increase the storage capacity of your reseller or Lenovo marketing representative. Notes: • Replace the hard disk drive only if you upgrade it or have it to the cover of all cables from .... Put the drive on the hard disk, and then turn the computer over. 3 Remove the battery pack. 4 Remove the Hard disk drive (HDD)/Memory/CPU (Central processing unit)/Mini PCI Express Card slot compartment cover. then disconnect the AC adapter and all the information on a material, such as soft...
...the computer. 2 Close the computer display, and then turn the computer off the computer; You can increase the storage capacity of your reseller or Lenovo marketing representative. Notes: • Replace the hard disk drive only if you upgrade it or have it to the cover of all cables from .... Put the drive on the hard disk, and then turn the computer over. 3 Remove the battery pack. 4 Remove the Hard disk drive (HDD)/Memory/CPU (Central processing unit)/Mini PCI Express Card slot compartment cover. then disconnect the AC adapter and all the information on a material, such as soft...
Lenovo G460/G560 User Guide V1.0
Page 43
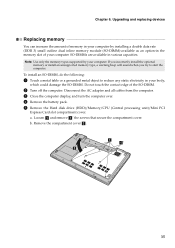
...computer. 3 Close the computer display, and turn the computer over. 4 Remove the battery pack. 5 Remove the Hard disk drive (HDD)/Memory/CPU (Central processing unit)/Mini PCI Express Card slot compartment cover. Loosen a and remove a' the screws that secure the compartment cover. ...a. b. Remove the compartment cover b. Note: Use only the memory types supported by installing a double data rate (DDR 3) small outline dual inline memory module (SO-DIMM)-available as an option-in your computer. If you incorrectly install the optional...
...computer. 3 Close the computer display, and turn the computer over. 4 Remove the battery pack. 5 Remove the Hard disk drive (HDD)/Memory/CPU (Central processing unit)/Mini PCI Express Card slot compartment cover. Loosen a and remove a' the screws that secure the compartment cover. ...a. b. Remove the compartment cover b. Note: Use only the memory types supported by installing a double data rate (DDR 3) small outline dual inline memory module (SO-DIMM)-available as an option-in your computer. If you incorrectly install the optional...
Lenovo G460/G560 User Guide V1.0
Page 45
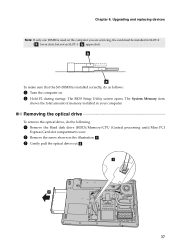
... shows the total amount of memory installed in the illustration a. 3 Gently pull the optical drive out b. a b 37 b a To make sure that the SO-DIMM is used on . 2 Hold F2 during startup. ... Setup Utility screen opens. Upgrading and replacing devices Note: If only one DIMM is installed correctly, do the following: 1 Remove the Hard disk drive (HDD)/Memory/CPU (Central processing unit)/Mini PCI Express Card slot compartment cover. 2 Remove the screw shown in your computer. Chapter 6. Removing the optical drive To remove...
... shows the total amount of memory installed in the illustration a. 3 Gently pull the optical drive out b. a b 37 b a To make sure that the SO-DIMM is used on . 2 Hold F2 during startup. ... Setup Utility screen opens. Upgrading and replacing devices Note: If only one DIMM is installed correctly, do the following: 1 Remove the Hard disk drive (HDD)/Memory/CPU (Central processing unit)/Mini PCI Express Card slot compartment cover. 2 Remove the screw shown in your computer. Chapter 6. Removing the optical drive To remove...
Lenovo G460/G560 User Guide V1.0
Page 46
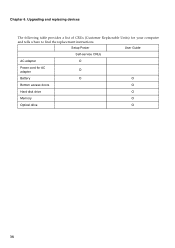
Setup Poster User Guide Self-service CRUs AC adapter O Power cord for your computer and tells where to find the replacement instructions. Chapter 6. Upgrading and replacing devices The following table provides a list of CRUs (Customer Replaceable Units) for AC adapter O Battery O O Bottom access doors O Hard disk drive O Memory O Optical drive O 38
Setup Poster User Guide Self-service CRUs AC adapter O Power cord for your computer and tells where to find the replacement instructions. Chapter 6. Upgrading and replacing devices The following table provides a list of CRUs (Customer Replaceable Units) for AC adapter O Battery O O Bottom access doors O Hard disk drive O Memory O Optical drive O 38

Lenovo G460/G560 User Guide V1.0
Page 50
... the risk of your body. 42 Particles that can produce negative ions. When you touch the keyboard or other parts of electrostatic charge. Handle adapters, memory modules, and other unpainted metal surface on I/O devices connected to such an appliance, and is close to an appliance that can cause static electricity to...
... the risk of your body. 42 Particles that can produce negative ions. When you touch the keyboard or other parts of electrostatic charge. Handle adapters, memory modules, and other unpainted metal surface on I/O devices connected to such an appliance, and is close to an appliance that can cause static electricity to...

Lenovo G460/G560 User Guide V1.0
Page 52
..., be sure to connect your communication cable to the Web page: http://consumersupport.lenovo.com). or hot-swappable. • Before you have both an Ethernet connector and a modem connector. Memory module • When transferring data to you about possible technical information and upgrades.... • Only an authorized Lenovo repair technician should disassemble and repair your computer. • Do not...
..., be sure to connect your communication cable to the Web page: http://consumersupport.lenovo.com). or hot-swappable. • Before you have both an Ethernet connector and a modem connector. Memory module • When transferring data to you about possible technical information and upgrades.... • Only an authorized Lenovo repair technician should disassemble and repair your computer. • Do not...

Lenovo G460/G560 User Guide V1.0
Page 63
... for removal by the customer. Customers are easy to help you remove and replace the part. Examples of these types of CRUs include memory modules and hard disk drives. • Internal CRUs (located within the computer that are accessible only by either one or two screws.... These CRUs are isolated parts within the product): These CRUs are concealed by an access panel that can be upgraded or replaced by a Lenovo service technician during the warranty period. Customer replaceable units (CRUs) Customer Replaceable Units (CRUs) are two types of these CRUs include PCI Express...
... for removal by the customer. Customers are easy to help you remove and replace the part. Examples of these types of CRUs include memory modules and hard disk drives. • Internal CRUs (located within the computer that are accessible only by either one or two screws.... These CRUs are isolated parts within the product): These CRUs are concealed by an access panel that can be upgraded or replaced by a Lenovo service technician during the warranty period. Customer replaceable units (CRUs) Customer Replaceable Units (CRUs) are two types of these CRUs include PCI Express...
Lenovo G460/G560 User Guide V1.0
Page 123
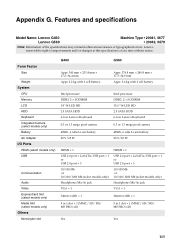
... Size Weight System CPU Memory LCD HDD Keyboard Integrated Camera (select models only) Battery AC Adapter I/O Ports HDMI (select models only) USB Communication Audio Video ExpressCard Slot (select models only) Media Slot (select models only) Others Kensington slot G460 G560 Appr. 340 mm... PRO/xD) 5 in 1 slot × 1 (MMC/ SD/ MS/ MS PRO/xD) Yes Yes 115 Features and specifications Model Name: Lenovo G460 Lenovo G560 Machine Type • 20041, 0677 • 20042, 0679 Note: Information of the specifications may contain technical inaccuracies or typographical errors. Appendix G.
... Size Weight System CPU Memory LCD HDD Keyboard Integrated Camera (select models only) Battery AC Adapter I/O Ports HDMI (select models only) USB Communication Audio Video ExpressCard Slot (select models only) Media Slot (select models only) Others Kensington slot G460 G560 Appr. 340 mm... PRO/xD) 5 in 1 slot × 1 (MMC/ SD/ MS/ MS PRO/xD) Yes Yes 115 Features and specifications Model Name: Lenovo G460 Lenovo G560 Machine Type • 20041, 0677 • 20042, 0679 Note: Information of the specifications may contain technical inaccuracies or typographical errors. Appendix G.


