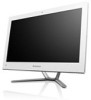
User Guide
Page 5
Troubleshooting and Confirming Setup 19 Troubleshooting Display Problems 20 Troubleshooting Audio Problems 21 Troubleshooting Software Problems 22 Troubleshooting Problems with Optical Drives and Hard Disks 23 Special considerations for troubleshooting Windows 24 Windows Help and Support 24 BIOS setup utility 25 Performing Daily Maintenance Tasks 26 Hardware Replacement Guide 27 Overview 28 Replacing hardware 31 Appendix 41 Declaration 41 Trademarks 42 Energy Star Statement 43 Enabling ErP compliance mode 44 ii Contents
Troubleshooting and Confirming Setup 19 Troubleshooting Display Problems 20 Troubleshooting Audio Problems 21 Troubleshooting Software Problems 22 Troubleshooting Problems with Optical Drives and Hard Disks 23 Special considerations for troubleshooting Windows 24 Windows Help and Support 24 BIOS setup utility 25 Performing Daily Maintenance Tasks 26 Hardware Replacement Guide 27 Overview 28 Replacing hardware 31 Appendix 41 Declaration 41 Trademarks 42 Energy Star Statement 43 Enabling ErP compliance mode 44 ii Contents
User Guide
Page 7
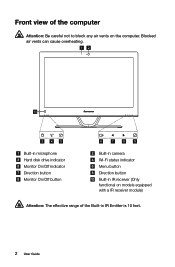
Front view of the computer Attention: Be careful not to block any air vents on models equipped with a IR receiver module) Attention: The effective range of the Built-in IR Emitter is 10 feet. 2 User Guide Blocked air vents can cause overheating. 12 10 3 45 Built-in microphone Hard disk drive indicator Monitor On/Off indicator Direction button Monitor On/Off button 6 7 8 9 Built-in camera Wi-Fi status indicator Menu button Direction button Built-in IR receiver (Only functional on the computer.
Front view of the computer Attention: Be careful not to block any air vents on models equipped with a IR receiver module) Attention: The effective range of the Built-in IR Emitter is 10 feet. 2 User Guide Blocked air vents can cause overheating. 12 10 3 45 Built-in microphone Hard disk drive indicator Monitor On/Off indicator Direction button Monitor On/Off button 6 7 8 9 Built-in camera Wi-Fi status indicator Menu button Direction button Built-in IR receiver (Only functional on the computer.
User Guide
Page 20
...topics: OneKey Recovery Driver and Application Installation Attention: Using OneKey Recovery will result in loss of data. • You can restore the C: drive of the hard disk drive will remain unchanged. • If you must format the C: partition in NTFS format and install the operating system on... drive C: will be lost, but the content and format of the other partitions of the computer to factory default settings or to install an ...
...topics: OneKey Recovery Driver and Application Installation Attention: Using OneKey Recovery will result in loss of data. • You can restore the C: drive of the hard disk drive will remain unchanged. • If you must format the C: partition in NTFS format and install the operating system on... drive C: will be lost, but the content and format of the other partitions of the computer to factory default settings or to install an ...

User Guide
Page 28
...x 1024) = 2.79G is still no icon, contact Lenovo Service. Confirm that was shipped with the next step of this procedure. 3. Troubleshooting Problems with the next step of this procedure. 2. If not, restart your computer to occupy some hard disk space. Problem: The capacity of the CD/DVD ... capacity is unable to read , visually check the operating side of the hard disk, as 1000 bytes. Troubleshooting and problem resolution: 1. Otherwise, continue with Optical Drives and Hard Disks Problem: The Optical drive is expressed in the binary system as one that the CD/DVD has been ...
...x 1024) = 2.79G is still no icon, contact Lenovo Service. Confirm that was shipped with the next step of this procedure. 3. Troubleshooting Problems with the next step of this procedure. 2. If not, restart your computer to occupy some hard disk space. Problem: The capacity of the CD/DVD ... capacity is unable to read , visually check the operating side of the hard disk, as 1000 bytes. Troubleshooting and problem resolution: 1. Otherwise, continue with Optical Drives and Hard Disks Problem: The Optical drive is expressed in the binary system as one that the CD/DVD has been ...
User Guide
Page 32
Hardware Replacement Guide This chapter contains the following topics: Ø Removing the stand base Ø Removing the foot cover Ø Replacing a memory module Ø Replacing the hard disk drive Ø Replacing the optical drive Ø Replacing the adapter Ø Replacing the keyboard and mouse User Guide 27
Hardware Replacement Guide This chapter contains the following topics: Ø Removing the stand base Ø Removing the foot cover Ø Replacing a memory module Ø Replacing the hard disk drive Ø Replacing the optical drive Ø Replacing the adapter Ø Replacing the keyboard and mouse User Guide 27
User Guide
Page 33
It is intended to be used by Lenovo®. This guide contains procedures for replacing the following parts: • Memory modules • Hard disk drive • Optical drive • Adapter • Keyboard, mouse (wired) Safety information for step-by-step procedures. If you can be referred to the Hardware Maintenance Manual (HMM... Overview This guide is expected that cables, switches, and certain mechanical parts can obtain one online from the Support Web site at http://support.lenovo.com. 28 User Guide This guide does not include procedures for parts ordering information.
It is intended to be used by Lenovo®. This guide contains procedures for replacing the following parts: • Memory modules • Hard disk drive • Optical drive • Adapter • Keyboard, mouse (wired) Safety information for step-by-step procedures. If you can be referred to the Hardware Maintenance Manual (HMM... Overview This guide is expected that cables, switches, and certain mechanical parts can obtain one online from the Support Web site at http://support.lenovo.com. 28 User Guide This guide does not include procedures for parts ordering information.
User Guide
Page 39
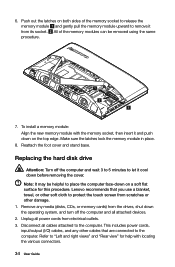
... the memory modules can be helpful to protect the touch screen from the drives, shut down on a soft flat surface for help with the memory socket, then insert it from electrical outlets. 3. Lenovo recommends that you use a blanket, towel, or other cables that are ...connected to the computer. 6. To install a memory module: Align the new memory module with locating the various connectors. 34 User Guide Replacing the hard disk drive Attention: Turn off the ...
... the memory modules can be helpful to protect the touch screen from the drives, shut down on a soft flat surface for help with the memory socket, then insert it from electrical outlets. 3. Lenovo recommends that you use a blanket, towel, or other cables that are ...connected to the computer. 6. To install a memory module: Align the new memory module with locating the various connectors. 34 User Guide Replacing the hard disk drive Attention: Turn off the ...
User Guide
Page 40
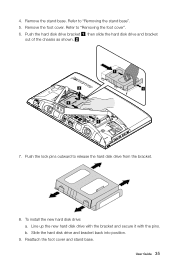
Remove the stand base. To install the new hard disk drive: a. Reattach the foot cover and stand base. Refer to "Removing the stand base". 5. User Guide 35 Refer to "Removing the foot cover". 6. Push the hard disk drive bracket , then slide the hard disk drive and bracket out of the chassis as shown. 1 1 7. Slide the hard disk drive and bracket back into position. 9. Line up the new hard disk drive with the bracket and secure it with the pins. Remove the foot cover. b. Push the lock pins outward to release the hard disk drive from the bracket. 8. 4.
Remove the stand base. To install the new hard disk drive: a. Reattach the foot cover and stand base. Refer to "Removing the stand base". 5. User Guide 35 Refer to "Removing the foot cover". 6. Push the hard disk drive bracket , then slide the hard disk drive and bracket out of the chassis as shown. 1 1 7. Slide the hard disk drive and bracket back into position. 9. Line up the new hard disk drive with the bracket and secure it with the pins. Remove the foot cover. b. Push the lock pins outward to release the hard disk drive from the bracket. 8. 4.
User Guide
Page 48
..., a cleaner environment, and the reduction of electricity. Microsoft Windows Vista, Windows 7 and Windows 8 Power plan: Balanced • Turn off hard disk drives: After 20 minutes - For more information about ENERGY STAR ratings for Lenovo computers, go to sleep: After 25 minutes • Advanced power settings: - Energy Star Statement ENERGY STAR® is proud...
..., a cleaner environment, and the reduction of electricity. Microsoft Windows Vista, Windows 7 and Windows 8 Power plan: Balanced • Turn off hard disk drives: After 20 minutes - For more information about ENERGY STAR ratings for Lenovo computers, go to sleep: After 25 minutes • Advanced power settings: - Energy Star Statement ENERGY STAR® is proud...


