
User Guide
Page 35
...reduces static electricity in the computer without setting the part down. Handle adapters, memory modules, system boards, and microprocessors by the edges. Never touch any exposed circuitry. • Prevent others from the anti-static packaging, and install it . • Do not place the part on ... electricity damage: • Limit your body. • When possible, remove the new part from touching the parts and other computer components. • Before you replace a new part, touch the anti-static package containing the part to a metal expansion slot cover or other unpainted metal surface...
...reduces static electricity in the computer without setting the part down. Handle adapters, memory modules, system boards, and microprocessors by the edges. Never touch any exposed circuitry. • Prevent others from the anti-static packaging, and install it . • Do not place the part on ... electricity damage: • Limit your body. • When possible, remove the new part from touching the parts and other computer components. • Before you replace a new part, touch the anti-static package containing the part to a metal expansion slot cover or other unpainted metal surface...
User Guide
Page 36
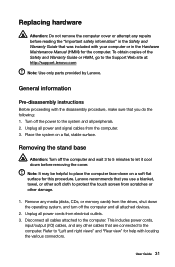
...CDs, or memory cards) from the drives, shut down the operating system, and turn off the computer and all cables attached to protect the touch screen from scratches or other damage. 1. This includes power cords, input/output (I/O) cables, and any other cables that are connected to the ...Support Web site at: http://support.lenovo.com Note: Use only parts provided by Lenovo. General information Pre-disassembly instructions Before proceeding with your computer or in the Safety and Warranty Guide that was included...
...CDs, or memory cards) from the drives, shut down the operating system, and turn off the computer and all cables attached to protect the touch screen from scratches or other damage. 1. This includes power cords, input/output (I/O) cables, and any other cables that are connected to the ...Support Web site at: http://support.lenovo.com Note: Use only parts provided by Lenovo. General information Pre-disassembly instructions Before proceeding with your computer or in the Safety and Warranty Guide that was included...
User Guide
Page 37
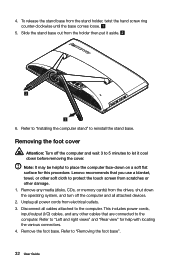
... system, and turn off the computer and wait 3 to 5 minutes to "Left and right views" and "Rear view" for this procedure. 4. Lenovo recommends that are connected to protect the touch screen from the drives, shut down before removing the cover. This includes power cords, input/output (I/O) cables, and any media (disks, CDs...
... system, and turn off the computer and wait 3 to 5 minutes to "Left and right views" and "Rear view" for this procedure. 4. Lenovo recommends that are connected to protect the touch screen from the drives, shut down before removing the cover. This includes power cords, input/output (I/O) cables, and any media (disks, CDs...
User Guide
Page 38
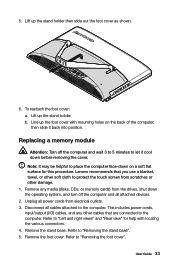
...foot cover as shown. 6. Line up the foot cover with mounting holes on a soft flat surface for help with locating the various connectors. 4. Lenovo recommends that are connected to "Left and right views" and "Rear view" for this procedure. Refer to "Removing the stand base". 5. Disconnect all...) from electrical outlets. 3. Remove the stand base. 5. Refer to "Removing the foot cover". Note: It may be helpful to protect the touch screen from scratches or other soft cloth to place the computer face-down on the back of the computer, then slide it cool down the...
...foot cover as shown. 6. Line up the foot cover with mounting holes on a soft flat surface for help with locating the various connectors. 4. Lenovo recommends that are connected to "Left and right views" and "Rear view" for this procedure. Refer to "Removing the stand base". 5. Disconnect all...) from electrical outlets. 3. Remove the stand base. 5. Refer to "Removing the foot cover". Note: It may be helpful to protect the touch screen from scratches or other soft cloth to place the computer face-down on the back of the computer, then slide it cool down the...
User Guide
Page 39
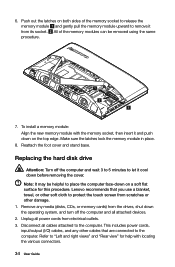
...to the computer. Make sure the latches lock the memory module in place. 8. Note: It may be removed using the same procedure. 7. Lenovo recommends that are connected to let it and push down before removing the cover. Disconnect all attached devices. 2. This includes power cords, input..., or memory cards) from electrical outlets. 3. Replacing the hard disk drive Attention: Turn off the computer and all cables attached to protect the touch screen from its socket. Refer to "Left and right views" and "Rear view" for this procedure. 6. To install a memory module: Align...
...to the computer. Make sure the latches lock the memory module in place. 8. Note: It may be removed using the same procedure. 7. Lenovo recommends that are connected to let it and push down before removing the cover. Disconnect all attached devices. 2. This includes power cords, input..., or memory cards) from electrical outlets. 3. Replacing the hard disk drive Attention: Turn off the computer and all cables attached to protect the touch screen from its socket. Refer to "Left and right views" and "Rear view" for this procedure. 6. To install a memory module: Align...
User Guide
Page 41
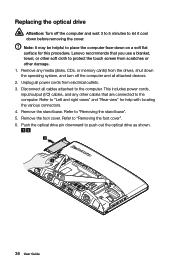
.... Remove the stand base. Remove any other damage. 1. Remove the foot cover. Replacing the optical drive Attention: Turn off the computer and all attached devices. 2. Lenovo recommends that you use a blanket, towel, or other soft cloth to protect the...
.... Remove the stand base. Remove any other damage. 1. Remove the foot cover. Replacing the optical drive Attention: Turn off the computer and all attached devices. 2. Lenovo recommends that you use a blanket, towel, or other soft cloth to protect the...


