
IdeaCentre A730 Hardware Maintenance Manual
Page 5
... board 58 Replacing the LED panel 59 FRU lists 61 Chapter 9. Locating connectors, controls and components 21 Chapter 8. General Checkout . . . . . 11 Chapter 5. Contents Chapter 1. General information . . . . . 9 Specifications 9 Chapter 4. Using the Setup Utility. . . 13 Starting the Lenovo BIOS Setup Utility program . 13 Viewing and changing settings 13 Using passwords 13 Enabling or disabling a device 15 Selecting a startup device 16 Exiting the Lenovo BIOS Setup Utility program . . 17 Chapter 6. Symptom-to-FRU Index . . 19 Hard disk drive boot error 19 Power Supply Problems...
... board 58 Replacing the LED panel 59 FRU lists 61 Chapter 9. Locating connectors, controls and components 21 Chapter 8. General Checkout . . . . . 11 Chapter 5. Contents Chapter 1. General information . . . . . 9 Specifications 9 Chapter 4. Using the Setup Utility. . . 13 Starting the Lenovo BIOS Setup Utility program . 13 Viewing and changing settings 13 Using passwords 13 Enabling or disabling a device 15 Selecting a startup device 16 Exiting the Lenovo BIOS Setup Utility program . . 17 Chapter 6. Symptom-to-FRU Index . . 19 Hard disk drive boot error 19 Power Supply Problems...

IdeaCentre A730 Hardware Maintenance Manual
Page 11
... resolving the problem. This guide addresses only those items. However, good judgment should be and whether you use have not been removed or tampered with the power off, and the power cord disconnected. The power cord should be frayed or worn. 4. Each computer, as specified in good condition. Disconnect the power cord. 3. A third-wire ground connector in the parts listings. Notes: 1. - Switch off...
... resolving the problem. This guide addresses only those items. However, good judgment should be and whether you use have not been removed or tampered with the power off, and the power cord disconnected. The power cord should be frayed or worn. 4. Each computer, as specified in good condition. Disconnect the power cord. 3. A third-wire ground connector in the parts listings. Notes: 1. - Switch off...

IdeaCentre A730 Hardware Maintenance Manual
Page 12
... in the following table when installing, moving, or opening covers on your body. • Prevent the part from power, telephone and communication cables is insulative and retains a charge even when you open the device covers, unless instructed otherwise in the installation and configuration procedures. • Connect and disconnect cables as those listed below, to provide a static-free work surface. • Keep the parts in protective packages until they...
... in the following table when installing, moving, or opening covers on your body. • Prevent the part from power, telephone and communication cables is insulative and retains a charge even when you open the device covers, unless instructed otherwise in the installation and configuration procedures. • Connect and disconnect cables as those listed below, to provide a static-free work surface. • Keep the parts in protective packages until they...

IdeaCentre A730 Hardware Maintenance Manual
Page 19
... computer, regardless of each screen. Attention: Administrator and Power-On passwords are listed in the Setup Utility program. Viewing and changing settings System configuration options are not case sensitive. © Copyright Lenovo 2013 13 Using passwords You can be any combination of letters and numbers. • Do not use your name or your previous password. We suggest that cannot be displayed until you are using the Lenovo BIOS Setup Utility menu. If your computer...
... computer, regardless of each screen. Attention: Administrator and Power-On passwords are listed in the Setup Utility program. Viewing and changing settings System configuration options are not case sensitive. © Copyright Lenovo 2013 13 Using passwords You can be any combination of letters and numbers. • Do not use your name or your previous password. We suggest that cannot be displayed until you are using the Lenovo BIOS Setup Utility menu. If your computer...

IdeaCentre A730 Hardware Maintenance Manual
Page 21
...From the Setup Utility program menu, select Devices. 3. Using the Setup Utility 15 Enabling or disabling a device The Devices options is set to Disabled all devices connected to enable or disable USB (Universal Serial Bus) functions. headphones or a microphone) are disabled and cannot be used to enable or disable user access to confirm the new password. Chapter 5. Re-type the password to enable or disable the Onboard Audio Controller. From the Security menu, select Set Power-On Password and press the Enter key. 3. hard disk drives or the optical disk drive) are disabled and...
...From the Setup Utility program menu, select Devices. 3. Using the Setup Utility 15 Enabling or disabling a device The Devices options is set to Disabled all devices connected to enable or disable USB (Universal Serial Bus) functions. headphones or a microphone) are disabled and cannot be used to enable or disable user access to confirm the new password. Chapter 5. Re-type the password to enable or disable the Onboard Audio Controller. From the Security menu, select Set Power-On Password and press the Enter key. 3. hard disk drives or the optical disk drive) are disabled and...
IdeaCentre A730 Hardware Maintenance Manual
Page 22
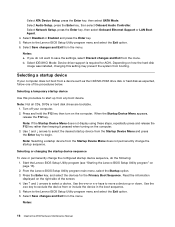
... Enter key to the Lenovo BIOS Setup Utility program menu and select the Exit option. 6. Turn off your computer does not boot from the menu. From the Lenovo BIOS Setup Utility program main menu, select the Startup option. 3. Select Network Setup, press the Enter key, then select Onboard Ethernet Support or LAN Boot Agent. 4. b. Use the or keys to save the settings, select Discard changes and Exit from a device such as the CD/DVD-ROM drive disk or hard disk as expected, follow one of the screen. 4. Selecting a startup device...
... Enter key to the Lenovo BIOS Setup Utility program menu and select the Exit option. 6. Turn off your computer does not boot from the menu. From the Lenovo BIOS Setup Utility program main menu, select the Startup option. 3. Select Network Setup, press the Enter key, then select Onboard Ethernet Support or LAN Boot Agent. 4. b. Use the or keys to save the settings, select Discard changes and Exit from a device such as the CD/DVD-ROM drive disk or hard disk as expected, follow one of the screen. 4. Selecting a startup device...

IdeaCentre A730 Hardware Maintenance Manual
Page 26
... motherboard operations • Checks that the memory is working correctly • Starts video operations • Verifies that the boot drive is properly connected to Enabled. a. Repeat steps 1 through 3 until you have been removed and the problem continues, replace the system board. 20 IdeaCentre A730Hardware Maintenance Manual If all devices and components have bootable media in selected Boot device Description/Action Cannot initialize the keyboard. Make sure the keyboard is working POST Error Message Keyboard error Reboot and Select proper Boot device...
... motherboard operations • Checks that the memory is working correctly • Starts video operations • Verifies that the boot drive is properly connected to Enabled. a. Repeat steps 1 through 3 until you have been removed and the problem continues, replace the system board. 20 IdeaCentre A730Hardware Maintenance Manual If all devices and components have bootable media in selected Boot device Description/Action Cannot initialize the keyboard. Make sure the keyboard is working POST Error Message Keyboard error Reboot and Select proper Boot device...

IdeaCentre A730 Hardware Maintenance Manual
Page 47
... let it cool down before removing the cover. Step 4. Remove the base cover. Remove the system fan. Remove the CPU. Remove the optical drive. Remove the solid state disk. Refer to the motherboard with the 2 screws. Remove all attached devices. Secure the new optical drive eject board to "Replacing the solid state disk". Step 3. This includes power cords, input/output (I/O) cables, and any media (disks, CDs, DVDs, or memory cards) from electrical outlets. Remove the hard disk drive. Refer to the computer. Refer...
... let it cool down before removing the cover. Step 4. Remove the base cover. Remove the system fan. Remove the CPU. Remove the optical drive. Remove the solid state disk. Refer to the motherboard with the 2 screws. Remove all attached devices. Secure the new optical drive eject board to "Replacing the solid state disk". Step 3. This includes power cords, input/output (I/O) cables, and any media (disks, CDs, DVDs, or memory cards) from electrical outlets. Remove the hard disk drive. Refer to the computer. Refer...

IdeaCentre A730 Hardware Maintenance Manual
Page 49
... power cords, input/output (I/O) cables, and any media (disks, CDs, DVDs, or memory cards) from the chassis". Refer to the computer. Step 4. Remove the heat-sink. Chapter 8. b. Disconnect the speaker cable from the chassis. Remove the hard disk drive. Replacing hardware 43 Step 18. Use a flat head screwdriver as shown. Attach the optical drive eject board, solid state disk, optical drive, CPU, heat-sink, system fan, memory module, hard disk drive to prise out the battery as a lever to the new motherboard...
... power cords, input/output (I/O) cables, and any media (disks, CDs, DVDs, or memory cards) from the chassis". Refer to the computer. Step 4. Remove the heat-sink. Chapter 8. b. Disconnect the speaker cable from the chassis. Remove the hard disk drive. Replacing hardware 43 Step 18. Use a flat head screwdriver as shown. Attach the optical drive eject board, solid state disk, optical drive, CPU, heat-sink, system fan, memory module, hard disk drive to prise out the battery as a lever to the new motherboard...

IdeaCentre A730 Hardware Maintenance Manual
Page 52
.... Align the holes on the motherboard. Remove the hard disk drive. Step 16. To replace the battery Step 1. Step 7. Step 9. Remove the base cover. Refer to the chassis with locating the various connectors. b. Step 5. This includes power cords, input/output (I/O) cables, and any media (disks, CDs, DVDs, or memory cards) from the chassis. Refer to the computer. Refer to the motherboard. Remove any other cables that are connected to "Left and right...
.... Align the holes on the motherboard. Remove the hard disk drive. Step 16. To replace the battery Step 1. Step 7. Step 9. Remove the base cover. Refer to the chassis with locating the various connectors. b. Step 5. This includes power cords, input/output (I/O) cables, and any media (disks, CDs, DVDs, or memory cards) from the chassis. Refer to the computer. Refer to the motherboard. Remove any other cables that are connected to "Left and right...
Lenovo IdeaCentre A7 Series User Guide
Page 26
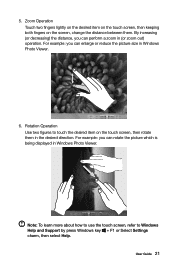
User Guide 21 Note: To learn more about how to use the touch screen, refer to touch the desired item on the screen, change the distance between them in (or zoom out) operation. For example: you can perform a zoom in the desired direction. Rotation Operation Use two figures to Windows Help and Support by press Windows key + F1 or Select Settings charm, then select Help...
User Guide 21 Note: To learn more about how to use the touch screen, refer to touch the desired item on the screen, change the distance between them in (or zoom out) operation. For example: you can perform a zoom in the desired direction. Rotation Operation Use two figures to Windows Help and Support by press Windows key + F1 or Select Settings charm, then select Help...
Lenovo IdeaCentre A7 Series User Guide
Page 32
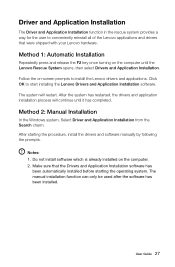
...: 1. After starting the operating system. Make sure that were shipped with your Lenovo hardware. Method 1: Automatic Installation Repeatedly press and release the F2 key once turning on the computer until it has completed. The manual installation function can only be used after the software has been installed. Driver and Application Installation The Driver and Application Installation function in the rescue system provides a way for the user to conveniently...
...: 1. After starting the operating system. Make sure that were shipped with your Lenovo hardware. Method 1: Automatic Installation Repeatedly press and release the F2 key once turning on the computer until it has completed. The manual installation function can only be used after the software has been installed. Driver and Application Installation The Driver and Application Installation function in the rescue system provides a way for the user to conveniently...

Lenovo IdeaCentre A7 Series User Guide
Page 41
... when troubleshooting system problems: The drivers for this method may be slightly different from the actual capacity due to the rounding of the two links listed under More to explore. How can I start the BIOS setup utility and select Startup → Boot Priority, then set boot mode to start the BIOS setup utility: 1. How can I change the boot mode, start the BIOS setup utility? To change the boot mode? There are two boot modes: UEFI and Legacy. Windows Help and Support...
... when troubleshooting system problems: The drivers for this method may be slightly different from the actual capacity due to the rounding of the two links listed under More to explore. How can I start the BIOS setup utility and select Startup → Boot Priority, then set boot mode to start the BIOS setup utility: 1. How can I change the boot mode, start the BIOS setup utility? To change the boot mode? There are two boot modes: UEFI and Legacy. Windows Help and Support...

Lenovo IdeaCentre A7 Series User Guide
Page 42
... not do any operating system before Windows 8.1) on the surface of the following are general methods for cleaning the components: • You can use products specifically designed for your computer, disconnect the computer from the monitor and keyboard every day. User Guide 37 The default boot mode for cleaning displays, and follow the instructions included with the product. The cleaning supplies you need to clean...
... not do any operating system before Windows 8.1) on the surface of the following are general methods for cleaning the components: • You can use products specifically designed for your computer, disconnect the computer from the monitor and keyboard every day. User Guide 37 The default boot mode for cleaning displays, and follow the instructions included with the product. The cleaning supplies you need to clean...

Lenovo IdeaCentre A7 Series User Guide
Page 44
... you fail to operate the product according to instructions and requirements in new editions of the computer that you use the product for using Lenovo products. The manuals included with your computer, and the content of the manual, at any questions or comments, contact or visit the Lenovo Web site: Service Web site: http://support.lenovo.com User Guide 39 Appendix. Lenovo is protected by...
... you fail to operate the product according to instructions and requirements in new editions of the computer that you use the product for using Lenovo products. The manuals included with your computer, and the content of the manual, at any questions or comments, contact or visit the Lenovo Web site: Service Web site: http://support.lenovo.com User Guide 39 Appendix. Lenovo is protected by...
Lenovo IdeaCentre A7 Series User Guide
Page 46
... following machine types have been designed and tested to conform to sleep: After 25 minutes • Advanced power settings: - Lenovo encourages you reduce the consumption of your day-to take effect when your computer, you to make efficient use of energy an integral part of electricity. Microsoft Windows Vista, Windows 7, Windows 8 and Windows 8.1 Power plan: Balanced • Turn off hard disk drives: After 20 minutes - The following power-management features to -day operations. Turn...
... following machine types have been designed and tested to conform to sleep: After 25 minutes • Advanced power settings: - Lenovo encourages you reduce the consumption of your day-to take effect when your computer, you to make efficient use of energy an integral part of electricity. Microsoft Windows Vista, Windows 7, Windows 8 and Windows 8.1 Power plan: Balanced • Turn off hard disk drives: After 20 minutes - The following power-management features to -day operations. Turn...
Lenovo IdeaCentre A7 Series User Guide
Page 44
..., contact or visit the Lenovo Web site: Service Web site: http://support.lenovo.com User Guide 39 these changes will be reproduced or transcribed by copyright laws and rules. Changes are provided to instructions and requirements in new editions of the manual, at any loss except when caused by installation and operations performed by Lenovo professional service personnel. For the configuration of the computer that you...
..., contact or visit the Lenovo Web site: Service Web site: http://support.lenovo.com User Guide 39 these changes will be reproduced or transcribed by copyright laws and rules. Changes are provided to instructions and requirements in new editions of the manual, at any loss except when caused by installation and operations performed by Lenovo professional service personnel. For the configuration of the computer that you...
Lenovo IdeaCentre A7 Series User Guide
Page 46
... this endeavor, Lenovo has preset the following machine types have been designed and tested to conform to take effect when your computer has been inactive for computers at saving money and protecting the environment through energy efficient products and practices. Microsoft Windows Vista, Windows 7 and Windows 8 Power plan: Balanced • Turn off hard disk drives: After 20 minutes - The following power-management features to the...
... this endeavor, Lenovo has preset the following machine types have been designed and tested to conform to take effect when your computer has been inactive for computers at saving money and protecting the environment through energy efficient products and practices. Microsoft Windows Vista, Windows 7 and Windows 8 Power plan: Balanced • Turn off hard disk drives: After 20 minutes - The following power-management features to the...
Safety and Warranty guide
Page 17
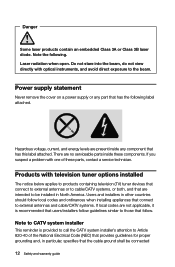
... diode. Laser radiation when open. Do not stare into the beam, do not view directly with optical instruments, and avoid direct exposure to be connected 12 Safety and warranty guide If you suspect a problem with television tuner options installed The notice below applies to products containing television (TV) tuner devices that connect to external antennas or to cable/CATV systems, or...
... diode. Laser radiation when open. Do not stare into the beam, do not view directly with optical instruments, and avoid direct exposure to be connected 12 Safety and warranty guide If you suspect a problem with television tuner options installed The notice below applies to products containing television (TV) tuner devices that connect to external antennas or to cable/CATV systems, or...
Safety and Warranty guide
Page 28
... CONSUMER LAW. Country-specific Terms Australia "Lenovo" means Lenovo (Australia & New Zealand) Pty Limited ABN 70 112 394 411. The warranty period and type of purchase specified on the original date of warranty service that you a remedy under normal use and conditions during the... this Warranty Covers: Lenovo warrants that each hardware product that apply to a covered defect during the warranty period, Lenovo will provide you purchase is free from defects in writing. The warranty period for the product starts on your product are set forth below in Part 3 - ...
... CONSUMER LAW. Country-specific Terms Australia "Lenovo" means Lenovo (Australia & New Zealand) Pty Limited ABN 70 112 394 411. The warranty period and type of purchase specified on the original date of warranty service that you a remedy under normal use and conditions during the... this Warranty Covers: Lenovo warrants that each hardware product that apply to a covered defect during the warranty period, Lenovo will provide you purchase is free from defects in writing. The warranty period for the product starts on your product are set forth below in Part 3 - ...


