
User Guide
Page 4
...limited and restricted rights to use , reproduction, or disclosure is subject to read and understand the ThinkCentre Safety and Warranty Guide and "Notices," on page 77. LENOVO products, data, computer software, and services have been developed exclusively at private expense and are delivered... pursuant a General Services Administration ″GSA″ contract, use , reproduction and disclosure. Note Before using this information and the product it supports, ...
...limited and restricted rights to use , reproduction, or disclosure is subject to read and understand the ThinkCentre Safety and Warranty Guide and "Notices," on page 77. LENOVO products, data, computer software, and services have been developed exclusively at private expense and are delivered... pursuant a General Services Administration ″GSA″ contract, use , reproduction and disclosure. Note Before using this information and the product it supports, ...

User Guide
Page 7
Reading and understanding this safety information reduces the risk of the ThinkCentre Safety and Warranty Guide, you can obtain a Portable Document Format (PDF) version from the Lenovo® Support Web site at: http://www.lenovo.com/support © Copyright Lenovo 2009 v Important safety information CAUTION: Before using this manual, be sure to your product. If you received...
Reading and understanding this safety information reduces the risk of the ThinkCentre Safety and Warranty Guide, you can obtain a Portable Document Format (PDF) version from the Lenovo® Support Web site at: http://www.lenovo.com/support © Copyright Lenovo 2009 v Important safety information CAUTION: Before using this manual, be sure to your product. If you received...

User Guide
Page 9
...-core processor v Intel Pentium® dual-core processor v Intel Core™ 2 Duo processor v Intel Core 2 Quad processor v Internal cache (size varies by model type) Memory v Supports up to two double data rate 2 dual inline memory modules (DDR2 DIMMs) Internal drives v Diskette drive or card reader (varies by model type) v Serial Advanced...
...-core processor v Intel Pentium® dual-core processor v Intel Core™ 2 Duo processor v Intel Core 2 Quad processor v Internal cache (size varies by model type) Memory v Supports up to two double data rate 2 dual inline memory modules (DDR2 DIMMs) Internal drives v Diskette drive or card reader (varies by model type) v Serial Advanced...

User Guide
Page 10
... with manual voltage-selection switch v 280-watt auto-sensing power supply v 320-watt auto-sensing power supply (some models) v Advanced Configuration and Power Interface (ACPI) support
... with manual voltage-selection switch v 280-watt auto-sensing power supply v 320-watt auto-sensing power supply (some models) v Advanced Configuration and Power Interface (ACPI) support

User Guide
Page 11
...174; 7 v Microsoft Windows Vista® v Microsoft Windows XP Professional (preinstalled through downgrade rights in features, and other support programs are included. Product overview 3 Additional operating systems might come with preinstalled software programs. If it does, an operating system, ...device drivers to support built-in Windows 7 Professional, Windows 7 Ultimate, Windows Vista Business, or Windows Vista Ultimate) Operating systems, certified or tested for compatibility1 (varies by Lenovo as compatible with fingerprint reader (some models) v ...
...174; 7 v Microsoft Windows Vista® v Microsoft Windows XP Professional (preinstalled through downgrade rights in features, and other support programs are included. Product overview 3 Additional operating systems might come with preinstalled software programs. If it does, an operating system, ...device drivers to support built-in Windows 7 Professional, Windows 7 Ultimate, Windows Vista Business, or Windows Vista Ultimate) Operating systems, certified or tested for compatibility1 (varies by Lenovo as compatible with fingerprint reader (some models) v ...

User Guide
Page 14
... report operating-system-controlled settings that support this option. See "Lenovo ThinkVantage Toolbox" on computers preinstalled with Windows 7 from Lenovo. Use the PC-Doctor for more information about accessing the online books and the Lenovo Web site. Lenovo provides a full version of the ...license to detect and eliminate viruses. Note: The Lenovo System Toolbox program is preinstalled on computers preinstalled with antivirus software that can adjust your hard disk drive. After 30 days, you maintain your ThinkCentre® computer. As a result, fingerprint authentication...
... report operating-system-controlled settings that support this option. See "Lenovo ThinkVantage Toolbox" on computers preinstalled with Windows 7 from Lenovo. Use the PC-Doctor for more information about accessing the online books and the Lenovo Web site. Lenovo provides a full version of the ...license to detect and eliminate viruses. Note: The Lenovo System Toolbox program is preinstalled on computers preinstalled with antivirus software that can adjust your hard disk drive. After 30 days, you maintain your ThinkCentre® computer. As a result, fingerprint authentication...

User Guide
Page 21
...damage: v Limit your computer. Handle PCI cards, memory modules, system boards, and microprocessors by Lenovo. © Copyright Lenovo 2009 13 Never touch any option, be sure to : http://www.lenovo.com/support Note: Use only computer parts provided by the edges. v Before you . v Do not ... devices Do not open your computer or attempt any repair before reading and understanding the "Important safety information" in the ThinkCentre Safety and Warranty Guide that the part came with the option. Installing options and replacing hardware This section provides introductions for...
...damage: v Limit your computer. Handle PCI cards, memory modules, system boards, and microprocessors by Lenovo. © Copyright Lenovo 2009 13 Never touch any option, be sure to : http://www.lenovo.com/support Note: Use only computer parts provided by the edges. v Before you . v Do not ... devices Do not open your computer or attempt any repair before reading and understanding the "Important safety information" in the ThinkCentre Safety and Warranty Guide that the part came with the option. Installing options and replacing hardware This section provides introductions for...

User Guide
Page 22
... to the computer. Disconnect the cables attached to the computer. For some external options, you must install additional software in the ThinkCentre Safety and Warranty Guide that came with the option to help you make the connection and install any locking devices, such as ... a scanner can be connected to your computer" on page 7 and "Locating connectors on the rear of the ThinkCentre Safety and Warranty Guide, go to: http://www.lenovo.com/support This section provides instructions on how to remove the computer cover. When installing an external option, see "Locating connectors...
... to the computer. Disconnect the cables attached to the computer. For some external options, you must install additional software in the ThinkCentre Safety and Warranty Guide that came with the option to help you make the connection and install any locking devices, such as ... a scanner can be connected to your computer" on page 7 and "Locating connectors on the rear of the ThinkCentre Safety and Warranty Guide, go to: http://www.lenovo.com/support This section provides instructions on how to remove the computer cover. When installing an external option, see "Locating connectors...
User Guide
Page 25
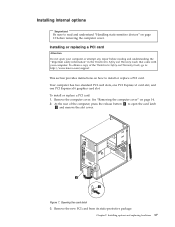
...to read and understand "Handling static-sensitive devices" on page 13 before reading and understanding the "Important safety information" in the ThinkCentre Safety and Warranty Guide that came with your computer or attempt any repair before removing the computer cover. Remove the computer cover....Opening the card latch 3. Remove the new PCI card from its static-protective package. At the rear of the ThinkCentre Safety and Warranty Guide, go to: http://www.lenovo.com/support This section provides instructions on page 14. 2. Chapter 2. To obtain a copy of the computer, press the ...
...to read and understand "Handling static-sensitive devices" on page 13 before reading and understanding the "Important safety information" in the ThinkCentre Safety and Warranty Guide that came with your computer or attempt any repair before removing the computer cover. Remove the computer cover....Opening the card latch 3. Remove the new PCI card from its static-protective package. At the rear of the ThinkCentre Safety and Warranty Guide, go to: http://www.lenovo.com/support This section provides instructions on page 14. 2. Chapter 2. To obtain a copy of the computer, press the ...
User Guide
Page 27
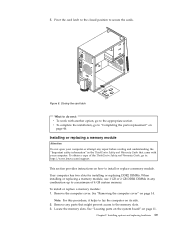
...memory module, use 1 GB or 2 GB DDR2 DIMMs in any repair before reading and understanding the "Important safety information" in the ThinkCentre Safety and Warranty Guide that might prevent access to the appropriate section. Figure 8. Locate the memory slots. See "Locating parts on the... system memory. See "Removing the computer cover" on page 14. Pivot the card latch to the closed position to : http://www.lenovo.com/support This section provides instructions on page 46. Chapter 2. 5. Installing or replacing a memory module Attention Do not open your computer. Installing ...
...memory module, use 1 GB or 2 GB DDR2 DIMMs in any repair before reading and understanding the "Important safety information" in the ThinkCentre Safety and Warranty Guide that might prevent access to the appropriate section. Figure 8. Locate the memory slots. See "Locating parts on the... system memory. See "Removing the computer cover" on page 14. Pivot the card latch to the closed position to : http://www.lenovo.com/support This section provides instructions on page 46. Chapter 2. 5. Installing or replacing a memory module Attention Do not open your computer. Installing ...
User Guide
Page 31
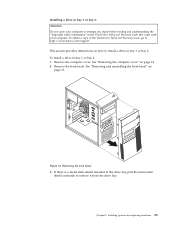
... the front bezel 3. To install a drive in the drive bay, pull the metal static shield outwards to install a drive in the ThinkCentre Safety and Warranty Guide that came with your computer or attempt any repair before reading and understanding the "Important safety information" in bay 1...2. Installing a drive in bay 1 or bay 2: Attention Do not open your computer. To obtain a copy of the ThinkCentre Safety and Warranty Guide, go to: http://www.lenovo.com/support This section provides instructions on how to remove it from the drive bay. Installing options and replacing hardware 23
... the front bezel 3. To install a drive in the drive bay, pull the metal static shield outwards to install a drive in the ThinkCentre Safety and Warranty Guide that came with your computer or attempt any repair before reading and understanding the "Important safety information" in bay 1...2. Installing a drive in bay 1 or bay 2: Attention Do not open your computer. To obtain a copy of the ThinkCentre Safety and Warranty Guide, go to: http://www.lenovo.com/support This section provides instructions on how to remove it from the drive bay. Installing options and replacing hardware 23
User Guide
Page 34
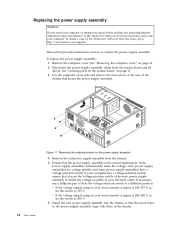
... the computer on how to 115 V. If necessary, use a ballpoint pen to slide the voltage-selection switch to : http://www.lenovo.com/support This section provides instructions on its side and remove the four screws at your electrical outlet. Remove the computer cover. If your computer... assembly Attention Do not open your computer or attempt any repair before reading and understanding the "Important safety information" in the ThinkCentre Safety and Warranty Guide that came with those in the chassis. Some power supply assemblies automatically sense the voltage, some power ...
... the computer on how to 115 V. If necessary, use a ballpoint pen to slide the voltage-selection switch to : http://www.lenovo.com/support This section provides instructions on its side and remove the four screws at your electrical outlet. Remove the computer cover. If your computer... assembly Attention Do not open your computer or attempt any repair before reading and understanding the "Important safety information" in the ThinkCentre Safety and Warranty Guide that came with those in the chassis. Some power supply assemblies automatically sense the voltage, some power ...

User Guide
Page 35
...The heat sink and fan assembly might be very hot. Chapter 2. Note: Use only screws provided by Lenovo. 8. Remove the computer cover. Reconnect a power supply assembly connector to each of the ThinkCentre Safety and Warranty Guide, go to the system board. 3. To replace the heat sink and fan ...assembly: 1. See "Removing the computer cover" on its side for easier access to : http://www.lenovo.com/support This section provides instructions on page ...
...The heat sink and fan assembly might be very hot. Chapter 2. Note: Use only screws provided by Lenovo. 8. Remove the computer cover. Reconnect a power supply assembly connector to each of the ThinkCentre Safety and Warranty Guide, go to the system board. 3. To replace the heat sink and fan ...assembly: 1. See "Removing the computer cover" on its side for easier access to : http://www.lenovo.com/support This section provides instructions on page ...
User Guide
Page 37
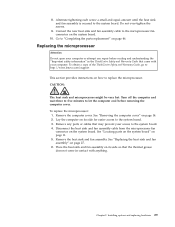
...cover" on its side for easier access to let the computer cool before reading and understanding the "Important safety information" in the ThinkCentre Safety and Warranty Guide that the thermal grease does not come in contact with anything. 8. See "Replacing the heat sink and fan..." on how to replace the microprocessor. Installing options and replacing hardware 29 To obtain a copy of the ThinkCentre Safety and Warranty Guide, go to: http://www.lenovo.com/support This section provides instructions on page 27. 6. Remove the heat sink and fan assembly. To replace the microprocessor...
...cover" on its side for easier access to let the computer cool before reading and understanding the "Important safety information" in the ThinkCentre Safety and Warranty Guide that the thermal grease does not come in contact with anything. 8. See "Replacing the heat sink and fan..." on how to replace the microprocessor. Installing options and replacing hardware 29 To obtain a copy of the ThinkCentre Safety and Warranty Guide, go to: http://www.lenovo.com/support This section provides instructions on page 27. 6. Remove the heat sink and fan assembly. To replace the microprocessor...
User Guide
Page 40
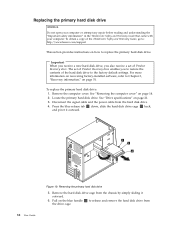
...sliding it outward. 32 User Guide Figure 19. To obtain a copy of Product Recovery discs. The set of the ThinkCentre Safety and Warranty Guide, go to: http://www.lenovo.com/support This section provides instructions on the blue handle 3 to Chapter 3, "Recovery information," on page 21. 3. See ... drive Attention Do not open your computer or attempt any repair before reading and understanding the "Important safety information" in the ThinkCentre Safety and Warranty Guide that came with your computer. For more information on recovering factory-installed software, refer to release and ...
...sliding it outward. 32 User Guide Figure 19. To obtain a copy of Product Recovery discs. The set of the ThinkCentre Safety and Warranty Guide, go to: http://www.lenovo.com/support This section provides instructions on the blue handle 3 to Chapter 3, "Recovery information," on page 21. 3. See ... drive Attention Do not open your computer or attempt any repair before reading and understanding the "Important safety information" in the ThinkCentre Safety and Warranty Guide that came with your computer. For more information on recovering factory-installed software, refer to release and ...
User Guide
Page 42
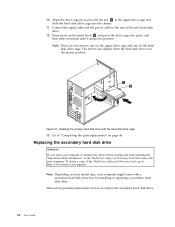
... hard disk drive Attention Do not open your computer or attempt any repair before reading and understanding the "Important safety information" in the ThinkCentre Safety and Warranty Guide that came with your computer might come with a secondary hard disk drive bay for installing or replacing a secondary hard ... of the new hard disk drive. 12. Connect the signal cable and the power cable to the rear of the ThinkCentre Safety and Warranty Guide, go to: http://www.lenovo.com/support Note: Depending on the metal latch 2 and pivot the drive cage into place, and then slide it forward until...
... hard disk drive Attention Do not open your computer or attempt any repair before reading and understanding the "Important safety information" in the ThinkCentre Safety and Warranty Guide that came with your computer might come with a secondary hard disk drive bay for installing or replacing a secondary hard ... of the new hard disk drive. 12. Connect the signal cable and the power cable to the rear of the ThinkCentre Safety and Warranty Guide, go to: http://www.lenovo.com/support Note: Depending on the metal latch 2 and pivot the drive cage into place, and then slide it forward until...

User Guide
Page 45
...the optical drive. See "Removing and reinstalling the front bezel" on page 46. Installing options and replacing hardware 37 Go to : http://www.lenovo.com/support This section provides instructions on page 14. 2. To replace the optical drive: 1. Remove the front bezel. Make sure that came with your ...the optical drive Attention Do not open your computer or attempt any repair before reading and understanding the "Important safety information" in the ThinkCentre Safety and Warranty Guide that the hard disk drive cage is secured in the chassis. See "Removing the computer cover" on how ...
...the optical drive. See "Removing and reinstalling the front bezel" on page 46. Installing options and replacing hardware 37 Go to : http://www.lenovo.com/support This section provides instructions on page 14. 2. To replace the optical drive: 1. Remove the front bezel. Make sure that came with your ...the optical drive Attention Do not open your computer or attempt any repair before reading and understanding the "Important safety information" in the ThinkCentre Safety and Warranty Guide that the hard disk drive cage is secured in the chassis. See "Removing the computer cover" on how ...
User Guide
Page 47
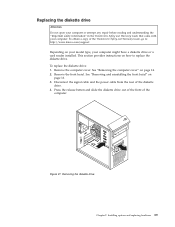
...the computer cover. To replace the diskette drive: 1. See "Removing and reinstalling the front bezel" on how to : http://www.lenovo.com/support Depending on page 14. 2. Disconnect the signal cable and the power cable from the rear of the computer. Figure 27. Replacing the... or a card reader installed. This section provides instructions on page 16. 3. Installing options and replacing hardware 39 To obtain a copy of the ThinkCentre Safety and Warranty Guide, go to replace the diskette drive. See "Removing the computer cover" on your model type, your computer. Press the ...
...the computer cover. To replace the diskette drive: 1. See "Removing and reinstalling the front bezel" on how to : http://www.lenovo.com/support Depending on page 14. 2. Disconnect the signal cable and the power cable from the rear of the computer. Figure 27. Replacing the... or a card reader installed. This section provides instructions on page 16. 3. Installing options and replacing hardware 39 To obtain a copy of the ThinkCentre Safety and Warranty Guide, go to replace the diskette drive. See "Removing the computer cover" on your model type, your computer. Press the ...

User Guide
Page 48
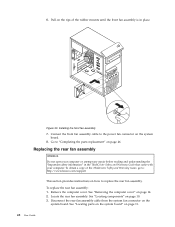
To obtain a copy of the ThinkCentre Safety and Warranty Guide, go to: http://www.lenovo.com/support This section provides instructions on page 46. Go to "Completing the parts replacement" on how to the new diskette drive. 8. To replace the front fan.... 2. Replacing the front fan assembly Attention Do not open your computer or attempt any repair before reading and understanding the "Important safety information" in the ThinkCentre Safety and Warranty Guide that came with your computer might have a front fan assembly installed. Note: Depending on page 16. 3. See "Removing the computer...
To obtain a copy of the ThinkCentre Safety and Warranty Guide, go to: http://www.lenovo.com/support This section provides instructions on page 46. Go to "Completing the parts replacement" on how to the new diskette drive. 8. To replace the front fan.... 2. Replacing the front fan assembly Attention Do not open your computer or attempt any repair before reading and understanding the "Important safety information" in the ThinkCentre Safety and Warranty Guide that came with your computer might have a front fan assembly installed. Note: Depending on page 16. 3. See "Removing the computer...
User Guide
Page 50
... replace the rear fan assembly: 1. See "Locating components" on how to : http://www.lenovo.com/support This section provides instructions on page 10. 3. 6. To obtain a copy of the rubber mounts until the front fan assembly is in the ThinkCentre Safety and Warranty Guide that came with your computer. See "Removing the computer cover...
... replace the rear fan assembly: 1. See "Locating components" on how to : http://www.lenovo.com/support This section provides instructions on page 10. 3. 6. To obtain a copy of the rubber mounts until the front fan assembly is in the ThinkCentre Safety and Warranty Guide that came with your computer. See "Removing the computer cover...


