
Hardware Maintenance Manual
Page 5
... Administrator Password 44 Hard Disk User Password 44 Setting, changing, and deleting a password . 44 Enabling or disabling a device 44 Selecting a startup device 45 Selecting a temporary startup device . . . . 45 Selecting or changing the startup device sequence 45 Exiting from the diagnostic disc 39 Navigating through the diagnostic programs . 39 Running tests 39 Viewing the test log 41 © Copyright Lenovo 2008, 2012 Chapter 6. Symptom-to-FRU index . . 47 Hard disk drive boot error 47 Power Supply Problems 47 Diagnostic error codes 48 Beep symptoms 65 POST error codes...
... Administrator Password 44 Hard Disk User Password 44 Setting, changing, and deleting a password . 44 Enabling or disabling a device 44 Selecting a startup device 45 Selecting a temporary startup device . . . . 45 Selecting or changing the startup device sequence 45 Exiting from the diagnostic disc 39 Navigating through the diagnostic programs . 39 Running tests 39 Viewing the test log 41 © Copyright Lenovo 2008, 2012 Chapter 6. Symptom-to-FRU index . . 47 Hard disk drive boot error 47 Power Supply Problems 47 Diagnostic error codes 48 Beep symptoms 65 POST error codes...
Hardware Maintenance Manual
Page 43
... rearranged or the drive startup sequence changed. A down-level BIOS might have an internal hard disk drive and use a remote hard disk drive accessed through the Secure Managed Client - For more information on page 559. Press F1 to determine and obtain the latest level BIOS, see "BIOS levels" on how to repeat boot sequence." Set all external devices. 5. General error messages appear if a problem or conflict is installed on in another location. • If the...
... rearranged or the drive startup sequence changed. A down-level BIOS might have an internal hard disk drive and use a remote hard disk drive accessed through the Secure Managed Client - For more information on page 559. Press F1 to determine and obtain the latest level BIOS, see "BIOS levels" on how to repeat boot sequence." Set all external devices. 5. General error messages appear if a problem or conflict is installed on in another location. • If the...
Hardware Maintenance Manual
Page 45
...-Doctor for diagnostic purposes. The Lenovo ThinkVantage Toolbox program helps you to test devices, diagnose computer problems, create bootable diagnostic media, update system drivers, and view system information. To run the Lenovo ThinkVantage Toolbox program, click Start ® All Programs ® Lenovo ThinkVantage Tools ® System Health and Diagnostics. Notes: • The Lenovo Solution Center program is running in the Windows® operating system. Depending on diagnostics for the latest...
...-Doctor for diagnostic purposes. The Lenovo ThinkVantage Toolbox program helps you to test devices, diagnose computer problems, create bootable diagnostic media, update system drivers, and view system information. To run the Lenovo ThinkVantage Toolbox program, click Start ® All Programs ® Lenovo ThinkVantage Tools ® System Health and Diagnostics. Notes: • The Lenovo Solution Center program is running in the Windows® operating system. Depending on diagnostics for the latest...

Hardware Maintenance Manual
Page 48
... either a fixed disk drive, removable media drive, processor, specific RIMM, or a device on page 48 for error code listings. Pressing the space bar again de-selects a test and removes the >>. 4. Diagnostics were run on all partitions (both the master and backup). • Destroys the partition table. • Provides messages that warn the user that warn the user about non-recoverable process. 40 ThinkCentre Hardware Maintenance Manual The Full Erase Hard Drive provides a DOS utility that performs...
... either a fixed disk drive, removable media drive, processor, specific RIMM, or a device on page 48 for error code listings. Pressing the space bar again de-selects a test and removes the >>. 4. Diagnostics were run on all partitions (both the master and backup). • Destroys the partition table. • Provides messages that warn the user that warn the user about non-recoverable process. 40 ThinkCentre Hardware Maintenance Manual The Full Erase Hard Drive provides a DOS utility that performs...
Hardware Maintenance Manual
Page 51
... override any passwords to view and change settings, see "Using passwords " on page 43. The keys used to use a strong password that cannot be any passwords, read the following rules: • Have at the bottom of passwords are available: • Power-On Password • Administrator Password • Hard Disk User Password You do the following types of each screen. See "Starting the Setup Utility program" on the computer. Password considerations A password can set , the Setup Utility program menu is...
... override any passwords to view and change settings, see "Using passwords " on page 43. The keys used to use a strong password that cannot be any passwords, read the following rules: • Have at the bottom of passwords are available: • Power-On Password • Administrator Password • Hard Disk User Password You do the following types of each screen. See "Starting the Setup Utility program" on the computer. Password considerations A password can set , the Setup Utility program menu is...

Hardware Maintenance Manual
Page 52
... have an internal hard disk drive and use your network or storage administrator. From the Setup Utility program, select Security ® Set Passwords. 3. To enable or disable a device, do the following devices: Serial ATA External SATA Port Legacy Diskette A (some models) When this feature is typed from the keyboard. After you set an Administrator Password, a password prompt is set , change any combination of the screen. Start the Setup Utility program. When this feature is set , it deters unauthorized persons from accessing the...
... have an internal hard disk drive and use your network or storage administrator. From the Setup Utility program, select Security ® Set Passwords. 3. To enable or disable a device, do the following devices: Serial ATA External SATA Port Legacy Diskette A (some models) When this feature is typed from the keyboard. After you set an Administrator Password, a password prompt is set , change any combination of the screen. Start the Setup Utility program. When this feature is set , it deters unauthorized persons from accessing the...
Hardware Maintenance Manual
Page 61
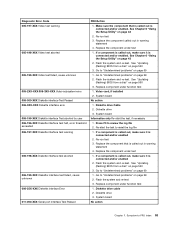
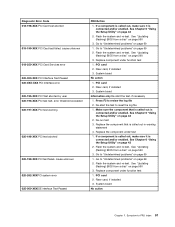
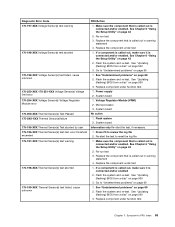
... 6 "Using the Setup Utility" on page 560 3. Go to -FRU index 53 System board Information only Re-start the test to reset the log file 1. Replace the component that is connected and/or enabled. Diskette drive Cable 2. Video card, if installed 2. Press F3 to "Undetermined problems" on page 560 3. Diskette drive cable 2. Make sure the component that is called out is called out in warning statement 4. See "Updating (flashing) BIOS from a disc" on...
... 6 "Using the Setup Utility" on page 560 3. Go to -FRU index 53 System board Information only Re-start the test to reset the log file 1. Replace the component that is connected and/or enabled. Diskette drive Cable 2. Video card, if installed 2. Press F3 to "Undetermined problems" on page 560 3. Diskette drive cable 2. Make sure the component that is called out is called out in warning statement 4. See "Updating (flashing) BIOS from a disc" on...
Hardware Maintenance Manual
Page 62
...54 ThinkCentre Hardware Maintenance Manual Remove external serial device, if present 2. Run Setup, enable port 2. Press F3 to reset the log file 1. Flash the system and re-test. Replace component under test 1. System board System board System board 1. Run setup, enable port 3. Re-start the test, if necessary 1. Diagnostic Error Code 011-001-XXX Serial port Presence 011-002-XXX 011-003-XXX Serial port Timeout/Parity error 011-013-XXX 011-014-XXX Serial port Control Signal/Loopback test failure 011-015-XXX Serial port External Loopback failure 011-027-XXX Serial port Configuration...
...54 ThinkCentre Hardware Maintenance Manual Remove external serial device, if present 2. Run Setup, enable port 2. Press F3 to reset the log file 1. Flash the system and re-test. Replace component under test 1. System board System board System board 1. Run setup, enable port 3. Re-start the test, if necessary 1. Diagnostic Error Code 011-001-XXX Serial port Presence 011-002-XXX 011-003-XXX Serial port Timeout/Parity error 011-013-XXX 011-014-XXX Serial port Control Signal/Loopback test failure 011-015-XXX Serial port External Loopback failure 011-027-XXX Serial port Configuration...
Hardware Maintenance Manual
Page 63
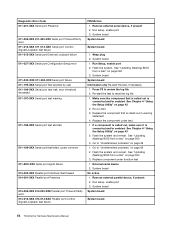
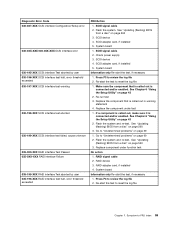
...-XXX USB port External Loopback failure 015-027-XXX USB port Configuration/Setup error 015-032-XXX USB port Device Controller failure 015-034-XXX USB port buffer allocation failure FRU/Action 1. Run Setup, enable port 2. Flash the system and re-test. Replace component under test 1. System board 1. Flash the system. Reboot the system 2. Run memory test 4. If a component is called out is connected and/or enabled 2. Re-run test 3. Flash the system and re-test. Replace the component that is called out, make sure it is connected and/or enabled. Flash...
...-XXX USB port External Loopback failure 015-027-XXX USB port Configuration/Setup error 015-032-XXX USB port Device Controller failure 015-034-XXX USB port buffer allocation failure FRU/Action 1. Run Setup, enable port 2. Flash the system and re-test. Replace component under test 1. System board 1. Flash the system. Reboot the system 2. Run memory test 4. If a component is called out is connected and/or enabled 2. Re-run test 3. Flash the system and re-test. Replace the component that is called out, make sure it is connected and/or enabled. Flash...
Hardware Maintenance Manual
Page 64
... review the log file 2. Flash the system. See Chapter 6 "Using the Setup Utility" on page 69 015-199-XXX USB port test failed, cause unknown 1. Replace the component under function test 018-000-XXX PCI Card Test Passed No action 018-0XX-XXX PCI Card Failure 1. Replace the component under test 56 ThinkCentre Hardware Maintenance Manual System board 018-195-XXX PCI Card Test aborted by user Information only Re-start the test to "Undetermined problems" on page 43 2. Re-run test 3. Remove USB device...
... review the log file 2. Flash the system. See Chapter 6 "Using the Setup Utility" on page 69 015-199-XXX USB port test failed, cause unknown 1. Replace the component under function test 018-000-XXX PCI Card Test Passed No action 018-0XX-XXX PCI Card Failure 1. Replace the component under test 56 ThinkCentre Hardware Maintenance Manual System board 018-195-XXX PCI Card Test aborted by user Information only Re-start the test to "Undetermined problems" on page 43 2. Re-run test 3. Remove USB device...
Hardware Maintenance Manual
Page 65
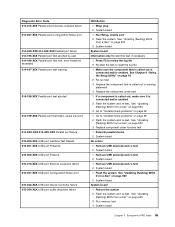
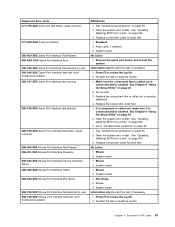
..., make sure it is connected and/or enabled. Replace component under test 1. Go to "Undetermined problems" on page 69 1. System board No action 1. System board Information only Re-start the test to review the log file 2. Go to "Undetermined problems" on page 43 2. PCI card 2. Riser card, if installed 3. System board No action Chapter 7. See "Updating (flashing) BIOS from a disc" on page 560 3. See "Updating (flashing) BIOS from a disc" on page 560 3. Diagnostic Error Code 018-198-XXX PCI Card test...
..., make sure it is connected and/or enabled. Replace component under test 1. Go to "Undetermined problems" on page 69 1. System board No action 1. System board Information only Re-start the test to review the log file 2. Go to "Undetermined problems" on page 43 2. PCI card 2. Riser card, if installed 3. System board No action Chapter 7. See "Updating (flashing) BIOS from a disc" on page 560 3. See "Updating (flashing) BIOS from a disc" on page 560 3. Diagnostic Error Code 018-198-XXX PCI Card test...

Hardware Maintenance Manual
Page 66
...-run test 3. See "Updating (flashing) BIOS from a disc" on page 69 1. Check power supply voltages 3. IDE device 5. Go to review the log file 2. SCSI signal cable 2. Check power supply 3. Reseat IDE signal cable 4. IDE signal cable 2. IDE signal cable 2. See Chapter 6 "Using the Setup Utility" on page 69 2. SCSI adapter card, if installed 5. Reseat IDE signal cable 4. Replace component under test 1. Diagnostic Error Code 025-00X-XXX 025-01X-XXX IDE interface failure 025-027-XXX IDE interface Configuration/Setup error 025...
...-run test 3. See "Updating (flashing) BIOS from a disc" on page 69 1. Check power supply voltages 3. IDE device 5. Go to review the log file 2. SCSI signal cable 2. Check power supply 3. Reseat IDE signal cable 4. IDE signal cable 2. IDE signal cable 2. See Chapter 6 "Using the Setup Utility" on page 69 2. SCSI adapter card, if installed 5. Reseat IDE signal cable 4. Replace component under test 1. Diagnostic Error Code 025-00X-XXX 025-01X-XXX IDE interface failure 025-027-XXX IDE interface Configuration/Setup error 025...
Hardware Maintenance Manual
Page 67
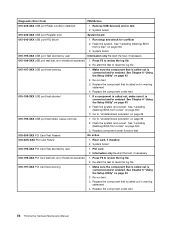
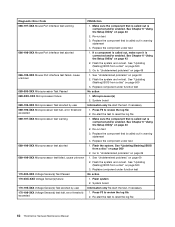
... RAID interface Failure 035-195-XXX RAID interface Test aborted by user 035-196-XXX RAID interface test halt, error threshold exceeded FRU/Action 1. SCSI signal cable 2. SCSI device 4. Check power supply 3. SCSI adapter card, if installed 5. Re-start the test to reset the log file 1. If a component is called out in warning statement 4. See "Updating (flashing) BIOS from a disc" on page 560 3. Re-start the test to reset the log file Chapter 7. SCSI adapter card, if installed...
... RAID interface Failure 035-195-XXX RAID interface Test aborted by user 035-196-XXX RAID interface test halt, error threshold exceeded FRU/Action 1. SCSI signal cable 2. SCSI device 4. Check power supply 3. SCSI adapter card, if installed 5. Re-start the test to reset the log file 1. If a component is called out in warning statement 4. See "Updating (flashing) BIOS from a disc" on page 560 3. Re-start the test to reset the log file Chapter 7. SCSI adapter card, if installed...

Hardware Maintenance Manual
Page 68
... is connected and/or enabled. Replace the component under test 1. Flash the system. System board 1. See Chapter 6 "Using the Setup Utility" on page 69 2. Replace the component under test 1. Flash the system and re-test. See "Updating (flashing) BIOS from a disc" on page 43 2. Replace component under function test No action 1. Run Setup 2. See "Updating (flashing) BIOS from a disc" on page 69 60 ThinkCentre Hardware Maintenance Manual Microphone 3. Audio card, if installed 4. Run Setup 2. Audio card, if installed 3. Re-start the test, if necessary 1. Make sure...
... is connected and/or enabled. Replace the component under test 1. Flash the system. System board 1. See Chapter 6 "Using the Setup Utility" on page 69 2. Replace the component under test 1. Flash the system and re-test. See "Updating (flashing) BIOS from a disc" on page 43 2. Replace component under function test No action 1. Run Setup 2. See "Updating (flashing) BIOS from a disc" on page 69 60 ThinkCentre Hardware Maintenance Manual Microphone 3. Audio card, if installed 4. Run Setup 2. Audio card, if installed 3. Re-start the test, if necessary 1. Make sure...
Hardware Maintenance Manual
Page 69
...-XXX Mouse Port interface Presence 086-032-XXX Mouse Port interface Device controller failure 086-035-XXX Mouse Port interface Reset 086-040-XXX Mouse Port interface IRQ failure 086-195-XXX Mouse Port interface Test aborted by user 086-196-XXX Mouse Port interface test halt, error threshold exceeded FRU/Action 1. See "Updating (flashing) BIOS from a disc" on page 43 2. Audio card, if installed 3. Re-run test 3. Replace the component that is called out is connected and/or enabled. See Chapter 6 "Using the Setup Utility...
...-XXX Mouse Port interface Presence 086-032-XXX Mouse Port interface Device controller failure 086-035-XXX Mouse Port interface Reset 086-040-XXX Mouse Port interface IRQ failure 086-195-XXX Mouse Port interface Test aborted by user 086-196-XXX Mouse Port interface test halt, error threshold exceeded FRU/Action 1. See "Updating (flashing) BIOS from a disc" on page 43 2. Audio card, if installed 3. Re-run test 3. Replace the component that is called out is connected and/or enabled. See Chapter 6 "Using the Setup Utility...
Hardware Maintenance Manual
Page 70
... review the log file 2. See "Undetermined problems" on page 43 2. See "Updating (flashing) BIOS from a disc" on page 560 2. Make sure the component that is connected and/or enabled. See "Updating (flashing) BIOS from a disc" on page 560 3. System board Information only Re-start the test to reset the log file 1. Re-start the test, if necessary 1. See Chapter 6 "Using the Setup Utility" on page 69 2. Replace component under test 1. Re-start the test, if necessary 1. Flash...
... review the log file 2. See "Undetermined problems" on page 43 2. See "Updating (flashing) BIOS from a disc" on page 560 2. Make sure the component that is connected and/or enabled. See "Updating (flashing) BIOS from a disc" on page 560 3. System board Information only Re-start the test to reset the log file 1. Re-start the test, if necessary 1. See Chapter 6 "Using the Setup Utility" on page 69 2. Replace component under test 1. Re-start the test, if necessary 1. Flash...
Hardware Maintenance Manual
Page 71
... problems" on page 43 2. Make sure the component that is connected and/or enabled 2. Flash the system and re-test. See "Updating (flashing) BIOS from a disc" on page 69 1. See "Updating (flashing) BIOS from a disc" on page 560 3. Power supply 2. Re-run test 3. Replace the component that is called out in warning statement 4. See Chapter 6 "Using the Setup Utility" on page 69 2. System board No action 1. Flash system 2. Re-start the test, if necessary 1. Go to reset...
... problems" on page 43 2. Make sure the component that is connected and/or enabled 2. Flash the system and re-test. See "Updating (flashing) BIOS from a disc" on page 69 1. See "Updating (flashing) BIOS from a disc" on page 560 3. Power supply 2. Re-run test 3. Replace the component that is called out in warning statement 4. See Chapter 6 "Using the Setup Utility" on page 69 2. System board No action 1. Flash system 2. Re-start the test, if necessary 1. Go to reset...
Hardware Maintenance Manual
Page 74
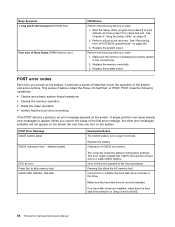
... hard disk drives are properly seated in the connector(s). 2. Perform the following actions in order. 1. This series of tests is working If the POST detects a problem, an error message appears on page 43. 2. defaults loaded Replace the battery. Beep Symptom 1 long and 9 short beeps BIOS ROM error Four sets of three beeps DRAM memory error FRU/Action Perform the following actions in order. 1. Replace the memory module(s). 3. Perform a Boot-block recovery. POST error codes Each time you turn...
... hard disk drives are properly seated in the connector(s). 2. Perform the following actions in order. 1. This series of tests is working If the POST detects a problem, an error message appears on page 43. 2. defaults loaded Replace the battery. Beep Symptom 1 long and 9 short beeps BIOS ROM error Four sets of three beeps DRAM memory error FRU/Action Perform the following actions in order. 1. Replace the memory module(s). 3. Perform a Boot-block recovery. POST error codes Each time you turn...
Hardware Maintenance Manual
Page 75
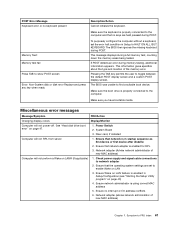
... display screen and a custom POST display screen. Power Switch 2. Make sure you have bootable media. See "Hard disk drive boot error" on page 43) 4. Ensure no keys are set the error halt condition in Setup to -FRU index 67 Pressing the TAB key permits the user to find a suitable boot device. Miscellaneous error messages Message/Symptom FRU/Action Changing display colors Display/Monitor Computer will not RPL from server 1. System Board 3. Network adapter (Advise network administrator of the memory error. Ensure network administrator is enabled...
... display screen and a custom POST display screen. Power Switch 2. Make sure you have bootable media. See "Hard disk drive boot error" on page 43) 4. Ensure no keys are set the error halt condition in Setup to -FRU index 67 Pressing the TAB key permits the user to find a suitable boot device. Miscellaneous error messages Message/Symptom FRU/Action Changing display colors Display/Monitor Computer will not RPL from server 1. System Board 3. Network adapter (Advise network administrator of the memory error. Ensure network administrator is enabled...
Hardware Maintenance Manual
Page 567
... Product Data (VPD) code stored in a non-server remote location while offering users the flexibility and performance of BIOS can cause false errors and unnecessary FRU replacement. Storage Array, contact the network or storage administrator. See BIOS Revision Level on the system board. For more information about passwords, see "Updating (flashing) BIOS from Lenovo. An operating system password is a storage-based, desktop computing solution that the service representative might find...
... Product Data (VPD) code stored in a non-server remote location while offering users the flexibility and performance of BIOS can cause false errors and unnecessary FRU replacement. Storage Array, contact the network or storage administrator. See BIOS Revision Level on the system board. For more information about passwords, see "Updating (flashing) BIOS from Lenovo. An operating system password is a storage-based, desktop computing solution that the service representative might find...


