User Manual
Page 5
... battery pack 53 Checking the backup battery 54 Related service information 55 Restoring the factory contents by using Product Recovery discs 55 Restoring the factory contents by using Recovery Disc Set 56 Passwords 57 Power-on password 57 Hard-disk password 57 Supervisor password 58 How to remove the power-on password . . . . 58 How to remove the hard-disk password . . . . 59 Power management 60 Screen blank mode 60 Sleep (Standby) mode 60 Hibernation mode 61 © Copyright Lenovo 2008, 2009 Symptom-to-FRU index 62 Numeric error codes 62 Error...
... battery pack 53 Checking the backup battery 54 Related service information 55 Restoring the factory contents by using Product Recovery discs 55 Restoring the factory contents by using Recovery Disc Set 56 Passwords 57 Power-on password 57 Hard-disk password 57 Supervisor password 58 How to remove the power-on password . . . . 58 How to remove the hard-disk password . . . . 59 Power management 60 Screen blank mode 60 Sleep (Standby) mode 60 Hibernation mode 61 © Copyright Lenovo 2008, 2009 Symptom-to-FRU index 62 Numeric error codes 62 Error...
User Manual
Page 11
... the off controls, is a complete circuit. Electrical safety Observe the following precautions: - Do not use this type of mat to lock the wall box in the safety sections of these precautions are moist floors, nongrounded power extension cables, power surges, and missing safety grounds. Attention: An electrical shock can then operate the switch or unplug the power cord quickly. First, check...
... the off controls, is a complete circuit. Electrical safety Observe the following precautions: - Do not use this type of mat to lock the wall box in the safety sections of these precautions are moist floors, nongrounded power extension cables, power surges, and missing safety grounds. Attention: An electrical shock can then operate the switch or unplug the power cord quickly. First, check...
User Manual
Page 51
... a variety of reasons that the model of the machine and the FRU part number are servicing sequence might be overwritten. Before you are correct by referring to the FRU parts list. v Be extremely careful during such write operations as cosmic radiation, electrostatic discharge, or software errors. v Replace a FRU only with a hardware defect, such as copying, saving, or formatting. Single failures can occur...
... a variety of reasons that the model of the machine and the FRU part number are servicing sequence might be overwritten. Before you are correct by referring to the FRU parts list. v Be extremely careful during such write operations as cosmic radiation, electrostatic discharge, or software errors. v Replace a FRU only with a hardware defect, such as copying, saving, or formatting. Single failures can occur...
User Manual
Page 53
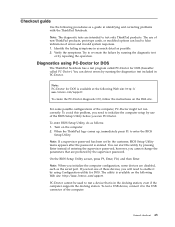
To avoid this problem, you need to enter the BIOS Setup Utility. Identify the failing symptoms in PC-Doctor. To enter BIOS Setup Utility, do as the serial port. Turn on the Web site. The utility is available on the following procedures as possible. 2. however, you run correctly. To test a USB device, connect it by using PC-Doctor for DOS The ThinkPad Notebook has a test program called PC-Doctor for DOS...
To avoid this problem, you need to enter the BIOS Setup Utility. Identify the failing symptoms in PC-Doctor. To enter BIOS Setup Utility, do as the serial port. Turn on the Web site. The utility is available on the following procedures as possible. 2. however, you run correctly. To test a USB device, connect it by using PC-Doctor for DOS The ThinkPad Notebook has a test program called PC-Doctor for DOS...
User Manual
Page 54
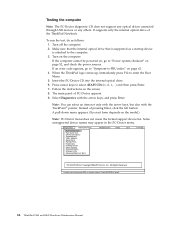
... does not support any optical drives connected through USB devices or any others. Turn on the screen. 8. Diagnostics Interactive Tests Run Normal Test Run Quick Test CPU/Coprocessor Systemboard Video Adapter Serial Ports Parallel Ports Fixed Disks Diskette Drives Other Devices Communication Wireless LAN Advanced Memory Tests Hardware Info Utility Quit F1=Help PC-DOCTOR 2.0 Copyright 2008 PC-Doctor, Inc. The main panel of the ThinkPad Notebook. Instead of pressing Enter, click the left button. Some unsupported device names...
... does not support any optical drives connected through USB devices or any others. Turn on the screen. 8. Diagnostics Interactive Tests Run Normal Test Run Quick Test CPU/Coprocessor Systemboard Video Adapter Serial Ports Parallel Ports Fixed Disks Diskette Drives Other Devices Communication Wireless LAN Advanced Memory Tests Hardware Info Utility Quit F1=Help PC-DOCTOR 2.0 Copyright 2008 PC-Doctor, Inc. The main panel of the ThinkPad Notebook. Instead of pressing Enter, click the left button. Some unsupported device names...
User Manual
Page 55
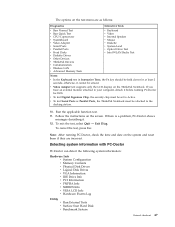
... v Run Quick Test v CPU/Coprocessor v Systemboard v Video Adapter v Serial Ports v Parallel Ports v Fixed Disks v Diskette Drives v Other Devices v ThinkPad Devices v Communication v Wireless LAN v Advanced Memory Tests v Keyboard v Video v Internal Speaker v Mouse v Diskette v System Load v Optical Drive Test v Intel WLAN Radio Test Notes: v In the Keyboard test in Interactive Tests, the Fn key should be sensed. Run the applicable function test. 11. v To test Serial Ports or Parallel Ports, the ThinkPad Notebook must be attached to Active. Follow the instructions on the ThinkPad...
... v Run Quick Test v CPU/Coprocessor v Systemboard v Video Adapter v Serial Ports v Parallel Ports v Fixed Disks v Diskette Drives v Other Devices v ThinkPad Devices v Communication v Wireless LAN v Advanced Memory Tests v Keyboard v Video v Internal Speaker v Mouse v Diskette v System Load v Optical Drive Test v Intel WLAN Radio Test Notes: v In the Keyboard test in Interactive Tests, the Fn key should be sensed. Run the applicable function test. 11. v To test Serial Ports or Parallel Ports, the ThinkPad Notebook must be attached to Active. Follow the instructions on the ThinkPad...
User Manual
Page 58
... port replicator is displayed at the lower left of the screen, press F1 to the ThinkPad computer, detach it. Then, run Diagnostics --> ThinkPad Devices --> HDD Active Protection Test. Diagnostics --> Systemboard --> Keyboard 2. Turn on the computer. 3. While the message, "To interrupt normal startup, press the blue ThinkVangate button," is attached to enter the BIOS Setup Utility. 4. PC Card slot ExpressCard slot Diagnostics --> Systemboard --> PCMCIA 1. Using cursor keys, select Main hard disk drive or Ultrabay hard disk drive. 6. Press Enter...
... port replicator is displayed at the lower left of the screen, press F1 to the ThinkPad computer, detach it. Then, run Diagnostics --> ThinkPad Devices --> HDD Active Protection Test. Diagnostics --> Systemboard --> Keyboard 2. Turn on the computer. 3. While the message, "To interrupt normal startup, press the blue ThinkVangate button," is attached to enter the BIOS Setup Utility. 4. PC Card slot ExpressCard slot Diagnostics --> Systemboard --> PCMCIA 1. Using cursor keys, select Main hard disk drive or Ultrabay hard disk drive. 6. Press Enter...
User Manual
Page 64
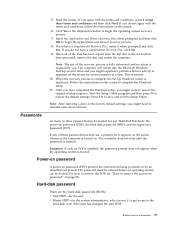
... and Drivers Recovery Disc (one disc) This disc restores the Microsoft® Windows operating system. If you can use an external USB DVD drive. Select the CD/DVD drive as updates to the software that you want to the original factory configuration. b. Not all data on the new drive. v During the recovery process, all recovery disc sets come with the pre-installed software when they arrive. Make the CD/DVD drive the first startup device in the startup sequence using the recovery disc set of the user instructions and...
... and Drivers Recovery Disc (one disc) This disc restores the Microsoft® Windows operating system. If you can use an external USB DVD drive. Select the CD/DVD drive as updates to the software that you want to the original factory configuration. b. Not all data on the new drive. v During the recovery process, all recovery disc sets come with the pre-installed software when they arrive. Make the CD/DVD drive the first startup device in the startup sequence using the recovery disc set of the user instructions and...
User Manual
Page 65
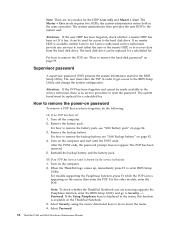
... is entered. Start the Setup Utility program and then press F9 to save and exit the Setup Utility. Note: After restoring a drive to the factory default settings, you agree with the terms and conditions, follow the instructions on the screen for it to get access to restore the original startup sequence. Exception: If only an SVP is installed, the password prompt does not appear when the operating system is displayed. Hard-disk password...
... is entered. Start the Setup Utility program and then press F9 to save and exit the Setup Utility. Note: After restoring a drive to the factory default settings, you agree with the terms and conditions, follow the instructions on the screen for it to get access to restore the original startup sequence. Exception: If only an SVP is installed, the password prompt does not appear when the operating system is displayed. Hard-disk password...
User Manual
Page 66
... in the menu, this function is available, neither Lenovo nor Lenovo authorized service technicians provide any services to reset either the user or the master HDP, or to recover data from the hard disk drive. The system board must enter the SVP in the same operation. Remove the battery pack. Reinstall the backup battery and the battery pack. (B) If an SVP has been set . then enter the POP. For the other models, enter the...
... in the menu, this function is available, neither Lenovo nor Lenovo authorized service technicians provide any services to reset either the user or the master HDP, or to recover data from the hard disk drive. The system board must enter the SVP in the same operation. Remove the battery pack. Reinstall the backup battery and the battery pack. (B) If an SVP has been set . then enter the POP. For the other models, enter the...
User Manual
Page 67
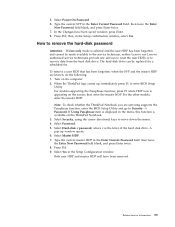
... the Changes have been removed. Press F10; How to enter BIOS Setup Utility. To remove a user HDP that has been forgotten, when the SVP and the master HDP are servicing supports the Passphrase function, enter the BIOS Setup Utility and go to move down the menu. 4. Turn on the screen; Note: To check whether the ThinkPad Notebook you are known, do the following: 1. Select Master HDP. 7. then leave the Enter New Password field...
... the Changes have been removed. Press F10; How to enter BIOS Setup Utility. To remove a user HDP that has been forgotten, when the SVP and the master HDP are servicing supports the Passphrase function, enter the BIOS Setup Utility and go to move down the menu. 4. Turn on the screen; Note: To check whether the ThinkPad Notebook you are known, do the following: 1. Select Master HDP. 7. then leave the Enter New Password field...
User Manual
Page 68
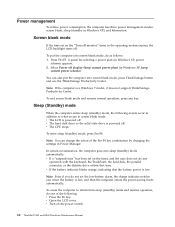
... screen blank mode: v The LCD is powered off . To put the computer into sleep (standby) mode automatically: v If a "suspend time" has been set the low-battery alarm, the charge indicator notifies you when the battery is a Windows 7 model, it does not support ThinkVantage Productivity Center. v Open the LCD cover. To enter sleep (standby) mode, press Fn+F4. Note: Even if you do not set on the power switch. 60 ThinkPad T400 and R400 Hardware Maintenance Manual Select Power...
... screen blank mode: v The LCD is powered off . To put the computer into sleep (standby) mode automatically: v If a "suspend time" has been set the low-battery alarm, the charge indicator notifies you when the battery is a Windows 7 model, it does not support ThinkVantage Productivity Center. v Open the LCD cover. To enter sleep (standby) mode, press Fn+F4. Note: Even if you do not set on the power switch. 60 ThinkPad T400 and R400 Hardware Maintenance Manual Select Power...

User Manual
Page 70
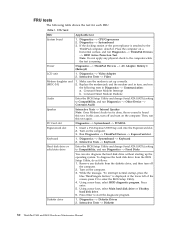
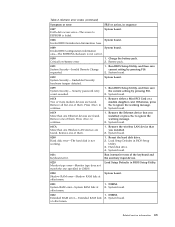
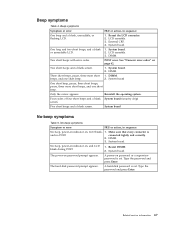
... ThinkPad Notebooks, see the manual for each error detected in sequence." Run BIOS Setup Utility. Then defaults.-The checksum of the supervisor password in the EEPROM is not correct. System board. 0185 Bad startup sequence settings. Numeric error codes Table 2. Note: For a device not supported by pressing F10. Enter BIOS Setup and load Setup Enter to load the default setting. in boldface type. Then save the current setting by pressing F10. 62 ThinkPad T400 and R400 Hardware Maintenance Manual...
... ThinkPad Notebooks, see the manual for each error detected in sequence." Run BIOS Setup Utility. Then defaults.-The checksum of the supervisor password in the EEPROM is not correct. System board. 0185 Bad startup sequence settings. Numeric error codes Table 2. Note: For a device not supported by pressing F10. Enter BIOS Setup and load Setup Enter to load the default setting. in boldface type. Then save the current setting by pressing F10. 62 ThinkPad T400 and R400 Hardware Maintenance Manual...
User Manual
Page 71
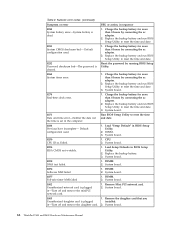
... Keyboard error. Charge the battery pack. 2. Press to ignore the warning message. 2. Otherwise, press Esc to continue. 1. Remove the Ethernet device that you installed; Remove one of them . System board. 0200 Hard disk error-The hard disk is failed. Extended RAM error- Numeric error codes (continued) Symptom or error FRU or action, in CMOS. Load Setup Defaults in BIOS Setup Utility. 3. DIMM. 2. Remove all but one of them. Reseat the hard disk drive. 2. Run BIOS Setup Utility, and then save the current setting...
... Keyboard error. Charge the battery pack. 2. Press to ignore the warning message. 2. Otherwise, press Esc to continue. 1. Remove the Ethernet device that you installed; Remove one of them . System board. 0200 Hard disk error-The hard disk is failed. Extended RAM error- Numeric error codes (continued) Symptom or error FRU or action, in CMOS. Load Setup Defaults in BIOS Setup Utility. 3. DIMM. 2. Remove all but one of them. Reseat the hard disk drive. 2. Run BIOS Setup Utility, and then save the current setting...
User Manual
Page 72
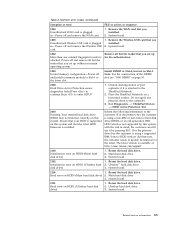
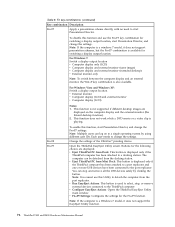
.... 1. Remove Mini PCI network card. 2. Remove the daughter card that you Unauthorized daughter card is plugged in -Turn off and remove the miniPCI network card. 1. Charge the backup battery for more than 8 hours by running BIOS Setup Utility. 0260 System timer error. 1. Charge the backup battery for more than 8 hours by connecting the ac adapter. 2. Run BIOS Setup Utility to reset the time and date. 3. Default configuration used . 1. Load "Setup Default" in BIOS Setup Utility. 2. System board. 02F4 EISA CMOS not writable. 1. System board. 02F6 Software NMI...
.... 1. Remove Mini PCI network card. 2. Remove the daughter card that you Unauthorized daughter card is plugged in -Turn off and remove the miniPCI network card. 1. Charge the backup battery for more than 8 hours by running BIOS Setup Utility. 0260 System timer error. 1. Charge the backup battery for more than 8 hours by connecting the ac adapter. 2. Run BIOS Setup Utility to reset the time and date. 3. Default configuration used . 1. Load "Setup Default" in BIOS Setup Utility. 2. System board. 02F4 EISA CMOS not writable. 1. System board. 02F6 Software NMI...
User Manual
Page 73
... is installed. System board. 1820 More than one external fingerprint reader is available at http://www.lenovo.com/support 2100 Initialization error on this system. Ensure that your main operating system. System board. 2112 Read error on HDD1 (Ultrabay hard 2. Power off and remove the Wireless USB card. 1. Undock docking station or port replicator if it by this system, with an old firmware, the customer needs to update its firmware to...
... is installed. System board. 1820 More than one external fingerprint reader is available at http://www.lenovo.com/support 2100 Initialization error on this system. Ensure that your main operating system. System board. 2112 Read error on HDD1 (Ultrabay hard 2. Power off and remove the Wireless USB card. 1. Undock docking station or port replicator if it by this system, with an old firmware, the customer needs to update its firmware to...
User Manual
Page 75
... 4. External CRT. 4. System board. 2. DIMM. Reseat DIMM. 2. A power-on page 62. A hard-disk password is and no POST. Type the password and press Enter. System board. 2. Two short beeps with error codes. See "Numeric error codes" on password or a supervisor password is set . Only the cursor appears. Reinstall the operating system. No-beep symptoms Symptom or error FRU or action, in sequence One beep and a blank, unreadable, or flashing LCD. 1. LCD assembly...
... 4. External CRT. 4. System board. 2. DIMM. Reseat DIMM. 2. A power-on page 62. A hard-disk password is and no POST. Type the password and press Enter. System board. 2. Two short beeps with error codes. See "Numeric error codes" on password or a supervisor password is set . Only the cursor appears. Reinstall the operating system. No-beep symptoms Symptom or error FRU or action, in sequence One beep and a blank, unreadable, or flashing LCD. 1. LCD assembly...
User Manual
Page 84
...Opens the ThinkPad EasyEject Utility main window. Note: If the computer is a windows 7 model, it does not support the EasyEject Utility function. 76 ThinkPad T400 and R400 Hardware Maintenance Manual For Windows 7: Switch a display output location v Computer display only (LCD) v Computer display and external monitor (same image) v Computer display and external monitor (extended desktop) v External monitor only Note: To switch between the computer display and an external monitor, the Win+P key combination is used to select, stop and remove all the USB devices safely by using different user...
...Opens the ThinkPad EasyEject Utility main window. Note: If the computer is a windows 7 model, it does not support the EasyEject Utility function. 76 ThinkPad T400 and R400 Hardware Maintenance Manual For Windows 7: Switch a display output location v Computer display only (LCD) v Computer display and external monitor (same image) v Computer display and external monitor (extended desktop) v External monitor only Note: To switch between the computer display and an external monitor, the Win+P key combination is used to select, stop and remove all the USB devices safely by using different user...
User Manual
Page 157
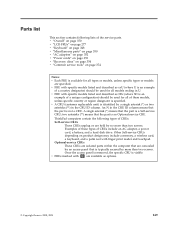
... configuration) should be used for all models ending in U. v FRUs marked with finger print reader and touchpad. v A CRU (customer replaceable unit) is a Self-service CRU; An N in the CRU ID column. Optional-service CRUs These CRUs are isolated parts within the computer that are concealed by an access panel that the part is available for all types or models, unless specific types or models are specified. Once the access panel...
... configuration) should be used for all models ending in U. v FRUs marked with finger print reader and touchpad. v A CRU (customer replaceable unit) is a Self-service CRU; An N in the CRU ID column. Optional-service CRUs These CRUs are isolated parts within the computer that are concealed by an access panel that the part is available for all types or models, unless specific types or models are specified. Once the access panel...
Brochure
Page 4
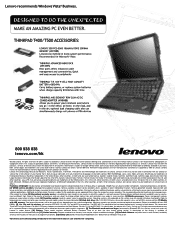
... information. [6] Hard disk drive: GB=1,000,000,000 bytes. Operating systems not preloaded on IEEE 802.11a, 802.11b, and 802.11g respectively. Lenovo makes no representation or warranty regarding third-party products or services. IBM, Lenovo logos and trademarks are subject to additional charges. [12] Included software: may not include user manuals or all countries. Lenovo, the Lenovo logo, Rescue and Recovery, Access Connections, TrackPoint, ThinkCentre...
... information. [6] Hard disk drive: GB=1,000,000,000 bytes. Operating systems not preloaded on IEEE 802.11a, 802.11b, and 802.11g respectively. Lenovo makes no representation or warranty regarding third-party products or services. IBM, Lenovo logos and trademarks are subject to additional charges. [12] Included software: may not include user manuals or all countries. Lenovo, the Lenovo logo, Rescue and Recovery, Access Connections, TrackPoint, ThinkCentre...


