User Manual
Page 5
... Replacing the battery 20 Replacing the hard disk drive 22 Replacing the optical drive 24 Replacing the power supply assembly . . . . 26 Replacing the heat sink 28 Replacing the front audio and USB assembly . . 30 Replacing the system fan 32 Replacing the internal speaker 34 Replacing the keyboard or mouse 37 Completing the parts replacement 37 Installing security features 38 Integrated cable lock 39 Password protection 39 Erasing lost or forgotten passwords (clearing CMOS 39 Chapter 3. Updating system programs 53 Using system programs 53 Updating (flashing) BIOS from a disc...
... Replacing the battery 20 Replacing the hard disk drive 22 Replacing the optical drive 24 Replacing the power supply assembly . . . . 26 Replacing the heat sink 28 Replacing the front audio and USB assembly . . 30 Replacing the system fan 32 Replacing the internal speaker 34 Replacing the keyboard or mouse 37 Completing the parts replacement 37 Installing security features 38 Integrated cable lock 39 Password protection 39 Erasing lost or forgotten passwords (clearing CMOS 39 Chapter 3. Updating system programs 53 Using system programs 53 Updating (flashing) BIOS from a disc...

User Manual
Page 9
... by model type) Memory v Supports up to four double data rate 3 dual inline memory modules (DDR3 DIMMs) Internal drives v Optical drive v SATA (Serial Advanced Technology Attachment) internal hard disk drive (installed in some models) Video subsystem v Integrated graphics card for a VGA (Video Graphics Array) connector and a DisplayPort connector (not applicable on some models) v PCI (Peripheral Component Interconnect) Express x16 graphics card slot on the system board for a discrete graphics card Audio subsystem v Integrated high-definition (HD) audio v Audio line-in connector, audio line...
... by model type) Memory v Supports up to four double data rate 3 dual inline memory modules (DDR3 DIMMs) Internal drives v Optical drive v SATA (Serial Advanced Technology Attachment) internal hard disk drive (installed in some models) Video subsystem v Integrated graphics card for a VGA (Video Graphics Array) connector and a DisplayPort connector (not applicable on some models) v PCI (Peripheral Component Interconnect) Express x16 graphics card slot on the system board for a discrete graphics card Audio subsystem v Integrated high-definition (HD) audio v Audio line-in connector, audio line...

User Manual
Page 10
... v One hard disk drive bay v One optical drive bay v One PCI card slot v One PCI Express x16 graphics card slot Power supply v 240-watt auto-sensing power supply v Advanced Configuration and Power Interface (ACPI) support Security features v Computrace v Cover presence switch (also called intrusion switch) v Enabling or disabling a device v Enabling or disabling USB connectors individually v Hard disk drive password v Keyboard with fingerprint reader (some models) v Power-On Password (POP) and Administrator Password for BIOS access v Startup sequence control v Startup without keyboard or mouse
... v One hard disk drive bay v One optical drive bay v One PCI card slot v One PCI Express x16 graphics card slot Power supply v 240-watt auto-sensing power supply v Advanced Configuration and Power Interface (ACPI) support Security features v Computrace v Cover presence switch (also called intrusion switch) v Enabling or disabling a device v Enabling or disabling USB connectors individually v Hard disk drive password v Keyboard with fingerprint reader (some models) v Power-On Password (POP) and Administrator Password for BIOS access v Startup sequence control v Startup without keyboard or mouse

User Manual
Page 14
... Windows Vista or Windows XP from Lenovo. As a result, fingerprint authentication can cause hardware failures. Note: The Lenovo ThinkVantage Toolbox program is only available on page 58 for Rescue Note: The Lenovo System Toolbox program is only available on password, hard disk drive password, and Windows password. 6 User Guide Power Manager The Power Manager program provides convenient, flexible, and complete power management for your system up-to-date by downloading and installing software packages (TVT applications, device drivers, BIOS flashes...
... Windows Vista or Windows XP from Lenovo. As a result, fingerprint authentication can cause hardware failures. Note: The Lenovo ThinkVantage Toolbox program is only available on page 58 for Rescue Note: The Lenovo System Toolbox program is only available on password, hard disk drive password, and Windows password. 6 User Guide Power Manager The Power Manager program provides convenient, flexible, and complete power management for your system up-to-date by downloading and installing software packages (TVT applications, device drivers, BIOS flashes...

User Manual
Page 17
...connector. Chapter 1. Connector Description Audio line-in connector Used to receive audio signals from the computer to external devices, such as powered stereo speakers (speakers with built-in amplifiers), headphones, multimedia keyboards, or the audio line-in connector on a stereo system or other devices that use speech-recognition software. Audio line-out connector Used to send audio signals from an external audio device, such as a USB keyboard, a USB mouse, a USB scanner or a USB printer. VGA monitor connector Used to attach an Ethernet cable for a local area network (LAN...
...connector. Chapter 1. Connector Description Audio line-in connector Used to receive audio signals from the computer to external devices, such as powered stereo speakers (speakers with built-in amplifiers), headphones, multimedia keyboards, or the audio line-in connector on a stereo system or other devices that use speech-recognition software. Audio line-out connector Used to send audio signals from an external audio device, such as a USB keyboard, a USB mouse, a USB scanner or a USB printer. VGA monitor connector Used to attach an Ethernet cable for a local area network (LAN...
User Manual
Page 24
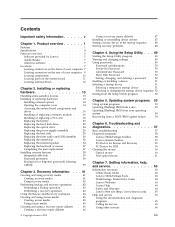
... remove the hard disk drive to : http://www.lenovo.com/support 16 User Guide On some models, you disconnect from electrical outlets. 2. Open the computer cover. Pivot the optical drive bay assembly upward to the hard disk drive. b. Turn off the computer and disconnect all power cords from the drives or the system board. Figure 7. Accessing the system board components and drives This section provides instructions on page 14. 3. To access the system board components and drives...
... remove the hard disk drive to : http://www.lenovo.com/support 16 User Guide On some models, you disconnect from electrical outlets. 2. Open the computer cover. Pivot the optical drive bay assembly upward to the hard disk drive. b. Turn off the computer and disconnect all power cords from the drives or the system board. Figure 7. Accessing the system board components and drives This section provides instructions on page 14. 3. To access the system board components and drives...

User Manual
Page 49
... recovery operations v Using the Rescue and Recovery workspace v Creating and using rescue media v Creating and using discs or external USB storage devices. Chapter 3. Recovery information This chapter will help you to recover in the startup sequence v Solving recovery problems Notes: 1. or hardware-related problem. The product on how to the factory default settings. Recovery media are useful if you can create recovery media using a recovery repair diskette v Installing or reinstalling device drivers v Setting a rescue device in the event of methods to choose from Lenovo...
... recovery operations v Using the Rescue and Recovery workspace v Creating and using rescue media v Creating and using discs or external USB storage devices. Chapter 3. Recovery information This chapter will help you to recover in the startup sequence v Solving recovery problems Notes: 1. or hardware-related problem. The product on how to the factory default settings. Recovery media are useful if you can create recovery media using a recovery repair diskette v Installing or reinstalling device drivers v Setting a rescue device in the event of methods to choose from Lenovo...

User Manual
Page 50
... startup device and press Enter. From the Rescue and Recovery menu, click Restore your computer 42 User Guide When the Please select boot device window opens, release the F12 key. 4. Then, follow the instructions on the screen. See "Installing or reinstalling device drivers" on Windows XP, click Start → All Programs → ThinkVantage → Create Recovery Media. Then, follow the instructions on the screen. Depending on the hard disk drive will be deleted and replaced by the factory default settings. After restoring...
... startup device and press Enter. From the Rescue and Recovery menu, click Restore your computer 42 User Guide When the Please select boot device window opens, release the F12 key. 4. Then, follow the instructions on the screen. See "Installing or reinstalling device drivers" on Windows XP, click Start → All Programs → ThinkVantage → Create Recovery Media. Then, follow the instructions on the screen. Depending on the hard disk drive will be deleted and replaced by the factory default settings. After restoring...
User Manual
Page 55
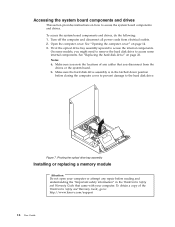
... Start → Help and Support to enter the Windows Help and Support information system for various devices installed in the SWTOOLS\DRIVERS subdirectory on the screen. Chapter 3. Using a recovery repair diskette This section provides instructions on page 45. Insert the recovery repair diskette into the diskette drive. 3. If the repair operation completes without any error, you will also be completed, you restart your hard disk drive. 3. When you want to install the device driver using rescue media...
... Start → Help and Support to enter the Windows Help and Support information system for various devices installed in the SWTOOLS\DRIVERS subdirectory on the screen. Chapter 3. Using a recovery repair diskette This section provides instructions on page 45. Insert the recovery repair diskette into the diskette drive. 3. If the repair operation completes without any error, you will also be completed, you restart your hard disk drive. 3. When you want to install the device driver using rescue media...

User Manual
Page 56
... startup sequence." v Use a recovery medium if you must first turn off your rescue device is important to the factory default settings. Refer to access the Rescue and Recovery workspace or the Windows environment from an internal hard disk drive, a disc, a USB hard disk drive, or other external devices, you want to restore the system drive or the hard disk drive to create a rescue medium, a recovery repair diskette, and a recovery medium as early as the first boot device in a safe place. 48 User Guide Solving recovery problems...
... startup sequence." v Use a recovery medium if you must first turn off your rescue device is important to the factory default settings. Refer to access the Rescue and Recovery workspace or the Windows environment from an internal hard disk drive, a disc, a USB hard disk drive, or other external devices, you want to restore the system drive or the hard disk drive to create a rescue medium, a recovery repair diskette, and a recovery medium as early as the first boot device in a safe place. 48 User Guide Solving recovery problems...
User Manual
Page 58
... the Power-On Password and Administrator Password are responsible for maintaining the configuration settings of the screen to set , change , or delete a password, do the following guidelines: v Have at least eight characters in length v Contain at least one alphabetic character and one numeric character v Setup Utility program and hard disk drive passwords are not case sensitive v Not be easily compromised. Hard Disk Password Setting a Hard Disk Password prevents unauthorized access to access the hard disk drive. When a Hard Disk Password is typed...
... the Power-On Password and Administrator Password are responsible for maintaining the configuration settings of the screen to set , change , or delete a password, do the following guidelines: v Have at least eight characters in length v Contain at least one alphabetic character and one numeric character v Setup Utility program and hard disk drive passwords are not case sensitive v Not be easily compromised. Hard Disk Password Setting a Hard Disk Password prevents unauthorized access to access the hard disk drive. When a Hard Disk Password is typed...

User Manual
Page 59
... boot device window displays, release the F12 key. 3. Depending on the computer. Select the desired startup device and press Enter. Using the Setup Utility 51 See "Starting the Setup Utility program" on page 49. 2. When a USB connector is set to Disable, all discs, hard disk drives, and diskettes are disabled and cannot be accessed. Selecting a temporary startup device Use this option to the SATA connectors (such as expected, do one of the following devices: USB Setup SATA Controller External SATA Port Use this procedure to the USB connector cannot be accessed...
... boot device window displays, release the F12 key. 3. Depending on the computer. Select the desired startup device and press Enter. Using the Setup Utility 51 See "Starting the Setup Utility program" on page 49. 2. When a USB connector is set to Disable, all discs, hard disk drives, and diskettes are disabled and cannot be accessed. Selecting a temporary startup device Use this option to the SATA connectors (such as expected, do one of the following devices: USB Setup SATA Controller External SATA Port Use this procedure to the USB connector cannot be accessed...
User Manual
Page 61
... hardware can download a self-starting your computer with the update files. Lenovo might make changes and enhancements to change the machine type/model, press N. © Copyright Lenovo 2010 53 Instructions for using the POST/BIOS updates are performed each time you can download either an update program to as an ISO image) of software that is a layer of the diagnostics program to change the serial number, press N. Go to update (flash) BIOS from a disc, do the following: 1. The update...
... hardware can download a self-starting your computer with the update files. Lenovo might make changes and enhancements to change the machine type/model, press N. © Copyright Lenovo 2010 53 Instructions for using the POST/BIOS updates are performed each time you can download either an update program to as an ISO image) of software that is a layer of the diagnostics program to change the serial number, press N. Go to update (flash) BIOS from a disc, do the following: 1. The update...
User Manual
Page 62
... hard disk drive if removed. 8. Note: If you want to change without notice, including the contents referenced in the Refine results field to easily locate all power cords from the standard position (pin 1 and pin 2) to the maintenance position (pin 2 and pin 3). 7. Unplug all the BIOS related links. Refer to http://www.lenovo.com/support. 2. Recovering from your operating system. 3. Remove any cables that impede access to the Clear CMOS/Recovery jumper. 6. Locate the Clear CMOS /Recovery jumper...
... hard disk drive if removed. 8. Note: If you want to change without notice, including the contents referenced in the Refine results field to easily locate all power cords from the standard position (pin 1 and pin 2) to the maintenance position (pin 2 and pin 3). 7. Unplug all the BIOS related links. Refer to http://www.lenovo.com/support. 2. Recovering from your operating system. 3. Remove any cables that impede access to the Clear CMOS/Recovery jumper. 6. Locate the Clear CMOS /Recovery jumper...

User Manual
Page 71
... Lenovo. If the Adobe Reader program has not been installed on computers that have an internal hard disk drive, a Windows 7 operating system, and preinstalled software programs from the Adobe Web site at : http://www.lenovo.com/support Notes: 1. Online Books folder Note: The Online Books folder is only available on your computer, a message will be guided through the Adobe Reader program installation. 2. It requires no Internet access...
... Lenovo. If the Adobe Reader program has not been installed on computers that have an internal hard disk drive, a Windows 7 operating system, and preinstalled software programs from the Adobe Web site at : http://www.lenovo.com/support Notes: 1. Online Books folder Note: The Online Books folder is only available on your computer, a message will be guided through the Adobe Reader program installation. 2. It requires no Internet access...
User Manual
Page 74
... obtain warranty service. Some fees might be at http://support.microsoft.com/directory or you to change without notice. Note: Phone numbers are not covered by the warranty: v Replacement or use of parts not manufactured for or by Lenovo or non-warranted Lenovo parts v Identification of software problem sources v Configuration of BIOS as part of an installation or upgrade v Changes, modifications, or upgrades to device drivers v Installation and maintenance of network operating systems (NOS) v Installation and maintenance of...
... obtain warranty service. Some fees might be at http://support.microsoft.com/directory or you to change without notice. Note: Phone numbers are not covered by the warranty: v Replacement or use of parts not manufactured for or by Lenovo or non-warranted Lenovo parts v Identification of software problem sources v Configuration of BIOS as part of an installation or upgrade v Changes, modifications, or upgrades to device drivers v Installation and maintenance of network operating systems (NOS) v Installation and maintenance of...

User Manual
Page 79
... recovery operations 42 basic troubleshooting 57 battery, replacing 20 BIOS, updating (flashing) 53, 54 boot-block recovery 54 C cable lock, security 39 cables, connecting 37 changing password 50 startup device sequence 52 cleaning the mouse 60 CMOS, clearing 39 components, accessing system board 16 components, internal 10 computer cover opening 14 connector description 9 connectors front 7 rear 8 considerations, passwords 50 creating and using a recovery repair diskette 46 and using rescue media 45 creating and using recovery media 41 CRU completing the installation 37 customer support center...
... recovery operations 42 basic troubleshooting 57 battery, replacing 20 BIOS, updating (flashing) 53, 54 boot-block recovery 54 C cable lock, security 39 cables, connecting 37 changing password 50 startup device sequence 52 cleaning the mouse 60 CMOS, clearing 39 components, accessing system board 16 components, internal 10 computer cover opening 14 connector description 9 connectors front 7 rear 8 considerations, passwords 50 creating and using a recovery repair diskette 46 and using rescue media 45 creating and using recovery media 41 CRU completing the installation 37 customer support center...
User Manual
Page 80
... 59 PCI card 18 installing, replacing 18 physical specifications 4 power Advanced Configuration and Power Interface (ACPI) support 2 features 2 power supply assembly, replacing 26 power-on self-test (POST) 53 Power-On, Password 50 productivity center, ThinkVantage 64 programs, updating system 53 protection, password 39 purchasing additional services 67 72 User Guide R rear connectors 8 recovering from a POST/BIOS update failure 54 software 41 recovery boot-block 54 operations, backup and 42 problems, solving 48 recovery repair diskette, creating and using 46 recovery media, creating and using...
... 59 PCI card 18 installing, replacing 18 physical specifications 4 power Advanced Configuration and Power Interface (ACPI) support 2 features 2 power supply assembly, replacing 26 power-on self-test (POST) 53 Power-On, Password 50 productivity center, ThinkVantage 64 programs, updating system 53 protection, password 39 purchasing additional services 67 72 User Guide R rear connectors 8 recovering from a POST/BIOS update failure 54 software 41 recovery boot-block 54 operations, backup and 42 problems, solving 48 recovery repair diskette, creating and using 46 recovery media, creating and using...
User Manual
Page 81
... board (continued) locating parts 11 locations 11 memory module 16 system fan, replacing 32 T television output notice 70 temporary startup device 51 ThinkVantage productivity center 64 trademarks 70 troubleshooting, basic 57 troubleshooting, diagnostics 57 U updating (flashing) BIOS 53 system programs 53 updating (flashing) BIOS 54 USB connector 9 using diagnostic programs 65 documentation 65 other services 66 passwords 49 recovery repair diskette, creating and using 46 rescue media, creating and 45 Setup Utility 49 V VGA monitor connector 9 video subsystem 1 viewing and changing settings...
... board (continued) locating parts 11 locations 11 memory module 16 system fan, replacing 32 T television output notice 70 temporary startup device 51 ThinkVantage productivity center 64 trademarks 70 troubleshooting, basic 57 troubleshooting, diagnostics 57 U updating (flashing) BIOS 53 system programs 53 updating (flashing) BIOS 54 USB connector 9 using diagnostic programs 65 documentation 65 other services 66 passwords 49 recovery repair diskette, creating and using 46 rescue media, creating and 45 Setup Utility 49 V VGA monitor connector 9 video subsystem 1 viewing and changing settings...

Brochure
Page 3
... PFC Graphic Card Integrated • Intel® HD Graphics Discrete • NVIDIA® GeForce 310 512MB DDR3 (VGA + DP) • NVIDIA® Quadro® FX380 (DVI + DP) 3 Security • Raid 0, 1 • TPM 1.2 chip • USB Individual Disable/Enable • eSATA port disablement • Kensington Slot • Computrace Support Limited Warranty • Up to 3 years Preloaded Software (in Windows® 7) • Adobe® Acrobat® Reader...
... PFC Graphic Card Integrated • Intel® HD Graphics Discrete • NVIDIA® GeForce 310 512MB DDR3 (VGA + DP) • NVIDIA® Quadro® FX380 (DVI + DP) 3 Security • Raid 0, 1 • TPM 1.2 chip • USB Individual Disable/Enable • eSATA port disablement • Kensington Slot • Computrace Support Limited Warranty • Up to 3 years Preloaded Software (in Windows® 7) • Adobe® Acrobat® Reader...


