
Owners Manual
Page 1
DVD PLAYER/ VIDEO CASSETTE RECORDER OWNER'S MANUAL MODEL : V281 Before connecting, operating or adjusting this product, please read this instruction booklet carefully and completely.
DVD PLAYER/ VIDEO CASSETTE RECORDER OWNER'S MANUAL MODEL : V281 Before connecting, operating or adjusting this product, please read this instruction booklet carefully and completely.

Owners Manual
Page 2
... COVER (OR BACK) NO USER-SERVICEABLE PARTS INSIDE REFER SERVICING TO QUALIFIED SERVICE PERSONNEL. Slots and openings in electric shock or fire. CAUTION: This Digital Video Disc Player employs a Laser System. DO NOT STARE INTO BEAM. 2 This lightning flash with liquids, such as a bookcase or rack unless proper ventilation is easily...
... COVER (OR BACK) NO USER-SERVICEABLE PARTS INSIDE REFER SERVICING TO QUALIFIED SERVICE PERSONNEL. Slots and openings in electric shock or fire. CAUTION: This Digital Video Disc Player employs a Laser System. DO NOT STARE INTO BEAM. 2 This lightning flash with liquids, such as a bookcase or rack unless proper ventilation is easily...
Owners Manual
Page 3
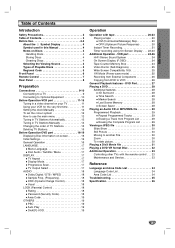
...26 General Playback features - VCR part 24-26 Hi-Fi Stereo Sound System 24 On Screen Display (F.OSD 24 Tape Counter Memory Stop 24 Video Doctor (Self-Diagnosis 25 Wide Screen Compatibility 16:9 25 1W Mode (Power save mode 25 Recording from External Components 26 Copying from Program ... 6 Remote Control 7 Rear Panel 8 Preparation Connections 9-10 Connecting to a TV 9 Connecting to Optional Equipment 10 Before Operation-VCR part 11-15 Tuning in a video channel on your TV 11 Using your VCR for the very first time 11 Setting the clock Manually 12 To set the colour system 12...
...26 General Playback features - VCR part 24-26 Hi-Fi Stereo Sound System 24 On Screen Display (F.OSD 24 Tape Counter Memory Stop 24 Video Doctor (Self-Diagnosis 25 Wide Screen Compatibility 16:9 25 1W Mode (Power save mode 25 Recording from External Components 26 Copying from Program ... 6 Remote Control 7 Rear Panel 8 Preparation Connections 9-10 Connecting to a TV 9 Connecting to Optional Equipment 10 Before Operation-VCR part 11-15 Tuning in a video channel on your TV 11 Using your VCR for the very first time 11 Setting the clock Manually 12 To set the colour system 12...
Owners Manual
Page 4
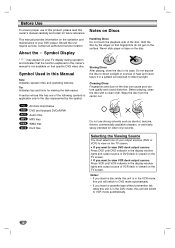
... intended for older vinyl records. " " may appear on your output sources (DVD or VCR) to the disc represented by the edges so that specific DVD video disc. Symbol Used in the display window lights and output source of your TV display during operation and indicates that the function explained in this...
... intended for older vinyl records. " " may appear on your output sources (DVD or VCR) to the disc represented by the edges so that specific DVD video disc. Symbol Used in the display window lights and output source of your TV display during operation and indicates that the function explained in this...
Owners Manual
Page 5
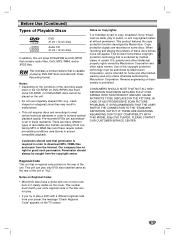
... by Macrovision Corporation and other limited viewing uses only unless otherwise authorized by Macrovision Corporation, and is capable of playing DVD-RW discs recorded with Video Recording format. Our company has no right to ensure compatible playback. CONSUMERS SHOULD NOTE THAT NOT ALL HIGH DEFINITION TELEVISION SETS ARE FULLY COMPATIBLE WITH...
... by Macrovision Corporation and other limited viewing uses only unless otherwise authorized by Macrovision Corporation, and is capable of playing DVD-RW discs recorded with Video Recording format. Our company has no right to ensure compatible playback. CONSUMERS SHOULD NOTE THAT NOT ALL HIGH DEFINITION TELEVISION SETS ARE FULLY COMPATIBLE WITH...
Owners Manual
Page 6
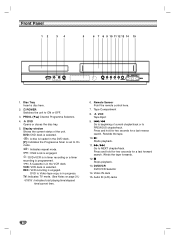
... deck is selected. : A disc is loaded in the VCR deck. VCR: VCR deck is in the DVD deck. [P]: Indicates the Progressive Scan is set to Video tape copy is engaged. DVD to On mode. : Indicates repeat mode. : Child Lock is engaged. : DVD+VCR is in progress. Winds the tape forwards. 12... playing time/elapsed time/current time. 6. VCR Tape Eject 9. ./m Go to PREVIOUS chapter/track. N Starts playback. 11. M/> Go to ON or OFF. 3. x Stops playback. 13. Video IN Jack 15.
... deck is selected. : A disc is loaded in the VCR deck. VCR: VCR deck is in the DVD deck. [P]: Indicates the Progressive Scan is set to Video tape copy is engaged. DVD to On mode. : Indicates repeat mode. : Child Lock is engaged. : DVD+VCR is in progress. Winds the tape forwards. 12... playing time/elapsed time/current time. 6. VCR Tape Eject 9. ./m Go to PREVIOUS chapter/track. N Starts playback. 11. M/> Go to ON or OFF. 3. x Stops playback. 13. Video IN Jack 15.
Owners Manual
Page 7
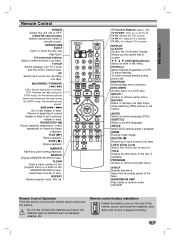
... disc tray. PR/TRK(+/-) Select channel programme of a DVD disc. DISC MENU Access menu of VCR. ANGLE Select DVD camera angle if available ZOOM Enlarge video image. Returns to previous chapter or track. MARKER Mark any point during the STOP mode, fast forward picture search. REPEAT Repeat chapter, track, title, all...
... disc tray. PR/TRK(+/-) Select channel programme of a DVD disc. DISC MENU Access menu of VCR. ANGLE Select DVD camera angle if available ZOOM Enlarge video image. Returns to previous chapter or track. MARKER Mark any point during the STOP mode, fast forward picture search. REPEAT Repeat chapter, track, title, all...

Owners Manual
Page 8
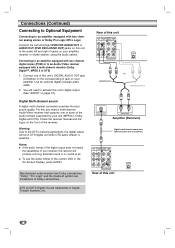
...(DVD/VCR OUT) Connect to an amplifier, receiver or stereo system. S-VIDEO OUT (DVD EXCLUSIVE OUT) Connect to a TV with Y Pb Pr inputs. COMPONENT/PROGRESSIVE SCAN VIDEO OUT (Y Pb Pr) (DVD EXCLUSIVE OUT) Connect to a TV with video inputs. COAXIAL (Digital audio out jack) (DVD EXCLUSIVE OUT) Connect to... power source. Do not touch the inner pins of the jacks on the rear panel. VIDEO OUT (DVD/VCR OUT) Connect to VCR. VIDEO IN (VCR IN AV1) Receive the video signals from an external source to a TV with S-Video input. Pr R R L L Pb Y AC Power Cord Connect to VCR.
...(DVD/VCR OUT) Connect to an amplifier, receiver or stereo system. S-VIDEO OUT (DVD EXCLUSIVE OUT) Connect to a TV with Y Pb Pr inputs. COMPONENT/PROGRESSIVE SCAN VIDEO OUT (Y Pb Pr) (DVD EXCLUSIVE OUT) Connect to a TV with video inputs. COAXIAL (Digital audio out jack) (DVD EXCLUSIVE OUT) Connect to... power source. Do not touch the inner pins of the jacks on the rear panel. VIDEO OUT (DVD/VCR OUT) Connect to VCR. VIDEO IN (VCR IN AV1) Receive the video signals from an external source to a TV with S-Video input. Pr R R L L Pb Y AC Power Cord Connect to VCR.

Owners Manual
Page 9
... appear scrambled if you may take advantage of this unit. 2. Connect the RF antenna cable from the RF.OUT jack on the TV using the video cable (V). 2. Rear of this unit to your indoor/ outdoor antenna to the TV. Connect the Left and Right AUDIO OUT jacks of the DVD Player... and Right AUDIO jacks of your audio system. When using the Y Pb Pr cable (C). 2. When using the Y Pb Pr cable. 2. Connect the COMPONENT/ PROGRESSIVE SCAN VIDEO OUT jacks on the DVD Player to the corresponding in jack (record deck) of the DVD Player to "On" on the TV using the audio...
... appear scrambled if you may take advantage of this unit. 2. Connect the RF antenna cable from the RF.OUT jack on the TV using the video cable (V). 2. Rear of this unit to your indoor/ outdoor antenna to the TV. Connect the Left and Right AUDIO OUT jacks of the DVD Player... and Right AUDIO jacks of your audio system. When using the Y Pb Pr cable (C). 2. When using the Y Pb Pr cable. 2. Connect the COMPONENT/ PROGRESSIVE SCAN VIDEO OUT jacks on the DVD Player to the corresponding in jack (record deck) of the DVD Player to "On" on the TV using the audio...
Owners Manual
Page 10
... the DTS Licensing agreement, the digital output will produce a strong, distorted sound or no sound at all. You will need a multi-channel Audio/Video receiver that supports one of your receiver, the receiver will be in jack on your amplifier. Check the receiver manual and the logos on page...output. (See "AUDIO" on the front of Dolby Laboratories. Connecting to an amplifier equipped with two channel digital stereo (PCM) or to an Audio/ Video receiver equipped with two channel analog stereo or Dolby Pro Logic II/Pro Logic Connect the Left and Right DVD/VCR AUDIO OUT or AUDIO...
... the DTS Licensing agreement, the digital output will produce a strong, distorted sound or no sound at all. You will need a multi-channel Audio/Video receiver that supports one of your receiver, the receiver will be in jack on your amplifier. Check the receiver manual and the logos on page...output. (See "AUDIO" on the front of Dolby Laboratories. Connecting to an amplifier equipped with two channel digital stereo (PCM) or to an Audio/ Video receiver equipped with two channel analog stereo or Dolby Pro Logic II/Pro Logic Connect the Left and Right DVD/VCR AUDIO OUT or AUDIO...
Owners Manual
Page 11
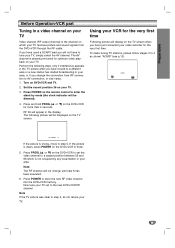
The AV channel is already pre-tuned for optimum video playback on the remote control to enter the stand by any local station ...(v or V) on your TV. 3. Note: The RF channel will appear in the display. Now tune your TV set the video channel to a vacant position between 22 and 68 which your TV receives picture and sound signals from RF connection to a different ... Following picture will not have to finish. 5. Preparation Before Operation-VCR part Tuning in a video channel on your TV Video channel (RF output channel) is the channel on the TV screen when you have just connected your...
The AV channel is already pre-tuned for optimum video playback on the remote control to enter the stand by any local station ...(v or V) on your TV. 3. Note: The RF channel will appear in the display. Now tune your TV set the video channel to a vacant position between 22 and 68 which your TV receives picture and sound signals from RF connection to a different ... Following picture will not have to finish. 5. Preparation Before Operation-VCR part Tuning in a video channel on your TV Video channel (RF output channel) is the channel on the TV screen when you have just connected your...
Owners Manual
Page 17
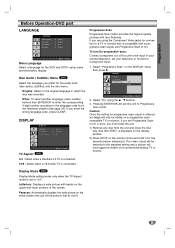
...Mode DVD Display Mode setting works only when the TV Aspect mode is connected. Letterbox: Displays a wide picture with less flickering. The video output will be restored to the standard setting and a picture will only be visible on the upper and lower portions of your monitor/...television, set Progressive Scan to Progressive scan mode. If you are using the v / V buttons. 3. Select "On" using the Component Video jacks for five seconds before releasing it. Move Enter 2. Original: Refers to the original language in error, you set to the language code list ...
...Mode DVD Display Mode setting works only when the TV Aspect mode is connected. Letterbox: Displays a wide picture with less flickering. The video output will be restored to the standard setting and a picture will only be visible on the upper and lower portions of your monitor/...television, set Progressive Scan to Progressive scan mode. If you are using the v / V buttons. 3. Select "On" using the Component Video jacks for five seconds before releasing it. Move Enter 2. Original: Refers to the original language in error, you set to the language code list ...
Owners Manual
Page 19
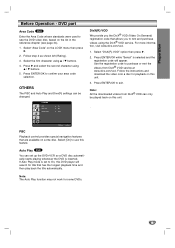
... this unit. . Select "Area Code" on the list in the reference chapter (see page 34). 1. Select [On] to purchase or rent the videos from DivX® VOD can be played back on this DVD player will appear. Press ENTER/OK while "Select" is inserted. Follow the instructions and... download the video onto a disc for playback on some DVDs. 19 Move Select PBC Playback control provides special navigation features that has the longest playback time and...
... this unit. . Select "Area Code" on the list in the reference chapter (see page 34). 1. Select [On] to purchase or rent the videos from DivX® VOD can be played back on this DVD player will appear. Press ENTER/OK while "Select" is inserted. Follow the instructions and... download the video onto a disc for playback on some DVDs. 19 Move Select PBC Playback control provides special navigation features that has the longest playback time and...
Owners Manual
Page 20
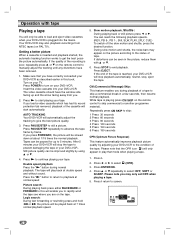
... to turn on the tape. Press PAUSE/STEP repeatedly to 5 minutes. If you press FORWARD, the picture will only be able to load and eject video cassettes when your DVD+VCR is plugged into your DVD+VCR to the condition of a tape to skip: 1 Press 30 seconds 2 Press 60 seconds 3 ... slightly by using v or V. 4. Please note you during normal playback. If the quality of tape. Insert the video cassette into the mains. Press N to rapidly wind the tape see where you load a video cassette which has had its record protection tab removed, playback of the tape is poor, repeatedly press 3 or...
... to turn on the tape. Press PAUSE/STEP repeatedly to 5 minutes. If you press FORWARD, the picture will only be able to load and eject video cassettes when your DVD+VCR is plugged into your DVD+VCR to the condition of a tape to skip: 1 Press 30 seconds 2 Press 60 seconds 3 ... slightly by using v or V. 4. Please note you during normal playback. If the quality of tape. Insert the video cassette into the mains. Press N to rapidly wind the tape see where you load a video cassette which has had its record protection tab removed, playback of the tape is poor, repeatedly press 3 or...
Owners Manual
Page 21
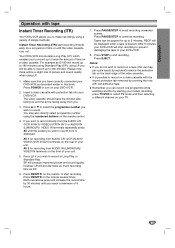
... 3 or 4 to select the programme number you wish to end recording. AV 2 for a set period of time or until you reach a maximum of the video cassette. RECP will be able to record up to 360 minutes. SP will produce improved picture and sound quality, however LP will be displayed when.... Press PAUSE/STEP to avoid recording unwanted scenes. Press REC/ITR on the remote to start recording immediately for recording from AUDIO IN (L(MONO)/R)/ VIDEO IN terminals on the front of your unit. 5. Notes: If you have the window side facing up to twice the amount of your DVD...
... 3 or 4 to select the programme number you wish to end recording. AV 2 for a set period of time or until you reach a maximum of the video cassette. RECP will be able to record up to 360 minutes. SP will produce improved picture and sound quality, however LP will be displayed when.... Press PAUSE/STEP to avoid recording unwanted scenes. Press REC/ITR on the remote to start recording immediately for recording from AUDIO IN (L(MONO)/R)/ VIDEO IN terminals on the front of your unit. 5. Notes: If you have the window side facing up to twice the amount of your DVD...
Owners Manual
Page 22
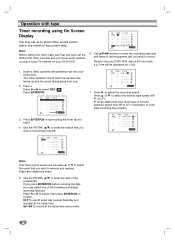
SP - - SP - - SP DLY SU MO TU WE TH FR SA OK i 6. Use v/V/1/2 buttons to enter the recording start setting the timer record event. 4. The video cassette should have tuned TV stations on your DVD+VCR. SP - - PR DATE T I M E - - SP - - SP - - Press B to select REC ( ). SP - ... record. PR DATE T I M E PR-03 SP - - SP - - Please note your DVD+VCR uses a 24 hour clock. Insert a video cassette with tape Timer recording using On Screen Display You may select one month of the programme that you wish to complete recording the program...
SP - - SP - - SP DLY SU MO TU WE TH FR SA OK i 6. Use v/V/1/2 buttons to enter the recording start setting the timer record event. 4. The video cassette should have tuned TV stations on your DVD+VCR. SP - - PR DATE T I M E - - SP - - SP - - Press B to select REC ( ). SP - ... record. PR DATE T I M E PR-03 SP - - SP - - Please note your DVD+VCR uses a 24 hour clock. Insert a video cassette with tape Timer recording using On Screen Display You may select one month of the programme that you wish to complete recording the program...
Owners Manual
Page 24
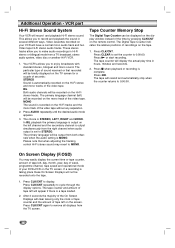
... mode from the TV screen. 24 Your VCR's allows you to STEREO. The particular type of tape left on the mono track of the video tape without any separation. 2. The tape counter and amount of sound received or that when adjusting the tracking control Hi-Fi stereo sound may ...through the display options. The primary language channel (left , day, month, year, day of week, programme channel, tape speed and operational mode of the video tape. The tape counter will record and playback Hi-Fi stereo sound. The choice is taking place these On Screen Displays will appear if there...
... mode from the TV screen. 24 Your VCR's allows you to STEREO. The particular type of tape left on the mono track of the video tape without any separation. 2. The tape counter and amount of sound received or that when adjusting the tracking control Hi-Fi stereo sound may ...through the display options. The primary language channel (left , day, month, year, day of week, programme channel, tape speed and operational mode of the video tape. The tape counter will record and playback Hi-Fi stereo sound. The choice is taking place these On Screen Displays will appear if there...
Owners Manual
Page 25
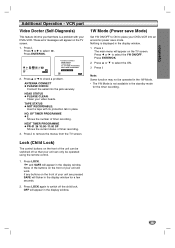
... PLEASE CHECK i 2. HEAD STATUS O PLEASE CLEAN: Clean your unit will flicker in the display window. Press ENTER/OK. 2. None of your video heads. OFF will appear on the front of the buttons on the TV screen. PRSET f OSD ON OFF Pr-12 ACMS 12 SET SYS ANTENNA...there is not available in the display window. 1 Press i. Press LOCK again to select the ON. 3 Press i. Operation Additional Operation - VCR part Video Doctor (Self-Diagnosis) This feature informs you that your unit are pressed SAFE will work. Press i. NEXT TIMER PROGRAMME O PR-01 26 10:00~11...
... PLEASE CHECK i 2. HEAD STATUS O PLEASE CLEAN: Clean your unit will flicker in the display window. Press ENTER/OK. 2. None of your video heads. OFF will appear on the front of the buttons on the TV screen. PRSET f OSD ON OFF Pr-12 ACMS 12 SET SYS ANTENNA...there is not available in the display window. 1 Press i. Press LOCK again to select the ON. 3 Press i. Operation Additional Operation - VCR part Video Doctor (Self-Diagnosis) This feature informs you that your unit are pressed SAFE will work. Press i. NEXT TIMER PROGRAMME O PR-01 26 10:00~11...

Owners Manual
Page 26
... to copy into VCR B. 3. Press REC/ITR on VCR is copy protected, you want to as VCR A. 1. VCR part Recording from External Components With this video recorder will be one used for a fixed length of your unit. 4. See Copyright on page 5 for more details. • To record for playback and will... the DVD deck and close the disc tray. 2. VCR A should be referred to start recording, press the REC/ITR on VCR B and PLAY on both video recorders. Insert the disc you may replay and record over and over again. • When you stop the DVD playback during copying, the recording on...
... to copy into VCR B. 3. Press REC/ITR on VCR is copy protected, you want to as VCR A. 1. VCR part Recording from External Components With this video recorder will be one used for a fixed length of your unit. 4. See Copyright on page 5 for more details. • To record for playback and will... the DVD deck and close the disc tray. 2. VCR A should be referred to start recording, press the REC/ITR on VCR B and PLAY on both video recorders. Insert the disc you may replay and record over and over again. • When you stop the DVD playback during copying, the recording on...

Owners Manual
Page 27
... screen. Operation General Playback features - DVD, DivX disc; 4 steps MP3, WMA, Audio CD ; 3 steps While the playback is paused, press M repeatedly to exit. Press . DVD Video discs: Chapter/Title/Off Audio CD, DivX/MP3/WMA discs: Track/All/Off During playback, each press of DVD disc contains scenes recorded different camera.... Otherwise, the disc menu may appears. During playback of A-B button to select point A and point B and repeats a sequence from point A (Starting point) to enlarge the video image (4 steps). During playback, press AUDIO repeatedly to select a desired angle.
... screen. Operation General Playback features - DVD, DivX disc; 4 steps MP3, WMA, Audio CD ; 3 steps While the playback is paused, press M repeatedly to exit. Press . DVD Video discs: Chapter/Title/Off Audio CD, DivX/MP3/WMA discs: Track/All/Off During playback, each press of DVD disc contains scenes recorded different camera.... Otherwise, the disc menu may appears. During playback of A-B button to select point A and point B and repeats a sequence from point A (Starting point) to enlarge the video image (4 steps). During playback, press AUDIO repeatedly to select a desired angle.

