
Owners Manual
Page 5
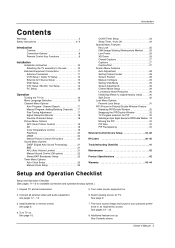
Connect all accessories. 5. see pages 12 ~ 14. 6. See page 9. 4. Turn video source equipment on . See pages 19 ~ 22. 8. Introduction Contents Warnings 2 Safety Instructions 3~4 Introduction Controls 7 Connection Options 8 Remote Control Key Functions 9 Installation ... 29 Cinema Mode Setup 29 Luminance Noise Reduction 30 Initializing (Reset to your personal preference or as required by source. Fine-tune source image and sound to original factory value) . . . . .30 Split Zoom 30 Lock Menu Options Parental Lock Setup 31 PIP (Picture-In-Picture)/Double Window ...
Connect all accessories. 5. see pages 12 ~ 14. 6. See page 9. 4. Turn video source equipment on . See pages 19 ~ 22. 8. Introduction Contents Warnings 2 Safety Instructions 3~4 Introduction Controls 7 Connection Options 8 Remote Control Key Functions 9 Installation ... 29 Cinema Mode Setup 29 Luminance Noise Reduction 30 Initializing (Reset to your personal preference or as required by source. Fine-tune source image and sound to original factory value) . . . . .30 Split Zoom 30 Lock Menu Options Parental Lock Setup 31 PIP (Picture-In-Picture)/Double Window ...
Owners Manual
Page 8
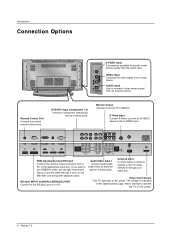
.... Monitor Output Connect a second TV or Monitor. AUDIO Input Use to connect to hear stereo sound from an S-VIDEO device to operate the TV on AC power. Antenna Input Connect cable or antenna signals to the RS-232C port on the Specifications ...with separate cable. REMOTE CONTROL RS-232C INPUT (CONTROL/SERVICE) DVI INPUT AUDIO INPUT RGB INPUT COMPONENT INPUT 2 COMPONENT INPUT 1 VIDEO R L AUDIO MONITOR OUTPUT R L/MONO A/V INPUT 1 S-VIDEO AUDIO VIDEO Antenna AC INPUT RGB Input/Audio Input/DVI Input Connect the monitor output connector from a PC to use RGB/DVI audio, ...
.... Monitor Output Connect a second TV or Monitor. AUDIO Input Use to connect to hear stereo sound from an S-VIDEO device to operate the TV on AC power. Antenna Input Connect cable or antenna signals to the RS-232C port on the Specifications ...with separate cable. REMOTE CONTROL RS-232C INPUT (CONTROL/SERVICE) DVI INPUT AUDIO INPUT RGB INPUT COMPONENT INPUT 2 COMPONENT INPUT 1 VIDEO R L AUDIO MONITOR OUTPUT R L/MONO A/V INPUT 1 S-VIDEO AUDIO VIDEO Antenna AC INPUT RGB Input/Audio Input/DVI Input Connect the monitor output connector from a PC to use RGB/DVI audio, ...
Owners Manual
Page 9
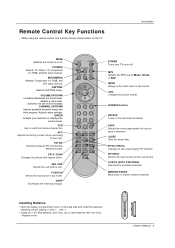
...it at the remote control sensor on the back side and install the batteries matching correct polarity (+ with +, - TVVIDEO Selects: TV, Video 1-2, Component 1-2, RGB, and DVI input sources. MULTIMEDIA Selects: Component 1-2, RGB, and DVI input sources. POSITION Moves the sub picture ... WIN. Selects a menu item. Don't mix old or used batteries with Auto program. Adjusts menu settings. DASP Selects the sound appropriate for available channels. CAPTION Selects CAPTION mode. PIP/DW Switches between PIP and Double Window modes. ENTER Accepts your TV on...
...it at the remote control sensor on the back side and install the batteries matching correct polarity (+ with +, - TVVIDEO Selects: TV, Video 1-2, Component 1-2, RGB, and DVI input sources. MULTIMEDIA Selects: Component 1-2, RGB, and DVI input sources. POSITION Moves the sub picture ... WIN. Selects a menu item. Don't mix old or used batteries with Auto program. Adjusts menu settings. DASP Selects the sound appropriate for available channels. CAPTION Selects CAPTION mode. PIP/DW Switches between PIP and Double Window modes. ENTER Accepts your TV on...
Owners Manual
Page 15
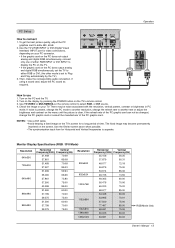
Use TV/VIDEO or MULTIMEDIA on the PC and the TV. 2. There may become permanently imprinted on the TV's remote ...Owner's Manual 15 To get the best picture quality, adjust the PC graphics card to use 1. If using a sound card, adjust the PC sound as required. The fixed image may be changed, change the refresh rate to connect 1. Use the TV's RGB INPUT...If noise is set to display the PC on the TV. • If the graphic card on the TV's screen for video connections, depending on your TV. Check the image on the menu until the picture is separate. REMOTE CONTROL RS-232C INPUT...
Use TV/VIDEO or MULTIMEDIA on the PC and the TV. 2. There may become permanently imprinted on the TV's remote ...Owner's Manual 15 To get the best picture quality, adjust the PC graphics card to use 1. If using a sound card, adjust the PC sound as required. The fixed image may be changed, change the refresh rate to connect 1. Use the TV's RGB INPUT...If noise is set to display the PC on the TV. • If the graphic card on the TV's screen for video connections, depending on your TV. Check the image on the menu until the picture is separate. REMOTE CONTROL RS-232C INPUT...
Owners Manual
Page 25
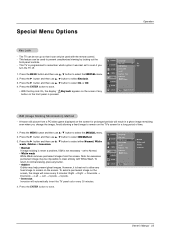
...image may help prevent ghost images. Press the ENTER button to Normal. • White wash White Wash removes permanent images from a PC/video game displayed on the TV's screen for prolonged periods will automatically invert the TV panel color every 30 minutes. 4. Special Menu Options Operation ...Key Lock - CHANNEL Language PICTURE Key lock ISM Method G On Off SOUND TIMER Low power Set ID Caption / Text SPECIAL Captions Demo SCREEN PIP/DW LOCK Menu Prev. To avoid a permanent image on the screen....
...image may help prevent ghost images. Press the ENTER button to Normal. • White wash White Wash removes permanent images from a PC/video game displayed on the TV's screen for prolonged periods will automatically invert the TV panel color every 30 minutes. 4. Special Menu Options Operation ...Key Lock - CHANNEL Language PICTURE Key lock ISM Method G On Off SOUND TIMER Low power Set ID Caption / Text SPECIAL Captions Demo SCREEN PIP/DW LOCK Menu Prev. To avoid a permanent image on the screen....
Owners Manual
Page 28
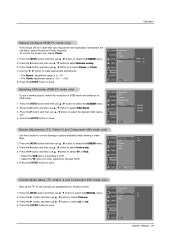
... To set Setting Picture Format - Set every aspect ratio for other RGB-PC and DVI-PC sources. - Use 4:3, or 16:9 for TV, Video, Component 480i sources. - Choose Zoom when you want to select Auto config.. 3. This function works in DVI mode. 1. RGB-PC, RGB-DTV... Auto config., you can also adjust ARC in the SCREEN menu. • 4:3 Choose 4:3 when you want to be cropped. CHANNEL Auto config. ARC PICTURE Position G SOUND Manual config D F G E 1. TIMER Reset 2. SPECIAL 3. Press the G button and then use D / E button to create a spectacular view. • Zoom - ...
... To set Setting Picture Format - Set every aspect ratio for other RGB-PC and DVI-PC sources. - Use 4:3, or 16:9 for TV, Video, Component 480i sources. - Choose Zoom when you want to select Auto config.. 3. This function works in DVI mode. 1. RGB-PC, RGB-DTV... Auto config., you can also adjust ARC in the SCREEN menu. • 4:3 Choose 4:3 when you want to be cropped. CHANNEL Auto config. ARC PICTURE Position G SOUND Manual config D F G E 1. TIMER Reset 2. SPECIAL 3. Press the G button and then use D / E button to create a spectacular view. • Zoom - ...
Owners Manual
Page 29
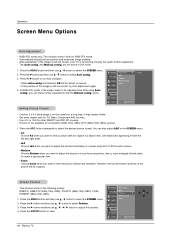
...) 4. Press the G button and then use D / E button to correct jittering or picture instability while viewing a video tape. 1. tion. 4. PICTURE ARC Position SOUND Manual config Reset TIMER VGA Mode G SPECIAL SCREEN PIP/DW LOCK Menu Prev. 640x480 848x480 852x480 Screen Adjustments (TV, ... still isn't clear after auto adjustment and especially if characters are still jittery, adjust the picture Phase manually. - PICTURE ARC Position SOUND Manual config G TIMER Reset SPECIAL SCREEN PIP/DW LOCK Menu Prev. Phase 0 Clock 0 CHANNEL Auto config. Use this function to...
...) 4. Press the G button and then use D / E button to correct jittering or picture instability while viewing a video tape. 1. tion. 4. PICTURE ARC Position SOUND Manual config Reset TIMER VGA Mode G SPECIAL SCREEN PIP/DW LOCK Menu Prev. 640x480 848x480 852x480 Screen Adjustments (TV, ... still isn't clear after auto adjustment and especially if characters are still jittery, adjust the picture Phase manually. - PICTURE ARC Position SOUND Manual config G TIMER Reset SPECIAL SCREEN PIP/DW LOCK Menu Prev. Phase 0 Clock 0 CHANNEL Auto config. Use this function to...

Owners Manual
Page 30
...YNR Reset SPECIAL SCREEN PIP/DW LOCK Menu Prev. Split Zoom can be viewed without using the D / E / F / G button. CHANNEL PICTURE SOUND TIMER Screen adj. Press the G button. • You can only move within the enlarged picture using Split Zoom. 1. G To set Split Zoom ...double window. - Section 5 is unique to fill the screen. 30 Plasma TV Operation Screen Menu Options continued Luminance Noise Reduction (TV, Video 1-2 and Component 480i modes only) - Enlarges the picture in correct proportions. - To return to initialize the adjusted settings. 1. Use...
...YNR Reset SPECIAL SCREEN PIP/DW LOCK Menu Prev. Split Zoom can be viewed without using the D / E / F / G button. CHANNEL PICTURE SOUND TIMER Screen adj. Press the G button. • You can only move within the enlarged picture using Split Zoom. 1. G To set Split Zoom ...double window. - Section 5 is unique to fill the screen. 30 Plasma TV Operation Screen Menu Options continued Luminance Noise Reduction (TV, Video 1-2 and Component 480i modes only) - Enlarges the picture in correct proportions. - To return to initialize the adjusted settings. 1. Use...
Owners Manual
Page 31
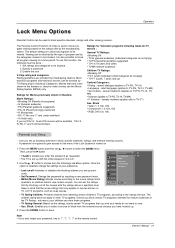
... F Violence - Ratings for Television programs including made-for a time period. A password is turned on /off G On Set password Off PICTURE MPAA SOUND Age block TIMER Content block Aux.block • Lock on 1. CHANNEL Lock on/off : Activates or disables the blocking scheme you to select a... on the ratings, blocks certain TV programs that the movie ratings limit only applies to save. sub menu, your children can set up . 3. Block • Video 1, 2 (On, Off) • Component 1, 2 (On, Off) • RGB, DVI (On, Off) Parental Lock Setup - Once the option is used...
... F Violence - Ratings for Television programs including made-for a time period. A password is turned on /off G On Set password Off PICTURE MPAA SOUND Age block TIMER Content block Aux.block • Lock on 1. CHANNEL Lock on/off : Activates or disables the blocking scheme you to select a... on the ratings, blocks certain TV programs that the movie ratings limit only applies to save. sub menu, your children can set up . 3. Block • Video 1, 2 (On, Off) • Component 1, 2 (On, Off) • RGB, DVI (On, Off) Parental Lock Setup - Once the option is used...

Owners Manual
Page 37
...ACC in color temperature. Acknowledgement [w][ ][Set ID][ ][OK][Data][x] External Control Device Setup 23. Transmission [k][y][ ][Set ID][ ][Data][Cr] Data 0 : TV 1 : Video 1 2 : Video 2 3 : Component 1 4 : Component 2 5 : RGB 6 : DVI Acknowledgement [y][ ][Set ID][ ][OK][Data][x] 25. See page 35. Transmission [k][t][ ][Set ...'Real data mapping 3' as shown below. You can also adjust bass in the Sound menu. PIP Input Select (Command2:y) G To select input source for sub picture in the Sound menu. You can also adjust balance in PIP mode. Transmission [k][$][ ][Set ID...
...ACC in color temperature. Acknowledgement [w][ ][Set ID][ ][OK][Data][x] External Control Device Setup 23. Transmission [k][y][ ][Set ID][ ][Data][Cr] Data 0 : TV 1 : Video 1 2 : Video 2 3 : Component 1 4 : Component 2 5 : RGB 6 : DVI Acknowledgement [y][ ][Set ID][ ][OK][Data][x] 25. See page 35. Transmission [k][t][ ][Set ...'Real data mapping 3' as shown below. You can also adjust bass in the Sound menu. PIP Input Select (Command2:y) G To select input source for sub picture in the Sound menu. You can also adjust balance in PIP mode. Transmission [k][$][ ][Set ID...


