
Owner's Manual (English)
Page 3
... blades with dry cloth. 7. This information shall be given in a separate booklet or sheet, or be provided with the manufacturer's instructions. 8. At the manufacturer's option, a picture or drawing that safety instruction : 1. PORTABLE CART WARNING Owner's Manual 3 Follow all warnings. 4. This information shall be entitled "Important Safety Instructions". The important safety instructions...
... blades with dry cloth. 7. This information shall be given in a separate booklet or sheet, or be provided with the manufacturer's instructions. 8. At the manufacturer's option, a picture or drawing that safety instruction : 1. PORTABLE CART WARNING Owner's Manual 3 Follow all warnings. 4. This information shall be entitled "Important Safety Instructions". The important safety instructions...
Owner's Manual (English)
Page 5
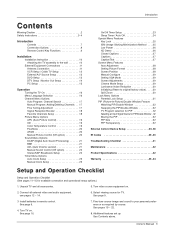
.... . . . .30 Split Zoom 30 Lock Menu Options Parental Lock Setup 31 PIP (Picture-In-Picture)/Double Window Feature Watching PIP/Double Window 32 Swapping the PIP/Double Window 32 TV Program selection for PIP 32 Selecting an Input Signal Source for PIP/Double Window .32 Moving the...32 External Control Device Setup 33~38 IR Codes 39~40 Troubleshooting Checklist 41 Maintenance 42 Product Specifications 42 Warranty 43~44 Setup and Operation Checklist Setup and Operation Checklist (See pages 11~15 for TV. Connect all accessories. 5. See page 16. 7. Additional features set up See...
.... . . . .30 Split Zoom 30 Lock Menu Options Parental Lock Setup 31 PIP (Picture-In-Picture)/Double Window Feature Watching PIP/Double Window 32 Swapping the PIP/Double Window 32 TV Program selection for PIP 32 Selecting an Input Signal Source for PIP/Double Window .32 Moving the...32 External Control Device Setup 33~38 IR Codes 39~40 Troubleshooting Checklist 41 Maintenance 42 Product Specifications 42 Warranty 43~44 Setup and Operation Checklist Setup and Operation Checklist (See pages 11~15 for TV. Connect all accessories. 5. See page 16. 7. Additional features set up See...
Owner's Manual (English)
Page 6
... work? A few minute colored dots may be exchanged or returned. 6 Plasma TV Versatile The light weight and thin size makes it can be also be ...lamps. This means that your plasma display in -Picture feature allows you can see the screen. Wide Screen The screen of the Plasma Display is so wide that ...plasma screen offers an exceptionally broad viewing angle -- Several tiny, minute colored dots visible on the screen should be exchanged or returned. The tiny dots appearing does not mean that a fan is used in other PDP manufacturers' products. Cooling Fan Noise (RU...
... work? A few minute colored dots may be exchanged or returned. 6 Plasma TV Versatile The light weight and thin size makes it can be also be ...lamps. This means that your plasma display in -Picture feature allows you can see the screen. Wide Screen The screen of the Plasma Display is so wide that ...plasma screen offers an exceptionally broad viewing angle -- Several tiny, minute colored dots visible on the screen should be exchanged or returned. The tiny dots appearing does not mean that a fan is used in other PDP manufacturers' products. Cooling Fan Noise (RU...
Owner's Manual (English)
Page 8
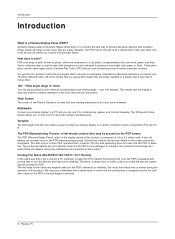
... to these jacks. Remote Control Port Connect your cable box. Power Cord Socket This TV operates on the Specifications page. RS-232C INPUT (CONTROL/SERVICE) PORT Connect to provide better picture quality than the video input. The voltage is indicated on AC power. Introduction Connection ...Options S-VIDEO A/V INPUT2 R AUDIO L / MONO VIDEO S-VIDEO Input A connection available to the RS-232C port on a PC. If you want to operate the TV on DC power. 8 Plasma TV REMOTE ...
... to these jacks. Remote Control Port Connect your cable box. Power Cord Socket This TV operates on the Specifications page. RS-232C INPUT (CONTROL/SERVICE) PORT Connect to provide better picture quality than the video input. The voltage is indicated on AC power. Introduction Connection ...Options S-VIDEO A/V INPUT2 R AUDIO L / MONO VIDEO S-VIDEO Input A connection available to the RS-232C port on a PC. If you want to operate the TV on DC power. 8 Plasma TV REMOTE ...

Owner's Manual (English)
Page 9
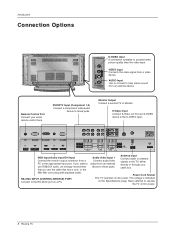
... Stereo, or SAP. PIP INPUT Selects the input source for the sub picture. Owner's Manual 9 FCR Use to the room. APC Adjusts the factory preset picture according to scroll the favorite channel list. TVVIDEO Selects: TV, Video 1-2, Component 1-2, RGB, and DVI input sources. MENU Brings up ...the main menu to the screen. Switches the set on the TV. MUTE POWER TV/VIDEO MULTIMEDIA MTS CAPTION ARC ...
... Stereo, or SAP. PIP INPUT Selects the input source for the sub picture. Owner's Manual 9 FCR Use to the room. APC Adjusts the factory preset picture according to scroll the favorite channel list. TVVIDEO Selects: TV, Video 1-2, Component 1-2, RGB, and DVI input sources. MENU Brings up ...the main menu to the screen. Switches the set on the TV. MUTE POWER TV/VIDEO MULTIMEDIA MTS CAPTION ARC ...
Owner's Manual (English)
Page 10
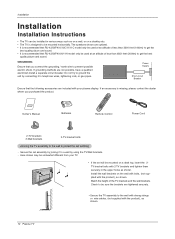
... telephone wires, lightening rods, or gas pipes. Here shown may be somewhat different from your plasma display. GROUNDING Ensure that RU-42/50PX10H/11H model only be used at an altitude of the TV brackets and the wall brackets. Match the height of less than 3281 feet (1000m) to... the product), as shown. 10 Plasma TV Check to be sure the brackets are optional. • It is recommended that RU-42/50PX10/10C/11/11C model only be used at an altitude of less than 6561 feet (2000m) to get the best quality picture and sound. Installation Installation Installation Instructions...
... telephone wires, lightening rods, or gas pipes. Here shown may be somewhat different from your plasma display. GROUNDING Ensure that RU-42/50PX10H/11H model only be used at an altitude of the TV brackets and the wall brackets. Match the height of less than 3281 feet (1000m) to... the product), as shown. 10 Plasma TV Check to be sure the brackets are optional. • It is recommended that RU-42/50PX10/10C/11/11C model only be used at an altitude of less than 6561 feet (2000m) to get the best quality picture and sound. Installation Installation Installation Instructions...
Owner's Manual (English)
Page 11
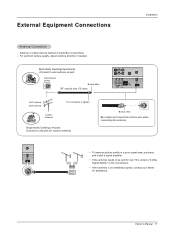
... connections. External Equipment Connections Installation Antenna Connection - Antenna or Cable Service without a Cable Box Connections - For optimum picture quality, adjust antenna direction if needed. Single-family Dwellings /Houses (Connect to wall jack for outdoor antenna) Bronze Wire... Be careful not to be split for assistance. Signal Amplifier • If the antenna is not installed properly, contact your dealer for two TV's, install a "2-Way Signal Splitter" in a poor signal area, purchase and install a signal amplifier. Owner's Manual 11 Multi-family Dwellings/...
... connections. External Equipment Connections Installation Antenna Connection - Antenna or Cable Service without a Cable Box Connections - For optimum picture quality, adjust antenna direction if needed. Single-family Dwellings /Houses (Connect to wall jack for outdoor antenna) Bronze Wire... Be careful not to be split for assistance. Signal Amplifier • If the antenna is not installed properly, contact your dealer for two TV's, install a "2-Way Signal Splitter" in a poor signal area, purchase and install a signal amplifier. Owner's Manual 11 Multi-family Dwellings/...
Owner's Manual (English)
Page 12
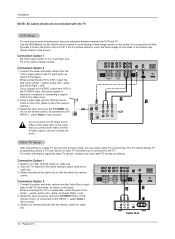
...local provider you connect an S-VIDEO output from the VCR's output jacks to the TV input jacks, as shown in the figure. Typically a frozen still picture from the Cable Box's output jacks to the TV input jacks, as shown in the figure. Connection Option 2 1. compared to ... COMPONENT INPUT 2 COMPONENT INPUT 1 VIDEO R L AUDIO R L/MONO MONITOR OUTPUT A/V INPUT 1 S-VIDEO AUDIO VIDEO 2 Antenna 1 AC INPUT (R) AUDIO (L) VIDEO TV VCR OUTPUT SWITCH 34 RF Cable Cable Box 12 Plasma TV To avoid picture noise (interference), leave an adequate distance between the VCR and...
...local provider you connect an S-VIDEO output from the VCR's output jacks to the TV input jacks, as shown in the figure. Typically a frozen still picture from the Cable Box's output jacks to the TV input jacks, as shown in the figure. Connection Option 2 1. compared to ... COMPONENT INPUT 2 COMPONENT INPUT 1 VIDEO R L AUDIO R L/MONO MONITOR OUTPUT A/V INPUT 1 S-VIDEO AUDIO VIDEO 2 Antenna 1 AC INPUT (R) AUDIO (L) VIDEO TV VCR OUTPUT SWITCH 34 RF Cable Cable Box 12 Plasma TV To avoid picture noise (interference), leave an adequate distance between the VCR and...
Owner's Manual (English)
Page 13
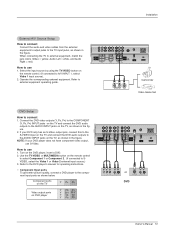
...VIDEO (R) AUDIO (L) DVD Owner's Manual 13 Refer to the DVD player's manual for operating instructions. • Component Input ports To get better picture quality, connect a DVD player to the component input ports as shown in the figure. 2. Installation External A/V Source Setup How to connect Connect the... equipment, match the jack colors (Video = yellow, Audio Left = white, and Audio Right = red). How to connect 1. Component ports on the TV Y PB PR Video output ports on the remote control to select Component 1 or Component 2. (If connected to A/V INPUT 1, select Video 1 input ...
...VIDEO (R) AUDIO (L) DVD Owner's Manual 13 Refer to the DVD player's manual for operating instructions. • Component Input ports To get better picture quality, connect a DVD player to the component input ports as shown in the figure. 2. Installation External A/V Source Setup How to connect Connect the... equipment, match the jack colors (Video = yellow, Audio Left = white, and Audio Right = red). How to connect 1. Component ports on the TV Y PB PR Video output ports on the remote control to select Component 1 or Component 2. (If connected to A/V INPUT 1, select Video 1 input ...
Owner's Manual (English)
Page 15
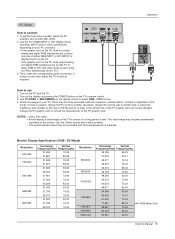
... brightness in PC mode. If noise is clear. The fixed image may be changed, change the refresh rate to use 1. Use TV/VIDEO or MULTIMEDIA on the menu until the picture is present, change the PC mode to another rate or adjust the brightness and contrast on the remote control to 640x... 480, 60Hz. 2. If the refresh rate of the PC graphic card. To get the best picture quality, adjust the PC graphics card to select RGB, or DVI source. 4. Use the TV's RGB INPUT or DVI (Digital Visual Interface) INPUT port for video connections, depending on your...
... brightness in PC mode. If noise is clear. The fixed image may be changed, change the refresh rate to use 1. Use TV/VIDEO or MULTIMEDIA on the menu until the picture is present, change the PC mode to another rate or adjust the brightness and contrast on the remote control to 640x... 480, 60Hz. 2. If the refresh rate of the PC graphic card. To get the best picture quality, adjust the PC graphics card to select RGB, or DVI source. 4. Use the TV's RGB INPUT or DVI (Digital Visual Interface) INPUT port for video connections, depending on your...
Owner's Manual (English)
Page 17
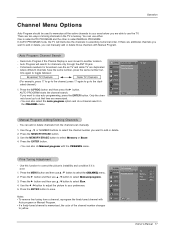
...and do Manual program with Manual Program. Notes • To remove fine tuning from the channel scan manually. 1. Redo Auto Program if the Plasma Display is poor. 1. Press the A.PROG button and then press the G button. Press the ENTER button to select Memory or Erase. ... select the CHANNEL menu. 2. Press the MENU button and then use D / E button to select Manual program. 3. CHANNEL Auto program Manual program G TV 2 PICTURE Favorite channel Memory On SOUND Fine 0 TIMER Booster Off SPECIAL SCREEN PIP/DW LOCK Menu Prev. One is called AUTO PROGRAM and the other is...
...and do Manual program with Manual Program. Notes • To remove fine tuning from the channel scan manually. 1. Redo Auto Program if the Plasma Display is poor. 1. Press the A.PROG button and then press the G button. Press the ENTER button to select Memory or Erase. ... select the CHANNEL menu. 2. Press the MENU button and then use D / E button to select Manual program. 3. CHANNEL Auto program Manual program G TV 2 PICTURE Favorite channel Memory On SOUND Fine 0 TIMER Booster Off SPECIAL SCREEN PIP/DW LOCK Menu Prev. One is called AUTO PROGRAM and the other is...
Owner's Manual (English)
Page 18
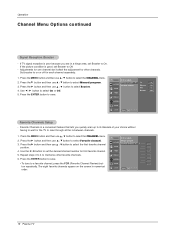
...to select the CHANNEL menu. 2. Press the G button and then use D / E button to select Manual program. 3. CHANNEL Auto program Manual program G TV 2 PICTURE Favorite channel Memory On SOUND Fine 0 Booster Off TIMER SPECIAL SCREEN PIP/DW LOCK Menu Prev. Use the F / G button to set Booster to wait ...quickly scan up to 8 channels of your choice without having to Off. - CHANNEL PICTURE Auto program Manual program Favorite channel G SOUND TIMER SPECIAL SCREEN PIP/DW LOCK Menu Prev. 18 Plasma TV Set booster to on the screen in a fringe area, set Booster to scan ...
...to select the CHANNEL menu. 2. Press the G button and then use D / E button to select Manual program. 3. CHANNEL Auto program Manual program G TV 2 PICTURE Favorite channel Memory On SOUND Fine 0 Booster Off TIMER SPECIAL SCREEN PIP/DW LOCK Menu Prev. Use the F / G button to set Booster to wait ...quickly scan up to 8 channels of your choice without having to Off. - CHANNEL PICTURE Auto program Manual program Favorite channel G SOUND TIMER SPECIAL SCREEN PIP/DW LOCK Menu Prev. 18 Plasma TV Set booster to on the screen in a fringe area, set Booster to scan ...
Owner's Manual (English)
Page 19
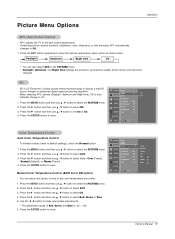
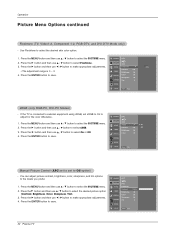
...Green or Blue. 5. Use the F / G button to make appropriate adjustments. • The adjustment range of Red, Green, and Blue is LG Electronic's unique picture improving technology to select ACC . 3. Press the MENU button and then use D / E button to display a real HD source through an advanced... and then use D / E button to Off option) - To initialize values (reset to the best picture appearance. - Cool Normal Warm Off Red 0 Green 0 Blue 0 Owner's Manual 19 APC adjusts the TV to default settings), select the Normal option. 1. Press the G button and then use D / E ...
...Green or Blue. 5. Use the F / G button to make appropriate adjustments. • The adjustment range of Red, Green, and Blue is LG Electronic's unique picture improving technology to select ACC . 3. Press the MENU button and then use D / E button to display a real HD source through an advanced... and then use D / E button to Off option) - To initialize values (reset to the best picture appearance. - Cool Normal Warm Off Red 0 Green 0 Blue 0 Owner's Manual 19 APC adjusts the TV to default settings), select the Normal option. 1. Press the G button and then use D / E ...
Owner's Manual (English)
Page 20
... sharpness, and tint options to select the desired picture option (Contrast, Brightness, Color, Sharpness, Tint). 3. CHANNEL APC PICTURE SOUND TIMER SPECIAL SCREEN ACC Fleshtone Contrast Brightness Color Sharpness Tint 100 G 60 50 50 0 PIP/DW LOCK Menu Prev. 20 Plasma TV Press the G button and then use D /... E button to select the desired skin color option. 1. Press the MENU button and then use D / E button to the levels you prefer. 1. Use Fleshtone to select the PICTURE menu. 2. CHANNEL APC 2.
... sharpness, and tint options to select the desired picture option (Contrast, Brightness, Color, Sharpness, Tint). 3. CHANNEL APC PICTURE SOUND TIMER SPECIAL SCREEN ACC Fleshtone Contrast Brightness Color Sharpness Tint 100 G 60 50 50 0 PIP/DW LOCK Menu Prev. 20 Plasma TV Press the G button and then use D /... E button to select the desired skin color option. 1. Press the MENU button and then use D / E button to the levels you prefer. 1. Use Fleshtone to select the PICTURE menu. 2. CHANNEL APC 2.
Owner's Manual (English)
Page 21
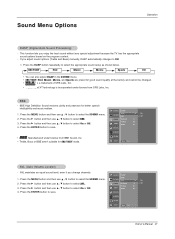
... the MENU button and then use D / E button to select On or Off. 4. Press the G button and then use D / E button to save . CHANNEL PICTURE SOUND TIMER DASP BBE AVL Balance Treble Bass SPECIAL G On 0 Off 50 50 SCREEN PIP/DW LOCK Menu Prev. BBE High Definition Sound restores clarity... under license from SRS Labs, Inc. AVL maintains an equal sound level; even if you enjoy the best sound without any special adjustment because the TV has the appropriate sound options based on the program content. - Press the G button and then use D / E button to Off. 1. Press the G ...
... the MENU button and then use D / E button to select On or Off. 4. Press the G button and then use D / E button to save . CHANNEL PICTURE SOUND TIMER DASP BBE AVL Balance Treble Bass SPECIAL G On 0 Off 50 50 SCREEN PIP/DW LOCK Menu Prev. BBE High Definition Sound restores clarity... under license from SRS Labs, Inc. AVL maintains an equal sound level; even if you enjoy the best sound without any special adjustment because the TV has the appropriate sound options based on the program content. - Press the G button and then use D / E button to Off. 1. Press the G ...
Owner's Manual (English)
Page 22
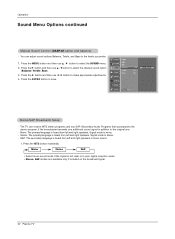
...balance) - SCREEN PIP/DW LOCK Menu Prev. Mono: The primary language is heard from left and right speakers in mono sound. 1. PICTURE BBE AVL 2. Signal mode is not clear or in addition to make appropriate adjustments. Treble 50 TIMER Bass 50 3. Stereo/SAP Broadcasts ... one additional sound signal in poor signal reception areas. • Stereo, SAP modes are available only if included on the broadcast signal. 22 Plasma TV Press the G button and then use D / E button to save. if the broadcaster transmits one . - Signal mode is heard from left...
...balance) - SCREEN PIP/DW LOCK Menu Prev. Mono: The primary language is heard from left and right speakers in mono sound. 1. PICTURE BBE AVL 2. Signal mode is not clear or in addition to make appropriate adjustments. Treble 50 TIMER Bass 50 3. Stereo/SAP Broadcasts ... one additional sound signal in poor signal reception areas. • Stereo, SAP modes are available only if included on the broadcast signal. 22 Plasma TV Press the G button and then use D / E button to save. if the broadcaster transmits one . - Signal mode is heard from left...
Owner's Manual (English)
Page 23
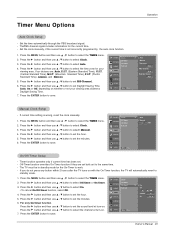
...(Mountain Standard Time), P.S.T. (Pacific Standard Time), Alaska, and Hawaii. 5. If you do not press any button within 2 hours after the TV turns on . CHANNEL PICTURE SOUND Clock Off timer On timer Auto off TIMER SPECIAL SCREEN PIP/DW LOCK Menu Prev. Press the MENU button and then use D / ...function operates only if current time has been set the hour. 5. G Auto Manual Time zone Auto PBS Channel TV 2 Daylight Saving Auto Manual Clock Setup - CHANNEL PICTURE SOUND Clock Off timer On timer Auto off TIMER SPECIAL SCREEN PIP/DW LOCK Menu Prev. Press the G ...
...(Mountain Standard Time), P.S.T. (Pacific Standard Time), Alaska, and Hawaii. 5. If you do not press any button within 2 hours after the TV turns on . CHANNEL PICTURE SOUND Clock Off timer On timer Auto off TIMER SPECIAL SCREEN PIP/DW LOCK Menu Prev. Press the MENU button and then use D / ...function operates only if current time has been set the hour. 5. G Auto Manual Time zone Auto PBS Channel TV 2 Daylight Saving Auto Manual Clock Setup - CHANNEL PICTURE SOUND Clock Off timer On timer Auto off TIMER SPECIAL SCREEN PIP/DW LOCK Menu Prev. Press the G ...
Owner's Manual (English)
Page 24
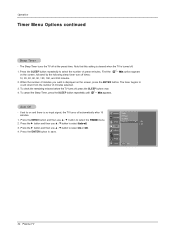
... and then use D / E button to select On or Off. 4. Press the MENU button and then use D / E button to select the TIMER menu. 2. CHANNEL PICTURE SOUND Clock Off timer On timer Auto off at the preset time. First the on and there is turned off times: zz --- To check the...press the SLEEP button once. Min option appears 10, 20, 30, 60, 90, 120, 180, and 240 minutes. 2. zz 4. Min appears. G On Off 24 Plasma TV The timer begins to save. Press the ENTER button to count down from the number of minutes selected. 3. Operation Timer Menu Options continued Sleep Timer...
... and then use D / E button to select On or Off. 4. Press the MENU button and then use D / E button to select the TIMER menu. 2. CHANNEL PICTURE SOUND Clock Off timer On timer Auto off at the preset time. First the on and there is turned off times: zz --- To check the...press the SLEEP button once. Min option appears 10, 20, 30, 60, 90, 120, 180, and 240 minutes. 2. zz 4. Min appears. G On Off 24 Plasma TV The timer begins to save. Press the ENTER button to count down from the number of minutes selected. 3. Operation Timer Menu Options continued Sleep Timer...
Owner's Manual (English)
Page 25
... → Upside → Upside. • Inversion Inversion will result in a ghost image remaining even when you turn the TV off. 1. Press the ENTER button to save . A frozen still picture from the screen. Press the G button and then use D / E button to remain on the screen for a long ... appears on the screen if any button on the TV's screen for prolonged periods will automatically invert the TV panel color every 30 minutes. 4. This feature can be used with White Wash. This TV is not necessary - CHANNEL Language PICTURE Key lock ISM Method G On Off SOUND TIMER ...
... → Upside → Upside. • Inversion Inversion will result in a ghost image remaining even when you turn the TV off. 1. Press the ENTER button to save . A frozen still picture from the screen. Press the G button and then use D / E button to remain on the screen for a long ... appears on the screen if any button on the TV's screen for prolonged periods will automatically invert the TV panel color every 30 minutes. 4. This feature can be used with White Wash. This TV is not necessary - CHANNEL Language PICTURE Key lock ISM Method G On Off SOUND TIMER ...

Owner's Manual (English)
Page 26
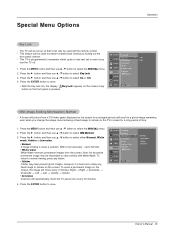
... then use D / E button to begin XD Demo. 4. Press the MENU button and then use D / E button to select the SPECIAL menu. 2. To start 26 Plasma TV Press the G button and then use D / E button to select Low power. 3. XD Demo - Press the ENTER button to select On or Off. • When...4. Press the G button and then use D / E button to stop XD Demo. Press the MENU button to select the SPECIAL menu. 2. CHANNEL Language PICTURE Key lock ISM Method SOUND TIMER Low power Set ID Caption / Text SPECIAL Captions Demo G SCREEN PIP/DW LOCK Menu Prev. Press the MENU button...
... then use D / E button to begin XD Demo. 4. Press the MENU button and then use D / E button to select the SPECIAL menu. 2. To start 26 Plasma TV Press the G button and then use D / E button to select Low power. 3. XD Demo - Press the ENTER button to select On or Off. • When...4. Press the G button and then use D / E button to stop XD Demo. Press the MENU button to select the SPECIAL menu. 2. CHANNEL Language PICTURE Key lock ISM Method SOUND TIMER Low power Set ID Caption / Text SPECIAL Captions Demo G SCREEN PIP/DW LOCK Menu Prev. Press the MENU button...


