

User Guide
Page 3
...and to ensure reliable operation of the obsolete outlet. 10. For example: near a swimming pool; Do not block any heat sources such as power supply cord or plug is operated. 2. Only use can be adhered to avoid injury from over . 13. Servicing is used, use instructions should... SAFETY INSTRUCTIONS CAUTION: PLEASE READ AND OBSERVE ALL WARNINGS AND INSTRUCTIONS IN THIS USER'S GUIDE AND THOSE MARKED ON THE UNIT. Protect the power cord from being walked on or pinched particularly at plugs, convenience receptacles, and the point where they exit from the wall outlet before the...
...and to ensure reliable operation of the obsolete outlet. 10. For example: near a swimming pool; Do not block any heat sources such as power supply cord or plug is operated. 2. Only use can be adhered to avoid injury from over . 13. Servicing is used, use instructions should... SAFETY INSTRUCTIONS CAUTION: PLEASE READ AND OBSERVE ALL WARNINGS AND INSTRUCTIONS IN THIS USER'S GUIDE AND THOSE MARKED ON THE UNIT. Protect the power cord from being walked on or pinched particularly at plugs, convenience receptacles, and the point where they exit from the wall outlet before the...

User Guide
Page 5
...Control Code 37 Test Changing Channels 38 Speed Test 38 Recorder Remote Control Settings. . . . . 38 7. Clock Setting 34 3. Table of Contents LG LRM-519 Front Panel and Rear Panel 9 Package Contents 10 Optional accessories 10 Subscribe to the Microsoft® Program Guide 11 Connect the Recorder to the TV... the Remote to Control the TV 26 To program the remote control 27 TV Manufacturing Remote Control Codes. . . . . . 28 Connect the Power to Setup 31 Terms of Digits and How You Change Channels 36 6. Subscription Status 35 4. Enter your ZIP Code 35 5. Wiring Setup and TV...
...Control Code 37 Test Changing Channels 38 Speed Test 38 Recorder Remote Control Settings. . . . . 38 7. Clock Setting 34 3. Table of Contents LG LRM-519 Front Panel and Rear Panel 9 Package Contents 10 Optional accessories 10 Subscribe to the Microsoft® Program Guide 11 Connect the Recorder to the TV... the Remote to Control the TV 26 To program the remote control 27 TV Manufacturing Remote Control Codes. . . . . . 28 Connect the Power to Setup 31 Terms of Digits and How You Change Channels 36 6. Subscription Status 35 4. Enter your ZIP Code 35 5. Wiring Setup and TV...

User Guide
Page 8
... to switch back. Press OK again to that channel. For more information, see Program the Remote to one page at a time on the Recorder. TV POWER POWER TV INPUT STOP PLAY REC REW PAUSE FWD REPLAY SKIP RECORDED TV GUIDE BACK INFO i DVD MENU OK LIVE TV TOP MENU AUDIO SUBTITLE ANGLE... one video input (such as the Program Guide. When watching live TV, the current chapter of a DVD, or track of a CD. To use the TV POWER button, you must program the remote to VIDEO 2. To use the MUTE button, you must program the remote to the next chapter of a DVD or...
... to switch back. Press OK again to that channel. For more information, see Program the Remote to one page at a time on the Recorder. TV POWER POWER TV INPUT STOP PLAY REC REW PAUSE FWD REPLAY SKIP RECORDED TV GUIDE BACK INFO i DVD MENU OK LIVE TV TOP MENU AUDIO SUBTITLE ANGLE... one video input (such as the Program Guide. When watching live TV, the current chapter of a DVD, or track of a CD. To use the TV POWER button, you must program the remote to VIDEO 2. To use the MUTE button, you must program the remote to the next chapter of a DVD or...

User Guide
Page 9
LG LRM-519 Front Panel and Rear Panel Disc Tray: Insert a DVD or CD here. HDD REC.: Indicates a show is playing. ANT.IN: Connect VHF/UHF/ CATV TV ... satellite settop box with a video cable. DIGITAL OUT - SERIAL: Connect the serial data control cable (if used ). POWER: Turns the Recorder on . RF BYPASS: Passes through the ANT.IN signal. Power cord: Connect the AC power cord. VIDEO IN: Connect the video output of a digital cable or satellite settop box with video inputs...
LG LRM-519 Front Panel and Rear Panel Disc Tray: Insert a DVD or CD here. HDD REC.: Indicates a show is playing. ANT.IN: Connect VHF/UHF/ CATV TV ... satellite settop box with a video cable. DIGITAL OUT - SERIAL: Connect the serial data control cable (if used ). POWER: Turns the Recorder on . RF BYPASS: Passes through the ANT.IN signal. Power cord: Connect the AC power cord. VIDEO IN: Connect the video output of a digital cable or satellite settop box with video inputs...
User Guide
Page 20
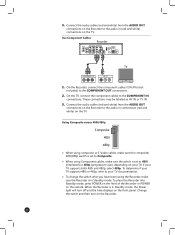
...connections. On the TV, connect the component cables to the COMPONENT OUT connections. 2. If your TV. When the Recorder is in Standby mode, the Power light will turn on your TV supports both 480i and 480p, select 480p. Using Composite versus 480i/480p Composite 480i 480p • When using composite... Recorder to the audio in (red and white) connections on the front panel. To place the Recorder into Standby mode, press POWER on the front of the Recorder or POWER on the TV. These connections may be labeled as AV IN or TV IN. 3. 3. Use Component Cables Recorder TV COMPONENT ...
...connections. On the TV, connect the component cables to the COMPONENT OUT connections. 2. If your TV. When the Recorder is in Standby mode, the Power light will turn on your TV supports both 480i and 480p, select 480p. Using Composite versus 480i/480p Composite 480i 480p • When using composite... Recorder to the audio in (red and white) connections on the front panel. To place the Recorder into Standby mode, press POWER on the front of the Recorder or POWER on the TV. These connections may be labeled as AV IN or TV IN. 3. 3. Use Component Cables Recorder TV COMPONENT ...
User Guide
Page 21
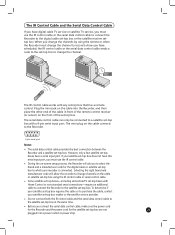
Plug the mini-jack on the cable into a power outlet or power strip. However, only a few satellite set -top box with a 9‑pin serial input port. If your satellite set-top box retailer or the satellite service ... to the satellite set-top box at the same time. • Before you connect the serial data control cable, make sure the power cord for the Recorder and the power cord for the satellite set-top box are not 21 plugged into the Recorder, and then place the other end of the...
Plug the mini-jack on the cable into a power outlet or power strip. However, only a few satellite set -top box with a 9‑pin serial input port. If your satellite set-top box retailer or the satellite service ... to the satellite set-top box at the same time. • Before you connect the serial data control cable, make sure the power cord for the Recorder and the power cord for the satellite set-top box are not 21 plugged into the Recorder, and then place the other end of the...
User Guide
Page 27
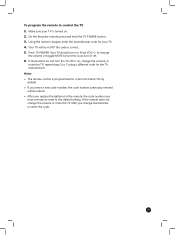
..., press and hold the TV POWER button. 3. Using the numeric keypad, enter the manufacturer code for the TV manufacturer. Your TV will be reset to control the TV 1. Press VOL+/- Notes • The remote control is correct. 5. to change the volume or toggle MUTE to control LG brand TVs by default. •... number you change the batteries, re-enter the code. 27 Make sure your TV. 4. If the buttons do not turn the sound on . 2. Press TV POWER. If the remote does not change the volume, or mute the TV, repeat steps 2 to 5 using a different code for your TV is turned on or...
..., press and hold the TV POWER button. 3. Using the numeric keypad, enter the manufacturer code for the TV manufacturer. Your TV will be reset to control the TV 1. Press VOL+/- Notes • The remote control is correct. 5. to change the volume or toggle MUTE to control LG brand TVs by default. •... number you change the batteries, re-enter the code. 27 Make sure your TV. 4. If the buttons do not turn the sound on . 2. Press TV POWER. If the remote does not change the volume, or mute the TV, repeat steps 2 to 5 using a different code for your TV is turned on or...

User Guide
Page 30
Turn on the TV 1. Attach the power cord to use the Recorder. Note You may need to change the TV video source to the Recorder and plug the power cord into a power strip/surge protector or a wall outlet. 2. On your TV remote control or the front panel of your TV, press TV/VIDEO until you see the Welcome screen for the Recorder Setup Wizard. Connect the Power to the Recorder and Turn on the TV. 3. The TV/VIDEO button might be marked SOURCE, INPUT, VIDEO 1, or VIDEO 2. 30 Press POWER on the Recorder. The TV should now display the Welcome screen for the Recorder Setup Wizard.
Turn on the TV 1. Attach the power cord to use the Recorder. Note You may need to change the TV video source to the Recorder and plug the power cord into a power strip/surge protector or a wall outlet. 2. On your TV remote control or the front panel of your TV, press TV/VIDEO until you see the Welcome screen for the Recorder Setup Wizard. Connect the Power to the Recorder and Turn on the TV. 3. The TV/VIDEO button might be marked SOURCE, INPUT, VIDEO 1, or VIDEO 2. 30 Press POWER on the Recorder. The TV should now display the Welcome screen for the Recorder Setup Wizard.
User Guide
Page 31
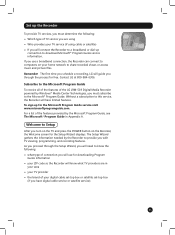
... gathers the information needed by Windows® Media Center Technologies, you must determine the following : • what type of the LG LRM-519 Digital Media Recorder powered by the Recorder to provide you with TV viewing, programming, and recording features. Subscribe to the Microsoft Program Guide To receive all... can connect to download Microsoft® Program Guide service information. Welcome to Setup After you turn on the TV and press the POWER button on your home network to share recorded shows or access music and picture files. Set up the Recorder To provide TV services...
... gathers the information needed by Windows® Media Center Technologies, you must determine the following : • what type of the LG LRM-519 Digital Media Recorder powered by the Recorder to provide you with TV viewing, programming, and recording features. Subscribe to the Microsoft Program Guide To receive all... can connect to download Microsoft® Program Guide service information. Welcome to Setup After you turn on the TV and press the POWER button on your home network to share recorded shows or access music and picture files. Set up the Recorder To provide TV services...

User Guide
Page 50
... To change channels to watch a show, view information about a show, record a show, and locate additional showings. Guide. Turn the TV Off or On Press TV POWER to turn the TV off or on by pressing MUTE, you must program the Recorder remote to control the TV. The Program Guide The Program... Input Source If you must program the Recorder remote to Control the TV. Change the TV Volume To change the TV volume by pressing TV POWER, you have another device such as a video cassette recorder connected to the TV, press TV INPUT to Control the TV. For more information, see Program...
... To change channels to watch a show, view information about a show, record a show, and locate additional showings. Guide. Turn the TV Off or On Press TV POWER to turn the TV off or on by pressing MUTE, you must program the Recorder remote to control the TV. The Program Guide The Program... Input Source If you must program the Recorder remote to Control the TV. Change the TV Volume To change the TV volume by pressing TV POWER, you have another device such as a video cassette recorder connected to the TV, press TV INPUT to Control the TV. For more information, see Program...

User Guide
Page 56
Follow the on the front panel of the Recorder turns off (approximately five seconds). 2. Turn the Recorder on by pressing Power on -screen messages to use the USB device for storage 1. Make sure the Recorder is powered off the Recorder, press and hold the button until the front panel of the Recorder or... (My Pictures) or listening to music (My Music), press Start on the remote to one of the Recorder or press and hold POWER on the Recorder. 4. Press and hold Power on the front panel of the USB ports on the Recorder remote. Connect the USB drive to exit My Pictures or My...
Follow the on the front panel of the Recorder turns off (approximately five seconds). 2. Turn the Recorder on by pressing Power on -screen messages to use the USB device for storage 1. Make sure the Recorder is powered off the Recorder, press and hold the button until the front panel of the Recorder or... (My Pictures) or listening to music (My Music), press Start on the remote to one of the Recorder or press and hold POWER on the Recorder. 4. Press and hold Power on the front panel of the USB ports on the Recorder remote. Connect the USB drive to exit My Pictures or My...

User Guide
Page 69
...If you forget your PIN, you must subscribe to the Microsoft Program Guide service. Cannot record a TV series. Turn the Recorder on: Press Power on the Recorder or POWER on the remote. The Recorder has locked up or frozen-the Start menu does not display, the TV picture is turned off. Wait... the volume, you can enter the following authorization code, and then select Done: Authorization Number: 2229566 You can then create a new PIN. The power light will not open. Issue The TV picture is lost when the Composite/480i/480p switch is turned off if you must program the remote...
...If you forget your PIN, you must subscribe to the Microsoft Program Guide service. Cannot record a TV series. Turn the Recorder on: Press Power on the Recorder or POWER on the remote. The Recorder has locked up or frozen-the Start menu does not display, the TV picture is turned off. Wait... the volume, you can enter the following authorization code, and then select Done: Authorization Number: 2229566 You can then create a new PIN. The power light will not open. Issue The TV picture is lost when the Composite/480i/480p switch is turned off if you must program the remote...

User Guide
Page 70
..., select Start > Settings > Audio Settings. Also check the connections from the back of the Recorder, wait five seconds, and then re-attach the power cord to the Recorder while press OPEN/CLOSE on the front panel. 70 For more information, see Connect the Recorder to the TV, Audio Components... DVD Settings > Digital Audio Settings: • The DVD or other content you are correctly positioned in Demonstration mode. To end Demonstration mode, unplug the power cord from the Recorder to the TV. Solution • Make sure the remote is no audio. Pay-per -view or video-on the TV or...
..., select Start > Settings > Audio Settings. Also check the connections from the back of the Recorder, wait five seconds, and then re-attach the power cord to the Recorder while press OPEN/CLOSE on the front panel. 70 For more information, see Connect the Recorder to the TV, Audio Components... DVD Settings > Digital Audio Settings: • The DVD or other content you are correctly positioned in Demonstration mode. To end Demonstration mode, unplug the power cord from the Recorder to the TV. Solution • Make sure the remote is no audio. Pay-per -view or video-on the TV or...

User Guide
Page 72
... and make sure the Recorder is not enough disk space to record the current show. If these two conditions are not plugged into a power outlet or power strip. • The Recorder supports serial data control by using the Serial-APG and Serial-MPG serial data control protocols. For example, ...music stored on the front panel. For more information, see Copying of the serial data control cable to make sure the power cord for the Recorder and the power cord for additional storage. Check with the serial data control cable connected. Solution Restart both the computer and the Recorder ...
... and make sure the Recorder is not enough disk space to record the current show. If these two conditions are not plugged into a power outlet or power strip. • The Recorder supports serial data control by using the Serial-APG and Serial-MPG serial data control protocols. For example, ...music stored on the front panel. For more information, see Copying of the serial data control cable to make sure the power cord for the Recorder and the power cord for additional storage. Check with the serial data control cable connected. Solution Restart both the computer and the Recorder ...

User Guide
Page 73
Specifications General Television System Channel Coverage Power Requirement Power Consumption Hard Disk Drive Operating Temperature Operating Humidity Dimension (W x D x H) Weight NTSC, Analog American Standard (480i) Unscrambled Air/Analog CATV 1-135 AC 120V, 60Hz 65W 160GB ...
Specifications General Television System Channel Coverage Power Requirement Power Consumption Hard Disk Drive Operating Temperature Operating Humidity Dimension (W x D x H) Weight NTSC, Analog American Standard (480i) Unscrambled Air/Analog CATV 1-135 AC 120V, 60Hz 65W 160GB ...


