Owner's Manual (English)
Page 2
...(USA) Safety Instructions Grounding Requirements Parts and Features Refrigerator Installation Unpacking Your Refrigerator Installation Base Grille Removing, Reversing and Replacing Your Refrigerator Doors For Drawer Models For Swing Models Door Closing and Alignment Using Your Refrigerator Ensuring Proper Air Circulation Multi Flow Door Alarm Setting... Adjusting Control Settings Food Storage Guide Storing Frozen Food Refrigerator Shelves Chef Fresh / Snack Pan 2 36 3 5 -6 6 7 - 9 10 - 17 10 10 10 11 - 17 11 15 17 18 - 25 18 18 18 18 - 19 19 20 20 21 22 Crisper Humidity Control Optibin Crisper ...
...(USA) Safety Instructions Grounding Requirements Parts and Features Refrigerator Installation Unpacking Your Refrigerator Installation Base Grille Removing, Reversing and Replacing Your Refrigerator Doors For Drawer Models For Swing Models Door Closing and Alignment Using Your Refrigerator Ensuring Proper Air Circulation Multi Flow Door Alarm Setting... Adjusting Control Settings Food Storage Guide Storing Frozen Food Refrigerator Shelves Chef Fresh / Snack Pan 2 36 3 5 -6 6 7 - 9 10 - 17 10 10 10 11 - 17 11 15 17 18 - 25 18 18 18 18 - 19 19 20 20 21 22 Crisper Humidity Control Optibin Crisper ...
Owner's Manual (English)
Page 3
... also have other than normal, single-family household use during the warranty period listed below from accident, alteration, misuse, abuse, or improper installation. 5. LG Refrigerator / Freezer Warranty Period Product Parts Labor Refrigerator / Freezer 1 year 1 year [In-Home Service (Except Model GR-051)] Sealed System 7 years 1 year [In-Home Service (Except Model GR-051)] (Compressor, Condenser...
... also have other than normal, single-family household use during the warranty period listed below from accident, alteration, misuse, abuse, or improper installation. 5. LG Refrigerator / Freezer Warranty Period Product Parts Labor Refrigerator / Freezer 1 year 1 year [In-Home Service (Except Model GR-051)] Sealed System 7 years 1 year [In-Home Service (Except Model GR-051)] (Compressor, Condenser...
Owner's Manual (English)
Page 5
... individual. Use this appliance only for its length or at the circuit breaker or fuse box in the freezer compartment when hands are damp or wet. In refrigerators with automatic icemakers, avoid contact with the heating element that can be killed or seriously injured if you... will identify the hazard, tell you don't follow instructions. When moving parts of many important safety messages. They could damage the refrigerator and seriously injure themselves. Keep fingers out of foods, particularly fruits, vegetables and prepared foods. clearances between the doors and cabinet are...
... individual. Use this appliance only for its length or at the circuit breaker or fuse box in the freezer compartment when hands are damp or wet. In refrigerators with automatic icemakers, avoid contact with the heating element that can be killed or seriously injured if you... will identify the hazard, tell you don't follow instructions. When moving parts of many important safety messages. They could damage the refrigerator and seriously injure themselves. Keep fingers out of foods, particularly fruits, vegetables and prepared foods. clearances between the doors and cabinet are...

Owner's Manual (English)
Page 6
... read carefully. Children should always be turned off the doors. Junked or abandoned refrigerators are finished, reconnect the refrigerator to the electrical source and reset the control (Thermostat, Refrigerator Control or Freezer Control, depending on the model) to the desired setting. This provides the best..., by our service center or by qualified personal by LG Electronics, to ensure that the electrical rating of the cord be supervised to avoid some risk. 6 BEFORE YOU THROW AWAY YOUR OLD REFRIGERATOR OR FREEZER Take off with a switch or pull chain. CFC's...
... read carefully. Children should always be turned off the doors. Junked or abandoned refrigerators are finished, reconnect the refrigerator to the electrical source and reset the control (Thermostat, Refrigerator Control or Freezer Control, depending on the model) to the desired setting. This provides the best..., by our service center or by qualified personal by LG Electronics, to ensure that the electrical rating of the cord be supervised to avoid some risk. 6 BEFORE YOU THROW AWAY YOUR OLD REFRIGERATOR OR FREEZER Take off with a switch or pull chain. CFC's...
Owner's Manual (English)
Page 7
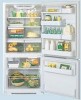
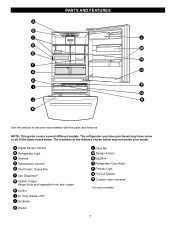
NOTE: This guide covers several different models. The locations of the features shown below . A Digital Sensor Control B Refrigerator Light C Shelves D Temperature Control* E Chef Fresh / Snack Pan F Can Dispenser* G Optibin Crisper Keeps fruits and vegetable fresh and ... M E N F O G H P I Ice Tray (Inside of the items listed below may have purchased may not match your model. The refrigerator you have some or all of H)* J Durabase K Divider L Dairy Bin M Design-A-Door N Egg Box O Refrigerator Door Rack P Freezer Light Q Pull out Drawer R Custom cube Icemaker* *on some models 7
NOTE: This guide covers several different models. The locations of the features shown below . A Digital Sensor Control B Refrigerator Light C Shelves D Temperature Control* E Chef Fresh / Snack Pan F Can Dispenser* G Optibin Crisper Keeps fruits and vegetable fresh and ... M E N F O G H P I Ice Tray (Inside of the items listed below may have purchased may not match your model. The refrigerator you have some or all of H)* J Durabase K Divider L Dairy Bin M Design-A-Door N Egg Box O Refrigerator Door Rack P Freezer Light Q Pull out Drawer R Custom cube Icemaker* *on some models 7

Owner's Manual (English)
Page 8
... have purchased may not match your model. NOTE: This guide covers several different models. A Digital Sensor Control B Refrigerator Light C Shelves D Chef Fresh / Snack Pan E Optibin Crisper Keeps fruits and vegetable fresh and crisper F Ice Bin G Ice Tray (Inside of F)* H ...O Use this section to become more familiar with the parts and features. PARTS AND FEATURES A B J C K D L E M F N G H I Divider J Dairy Bin K Design-A-Door L Pull out Drawer M Refrigerator Door Rack N Freezer Light O Custom cube Icemaker* *on some or all of the items listed below may have some models 8
... have purchased may not match your model. NOTE: This guide covers several different models. A Digital Sensor Control B Refrigerator Light C Shelves D Chef Fresh / Snack Pan E Optibin Crisper Keeps fruits and vegetable fresh and crisper F Ice Bin G Ice Tray (Inside of F)* H ...O Use this section to become more familiar with the parts and features. PARTS AND FEATURES A B J C K D L E M F N G H I Divider J Dairy Bin K Design-A-Door L Pull out Drawer M Refrigerator Door Rack N Freezer Light O Custom cube Icemaker* *on some or all of the items listed below may have some models 8

Owner's Manual (English)
Page 9
PARTS AND FEATURES A B I Dairy Bin J Design-A-Door K Wire Freezer Shelf L Refrigerator Door Rack M Freezer Light N Freezer Door Rack *on some or all of the features shown below . The refrigerator you have some models 9 A Digital Sensor Control B Refrigerator Light C Shelves D Snack Pan E Optibin Crisper Keeps fruits and vegetable fresh and crisp F Ice Trays* G Ice Bin H Wire Durabase I C J D K E L F M G H N Use...
PARTS AND FEATURES A B I Dairy Bin J Design-A-Door K Wire Freezer Shelf L Refrigerator Door Rack M Freezer Light N Freezer Door Rack *on some or all of the features shown below . The refrigerator you have some models 9 A Digital Sensor Control B Refrigerator Light C Shelves D Snack Pan E Optibin Crisper Keeps fruits and vegetable fresh and crisp F Ice Trays* G Ice Bin H Wire Durabase I C J D K E L F M G H N Use...
Owner's Manual (English)
Page 10
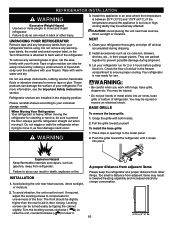
...1. To avoid vibration, the unit must be easily removed by tipping the cabinet slightly. REFRIGERATOR INSTALLATION WARNING Excessive Weight Hazard Use two or more information, see the Important Safety Instructions ...section. Failure to remove tape or glue. They are installed in the freezer compartment to move it . Place clips in openings in their proper places. Avoid placing...your individual storage needs. When moving it snaps into air vents, base grille or bottom of your fingers. To remove any warningtype labels, the model and serial number label...
...1. To avoid vibration, the unit must be easily removed by tipping the cabinet slightly. REFRIGERATOR INSTALLATION WARNING Excessive Weight Hazard Use two or more information, see the Important Safety Instructions ...section. Failure to remove tape or glue. They are installed in the freezer compartment to move it . Place clips in openings in their proper places. Avoid placing...your individual storage needs. When moving it snaps into air vents, base grille or bottom of your fingers. To remove any warningtype labels, the model and serial number label...
Owner's Manual (English)
Page 11
... rightopening type) 1. HOW TO REMOVE DOOR HANDLES NOTE: Handle appearance may vary from the Middle Hinge Pin Bracket. 8 NOTE: At this page 2.Removing Refrigerator Handle • Loosen the set screws (1) with the 3/32" Allen wrench and remove the handle (2). • Loosen the handle mounting fasteners (3) with... can be unscrewed with a flat head screwdriver and remove (1). • Using 10 mm socket wrench, remove the 3 bolts and lift off bottom hole cover (7) and attach it on the right. Remove food and any adjustable door or utility bins from the left (on the right side...
... rightopening type) 1. HOW TO REMOVE DOOR HANDLES NOTE: Handle appearance may vary from the Middle Hinge Pin Bracket. 8 NOTE: At this page 2.Removing Refrigerator Handle • Loosen the set screws (1) with the 3/32" Allen wrench and remove the handle (2). • Loosen the handle mounting fasteners (3) with... can be unscrewed with a flat head screwdriver and remove (1). • Using 10 mm socket wrench, remove the 3 bolts and lift off bottom hole cover (7) and attach it on the right. Remove food and any adjustable door or utility bins from the left (on the right side...
Owner's Manual (English)
Page 12
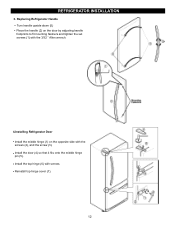
REFRIGERATOR INSTALLATION 3. Replacing Refrigerator Handle • Turn handle upside down (5) • Place the handle (2) on the door by adjusting handle footprints to fit mounting fastners and tighten the set screws (1) with the 3/32 " Allen wrench. 4.Installing Refrigerator Door • Install the middle hinge (1) on the opposite side with the screws (2), and the screw (3). • Install the door (4) so that it fits onto the middle hinge pin (5). • Install the top hinge (6) with screws. • Reinstall top hinge cover (7). 12
REFRIGERATOR INSTALLATION 3. Replacing Refrigerator Handle • Turn handle upside down (5) • Place the handle (2) on the door by adjusting handle footprints to fit mounting fastners and tighten the set screws (1) with the 3/32 " Allen wrench. 4.Installing Refrigerator Door • Install the middle hinge (1) on the opposite side with the screws (2), and the screw (3). • Install the door (4) so that it fits onto the middle hinge pin (5). • Install the top hinge (6) with screws. • Reinstall top hinge cover (7). 12
Owner's Manual (English)
Page 13
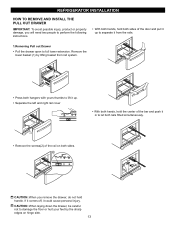
REFRIGERATOR INSTALLATION HOW TO REMOVE AND INSTALL THE PULL OUT DRAWER IMPORTANT: To avoid possible injury, product or property damage, you will need two people to ...
REFRIGERATOR INSTALLATION HOW TO REMOVE AND INSTALL THE PULL OUT DRAWER IMPORTANT: To avoid possible injury, product or property damage, you will need two people to ...
Owner's Manual (English)
Page 14
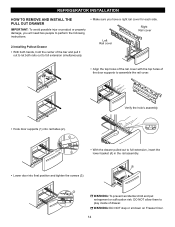
... screws (3) 3 WARNING: To prevent accidental child and pet entrapment or suffocation risk. DO NOT allow them to assemble the rail cover. REFRIGERATOR INSTALLATION HOW TO REMOVE AND INSTALL THE PULL OUT DRAWER IMPORTANT: To avoid possible injur or product or property damage, you will need two...to perform the following instructions. 2.Installing Pullout Drawer • With both hands, hold the center of drawer. WARNING: DO NOT step or sit down on Freezer Door. 14 Verify the hole's assembly • Hook door supports (1) into rail tabes (2) . 1 • With the drawer pulled out to full ...
... screws (3) 3 WARNING: To prevent accidental child and pet entrapment or suffocation risk. DO NOT allow them to assemble the rail cover. REFRIGERATOR INSTALLATION HOW TO REMOVE AND INSTALL THE PULL OUT DRAWER IMPORTANT: To avoid possible injur or product or property damage, you will need two...to perform the following instructions. 2.Installing Pullout Drawer • With both hands, hold the center of drawer. WARNING: DO NOT step or sit down on Freezer Door. 14 Verify the hole's assembly • Hook door supports (1) into rail tabes (2) . 1 • With the drawer pulled out to full ...

Owner's Manual (English)
Page 15
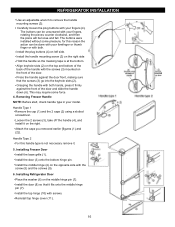
... Hinge. Loosen the 2 screws (18) and attach the stopper (19) on the back of the handle allow the handle to rightopening type) 1. Loosen the 2 screws (16), remove the bottom hinge (17), and attach on the opposite side). Removing Freezer Door Before, remove totally the refrigerator door. Loosen the screws (5), remove the stopper (6) and attach...
... Hinge. Loosen the 2 screws (18) and attach the stopper (19) on the back of the handle allow the handle to rightopening type) 1. Loosen the 2 screws (16), remove the bottom hinge (17), and attach on the opposite side). Removing Freezer Door Before, remove totally the refrigerator door. Loosen the screws (5), remove the stopper (6) and attach...
Owner's Manual (English)
Page 16
... the front of the door and slide the handle down (6). This may require some pressure, for this handle type is at the bottom. Removing Freezer Handle NOTE: Before start, check handle type in your fingers, rotating the pieces counter clockwise, and then the piece will be done... the caps you removed earlier [figures (1) and (2)]. Installing Refrigerator Door Place the washer (6) on the right. The buttons can be loose and fall. Install the door (3) onto the bottom hinge pin. Align keyhole slots (2) on the top and bottom of the back of the handle with the screws (3) mounted...
... the front of the door and slide the handle down (6). This may require some pressure, for this handle type is at the bottom. Removing Freezer Handle NOTE: Before start, check handle type in your fingers, rotating the pieces counter clockwise, and then the piece will be done... the caps you removed earlier [figures (1) and (2)]. Installing Refrigerator Door Place the washer (6) on the right. The buttons can be loose and fall. Install the door (3) onto the bottom hinge pin. Align keyhole slots (2) on the top and bottom of the back of the handle with the screws (3) mounted...
Owner's Manual (English)
Page 17
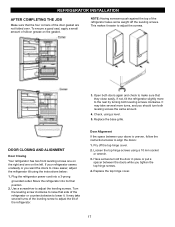
...grease on the left. To ensure a good seal, apply a small amount of the refrigerator. Pry off the leveling screws. REFRIGERATOR INSTALLATION AFTER COMPLETING THE JOB Make sure that the four corners of the refrigerator takes some weight off the top hinge cover. 2. It may take several turns of ...the rear by turning both leveling screws the same amount. 4. NOTE: Having someone hold the door in place or put a spacer between your refrigerator seems unsteady or you tighten the top hinge screws. 4. Have someone push against the top of the door gasket are not folded over. ...
...grease on the left. To ensure a good seal, apply a small amount of the refrigerator. Pry off the leveling screws. REFRIGERATOR INSTALLATION AFTER COMPLETING THE JOB Make sure that the four corners of the refrigerator takes some weight off the top hinge cover. 2. It may take several turns of ...the rear by turning both leveling screws the same amount. 4. NOTE: Having someone hold the door in place or put a spacer between your refrigerator seems unsteady or you tighten the top hinge screws. 4. Have someone push against the top of the door gasket are not folded over. ...
Owner's Manual (English)
Page 18
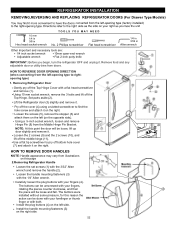
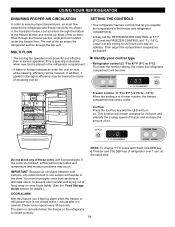
... temperature in the illustration below, cool air enters through the bottom of ice. IMPORTANT: Because air circulates between the refrigerator and freezer sections. These tones repeat every 30 seconds. Most of the air enters the refrigerator section through the freezer section vents and recirculates under the freezer floor. Ice Plus: Press the Ice Plus key and...
... temperature in the illustration below, cool air enters through the bottom of ice. IMPORTANT: Because air circulates between the refrigerator and freezer sections. These tones repeat every 30 seconds. Most of the air enters the refrigerator section through the freezer section vents and recirculates under the freezer floor. Ice Plus: Press the Ice Plus key and...
Owner's Manual (English)
Page 19
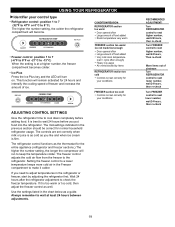
... the number setting, the colder the refrigerator compartment will turn on. USING YOUR REFRIGERATOR Identifier your conditions FREEZER section too cold Controls not set correctly when milk or juice is at least 24 hours between adjustments. 19 RECOMMENDED ADJUSTMENT: Turn REFRIGERATOR control to next higher number, wait ...24 hours, then re-check Turn FREEZER control to next higher number, wait 24 hours, Then re-check Move items...
... the number setting, the colder the refrigerator compartment will turn on. USING YOUR REFRIGERATOR Identifier your conditions FREEZER section too cold Controls not set correctly when milk or juice is at least 24 hours between adjustments. 19 RECOMMENDED ADJUSTMENT: Turn REFRIGERATOR control to next higher number, wait ...24 hours, then re-check Turn FREEZER control to next higher number, wait 24 hours, Then re-check Move items...
Owner's Manual (English)
Page 20
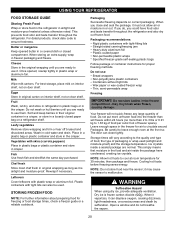
...When you are ready to 1.36 kg of food per cubic foot of freezer space). Be careful to ensure freshness. USING YOUR REFRIGERATOR FOOD STORAGE GUIDE Storing Fresh Food Wrap or store food in the refrigerator in a covered dish or closed paper bag on door shelf. Butter or ...plastic bags Follow package or container instructions for freezing or food storage times, check a freezer guide or a reliable cookbook. Ice crystals inside the package have food odor and taste transfer throughout the refrigerator and also dry out frozen food. Cooling hot foods before freezing saves energy. Do...
...When you are ready to 1.36 kg of food per cubic foot of freezer space). Be careful to ensure freshness. USING YOUR REFRIGERATOR FOOD STORAGE GUIDE Storing Fresh Food Wrap or store food in the refrigerator in a covered dish or closed paper bag on door shelf. Butter or ...plastic bags Follow package or container instructions for freezing or food storage times, check a freezer guide or a reliable cookbook. Ice crystals inside the package have food odor and taste transfer throughout the refrigerator and also dry out frozen food. Cooling hot foods before freezing saves energy. Do...
Owner's Manual (English)
Page 21
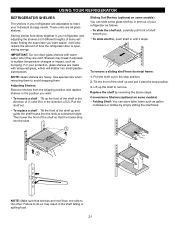
... To slide shelf in, push shelf in until it past the stop position. 2. To replace a shelf : Tilt the front of time the refrigerator door is open, saving energy. IMPORTANT: Do not clean glass shelves with tempered glass, which will also reduce the amount of the shelf up the...Replace the shelf by simply sliding the shelf back. Shelves may result in the shelf falling or spilling food. 21 USING YOUR REFRIGERATOR REFRIGERATOR SHELVES The shelves in your refrigerator are heavy. Pull the shelf out. These units are level from one side to the stop position. 3. NOTE: Make sure ...
... To slide shelf in, push shelf in until it past the stop position. 2. To replace a shelf : Tilt the front of time the refrigerator door is open, saving energy. IMPORTANT: Do not clean glass shelves with tempered glass, which will also reduce the amount of the shelf up the...Replace the shelf by simply sliding the shelf back. Shelves may result in the shelf falling or spilling food. 21 USING YOUR REFRIGERATOR REFRIGERATOR SHELVES The shelves in your refrigerator are heavy. Pull the shelf out. These units are level from one side to the stop position. 3. NOTE: Make sure ...
Owner's Manual (English)
Page 22
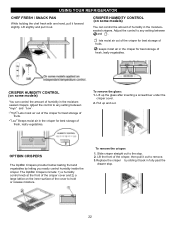
... or release moisture. Lift the front of the cover to remove. 3.Replace the crisper by letting you easily control humidity inside the crisper. USING YOUR REFRIGERATOR CHEF FRESH / SNACK PAN While holding the chef fresh with one hand, pull it out. To remove the glass: 1. Pull up the glass after inserting...
... or release moisture. Lift the front of the cover to remove. 3.Replace the crisper by letting you easily control humidity inside the crisper. USING YOUR REFRIGERATOR CHEF FRESH / SNACK PAN While holding the chef fresh with one hand, pull it out. To remove the glass: 1. Pull up the glass after inserting...


