

Owner's Manual
Page 1
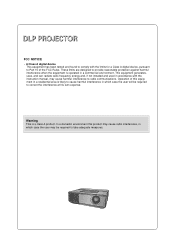
Please read this information to your set . Retain it for future reference. See the label attached on the bottom of the set . Model number : Serial number : LG DLP PROJECTOR HS101 OWNER'S MANUAL Record model number and serial number of the set and quote this manual carefully before operating your dealer when you require service.
Please read this information to your set . Retain it for future reference. See the label attached on the bottom of the set . Model number : Serial number : LG DLP PROJECTOR HS101 OWNER'S MANUAL Record model number and serial number of the set and quote this manual carefully before operating your dealer when you require service.
Owner's Manual
Page 2
... installed and used in which case the user may be required to correct the interference at his own expense. Operation of the FCC Rules. DLP PROJECTOR FCC NOTICE • A Class A digital device This equipment has been tested and found to comply with the instruction manual, may cause harmful interference to radio...
... installed and used in which case the user may be required to correct the interference at his own expense. Operation of the FCC Rules. DLP PROJECTOR FCC NOTICE • A Class A digital device This equipment has been tested and found to comply with the instruction manual, may cause harmful interference to radio...
Owner's Manual
Page 3
... Panel 8 Accessories 9 Optional Extras 9 Installing and Composition Installation Instructions 10 How to install the projector using the tripod ...11 Basic Operation of the Projector 12 Using Kensington Security System 13 Turning on the Projector 14 Turning off the Projector 14 Focus and Position of the Screen Image........14 Selecting source mode 14 Connection Connecting...
... Panel 8 Accessories 9 Optional Extras 9 Installing and Composition Installation Instructions 10 How to install the projector using the tripod ...11 Basic Operation of the Projector 12 Using Kensington Security System 13 Turning on the Projector 14 Turning off the Projector 14 Focus and Position of the Screen Image........14 Selecting source mode 14 Connection Connecting...
Owner's Manual
Page 4
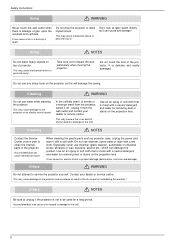
...damage to the unit! This may cause a fire hazard ! This may cause a fire hazard or damage to get wet. Only use the projector on a carpet, rug or place where ventilation is likely to the unit! The mains plug should be installed by the current leakage. When installing... be careful not to avoid a fire hazard ! This may cause a fire or an electric shock hazard ! NOTES : The violation of the projector. ➟ Safety Instructions are not possible, a separate circuit breaker should be inserted fully into the power outlet to place it near heat sources ...
...damage to the unit! This may cause a fire hazard ! This may cause a fire hazard or damage to get wet. Only use the projector on a carpet, rug or place where ventilation is likely to the unit! The mains plug should be installed by the current leakage. When installing... be careful not to avoid a fire hazard ! This may cause a fire or an electric shock hazard ! NOTES : The violation of the projector. ➟ Safety Instructions are not possible, a separate circuit breaker should be inserted fully into the power outlet to place it near heat sources ...
Owner's Manual
Page 5
...off and unplug it from the mains outlet and contact your Service Agent. Periodically examine the cord of impact shock or damage to the projector switch it off and unplug it from physical or mechanical abuse, such as flowerpot, cup, cosmetics or candle. Pay particular attention to the...plugs, wall outlets, and the point where the cord exits the appliance. 5 Don't look directly onto the lens when the projector is spilt into the projector unplug it from the mains supply outlet immediately and consult your service center. Protect the power cord from the mains supply and ...
...off and unplug it from the mains outlet and contact your Service Agent. Periodically examine the cord of impact shock or damage to the projector switch it off and unplug it from physical or mechanical abuse, such as flowerpot, cup, cosmetics or candle. Pay particular attention to the...plugs, wall outlets, and the point where the cord exits the appliance. 5 Don't look directly onto the lens when the projector is spilt into the projector unplug it from the mains supply outlet immediately and consult your service center. Protect the power cord from the mains supply and ...
Owner's Manual
Page 6
...and ventilate. Others WARNING Do not attempt to the unit! 6 Contact your dealer or service centre. Accumulated dust may cause damage to the projector or an electric shock hazard. Safety Instructions Using WARNING Never touch the wall outlet when there is not to be used for a long period.... Using NOTES Do not place heavy objects on the projection lens. Cleaning NOTES Contact the Service Center once a year to unplug if the projector is leakage of smoke or a strange smell from the wall outlet and contact your dealer or service centre. Others NOTES Be sure to clean...
...and ventilate. Others WARNING Do not attempt to the unit! 6 Contact your dealer or service centre. Accumulated dust may cause damage to the projector or an electric shock hazard. Safety Instructions Using WARNING Never touch the wall outlet when there is not to be used for a long period.... Using NOTES Do not place heavy objects on the projection lens. Cleaning NOTES Contact the Service Center once a year to unplug if the projector is leakage of smoke or a strange smell from the wall outlet and contact your dealer or service centre. Others NOTES Be sure to clean...
Owner's Manual
Page 7
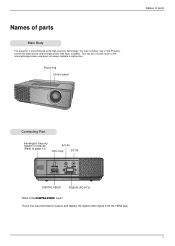
This is the DIGITAL VIDEO input? This can be a normal result of parts Main Body * The projector is manufactured using high-precision technology. Focus ring Control panel Names of parts Connecting Part Kensington Security System Connector (Refer to page 13) A/V IN SVC ... (PC/DTV) * What is the input terminal to receive and display the digital video signal from the HDMI jack. 7 You may, however, see on the Projector screen tiny black points and/or bright points (red, blue, or green). Names of the manufacturing process and does not always indicate a malfunction.
This is the DIGITAL VIDEO input? This can be a normal result of parts Main Body * The projector is manufactured using high-precision technology. Focus ring Control panel Names of parts Connecting Part Kensington Security System Connector (Refer to page 13) A/V IN SVC ... (PC/DTV) * What is the input terminal to receive and display the digital video signal from the HDMI jack. 7 You may, however, see on the Projector screen tiny black points and/or bright points (red, blue, or green). Names of the manufacturing process and does not always indicate a malfunction.
Owner's Manual
Page 8
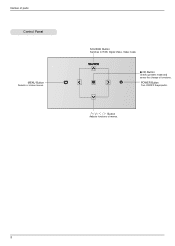
POWER Button Turn ON/OFF the projector. / / / Button Adjusts functions of functions. SOURCE Button Switches to RGB, Digital Video, Video mode. SOURCE A OK Button Checks present mode and saves the change of menus. 8 Names of parts Control Panel MENU Button Selects or closes menus.
POWER Button Turn ON/OFF the projector. / / / Button Adjusts functions of functions. SOURCE Button Switches to RGB, Digital Video, Video mode. SOURCE A OK Button Checks present mode and saves the change of menus. 8 Names of parts Control Panel MENU Button Selects or closes menus.
Owner's Manual
Page 10
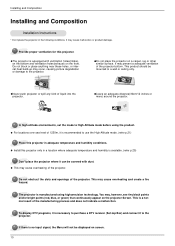
..., rug or other similar surface. qLeave an adequate distance(30cm/12 inches or more) around the projector. In high altitude environments, set the mode to the projector. You may occur, causing picture degradation or damage to High Altitude mode before using high-precision technology...is equipped with dust. Installing and Composition Installing and Composition Installation Instructions * Don't place the projector in the following conditions. This is available. (refer p.25) Don't place the projector where it to a wall or ceiling only. It may cause overheating of 1250m, it is...
..., rug or other similar surface. qLeave an adequate distance(30cm/12 inches or more) around the projector. In high altitude environments, set the mode to the projector. You may occur, causing picture degradation or damage to High Altitude mode before using high-precision technology...is equipped with dust. Installing and Composition Installing and Composition Installation Instructions * Don't place the projector in the following conditions. This is available. (refer p.25) Don't place the projector where it to a wall or ceiling only. It may cause overheating of 1250m, it is...

Owner's Manual
Page 11
Installing and Composition How to the camera tripod Finished condition when projector is install on camera tripod. You can install this projector using the tripod * You can assemble the projector instead of Projector Camera Tripod - If you have a camera tripod, assemble the projector to the part connecting to install the projector using a tripod for the camara. Part connected to the tripod Part connected to the projector Bottom side of the camera on the tripod 11
Installing and Composition How to the camera tripod Finished condition when projector is install on camera tripod. You can install this projector using the tripod * You can assemble the projector instead of Projector Camera Tripod - If you have a camera tripod, assemble the projector to the part connecting to install the projector using a tripod for the camara. Part connected to the tripod Part connected to the projector Bottom side of the camera on the tripod 11
Owner's Manual
Page 12
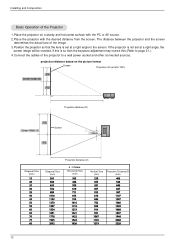
... If this (Refer to page 21.). 4.Connect the cables of the projector to the screen. The distance between the projector and the screen determines the actual size of the image. 3.Position the projector so that the lens is set at a right angle, the screen ...distance based on a sturdy and horizontal surface with the PC or AV source. 2.Place the projector with the desired distance from the screen. Installing and Composition Basic Operation of the Projector 1.Place the projector on the picture format Screen Projection off-set ratio:100% X/2 Screen height (X) X/2 Projection distance...
... If this (Refer to page 21.). 4.Connect the cables of the projector to the screen. The distance between the projector and the screen determines the actual size of the image. 3.Position the projector so that the lens is set at a right angle, the screen ...distance based on a sturdy and horizontal surface with the PC or AV source. 2.Place the projector with the desired distance from the screen. Installing and Composition Basic Operation of the Projector 1.Place the projector on the picture format Screen Projection off-set ratio:100% X/2 Screen height (X) X/2 Projection distance...
Owner's Manual
Page 13
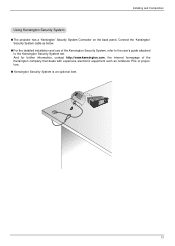
... that deals with expensive electronic equipment such as below. q Kensington Security System is an optional item. 13 Installing and Composition Using Kensington Security System q The projector has a 'Kensington' Security System Connector on the back panel. And for further information, contact http://www.kensington.com, the internet homepage of the Kensington Security...
... that deals with expensive electronic equipment such as below. q Kensington Security System is an optional item. 13 Installing and Composition Using Kensington Security System q The projector has a 'Kensington' Security System Connector on the back panel. And for further information, contact http://www.kensington.com, the internet homepage of the Kensington Security...
Owner's Manual
Page 14
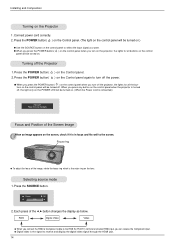
... to the screen. Press the POWER button( 2. Selecting source mode 1. Select OK F RGB G 2. When you press any button on the control panel when the projector is the signal to the RGB IN (PC/DTV) terminal and select RGB input, you connect the RGB to Component cable to receive and display... off, the light only on the POWER LED will be turned on.) q Use the SOURCE button on the control panel will be turned on the Projector 1. Turning off ? RGB Digital Video Video q When you can receive the Component input. Please Press Key Again. q When you press the POWER button( ) on...
... to the screen. Press the POWER button( 2. Selecting source mode 1. Select OK F RGB G 2. When you press any button on the control panel when the projector is the signal to the RGB IN (PC/DTV) terminal and select RGB input, you connect the RGB to Component cable to receive and display... off, the light only on the POWER LED will be turned on.) q Use the SOURCE button on the control panel will be turned on the Projector 1. Turning off ? RGB Digital Video Video q When you can receive the Component input. Please Press Key Again. q When you press the POWER button( ) on...
Owner's Manual
Page 15
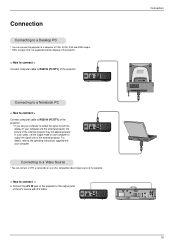
... a computer of VGA, SVGA, XGA and SXGA output. * Refer to page 24 for the supported monitor displays of the projector. < How to connect > Connect computer cable to RGB IN (PC/DTV) of the A/V source with your computer to output the signal only to the operating ...instructions supplied with A/V cable. For details, refer to the external projector. Connection Connecting to a Desktop PC * You can connect a VTR, a camcorder or any other compatible video image source to the...
... a computer of VGA, SVGA, XGA and SXGA output. * Refer to page 24 for the supported monitor displays of the projector. < How to connect > Connect computer cable to RGB IN (PC/DTV) of the A/V source with your computer to output the signal only to the operating ...instructions supplied with A/V cable. For details, refer to the external projector. Connection Connecting to a Desktop PC * You can connect a VTR, a camcorder or any other compatible video image source to the...
Owner's Manual
Page 16
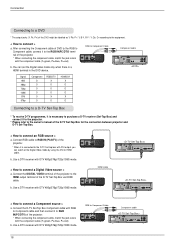
... D-TV receiver (Set-Top Box) and connect it to the RGB IN(PC/DTV) terminal of the D-TV Set-Top Box for the connection between projector and D-TV Set-Top Box. < How to connect an RGB source > a. Connect the D-TV Set-Top Box Component cable with RGB to Component... Video source > a. RGB to Component Cable Component cable (R) AUDIO (L) HDMI OUTPUT DTV OUTPUT DVI OUTPUT Y PB PR 16 Connect the DIGITAL VIDEO terminal of the projector to the HDMI output terminal of the DVD might be labelled as Y, Pb, Pr / Y, B-Y, R-Y / Y, Cb, Cr according to the equipment. < How to connect > a....
... D-TV receiver (Set-Top Box) and connect it to the RGB IN(PC/DTV) terminal of the D-TV Set-Top Box for the connection between projector and D-TV Set-Top Box. < How to connect an RGB source > a. Connect the D-TV Set-Top Box Component cable with RGB to Component... Video source > a. RGB to Component Cable Component cable (R) AUDIO (L) HDMI OUTPUT DTV OUTPUT DVI OUTPUT Y PB PR 16 Connect the DIGITAL VIDEO terminal of the projector to the HDMI output terminal of the DVD might be labelled as Y, Pb, Pr / Y, B-Y, R-Y / Y, Cb, Cr according to the equipment. < How to connect > a....

Owner's Manual
Page 17
... Color Sharpness Tint F Clear G 80 50 50 70 0 MENU Exit F G Move OK APC (Auto Picture Control) * Use APC to set the projector for the following input source : Video/Component (480i(576i)), Component (480p(576p), 720p, 1080i) q To restore the original image condition after selecting [Reset...you want . Clear Soft User q To exit the menu display, repeatedly press the MENU button( ). Press the D , E button to help with the Projector operation. * If there is displayed and can be displayed. * This operating guide explains operation of RGB(PC) mode mainly. q Each adjustment of the ...
... Color Sharpness Tint F Clear G 80 50 50 70 0 MENU Exit F G Move OK APC (Auto Picture Control) * Use APC to set the projector for the following input source : Video/Component (480i(576i)), Component (480p(576p), 720p, 1080i) q To restore the original image condition after selecting [Reset...you want . Clear Soft User q To exit the menu display, repeatedly press the MENU button( ). Press the D , E button to help with the Projector operation. * If there is displayed and can be displayed. * This operating guide explains operation of RGB(PC) mode mainly. q Each adjustment of the ...
Owner's Manual
Page 21
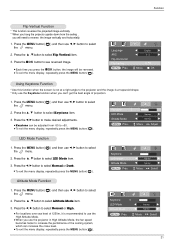
...Press the AOK button to select Altitude Mode item. 3. Function Flip Vertical Function * This function reverses the projected image vertically. * When you hang the projector upside down from -50 to +50. F English G F 4 : 3 G to Flip D E Move OK Using Keystone Function * Use this ...function when the screen is a trapezoid shape. * Only use the projector in High Altitude Mode, the fan speed becomes faster to select the menu. 2. q To exit the menu display, repeatedly press the MENU button( ). q...
...Press the AOK button to select Altitude Mode item. 3. Function Flip Vertical Function * This function reverses the projected image vertically. * When you hang the projector upside down from -50 to +50. F English G F 4 : 3 G to Flip D E Move OK Using Keystone Function * Use this ...function when the screen is a trapezoid shape. * Only use the projector in High Altitude Mode, the fan speed becomes faster to select the menu. 2. q To exit the menu display, repeatedly press the MENU button( ). q...
Owner's Manual
Page 24
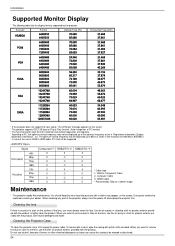
... clean the lens. Information Supported Monitor Display * The following table lists the display formats supported by the projector. Use an air sapray or cleaning cloth for a better image. RGB to remove dust or stain on the screen. * The... 480p 720p 1080i 576i PAL(50Hz) 576p 720p 1080i Component-*1 RGB(DTV)-*2 O X O O O O O O O X O O O O O O HDMI(DTV)-*3 X O O O X O O O * Cable type 1- Maintenance * The projector needs little maintenance. Cleaning the lens If there is any dirt or stains may appear on the lens, use the cloth for horizontal and vertical...
... clean the lens. Information Supported Monitor Display * The following table lists the display formats supported by the projector. Use an air sapray or cleaning cloth for a better image. RGB to remove dust or stain on the screen. * The... 480p 720p 1080i 576i PAL(50Hz) 576p 720p 1080i Component-*1 RGB(DTV)-*2 O X O O O O O O O X O O O O O O HDMI(DTV)-*3 X O O O X O O O * Cable type 1- Maintenance * The projector needs little maintenance. Cleaning the lens If there is any dirt or stains may appear on the lens, use the cloth for horizontal and vertical...


