
Owner's Manual
Page 1
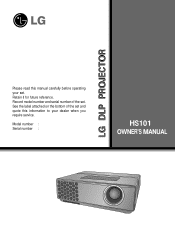
Record model number and serial number of the set and quote this manual carefully before operating your dealer when you require service. Retain it for future reference. Model number : Serial number : LG DLP PROJECTOR HS101 OWNER'S MANUAL Please read this information to your set . See the label attached on the bottom of the set .
Record model number and serial number of the set and quote this manual carefully before operating your dealer when you require service. Retain it for future reference. Model number : Serial number : LG DLP PROJECTOR HS101 OWNER'S MANUAL Please read this information to your set . See the label attached on the bottom of the set .
Owner's Manual
Page 2
... energy and, if not installed and used in accordance with the limits for a Class A digital device, pursuant to Part 15 of this product may cause radio interference, in a commercial environment. Operation of the FCC Rules. DLP PROJECTOR FCC NOTICE • A Class A digital device This equipment has been tested and found to comply with the instruction manual, may cause harmful interference...
... energy and, if not installed and used in accordance with the limits for a Class A digital device, pursuant to Part 15 of this product may cause radio interference, in a commercial environment. Operation of the FCC Rules. DLP PROJECTOR FCC NOTICE • A Class A digital device This equipment has been tested and found to comply with the instruction manual, may cause harmful interference...
Owner's Manual
Page 3
... Set-Top Box 16 Function Video Menu Options Adjusting Video 17 APC (Auto Picture Control 17 Auto Color Temperature Control 18 Gamma Function 18 Black level Function 19 Keypad Sound Function 19 Keypad LED Function 19 Special Menu Options Selecting Language 20 Using ARC Function 20 Flip Horizontal Function 20 Flip Vertical Function 21 Using Keystone Function 21 LED Mode Function 21 Altitude Mode Function 21 Screen Menu Options Auto Configure Function 22 Using Clock Function 22 Using...
... Set-Top Box 16 Function Video Menu Options Adjusting Video 17 APC (Auto Picture Control 17 Auto Color Temperature Control 18 Gamma Function 18 Black level Function 19 Keypad Sound Function 19 Keypad LED Function 19 Special Menu Options Selecting Language 20 Using ARC Function 20 Flip Horizontal Function 20 Flip Vertical Function 21 Using Keystone Function 21 LED Mode Function 21 Altitude Mode Function 21 Screen Menu Options Auto Configure Function 22 Using Clock Function 22 Using...
Owner's Manual
Page 4
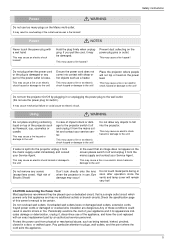
...cause light injuries or damage to the projector. ➟ After reading this manual, keep it in direct sunlight or near the edge. NOTES : The violation of this instruction may cause a fire hazard or damage to the unit! Indoor Installation WARNING Do not place the Projector in the place that the user ...not allow children to hang on the power cord. Do not place the projector where it might create a fire hazard or damage the unit. Only use the projector on a table, be exposed to dust. The distance between the projector and the wall should be installed by the current leakage. This may...
...cause light injuries or damage to the projector. ➟ After reading this manual, keep it in direct sunlight or near the edge. NOTES : The violation of this instruction may cause a fire hazard or damage to the unit! Indoor Installation WARNING Do not place the Projector in the place that the user ...not allow children to hang on the power cord. Do not place the projector where it might create a fire hazard or damage the unit. Only use the projector on a table, be exposed to dust. The distance between the projector and the wall should be installed by the current leakage. This may...
Owner's Manual
Page 5
... Instructions Power WARNING Do not use the power plug for switch.) It may cause mechanical failure or could result in a door, or walked upon a dedicated circuit; Prevent dust collecting on the power lead. Do not plug when the power cord or the plug is damaged or any covers (except lens cover). Place the projector where people will remain very hot! Do not turn the projector On...
... Instructions Power WARNING Do not use the power plug for switch.) It may cause mechanical failure or could result in a door, or walked upon a dedicated circuit; Prevent dust collecting on the power lead. Do not plug when the power cord or the plug is damaged or any covers (except lens cover). Place the projector where people will remain very hot! Do not turn the projector On...
Owner's Manual
Page 6
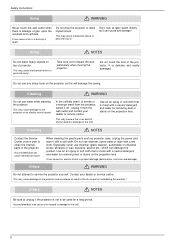
... will damage the casing. Cleaning WARNING Do not use any sharp tools on the projection lens. Others WARNING Do not attempt to clean the internal parts of smoke or a strange smell from the projector, switch it off , unplug it from the wall outlet and contact your dealer or service centre. Cleaning NOTES Contact the Service Center once a year to service the projector yourself. This may...
... will damage the casing. Cleaning WARNING Do not use any sharp tools on the projection lens. Others WARNING Do not attempt to clean the internal parts of smoke or a strange smell from the projector, switch it off , unplug it from the wall outlet and contact your dealer or service centre. Cleaning NOTES Contact the Service Center once a year to service the projector yourself. This may...
Owner's Manual
Page 7
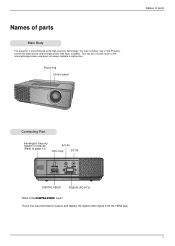
..., see on the Projector screen tiny black points and/or bright points (red, blue, or green). Focus ring Control panel Names of parts Connecting Part Kensington Security System Connector (Refer to receive and display the digital video signal from the HDMI jack. 7 This can be a normal result of the manufacturing process and does not always indicate a malfunction. Names of parts Main Body * The projector is the DIGITAL VIDEO input? This is the...
..., see on the Projector screen tiny black points and/or bright points (red, blue, or green). Focus ring Control panel Names of parts Connecting Part Kensington Security System Connector (Refer to receive and display the digital video signal from the HDMI jack. 7 This can be a normal result of the manufacturing process and does not always indicate a malfunction. Names of parts Main Body * The projector is the DIGITAL VIDEO input? This is the...
Owner's Manual
Page 10
This product should be covered with ventilation holes(intake) on the bottom and ventilation holes(exhaust) on screen. 10 qLeave an adequate distance(30cm/12 inches or more) around the projector. Do not obstruct the slots and openings of liquid into the projector. This is no input signal, the Menu will not be displayed on the front. If there is a normal...
This product should be covered with ventilation holes(intake) on the bottom and ventilation holes(exhaust) on screen. 10 qLeave an adequate distance(30cm/12 inches or more) around the projector. Do not obstruct the slots and openings of liquid into the projector. This is no input signal, the Menu will not be displayed on the front. If there is a normal...
Owner's Manual
Page 12
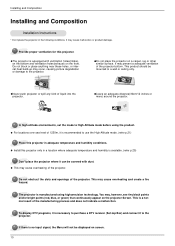
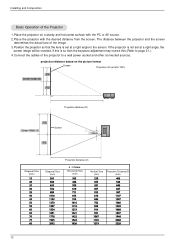
... source. 2.Place the projector with the desired distance from the screen. If this is so then the keystone adjustment may correct this (Refer to page 21.). 4.Connect the cables of the image. 3.Position the projector so that the lens is not set at a right angle, the screen image will be crooked. Installing and Composition Basic Operation of the Projector 1.Place the projector on the picture format Screen Projection off-set ratio:100% X/2 Screen...
... source. 2.Place the projector with the desired distance from the screen. If this is so then the keystone adjustment may correct this (Refer to page 21.). 4.Connect the cables of the image. 3.Position the projector so that the lens is not set at a right angle, the screen image will be crooked. Installing and Composition Basic Operation of the Projector 1.Place the projector on the picture format Screen Projection off-set ratio:100% X/2 Screen...
Owner's Manual
Page 13
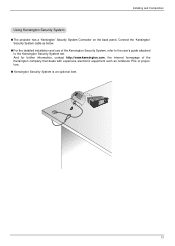
Installing and Composition Using Kensington Security System q The projector has a 'Kensington' Security System Connector on the back panel. q For the detailed installation and use of the Kensington company that deals with expensive electronic equipment such as below. q Kensington Security System is an optional item... for further information, contact http://www.kensington.com, the internet homepage of the Kensington Security System, refer to the user's guide attached to the Kensington Security System set. Connect the 'Kensington' Security System cable as notebook PCs or projectors.
Installing and Composition Using Kensington Security System q The projector has a 'Kensington' Security System Connector on the back panel. q For the detailed installation and use of the Kensington company that deals with expensive electronic equipment such as below. q Kensington Security System is an optional item... for further information, contact http://www.kensington.com, the internet homepage of the Kensington Security System, refer to the user's guide attached to the Kensington Security System set. Connect the 'Kensington' Security System cable as notebook PCs or projectors.
Owner's Manual
Page 14
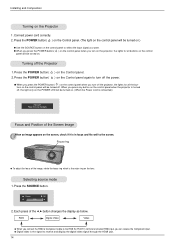
... signal to receive and display the digital video signal through the HDMI jack. 14 Press the POWER button( 2. Selecting source mode 1. RGB Digital Video Video q When you connect the RGB to Component cable to the RGB IN (PC/DTV) terminal and select RGB input, you want. Please Press Key Again. q When you press the POWER button( ) on the control panel when you turn off the Projector 1. Focus ring q To adjust the focus of the image, rotate the focus...
... signal to receive and display the digital video signal through the HDMI jack. 14 Press the POWER button( 2. Selecting source mode 1. RGB Digital Video Video q When you connect the RGB to Component cable to the RGB IN (PC/DTV) terminal and select RGB input, you want. Please Press Key Again. q When you press the POWER button( ) on the control panel when you turn off the Projector 1. Focus ring q To adjust the focus of the image, rotate the focus...
Owner's Manual
Page 15
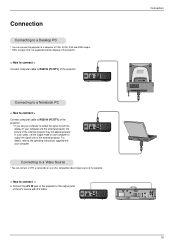
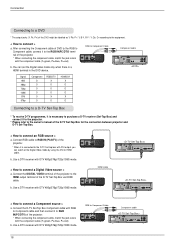
... cases, set your computer to output the signal to the output jacks of the projector. For details, refer to the operating instructions supplied with A/V cable. Connecting to a Video Source * You can connect the projector to a computer of VGA, SVGA, XGA and SXGA output. * Refer to page 24 for the supported monitor displays of the projector. < How to connect > Connect computer cable to RGB IN (PC/DTV) of the A/V source with your...
... cases, set your computer to output the signal to the output jacks of the projector. For details, refer to the operating instructions supplied with A/V cable. Connecting to a Video Source * You can connect the projector to a computer of VGA, SVGA, XGA and SXGA output. * Refer to page 24 for the supported monitor displays of the projector. < How to connect > Connect computer cable to RGB IN (PC/DTV) of the A/V source with your...
Owner's Manual
Page 16
... jack colors with the component cable.(Y=green, PB=blue, PR=red) b. Use a DTV receiver with DTV 480p(576p)/720p/1080i mode. Connect the DIGITAL VIDEO terminal of the projector to the HDMI output terminal of the DVD might be labelled as Y, Pb, Pr / Y, B-Y, R-Y / Y, Cb, Cr according to the equipment. < How to connect > a. Use a DTV receiver with DTV 480p(576p)/720p/1080i mode. < How to connect a Digital Video source > a. Connection Connecting to...
... jack colors with the component cable.(Y=green, PB=blue, PR=red) b. Use a DTV receiver with DTV 480p(576p)/720p/1080i mode. Connect the DIGITAL VIDEO terminal of the projector to the HDMI output terminal of the DVD might be labelled as Y, Pb, Pr / Y, B-Y, R-Y / Y, Cb, Cr according to the equipment. < How to connect > a. Use a DTV receiver with DTV 480p(576p)/720p/1080i mode. < How to connect a Digital Video source > a. Connection Connecting to...

Owner's Manual
Page 17
... the D, E button changes the screen as you want . Clear Soft User q To exit the menu display, repeatedly press the MENU button( ). APC Contrast Brightness Color Sharpness Tint MENU Prev. Press the D , E button to select a video item you want to help with the Projector operation. * If there is no input signal present, the Menu will not be displayed. * This operating guide explains operation of menu options will not work at the RGB mode and the Digital video mode. 1. As...
... the D, E button changes the screen as you want . Clear Soft User q To exit the menu display, repeatedly press the MENU button( ). APC Contrast Brightness Color Sharpness Tint MENU Prev. Press the D , E button to select a video item you want to help with the Projector operation. * If there is no input signal present, the Menu will not be displayed. * This operating guide explains operation of menu options will not work at the RGB mode and the Digital video mode. 1. As...

Owner's Manual
Page 18
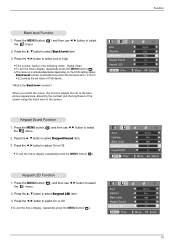
... Auto Color Temperature Control - Press the MENU( ) button and then use F, G button to adjust the screen condition as required. q Each press of the D, E button changes the screen as shown below . F Normal G F Film G F High G F On G F On G D E Move F G Select 18 To initialize values (reset to select the menu. 2. Press the MENU button( ) and then use F, G button to default settings), select the Normal option. 1. Press the F, G button to select the menu. 2. q Each press of the F, G button changes the screen as...
... Auto Color Temperature Control - Press the MENU( ) button and then use F, G button to adjust the screen condition as required. q Each press of the D, E button changes the screen as shown below . F Normal G F Film G F High G F On G F On G D E Move F G Select 18 To initialize values (reset to select the menu. 2. Press the MENU button( ) and then use F, G button to default settings), select the Normal option. 1. Press the F, G button to select the menu. 2. q Each press of the F, G button changes the screen as...
Owner's Manual
Page 19
q This function works in the following mode : Digital Video q To exit the menu display, repeatedly press the MENU button( ). q The menu is is the Black level function? When you watch the movie, this function adjusts the set value of the screen. Function Black level Function 1. Press the MENU button( ) and then use F, G button to the best picture appearance. Press the F, G button to select Keypad LED item. 3. Black level function is...
q This function works in the following mode : Digital Video q To exit the menu display, repeatedly press the MENU button( ). q The menu is is the Black level function? When you watch the movie, this function adjusts the set value of the screen. Function Black level Function 1. Press the MENU button( ) and then use F, G button to the best picture appearance. Press the F, G button to select Keypad LED item. 3. Black level function is...
Owner's Manual
Page 21
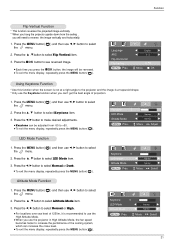
... menu display, repeatedly press the MENU button( ). q To exit the menu display, repeatedly press the MENU button( ). F English G F 4 : 3 G to Flip D E Move OK Using Keystone Function * Use this function when the screen is not at a right angle to the projector and the image is a trapezoid shape. * Only use the Keystone function when you can't get the best angle of 1250m, it is recommended to use the projector in High Altitude Mode, the fan...
... menu display, repeatedly press the MENU button( ). q To exit the menu display, repeatedly press the MENU button( ). F English G F 4 : 3 G to Flip D E Move OK Using Keystone Function * Use this function when the screen is not at a right angle to the projector and the image is a trapezoid shape. * Only use the Keystone function when you can't get the best angle of 1250m, it is recommended to use the projector in High Altitude Mode, the fan...

Owner's Manual
Page 22
... depends on input resolutions. Auto configure Clock Phase Horizontal Vertical MENU Prev. 0 4 0 0 D E Move F G Adjust 22 q Image positioning and synchronization are automatically adjusted. 4. q To exit the menu display, repeatedly press the MENU button( ). Press the MENU button( ) and then use F, G button to select the menu. 2. q To exit the menu display, repeatedly press the MENU button( ). q The variable range can be different depends on input resolutions. Press the MENU button( ) and then use F, G button to start 0 4 0 0 D E Move OK Using Clock...
... depends on input resolutions. Auto configure Clock Phase Horizontal Vertical MENU Prev. 0 4 0 0 D E Move F G Adjust 22 q Image positioning and synchronization are automatically adjusted. 4. q To exit the menu display, repeatedly press the MENU button( ). Press the MENU button( ) and then use F, G button to select the menu. 2. q To exit the menu display, repeatedly press the MENU button( ). q The variable range can be different depends on input resolutions. Press the MENU button( ) and then use F, G button to start 0 4 0 0 D E Move OK Using Clock...
Owner's Manual
Page 24
... support the input signal, "Out of the use the air spray or choth for a better image. If any part of HDMI to be supported. Cleaning the lens If there is any dirt or stains may appear on the screen. * The projector supports DDC1/2B type as these can cause the casing to HDMI cable, PC shall not be warped or discolored. 24 Cleaning the Projector Case To clean the projector...
... support the input signal, "Out of the use the air spray or choth for a better image. If any part of HDMI to be supported. Cleaning the lens If there is any dirt or stains may appear on the screen. * The projector supports DDC1/2B type as these can cause the casing to HDMI cable, PC shall not be warped or discolored. 24 Cleaning the Projector Case To clean the projector...
Owner's Manual
Page 25
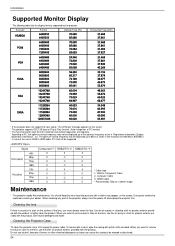
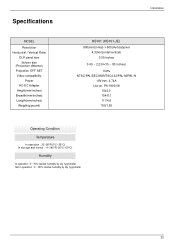
Specifications MODEL Resolution Horizontal / Vertical Ratio DLP panel size Screen size (Projection distance) Projection OFF SET Video compatibility Power AC-DC Adapter Height(mm/inches) Breadth(mm/inches) Length(mm/inches) Weight(g/pound) Information HS101 (HS101-JE) 800(Horizontal) x 600(Vertical)pixel 4:3(horizontal:vertical) 0.55 inches .../6.1 117/4.6 750/1.65 Operating Condition Temperature In operation : 32~95°F(0°C~35°C) In storage and transit : -4~140°F(-20°C~60°C) Humidity In operation : 0~ 75% relative humidity by dry hygrometer Not in operation : 0 ~ 85%...
Specifications MODEL Resolution Horizontal / Vertical Ratio DLP panel size Screen size (Projection distance) Projection OFF SET Video compatibility Power AC-DC Adapter Height(mm/inches) Breadth(mm/inches) Length(mm/inches) Weight(g/pound) Information HS101 (HS101-JE) 800(Horizontal) x 600(Vertical)pixel 4:3(horizontal:vertical) 0.55 inches .../6.1 117/4.6 750/1.65 Operating Condition Temperature In operation : 32~95°F(0°C~35°C) In storage and transit : -4~140°F(-20°C~60°C) Humidity In operation : 0~ 75% relative humidity by dry hygrometer Not in operation : 0 ~ 85%...


