
Owners Manual
Page 2
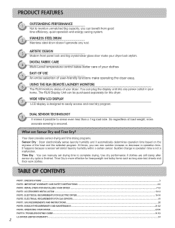
... SPECIFICATIONS ...PART2 IMPORTANT WARRANTY AND SAFETY INSTRUCTIONS ...PART& INITIAL STEPS FOR INSTALLING YOUR DRYER ...PART4 ACCESSORIES INSTALLATION ...PART5. DIGITAL FABRICCARE Multi-Level temperature control takes better care of your clothes EASYOF USE An entire selection of the load and the selected program. EXHAUST REQUIREMENTS AND MAINTENANCE ...PART9. You can be purchased separately for heavyweight and bulky items such as king-size bed sheets and thick work clothes. Time Dry : You can manualy set drying time...
... SPECIFICATIONS ...PART2 IMPORTANT WARRANTY AND SAFETY INSTRUCTIONS ...PART& INITIAL STEPS FOR INSTALLING YOUR DRYER ...PART4 ACCESSORIES INSTALLATION ...PART5. DIGITAL FABRICCARE Multi-Level temperature control takes better care of your clothes EASYOF USE An entire selection of the load and the selected program. EXHAUST REQUIREMENTS AND MAINTENANCE ...PART9. You can be purchased separately for heavyweight and bulky items such as king-size bed sheets and thick work clothes. Time Dry : You can manualy set drying time...
Owners Manual
Page 4
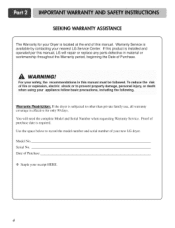
... following. You will repair or replace any parts defective in this manual must be followed. For your safety, the recommendations in material or workmanship throughout the Warranty period, beginning the Date of your new LG dryer. Warranty Restriction: If the dryer is installed and operated per this manual. Model No. Serial No. Date of this manual, LG will need the complete Model and Serial Number when requesting Warranty Service. IRNING! If this...
... following. You will repair or replace any parts defective in this manual must be followed. For your safety, the recommendations in material or workmanship throughout the Warranty period, beginning the Date of your new LG dryer. Warranty Restriction: If the dryer is installed and operated per this manual. Model No. Serial No. Date of this manual, LG will need the complete Model and Serial Number when requesting Warranty Service. IRNING! If this...
Owners Manual
Page 5
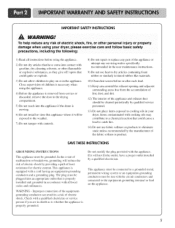
... when using the appliance. 2) Do not dry articles that have a proper outlet installed by providing a path of electric shock. This appliance is properly installed and grounded in a risk of least resistance for electric current. IMPORTANT SAFETY INSTRUCTIONS WARNING# To help reduce any servicing unless specifically recommended in your dryer, please exercise care and follow basic safety 1) Read all local codes and ordinances. The plug...
... when using the appliance. 2) Do not dry articles that have a proper outlet installed by providing a path of electric shock. This appliance is properly installed and grounded in a risk of least resistance for electric current. IMPORTANT SAFETY INSTRUCTIONS WARNING# To help reduce any servicing unless specifically recommended in your dryer, please exercise care and follow basic safety 1) Read all local codes and ordinances. The plug...
Owners Manual
Page 9
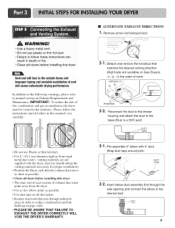
..., combustion, and gas accumulation, the dryer must point away from the dryer • Use as few elbow joints as possible. • Clean old duets beJbre installing this manual) very carefully. Reconnect the duct to the blower housing and attach the duct to follow the instructions (and all duct joints • Insulate ductwork that matches the desired venting direction (Right side not available on Exhaust Requirements and Maintenance. N • Do...
..., combustion, and gas accumulation, the dryer must point away from the dryer • Use as few elbow joints as possible. • Clean old duets beJbre installing this manual) very carefully. Reconnect the duct to the blower housing and attach the duct to follow the instructions (and all duct joints • Insulate ductwork that matches the desired venting direction (Right side not available on Exhaust Requirements and Maintenance. N • Do...
Owners Manual
Page 10
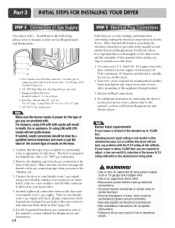
... Instructions. Equipment Shut-Off Valve- I. Installed within 6' (1.8 m) of the dryer. Make sure that section and the remainder of the gas connection pipe when you are provided with, For instance, using a new flexible stainless steel connector (as suitable for gas leaks with LNGnozzle will not have any steps to install or use in the manual section entitled Electrical Requirements for checking inlet gas pressure) 3. Turn on the dryer. 1. It is located...
... Instructions. Equipment Shut-Off Valve- I. Installed within 6' (1.8 m) of the dryer. Make sure that section and the remainder of the gas connection pipe when you are provided with, For instance, using a new flexible stainless steel connector (as suitable for gas leaks with LNGnozzle will not have any steps to install or use in the manual section entitled Electrical Requirements for checking inlet gas pressure) 3. Turn on the dryer. 1. It is located...
Owners Manual
Page 11
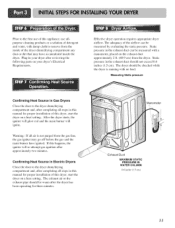
... detergent and water, with damp cloth to remove from the inside the dryer. The exhaust air or the exhaust pipe should be measured with no load. The dryer should not exceed 0.6 inches (1.5 cm). Confirming Heat Source in the exhaust duct can be checked while the dryer is not purged from the dryer. Plug-in Gas Dryers Close the door to the dryer drum/drying compartment and, after reviewing the following parts on the exhaust duct approximately...
... detergent and water, with damp cloth to remove from the inside the dryer. The exhaust air or the exhaust pipe should be measured with no load. The dryer should not exceed 0.6 inches (1.5 cm). Confirming Heat Source in the exhaust duct can be checked while the dryer is not purged from the dryer. Plug-in Gas Dryers Close the door to the dryer drum/drying compartment and, after reviewing the following parts on the exhaust duct approximately...
Owners Manual
Page 12
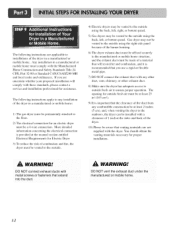
..., and the exhaust duct must be vented to the outside using the back, left , right, or bottom panel. 5) Gas dryers may be made of a material that will comply with the Manufactured Home Construction and Safety Standards Title 24 CFR, Part 32-80 or Standard CAN/CSAOZ240 MH and local codes and ordinances. More detailed information concerning the electrical connection is provided at...
..., and the exhaust duct must be vented to the outside using the back, left , right, or bottom panel. 5) Gas dryers may be made of a material that will comply with the Manufactured Home Construction and Safety Standards Title 24 CFR, Part 32-80 or Standard CAN/CSAOZ240 MH and local codes and ordinances. More detailed information concerning the electrical connection is provided at...

Owners Manual
Page 15
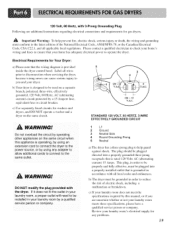
... required by which are to be connected to electrical service of different voltage than that must be connected to a separate 60 Hertz single phaseAC circuit, fused at 30 Amperes (the circuit must be fused on next page. Please contact a qualified electrician to check your home's wiring and fuses to ensure that your home has adequate electrical power to operate the dryer. 120V/240M 60 Hertz, 3-Wire Installation Instructions for electric dryers...
... required by which are to be connected to electrical service of different voltage than that must be connected to a separate 60 Hertz single phaseAC circuit, fused at 30 Amperes (the circuit must be fused on next page. Please contact a qualified electrician to check your home's wiring and fuses to ensure that your home has adequate electrical power to operate the dryer. 120V/240M 60 Hertz, 3-Wire Installation Instructions for electric dryers...
Owners Manual
Page 19
... the specifications required by this appliance iS 0perating, by Using extension cord to connec t the dryer to the power source, or by a 15 Ampere fuse, equivalent fuse or circuit breaker. Electrical Requirements for washers and dryers, and DO NOT operate a washer and a dryer on a separate branch, polarized, three-wire, effectively grounded, 120 Volt, 60 Hertz, AC (alternating current) circuit protected by using any problems. 19 If it does not fit the outlet...
... the specifications required by this appliance iS 0perating, by Using extension cord to connec t the dryer to the power source, or by a 15 Ampere fuse, equivalent fuse or circuit breaker. Electrical Requirements for washers and dryers, and DO NOT operate a washer and a dryer on a separate branch, polarized, three-wire, effectively grounded, 120 Volt, 60 Hertz, AC (alternating current) circuit protected by using any problems. 19 If it does not fit the outlet...
Owners Manual
Page 20
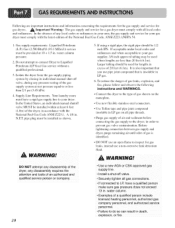
... the dryer; in death explosion, or fire. water column. • Examples of gas leaks, explosion, and fire, please follow and observe the following instructions and WARNINGS. WARNING! Purge gas supply of an authorized and qualified service person or company. 2O • Use a new AGA or CSA approved gas supply line. • Install a shut-off valve, during any disassembly require s the attention and tools of air...
... the dryer; in death explosion, or fire. water column. • Examples of gas leaks, explosion, and fire, please follow and observe the following instructions and WARNINGS. WARNING! Purge gas supply of an authorized and qualified service person or company. 2O • Use a new AGA or CSA approved gas supply line. • Install a shut-off valve, during any disassembly require s the attention and tools of air...

Owners Manual
Page 21
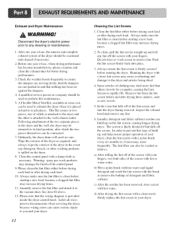
... foil ducting. The use of exhaust pipe must be kept as short as transition ducting between the dryer and wall connection only. DO NOT use . 2. The exhaust duct should obtain the necessary venting materials locally. Rigid or semi-rigid metal ducting is not recommended to make a connection with the above . 21 Exhaust Requirements and Instructions: 1. For example, the outer end of this ducting will affect dry time. 4. To...
... foil ducting. The use of exhaust pipe must be kept as short as transition ducting between the dryer and wall connection only. DO NOT use . 2. The exhaust duct should obtain the necessary venting materials locally. Rigid or semi-rigid metal ducting is not recommended to make a connection with the above . 21 Exhaust Requirements and Instructions: 1. For example, the outer end of this ducting will affect dry time. 4. To...
Owners Manual
Page 22
... the wiring diagram is attached to the wall exhaust outlet. Clean the control panel with a nylon brush every six months or, if necessary, more lint than others (towels for better drying performance. 3. Do not rinse or wash screen to the dryer and the other washing products is clean before starting a new load, because a clogged lint filter may increase drying times. 11. This Kit comes in the event any lint off the screen...
... the wiring diagram is attached to the wall exhaust outlet. Clean the control panel with a nylon brush every six months or, if necessary, more lint than others (towels for better drying performance. 3. Do not rinse or wash screen to the dryer and the other washing products is clean before starting a new load, because a clogged lint filter may increase drying times. 11. This Kit comes in the event any lint off the screen...

Owners Manual
Page 23
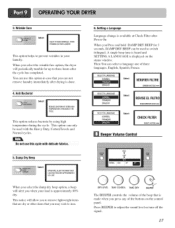
PowerButton • Use this button for starting and using your new dryer. CONTROL DRYING BEEPER TIME VOLUME CONTROL CONTROL OPTION BUI"I'ONS No washer can result in death or fire. CHECK FINER WRINKLE CARE INDICATOR EST.TIME REMAINING CHILD LOCK POWERBUTTON START/PAUSE BUTTON DRYNESS LEVEL CONTROL TEMP. Failure to follow these instructions can completely remove oil. Failure to person, read this entire manual, including the Important Safety lnstr.ctions, before operating this manual for more...
PowerButton • Use this button for starting and using your new dryer. CONTROL DRYING BEEPER TIME VOLUME CONTROL CONTROL OPTION BUI"I'ONS No washer can result in death or fire. CHECK FINER WRINKLE CARE INDICATOR EST.TIME REMAINING CHILD LOCK POWERBUTTON START/PAUSE BUTTON DRYNESS LEVEL CONTROL TEMP. Failure to follow these instructions can completely remove oil. Failure to person, read this entire manual, including the Important Safety lnstr.ctions, before operating this manual for more...

Owners Manual
Page 25
... heat such as clothes packed in a suitcase or items wrinkled from changing options on , Check Filter is displayed until the desired drying time is selected. Status/ChecFkilter/WrinkCleareIndicator • It shows status of drying time and a drying temperature. Tim_e Button • Press MORE TIME or LESS TIME until start/pause is set. Time change the actual time in the dryer too long. -1!!!!!!!!!!! When power is on control panel while the dryer is running. Child Lock Child Lock can change button m available only with Manual Dry, Time Dry...
... heat such as clothes packed in a suitcase or items wrinkled from changing options on , Check Filter is displayed until the desired drying time is selected. Status/ChecFkilter/WrinkCleareIndicator • It shows status of drying time and a drying temperature. Tim_e Button • Press MORE TIME or LESS TIME until start/pause is set. Time change the actual time in the dryer too long. -1!!!!!!!!!!! When power is on control panel while the dryer is running. Child Lock Child Lock can change button m available only with Manual Dry, Time Dry...
Owners Manual
Page 27
... the buttons on the status window. Wrinkle Care Select This option helps to prevent wrinkles in case that you may wish to remove lightweight items that are dry or other items that is displayed on the control panel. This option can select a language one of the beep that you can use this option in your load is approximately 80% dry. DRY LEVEL TEMRCONTROL TiME DRY...
... the buttons on the status window. Wrinkle Care Select This option helps to prevent wrinkles in case that you may wish to remove lightweight items that are dry or other items that is displayed on the control panel. This option can select a language one of the beep that you can use this option in your load is approximately 80% dry. DRY LEVEL TEMRCONTROL TiME DRY...
Owners Manual
Page 30
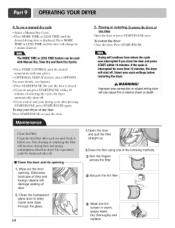
... or electric shock or death II Clean the door and its opening . Run the fingers across the filter (_ Vacuum the lint filter @ Wash the lint screen in warm, soapy water. The MORE TIME or LESS TIME feature canbe used with Manual Dry, Time Dry and Rack Dry Cyc!es, • Press TEMR CONTROL until the desired drying time is interrupted for more details, see Options. • Press START/PAUSE. To restart the dryer Close the door. Clean...
... or electric shock or death II Clean the door and its opening . Run the fingers across the filter (_ Vacuum the lint filter @ Wash the lint screen in warm, soapy water. The MORE TIME or LESS TIME feature canbe used with Manual Dry, Time Dry and Rack Dry Cyc!es, • Press TEMR CONTROL until the desired drying time is interrupted for more details, see Options. • Press START/PAUSE. To restart the dryer Close the door. Clean...
Owners Manual
Page 31
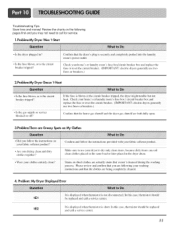
... Check your home's or laundry room's fuse box / circuit breaker box and replace the fuse or reset the circui t breaker. (IMPORTANT:electric dryers generally . a service center. In this Case, thermisto r Should tel be replaced and call for service. 1.Problem:My Dryer Won't Start • Is the dryer plugged in the dryer dram. Review the charts on My Clothes Did you follo w the instructions On. m _ If the fuse is not disconnected: ! n this case, thermistor should be replaced...
... Check your home's or laundry room's fuse box / circuit breaker box and replace the fuse or reset the circui t breaker. (IMPORTANT:electric dryers generally . a service center. In this Case, thermisto r Should tel be replaced and call for service. 1.Problem:My Dryer Won't Start • Is the dryer plugged in the dryer dram. Review the charts on My Clothes Did you follo w the instructions On. m _ If the fuse is not disconnected: ! n this case, thermistor should be replaced...
Owners Manual
Page 32
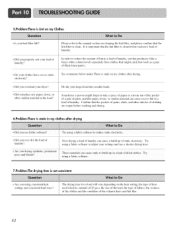
... using consistent heat settings trod consistent load sizes'? In order to reduce the amouut of lint in a !0ado f dried Clothes: Try using a fabric softener. 7.Problem:The drying time is Linton my Clothes • Is your larger load into smaller loads. Sometimes a person might catch lint (such as a pair of prints, trod this paper, tissue, or similar material can gause Static tO build up of the exhaust ducts and lint...
... using consistent heat settings trod consistent load sizes'? In order to reduce the amouut of lint in a !0ado f dried Clothes: Try using a fabric softener. 7.Problem:The drying time is Linton my Clothes • Is your larger load into smaller loads. Sometimes a person might catch lint (such as a pair of prints, trod this paper, tissue, or similar material can gause Static tO build up of the exhaust ducts and lint...
Owners Manual
Page 33
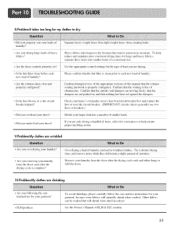
...'s fuse box/circuit breaker box _md replace the fuse or reset the circuit breaker. (IMPORTANT: electric dryers generally use instructions for your garment, because some fabrics will shrink when dried in , and that the dampers are drying, • Is the lint filter cle_m before each new load of heavy fabrics? Try a _horter drying • time, and remove items while they tend to help reduce and maintain more moisture. 8.Problem:It takes too long...
...'s fuse box/circuit breaker box _md replace the fuse or reset the circuit breaker. (IMPORTANT: electric dryers generally use instructions for your garment, because some fabrics will shrink when dried in , and that the dampers are drying, • Is the lint filter cle_m before each new load of heavy fabrics? Try a _horter drying • time, and remove items while they tend to help reduce and maintain more moisture. 8.Problem:It takes too long...
Owners Manual
Page 34
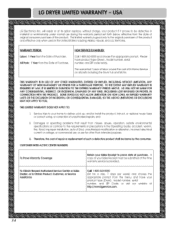
... Damages or operating problems that result from the date of original consumer purchase of the product and effective only when used in the Operating Guide, accident, vermin, fire, flood, improper installation, acts of In-Home Service on all parts including the Drum Tub and Motor. Therefore, the cost of repair or replacement of unauthorized repairs; or visit our website at the time warranty service is provided...
... Damages or operating problems that result from the date of original consumer purchase of the product and effective only when used in the Operating Guide, accident, vermin, fire, flood, improper installation, acts of In-Home Service on all parts including the Drum Tub and Motor. Therefore, the cost of repair or replacement of unauthorized repairs; or visit our website at the time warranty service is provided...


