
Owners Manual
Page 1
r,L_r _ "_ r,L_r r,L!' For more information, visit our website at http://us.lge.com P/No.: 3828EL3010B Record the Model and Serial Numbers, and retain the manual for buying a LG Dryer. Please read your manual carefully, as it provides instructions on safe Installation, Use and Maintenance. d'r'J,'_l_, ElectricandGasDryer DLE8377WM / DLG8388WIVl DLE8377NM / DLG8388NM Thank you for future reference. 1-800-243-0000 24 HOURS A DAY, 7 DAYS A WEEK FOR LG CUSTOMER SERVICE ,_J_, _ll__ I_r_ I' x!
r,L_r _ "_ r,L_r r,L!' For more information, visit our website at http://us.lge.com P/No.: 3828EL3010B Record the Model and Serial Numbers, and retain the manual for buying a LG Dryer. Please read your manual carefully, as it provides instructions on safe Installation, Use and Maintenance. d'r'J,'_l_, ElectricandGasDryer DLE8377WM / DLG8388WIVl DLE8377NM / DLG8388NM Thank you for future reference. 1-800-243-0000 24 HOURS A DAY, 7 DAYS A WEEK FOR LG CUSTOMER SERVICE ,_J_, _ll__ I_r_ I' x!
Owners Manual
Page 4
...electric shock or to other than private family use, all warranty coverage is effective for your new LG dryer. To reduce the risk of your Dryer is installed and operated per this manual must be followed. Warranty Service is subjected to prevent property damage, personal injury, or death when... using your nearest LG Service Center. If this product is located at the end of Purchase. You will repair or replace any parts defective in material or workmanship throughout the Warranty period, beginning the Date of this manual. Warranty Restriction: If the dryer is available by contacting...
...electric shock or to other than private family use, all warranty coverage is effective for your new LG dryer. To reduce the risk of your Dryer is installed and operated per this manual must be followed. Warranty Service is subjected to prevent property damage, personal injury, or death when... using your nearest LG Service Center. If this product is located at the end of Purchase. You will repair or replace any parts defective in material or workmanship throughout the Warranty period, beginning the Date of this manual. Warranty Restriction: If the dryer is available by contacting...
Owners Manual
Page 6
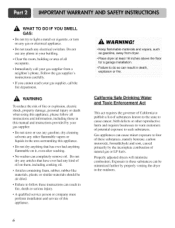
... natural gas or LP fuels. Follow the gas supplier's instructions carefully. • If you cannot reach your gas supplier from dryer. • Place dryer at least 18 inches above the floor for a garage installation. • Failure to do so can result in the area ... instructions can result in fire, death or serious injury. • A qualified service person or company must perform installation and service of this manual and instructions provided by the incomplete combustion of oil on them, including cooking oil. • Articles containing foam, rubber, rubber-like materials,...
... natural gas or LP fuels. Follow the gas supplier's instructions carefully. • If you cannot reach your gas supplier from dryer. • Place dryer at least 18 inches above the floor for a garage installation. • Failure to do so can result in the area ... instructions can result in fire, death or serious injury. • A qualified service person or company must perform installation and service of this manual and instructions provided by the incomplete combustion of oil on them, including cooking oil. • Articles containing foam, rubber, rubber-like materials,...
Owners Manual
Page 7
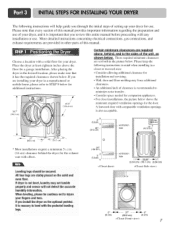
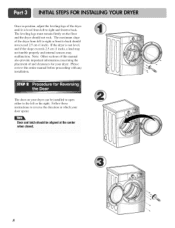
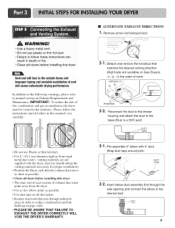
... (14 cm) clearance behind , and to the sides of clearance is important that every section of this entire manual before proceeding with any installation or use of your dryer in a closet o1 recessed area: • Consider allowing additional clearance/'o1 installation and servicing. • Wall,... door and floor molding may net tumble properly and sensor will help guide you review this manual provides important information regarding ...
... (14 cm) clearance behind , and to the sides of clearance is important that every section of this entire manual before proceeding with any installation or use of your dryer in a closet o1 recessed area: • Consider allowing additional clearance/'o1 installation and servicing. • Wall,... door and floor molding may net tumble properly and sensor will help guide you review this manual provides important information regarding ...
Owners Manual
Page 8
The maximum slope of the dryer from left to right or front to back. Note: Other sections of this manual also provide important information concerning the placement of the dryer until it is not level, and if the slope exceeds 2.5 cm (1 inch), a load may not tumble properly and internal ...sensors may malfunction. If the dryer is level from left to right ...
The maximum slope of the dryer from left to right or front to back. Note: Other sections of this manual also provide important information concerning the placement of the dryer until it is not level, and if the slope exceeds 2.5 cm (1 inch), a load may not tumble properly and internal ...sensors may malfunction. If the dryer is level from left to right ...
Owners Manual
Page 9
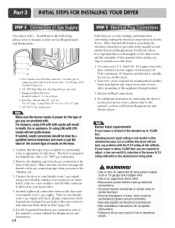
... home and improper taping and unstable installation of vent will cause undesirable drying performance, In addition to the following warnings, please refer to manual section on Gas Dryers) _i), @%_3)the order of exhaust duct must be vented to the outdoors. Reconnect the duct to the blower housing and attach... the duct to reduce condensation and lint build-up on all others in death or fire, • Clean old ducts before installing this manual) very ...
... home and improper taping and unstable installation of vent will cause undesirable drying performance, In addition to the following warnings, please refer to manual section on Gas Dryers) _i), @%_3)the order of exhaust duct must be vented to the outdoors. Reconnect the duct to the blower housing and attach... the duct to reduce condensation and lint build-up on all others in death or fire, • Clean old ducts before installing this manual) very ...
Owners Manual
Page 10
...Use Design AGA Certified Connector. 2. 1/8" Nl:rI ' Pipe Plug (for Electric Dryer. Longer than 20' (6.1 m) Use 3/8" pipe. Refer to manual section on connecting the dryer to an electrical power source, please refer to this dryer. 1. Use only a new U.L. For additional instruction on Gas Requirements and Instructions.... of the gas connection pipe when you are required to adjust a four percent(4%) reduction of this manual, before making the electrical connection l_r electric dryers. Iron Pipe. Gas Connection Make sure the burner nozzle is located at the elevation up to your...
...Use Design AGA Certified Connector. 2. 1/8" Nl:rI ' Pipe Plug (for Electric Dryer. Longer than 20' (6.1 m) Use 3/8" pipe. Refer to manual section on connecting the dryer to an electrical power source, please refer to this dryer. 1. Use only a new U.L. For additional instruction on Gas Requirements and Instructions.... of the gas connection pipe when you are required to adjust a four percent(4%) reduction of this manual, before making the electrical connection l_r electric dryers. Iron Pipe. Gas Connection Make sure the burner nozzle is located at the elevation up to your...
Owners Manual
Page 11
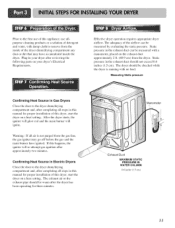
...three minutes. Measuring Static pressure Confirming Heat Source in Gas Dryers Close the door to the dryer drum/drying compartment and, after completing all steps in this manual for proper installation of this dryer, start the dryer on a heat setting. If this happens, the igniter.... Confirming Heat Source in Electric Dryers Close the door to the dryer drum/drying compartment and, after completing all steps in this manual for proper installation of this dryer, start the dryer on a heat setting. Static pressure in your dryer's Electrical Requirements. Manometer j_ "Exhaust...
...three minutes. Measuring Static pressure Confirming Heat Source in Gas Dryers Close the door to the dryer drum/drying compartment and, after completing all steps in this manual for proper installation of this dryer, start the dryer on a heat setting. If this happens, the igniter.... Confirming Heat Source in Electric Dryers Close the door to the dryer drum/drying compartment and, after completing all steps in this manual for proper installation of this dryer, start the dryer on a heat setting. Static pressure in your dryer's Electrical Requirements. Manometer j_ "Exhaust...
Owners Manual
Page 12
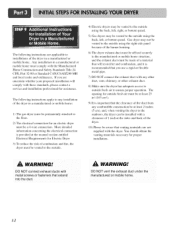
...duct with any combustible construction be at least 2 inches (5 cm), and, when venting the dryer to the outdoors, the dryer can be installed with a clearance of 1 inch at the manual section entitled Electrical Requirements for outside using the right side panel because of the burner housing.... 6) The dryer exhaust duct must be affixed securely to installations of the dryer in a manufactured or mobile home: 1) The gas dryer must be permanently attached to...
...duct with any combustible construction be at least 2 inches (5 cm), and, when venting the dryer to the outdoors, the dryer can be installed with a clearance of 1 inch at the manual section entitled Electrical Requirements for outside using the right side panel because of the burner housing.... 6) The dryer exhaust duct must be affixed securely to installations of the dryer in a manufactured or mobile home: 1) The gas dryer must be permanently attached to...

Owners Manual
Page 16
...¢ Then, put the hooked shape end of the wire under the screw of ground wire insulation. Use the instructions in order for dryer to be sure that the strain relief screw is prohibited for your home: Use the instructions in right position. Otherwise, excessive current is available... at your home. Wire color indicated on manual is connected to the same color screw in damages on tight and power cord is in this type is applied resulting in block. Review...
...¢ Then, put the hooked shape end of the wire under the screw of ground wire insulation. Use the instructions in order for dryer to be sure that the strain relief screw is prohibited for your home: Use the instructions in right position. Otherwise, excessive current is available... at your home. Wire color indicated on manual is connected to the same color screw in damages on tight and power cord is in this type is applied resulting in block. Review...
Owners Manual
Page 19
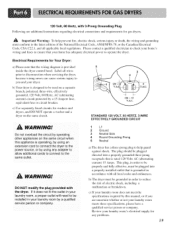
...the wiring and grounding must be nstalled in accordance with the dryer. STANDARD 120 VOLT, 60 HERTZ, 3-WIRE EFFECTIVELY GROUNDED CIRCUIT Donot overload the circuit by operating Other appliances On the same circuit when this manual, or if you are additional instructions regarding electrical connections and ...requirements for any adapter tO allow additional cords to connect to you and your dryer. This plug, in order to reduce the risk of...
...the wiring and grounding must be nstalled in accordance with the dryer. STANDARD 120 VOLT, 60 HERTZ, 3-WIRE EFFECTIVELY GROUNDED CIRCUIT Donot overload the circuit by operating Other appliances On the same circuit when this manual, or if you are additional instructions regarding electrical connections and ...requirements for any adapter tO allow additional cords to connect to you and your dryer. This plug, in order to reduce the risk of...
Owners Manual
Page 20
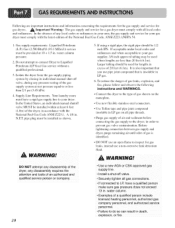
... gas supply line to or less than 20 feet (6.1 m). In the United States, an individual manual shutoff valve MUST be used for your dryer. Before tightening connection between gas supply and dryer, purge remaining air until odor of gas leaks, explosion, and fire, please follow and observe the... have a qualified person make sure gas pressure does not exceed 13 in death explosion, or fire. Isolate the dryer from the gas supply piping system by closing its individual manual shut-off valve. • Securely tighten all pipe threads. in LP gas. . WARNING! water column. •...
... gas supply line to or less than 20 feet (6.1 m). In the United States, an individual manual shutoff valve MUST be used for your dryer. Before tightening connection between gas supply and dryer, purge remaining air until odor of gas leaks, explosion, and fire, please follow and observe the... have a qualified person make sure gas pressure does not exceed 13 in death explosion, or fire. Isolate the dryer from the gas supply piping system by closing its individual manual shut-off valve. • Securely tighten all pipe threads. in LP gas. . WARNING! water column. •...

Owners Manual
Page 23
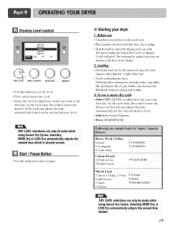
... or fire. DLE8377WM/DLG8388WM/DLE8377NM/DLG8388NM CYCLESELECTOR TIME CHANGE BUTTON STATUS. Donot dry anything flammable on it (even after washing). Failure to person, read this entire manual, including the Important Safety lnstr.ctions, before operating this dryer. Explosion Hazard Keep ...flammable materials and vapors, such as gasoline, away from dryer. PowerButton • Use this manual for starting and using your new...
... or fire. DLE8377WM/DLG8388WM/DLE8377NM/DLG8388NM CYCLESELECTOR TIME CHANGE BUTTON STATUS. Donot dry anything flammable on it (even after washing). Failure to person, read this entire manual, including the Important Safety lnstr.ctions, before operating this dryer. Explosion Hazard Keep ...flammable materials and vapors, such as gasoline, away from dryer. PowerButton • Use this manual for starting and using your new...

Owners Manual
Page 25
... drying without heat such as clothes packed in a suitcase or items wrinkled from changing options on control panel while the dryer is running. When a Manual Cycle is selected. Tim_e Button • Press MORE TIME or LESS TIME until start/pause is selected, the ESTIMATED ...status window. Speed Dry Use for 3 seconds again. 2% Time change the actual time in the dryer too long. -1!!!!!!!!!!! Child Lock Child Lock can change button m available only with Manual Dry, Time Dry and Rack Dry programs. EstimatedTimeRemaining • The Display shows the estimated time remaining...
... drying without heat such as clothes packed in a suitcase or items wrinkled from changing options on control panel while the dryer is running. When a Manual Cycle is selected. Tim_e Button • Press MORE TIME or LESS TIME until start/pause is selected, the ESTIMATED ...status window. Speed Dry Use for 3 seconds again. 2% Time change the actual time in the dryer too long. -1!!!!!!!!!!! Child Lock Child Lock can change button m available only with Manual Dry, Time Dry and Rack Dry programs. EstimatedTimeRemaining • The Display shows the estimated time remaining...
Owners Manual
Page 29
... instructions can on the selected dryness level. hess Level control DRY LEVEL TEMRCONTROL TiME DRY BEEPER • Use this button for Sensor Dry Cycles or Manual Cycles will show in minutes) will glow. See Loading. • Tuna the knob to dry the load. As the cycle runs, the control senses the...
... instructions can on the selected dryness level. hess Level control DRY LEVEL TEMRCONTROL TiME DRY BEEPER • Use this button for Sensor Dry Cycles or Manual Cycles will show in minutes) will glow. See Loading. • Tuna the knob to dry the load. As the cycle runs, the control senses the...
Owners Manual
Page 30
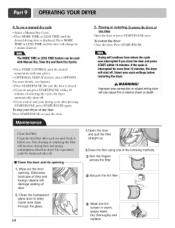
... shuts off . Clean the transparent glass door to end your dryer at any time Press START/PAUSE or open the door. 5. The MORE TIME or LESS TIME feature canbe used with Manual Dry, Time Dry and Rack Dry Cyc!es, • Press TEMR CONTROL until the desired drying time ... shut off . • If you do not press START/PAUSE within 10 minutes. Select new cycle settings before restarting the dryer. 4. To use a manual dry cycle • Select a Manual Dry Cycle. • Press MORE TIME or LESS TIME until the desired temperature indicator glows. • (OPTIONAL STEP) If desired, select OPTIONS...
... shuts off . Clean the transparent glass door to end your dryer at any time Press START/PAUSE or open the door. 5. The MORE TIME or LESS TIME feature canbe used with Manual Dry, Time Dry and Rack Dry Cyc!es, • Press TEMR CONTROL until the desired drying time ... shut off . • If you do not press START/PAUSE within 10 minutes. Select new cycle settings before restarting the dryer. 4. To use a manual dry cycle • Select a Manual Dry Cycle. • Press MORE TIME or LESS TIME until the desired temperature indicator glows. • (OPTIONAL STEP) If desired, select OPTIONS...
Owners Manual
Page 33
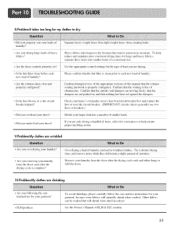
...not pushed in a dryer. Heavy lklbrics take longer to dry because they still retain a ...ead tO w7rinkled Clothes . your dryer? Please confirm that the lint tilter...are wrinkled A'--_e you Over d..r.y..i.n..g. Remove your laundry from the dryer soon after the drying cycle ends mad either h_mg or fold...breakers.) • Did you overload your laundry from the dryer after the drying cycle is complete'? Confirm that the venting..._md replace the fuse or reset the circuit breaker. (IMPORTANT: electric dryers generally use instructions for your loads of smaller loads. • Did ...
...not pushed in a dryer. Heavy lklbrics take longer to dry because they still retain a ...ead tO w7rinkled Clothes . your dryer? Please confirm that the lint tilter...are wrinkled A'--_e you Over d..r.y..i.n..g. Remove your laundry from the dryer soon after the drying cycle ends mad either h_mg or fold...breakers.) • Did you overload your laundry from the dryer after the drying cycle is complete'? Confirm that the venting..._md replace the fuse or reset the circuit breaker. (IMPORTANT: electric dryers generally use instructions for your loads of smaller loads. • Did ...


