
Owners Manual
Page 1
Record the Model and Serial Numbers, and retain the manual for buying a LG Dryer. r,L_r _ "_ r,L_r r,L!' For more information, visit our website at http://us.lge.com P/No.: 3828EL3010B Please read your manual carefully, as it provides instructions on safe Installation, Use and Maintenance. d'r'J,'_l_, ElectricandGasDryer DLE8377WM / DLG8388WIVl DLE8377NM / DLG8388NM Thank you for future reference. 1-800-243-0000 24 HOURS A DAY, 7 DAYS A WEEK FOR LG CUSTOMER SERVICE ,_J_, _ll__ I_r_ I' x!
Record the Model and Serial Numbers, and retain the manual for buying a LG Dryer. r,L_r _ "_ r,L_r r,L!' For more information, visit our website at http://us.lge.com P/No.: 3828EL3010B Please read your manual carefully, as it provides instructions on safe Installation, Use and Maintenance. d'r'J,'_l_, ElectricandGasDryer DLE8377WM / DLG8388WIVl DLE8377NM / DLG8388NM Thank you for future reference. 1-800-243-0000 24 HOURS A DAY, 7 DAYS A WEEK FOR LG CUSTOMER SERVICE ,_J_, _ll__ I_r_ I' x!
Owners Manual
Page 2
... in operation time. DUAL SENSORTECHNOLOGY It makes it automatically determines operation time based on the dryness of load weight, more effective for this dryer. TROUBLESHOOTING GUIDE ...LG DRYER LiMiTED WARRANTY ...2 3 4-6 7-12 13-14 15-18 19 20 21-22 23-30 31-33 34 USING THE RLM (REMOTELAUNDRY MONITOR...) The RLM monitors status of your clothes EASYOF USE An entire selection of your dryer. Time Dry is finished. DIGITAL FABRICCARE Multi-Level temperature ...
... in operation time. DUAL SENSORTECHNOLOGY It makes it automatically determines operation time based on the dryness of load weight, more effective for this dryer. TROUBLESHOOTING GUIDE ...LG DRYER LiMiTED WARRANTY ...2 3 4-6 7-12 13-14 15-18 19 20 21-22 23-30 31-33 34 USING THE RLM (REMOTELAUNDRY MONITOR...) The RLM monitors status of your clothes EASYOF USE An entire selection of your dryer. Time Dry is finished. DIGITAL FABRICCARE Multi-Level temperature ...

Owners Manual
Page 3
... (1 each) Stacking kit (1 each ) Purchased Separately Remote Laundry Monitor Purchased Separately See page 26 for how to use. [] Type Electric and Gas Dryer [] Rating [] Size Please refer to the rating label regarding detailed information. 27 x 29.9 x 38.7(inch) [] Capacity IEC 7.3cu.ft. (22.5 Ib) [] Weight : 126 Ibs (57.2 ...
... (1 each) Stacking kit (1 each ) Purchased Separately Remote Laundry Monitor Purchased Separately See page 26 for how to use. [] Type Electric and Gas Dryer [] Rating [] Size Please refer to the rating label regarding detailed information. 27 x 29.9 x 38.7(inch) [] Capacity IEC 7.3cu.ft. (22.5 Ib) [] Weight : 126 Ibs (57.2 ...
Owners Manual
Page 4
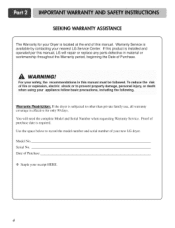
... coverage is effective for your safety, the recommendations in this manual, LG will need the complete Model and Serial Number when requesting Warranty Service. SEEKING WARRANTY ASSISTANCE The Warranty for only 90 days. For your Dryer is required. Use the space below to prevent property damage, personal... injury, or death when using your new LG dryer. Serial No. Date of purchase date is located at the end of your...
... coverage is effective for your safety, the recommendations in this manual, LG will need the complete Model and Serial Number when requesting Warranty Service. SEEKING WARRANTY ASSISTANCE The Warranty for only 90 days. For your Dryer is required. Use the space below to prevent property damage, personal... injury, or death when using your new LG dryer. Serial No. Date of purchase date is located at the end of your...
Owners Manual
Page 5
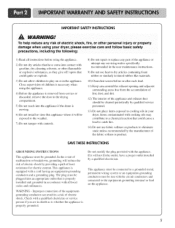
... exhaust duct should be plugged into contact with gasoline, dry-cleaning solvents, or other personal injury or property damage when using your dryer. If it will be grounded. In the event of mafiunction or breakdown, grounding will not fit the outlet, have come into .... 9) Do not use fabric softners or products to play on the appliance. 5 Close supervision of the equipmentgrounding conductor can result in your dryer, please exercise care and follow basic safety 1) Read all local codes and ordinances. WARNING -hnproper connection of children is necessary when using the...
... exhaust duct should be plugged into contact with gasoline, dry-cleaning solvents, or other personal injury or property damage when using your dryer. If it will be grounded. In the event of mafiunction or breakdown, grounding will not fit the outlet, have come into .... 9) Do not use fabric softners or products to play on the appliance. 5 Close supervision of the equipmentgrounding conductor can result in your dryer, please exercise care and follow basic safety 1) Read all local codes and ordinances. WARNING -hnproper connection of children is necessary when using the...
Owners Manual
Page 6
...instructions and information, including those in this manual and instructions provided by properly venting the dryer to the outdoors. 6 Gas appliances can result in death explosion or fire. Properly adjusted dryers will minimize combustion. Do not use any phone in your building. • Clear ...8226; Articles containing foam, rubber, rubber-like materials, plastic or similar materials should be minimized further by your gas supplier from dryer. • Place dryer at least 18 inches above the floor for a garage installation. • Failure to do so can cause minor exposure to four...
...instructions and information, including those in this manual and instructions provided by properly venting the dryer to the outdoors. 6 Gas appliances can result in death explosion or fire. Properly adjusted dryers will minimize combustion. Do not use any phone in your building. • Clear ...8226; Articles containing foam, rubber, rubber-like materials, plastic or similar materials should be minimized further by your gas supplier from dryer. • Place dryer at least 18 inches above the floor for a garage installation. • Failure to do so can cause minor exposure to four...
Owners Manual
Page 7
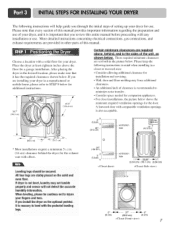
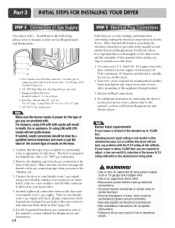
...that every section of this manual provides important information regarding the preparation and use of setting up your dryer for your dryer, and it has the required clearances shown below shows the minimum required ventilation openings/`01 the door. After placing the... cm) ventilation hole 1' 29.96" (2.54cm) (76.1 cm) (2.54cm) 0" _ 27" _0" (O cm) (68.6 cm) (0 cm) 7 Place the dryer at least eighteen inches above , behind the dryer for the exhaust vent with a solid floor for use . ventilation 48 t_2. (310 cm 2) hole i!i_i{[iiiii} _ (35.6 cm) * Most installations require...
...that every section of this manual provides important information regarding the preparation and use of setting up your dryer for your dryer, and it has the required clearances shown below shows the minimum required ventilation openings/`01 the door. After placing the... cm) ventilation hole 1' 29.96" (2.54cm) (76.1 cm) (2.54cm) 0" _ 27" _0" (O cm) (68.6 cm) (0 cm) 7 Place the dryer at least eighteen inches above , behind the dryer for the exhaust vent with a solid floor for use . ventilation 48 t_2. (310 cm 2) hole i!i_i{[iiiii} _ (35.6 cm) * Most installations require...
Owners Manual
Page 8
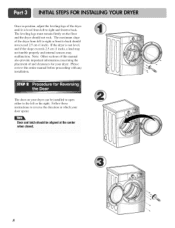
... entire manual before proceeding with any installation. The leveling legs must remain firmly on your dryer can be installed to open either to the left to right and front to back. If the dryer is level from left to right or front to reverse the direction in position, adjust ...the leveling legs of and clearances for your dryei: Please review this manual also provide important information concerning the placement of the dryer until it is not level, and if the slope exceeds 2.5 cm (1 inch), a load may not tumble properly and internal sensors may malfunction. ...
... entire manual before proceeding with any installation. The leveling legs must remain firmly on your dryer can be installed to open either to the left to right and front to back. If the dryer is level from left to right or front to reverse the direction in position, adjust ...the leveling legs of and clearances for your dryei: Please review this manual also provide important information concerning the placement of the dryer until it is not level, and if the slope exceeds 2.5 cm (1 inch), a load may not tumble properly and internal sensors may malfunction. ...
Owners Manual
Page 9
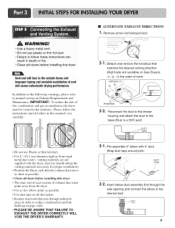
... unheated areas in order to reduce condensation and lint build-up on pipe walls. • PLEASE BE AWARE THAT FAILURE TO EXHAUST THE DRYER CORRECTLY WILL VOID THE DRYER'S WARRANTY. • ALTERNATE EXHAUST DIRECTIONS ] • Remove screw and exhaust duct. 2- ]. N • Do not use plastic or thin foil... not available on Exhaust Requirements and Maintenance. Reconnect the duct to the blower housing and attach the duct to manual section on Gas Dryers) _i), @%_3)the order of vent will cause undesirable drying performance, In addition to the following warnings, please refer to the base...
... unheated areas in order to reduce condensation and lint build-up on pipe walls. • PLEASE BE AWARE THAT FAILURE TO EXHAUST THE DRYER CORRECTLY WILL VOID THE DRYER'S WARRANTY. • ALTERNATE EXHAUST DIRECTIONS ] • Remove screw and exhaust duct. 2- ]. N • Do not use plastic or thin foil... not available on Exhaust Requirements and Maintenance. Reconnect the duct to the blower housing and attach the duct to manual section on Gas Dryers) _i), @%_3)the order of vent will cause undesirable drying performance, In addition to the following warnings, please refer to the base...
Owners Manual
Page 10
... entitled Gas Requirements and Instructions. 10 Following are required to install or use in the manual section entitled Electrical Requirements for the dryer. Iron Pipe. Four-wire cord is proper for complete instructions. • Failure to 10,000 Adjustingburner input setting isnot neededin ...gas leaks with a non-corrosive leak detection fluid. Securely tighten all electrical connections • See installation instructions for the type of dryer 4. The dryer is located at the back of this altitude, If your laundry room's gas supply. listed No. 10 (copper wire only) ...
... entitled Gas Requirements and Instructions. 10 Following are required to install or use in the manual section entitled Electrical Requirements for the dryer. Iron Pipe. Four-wire cord is proper for complete instructions. • Failure to 10,000 Adjustingburner input setting isnot neededin ...gas leaks with a non-corrosive leak detection fluid. Securely tighten all electrical connections • See installation instructions for the type of dryer 4. The dryer is located at the back of this altitude, If your laundry room's gas supply. listed No. 10 (copper wire only) ...
Owners Manual
Page 11
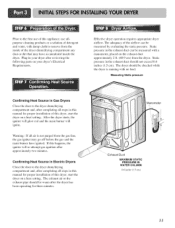
...go off before the gas and the main burner have accumulated inside the dryer. The dryer should be measured by evaluating the static pressure. Measuring Static pressure Confirming Heat Source in Gas Dryers Close the door to remove from the gas line, the gas igniter ... with a manometer, placed on the exhaust duct approximately 2 ft. (60.9 cm) from the dryer. If this happens, the igniter will ignite. Effective dryer operation requires appropriate dryer airflow. Plug-in your dryer after approximately two minutes. The exhaust air or the exhaust pipe should not exceed 0.6 inches (1.5 ...
...go off before the gas and the main burner have accumulated inside the dryer. The dryer should be measured by evaluating the static pressure. Measuring Static pressure Confirming Heat Source in Gas Dryers Close the door to remove from the gas line, the gas igniter ... with a manometer, placed on the exhaust duct approximately 2 ft. (60.9 cm) from the dryer. If this happens, the igniter will ignite. Effective dryer operation requires appropriate dryer airflow. Plug-in your dryer after approximately two minutes. The exhaust air or the exhaust pipe should not exceed 0.6 inches (1.5 ...
Owners Manual
Page 12
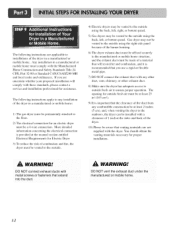
... fasteners that the clearance of the duct from any combustible construction be at least 2 inches (5 cm), and, when venting the dryer to the outdoors, the dryer can be installed with a clearance of 1 inch at the manual section entitled Electrical Requirements for outside fresh air must be vented ...If you use a rigid or flexible metal pipe. 7) DO NOT connect the exhaust duct with any installation of the burner housing. 6) The dryer exhaust duct must be affixed securely to the manufactured or mobile home structure, and the exhaust duct must comply with these standards, please contact a ...
... fasteners that the clearance of the duct from any combustible construction be at least 2 inches (5 cm), and, when venting the dryer to the outdoors, the dryer can be installed with a clearance of 1 inch at the manual section entitled Electrical Requirements for outside fresh air must be vented ...If you use a rigid or flexible metal pipe. 7) DO NOT connect the exhaust duct with any installation of the burner housing. 6) The dryer exhaust duct must be affixed securely to the manufactured or mobile home structure, and the exhaust duct must comply with these standards, please contact a ...
Owners Manual
Page 13
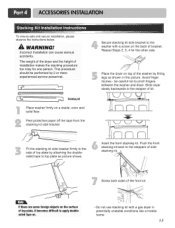
... the side of installation makes the stacking procedure too risky for the other side. WARNING! Incorrect Installation can cause serious accidents. The weight of the dryer and the height of top plate by 2 or more experienced service personnel. Secure stacking kit side bracket to apply double' sided tape on. •... to the stoppers of bracket. Screw both sides of kit. Push the front stacking kit back to pinch fingers between the washer and dryer. Stackin9kit Place washer firmly on the back of side stacking kit. Avoid finger injuries - Insert the front stacking kit.
... the side of installation makes the stacking procedure too risky for the other side. WARNING! Incorrect Installation can cause serious accidents. The weight of the dryer and the height of top plate by 2 or more experienced service personnel. Secure stacking kit side bracket to apply double' sided tape on. •... to the stoppers of bracket. Screw both sides of kit. Push the front stacking kit back to pinch fingers between the washer and dryer. Stackin9kit Place washer firmly on the back of side stacking kit. Avoid finger injuries - Insert the front stacking kit.
Owners Manual
Page 14
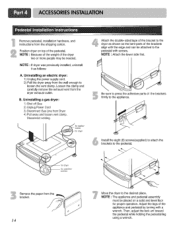
... outlet. NOTE • Because of the weight of the brackets align with the edge and can be attached to the dryer as follows: A. Loosen the clamp and carefully remove the exhaust vent from the shipping carton. combo Attach the double-sided tape of the bracket to .... Install the eight (8) screws(supplied) to attach the brackets to the desired place. for proper operation. NOTE : If dryer was previously installed, uninstall it as shown so the bent parts of the dryer two or more people may be placed on top of the appliance and pedestal by turning with screws. B. NOTE...
... outlet. NOTE • Because of the weight of the brackets align with the edge and can be attached to the dryer as follows: A. Loosen the clamp and carefully remove the exhaust vent from the shipping carton. combo Attach the double-sided tape of the bracket to .... Install the eight (8) screws(supplied) to attach the brackets to the desired place. for proper operation. NOTE : If dryer was previously installed, uninstall it as shown so the bent parts of the dryer two or more people may be placed on top of the appliance and pedestal by turning with screws. B. NOTE...

Owners Manual
Page 15
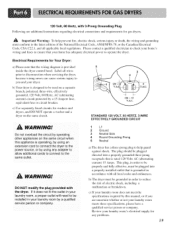
... to ensure that your home has adequate electrical power to operate the dryer. 120V/240M 60 Hertz, 3-Wire Installation Instructions for field installation in dryers which to wire your Electric Dryer: a) This dryer must be connected to a grounded metal, permanent wiring system or an...No. 10 A.W.G. terminal or lead on the following pages. 15 Sample methods are additional instructions regarding electrical connections and requirements for electric dryers. c) If branch circuit to a separate 60 Hertz single phaseAC circuit, fused at 30 Amperes (the circuit must conform to examples ...
... to ensure that your home has adequate electrical power to operate the dryer. 120V/240M 60 Hertz, 3-Wire Installation Instructions for field installation in dryers which to wire your Electric Dryer: a) This dryer must be connected to a grounded metal, permanent wiring system or an...No. 10 A.W.G. terminal or lead on the following pages. 15 Sample methods are additional instructions regarding electrical connections and requirements for electric dryers. c) If branch circuit to a separate 60 Hertz single phaseAC circuit, fused at 30 Amperes (the circuit must conform to examples ...

Owners Manual
Page 16
...3-wire receptacle (NEMA type 10-30R) and you will be using a UL listed, 120/240 volt minimum, 30 amp, dryer power supply cord. If this type is connected to the same color screw in block. Strip 5 inches of length in order for... dryer to be replaced. Connect red and black wire to the left and right terminal block screws. 3. Review the following options...wire receptacle (NEMA type 14-30R) and you will be using a UL listed, 120/240 volt minimum, 30 amp, dryer power supply cord.
...3-wire receptacle (NEMA type 10-30R) and you will be using a UL listed, 120/240 volt minimum, 30 amp, dryer power supply cord. If this type is connected to the same color screw in block. Strip 5 inches of length in order for... dryer to be replaced. Connect red and black wire to the left and right terminal block screws. 3. Review the following options...wire receptacle (NEMA type 14-30R) and you will be using a UL listed, 120/240 volt minimum, 30 amp, dryer power supply cord.

Owners Manual
Page 17
...or center wire) Strain relief Green wire of a 3 wire connection, or you are on tight and power cord is in order for dryer to be sure that the strain relief screw is prohibited for (1) new branch-circuit installations, (2) mobile homes, and (3) recreational vehicles, ...block screws. 3. Center terminal block screw(silver) Neutral grounding wire(white) Neutral grounding wire(white) Strain relief ground connector • If your dryer in a mobile home, you must use a 4wire connection. (N4-wirereceptacle EMA type 14-30R) nt pmug _ SPtadnetc_remnicnwailtsh _ee uG[°lUpdoPrgOng ...
...or center wire) Strain relief Green wire of a 3 wire connection, or you are on tight and power cord is in order for dryer to be sure that the strain relief screw is prohibited for (1) new branch-circuit installations, (2) mobile homes, and (3) recreational vehicles, ...block screws. 3. Center terminal block screw(silver) Neutral grounding wire(white) Neutral grounding wire(white) Strain relief ground connector • If your dryer in a mobile home, you must use a 4wire connection. (N4-wirereceptacle EMA type 14-30R) nt pmug _ SPtadnetc_remnicnwailtsh _ee uG[°lUpdoPrgOng ...
Owners Manual
Page 19
...meet the specifications required by a qualified service person or corn party. 1 L1 2 Ground 3 Neutral Side 4 Round Grounding Prong 5 Neutral a) The dryer has a three-prong plug to help prevent fire, electric shock, serious injury or death, the wiring and grounding must conform to the latest edition of...a proper outlet will need to be grounded in your laundry room by this appliance iS 0perating, by Using extension cord to connec t the dryer to reduce the risk of the National Electrical Code, ANSI/NFPA 70, or the Canadian Electrical Code, CSA C22.1, and all applicable local ...
...meet the specifications required by a qualified service person or corn party. 1 L1 2 Ground 3 Neutral Side 4 Round Grounding Prong 5 Neutral a) The dryer has a three-prong plug to help prevent fire, electric shock, serious injury or death, the wiring and grounding must conform to the latest edition of...a proper outlet will need to be grounded in your laundry room by this appliance iS 0perating, by Using extension cord to connec t the dryer to reduce the risk of the National Electrical Code, ANSI/NFPA 70, or the Canadian Electrical Code, CSA C22.1, and all applicable local ...
Owners Manual
Page 20
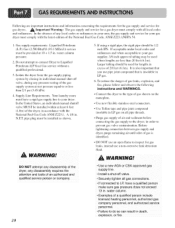
...must have a qualified person make sure gas pressure does not exceed 13 in accordance with the National Fuel Gas Code ANSI Z223.1. Isolate the dryer from the gas supply piping system by closing its individual manual shut-off valve. • Securely tighten all pipe threads. pipe plug must...result in . If using a rigid pipe, the rigid pipe should be installed within at 10 + 1.5 in death explosion, or fire. Connect the dryer to or less than 20 feet (6.1 m). In the United States, an individual manual shutoff valve MUST be used where lengths are important instructions and ...
...must have a qualified person make sure gas pressure does not exceed 13 in accordance with the National Fuel Gas Code ANSI Z223.1. Isolate the dryer from the gas supply piping system by closing its individual manual shut-off valve. • Securely tighten all pipe threads. pipe plug must...result in . If using a rigid pipe, the rigid pipe should be installed within at 10 + 1.5 in death explosion, or fire. Connect the dryer to or less than 20 feet (6.1 m). In the United States, an individual manual shutoff valve MUST be used where lengths are important instructions and ...

Owners Manual
Page 21
...exhaust duct should obtain the necessary venting materials locally. To reduce the risk of fire, DO NOT exhaust the dryer with the dryer and you should be t_ur inches (10.2 cm) in diameter with hinged dampers to make a connection with... 2 41 feet (12.5 m) 21 feet (6.4 m) 3 30 feet (9.1 m) 17 feet (5.2 m) 4 22 feet (6.7 m) 15 feet (4.5m) NOTE : Deduct 6 feet (1.8 m) for your new dryer. 3. The use as possible. Following are not provided with plastic or thin foil ducting. Exhaust Requirements and Instructions: 1. To maximize operating results, please observe the...
...exhaust duct should obtain the necessary venting materials locally. To reduce the risk of fire, DO NOT exhaust the dryer with the dryer and you should be t_ur inches (10.2 cm) in diameter with hinged dampers to make a connection with... 2 41 feet (12.5 m) 21 feet (6.4 m) 3 30 feet (9.1 m) 17 feet (5.2 m) 4 22 feet (6.7 m) 15 feet (4.5m) NOTE : Deduct 6 feet (1.8 m) for your new dryer. 3. The use as possible. Following are not provided with plastic or thin foil ducting. Exhaust Requirements and Instructions: 1. To maximize operating results, please observe the...


