
Owners Manual
Page 1
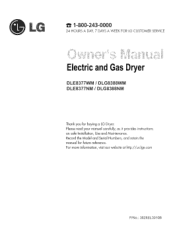
r,L_r _ "_ r,L_r r,L!' For more information, visit our website at http://us.lge.com P/No.: 3828EL3010B Record the Model and Serial Numbers, and retain the manual for buying a LG Dryer. d'r'J,'_l_, ElectricandGasDryer DLE8377WM / DLG8388WIVl DLE8377NM / DLG8388NM Thank you for future reference. 1-800-243-0000 24 HOURS A DAY, 7 DAYS A WEEK FOR LG CUSTOMER SERVICE ,_J_, _ll__ I_r_ I' x! Please read your manual carefully, as it provides instructions on safe Installation, Use and Maintenance.
r,L_r _ "_ r,L_r r,L!' For more information, visit our website at http://us.lge.com P/No.: 3828EL3010B Record the Model and Serial Numbers, and retain the manual for buying a LG Dryer. d'r'J,'_l_, ElectricandGasDryer DLE8377WM / DLG8388WIVl DLE8377NM / DLG8388NM Thank you for future reference. 1-800-243-0000 24 HOURS A DAY, 7 DAYS A WEEK FOR LG CUSTOMER SERVICE ,_J_, _ll__ I_r_ I' x! Please read your manual carefully, as it provides instructions on safe Installation, Use and Maintenance.
Owners Manual
Page 4
... or workmanship throughout the Warranty period, beginning the Date of this product is required. Serial No. If this manual. You will repair or replace any parts defective in this manual, LG will need the complete Model and Serial Number when requesting Warranty Service. Proof of your appliance follow basic precautions,... or explosion, electric shock or to record the model number and serial number of purchase date is installed and operated per this manual must be followed. Use the space below to prevent property damage, personal injury, or death when using your new...
... or workmanship throughout the Warranty period, beginning the Date of this product is required. Serial No. If this manual. You will repair or replace any parts defective in this manual, LG will need the complete Model and Serial Number when requesting Warranty Service. Proof of your appliance follow basic precautions,... or explosion, electric shock or to record the model number and serial number of purchase date is installed and operated per this manual must be followed. Use the space below to prevent property damage, personal injury, or death when using your new...
Owners Manual
Page 6
... governor of California to publish a list of substances known to the state to cause cancer, birth defects or other flammable vapors or liquids in this manual and instructions provided by the incomplete combustion of natural gas or LP fuels. Exposure to these instructions can result in fire, death or serious injury...
... governor of California to publish a list of substances known to the state to cause cancer, birth defects or other flammable vapors or liquids in this manual and instructions provided by the incomplete combustion of natural gas or LP fuels. Exposure to these instructions can result in fire, death or serious injury...
Owners Manual
Page 7
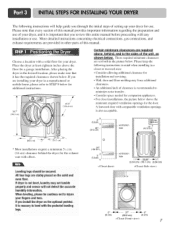
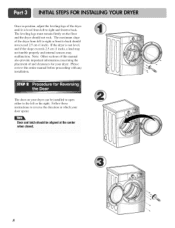
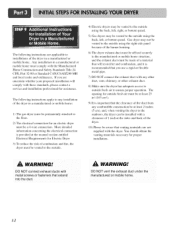
...Wall, door and floor molding may net tumble properly and sensor will help guide you are set forth in other parts of this entire manual before proceeding with elbow. Please keep the t`011owing instructions in mind when installing in the desired location, please make sure that it is... important that every section of this manual. Please note that you install the dryer on the solid and even floor. if you review this manual provides important information regarding the preparation and use . When leveling, please be secured....
...Wall, door and floor molding may net tumble properly and sensor will help guide you are set forth in other parts of this entire manual before proceeding with elbow. Please keep the t`011owing instructions in mind when installing in the desired location, please make sure that it is... important that every section of this manual. Please note that you install the dryer on the solid and even floor. if you review this manual provides important information regarding the preparation and use . When leveling, please be secured....
Owners Manual
Page 8
... important information concerning the placement of and clearances for your dryer can be installed to open either to back. Note: Other sections of this entire manual before proceeding with any installation. If the dryer is level from left or the right. Follow these instructions to reverse the direction in position, adjust...
... important information concerning the placement of and clearances for your dryer can be installed to open either to back. Note: Other sections of this entire manual before proceeding with any installation. If the dryer is level from left or the right. Follow these instructions to reverse the direction in position, adjust...
Owners Manual
Page 9
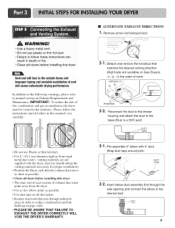
..., In addition to the following warnings, please refer to the outdoors. i f PORTION -A,, I Knockout O \ 2-2. IMPORTANT: To reduce the risk of exhaust duct must be vented to manual section on all others in death or fire, • Clean old ducts before installing this...
..., In addition to the following warnings, please refer to the outdoors. i f PORTION -A,, I Knockout O \ 2-2. IMPORTANT: To reduce the risk of exhaust duct must be vented to manual section on all others in death or fire, • Clean old ducts before installing this...
Owners Manual
Page 10
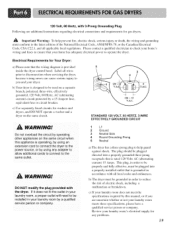
... Gas Connection Make sure the burner nozzle is prepared tbr Natural Gas with LPG If needed, nozzle conversion should be connected to this manual, before making the electrical connection l_r electric dryers. Use only a new U.L. For additional instruction on connecting the dryer to an electrical... rating indicated on Gas Requirements and Instructions. Securely tighten all electrical connections • See installation instructions for the type of this manual's section on your house is above lO,0Oo feet, you are required to install or use a new stainless steel flexible connector ...
... Gas Connection Make sure the burner nozzle is prepared tbr Natural Gas with LPG If needed, nozzle conversion should be connected to this manual, before making the electrical connection l_r electric dryers. Use only a new U.L. For additional instruction on connecting the dryer to an electrical... rating indicated on Gas Requirements and Instructions. Securely tighten all electrical connections • See installation instructions for the type of this manual's section on your house is above lO,0Oo feet, you are required to install or use a new stainless steel flexible connector ...
Owners Manual
Page 11
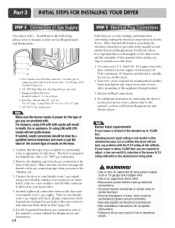
... the following parts on the exhaust duct approximately 2 ft. (60.9 cm) from the dryer. Plug-in this manual for proper installation of this dryer, start the dryer on a heat setting. Static pressure in this manual for three minutes. The adequacy of the airflow can be measured by evaluating the static pressure. Measuring...
... the following parts on the exhaust duct approximately 2 ft. (60.9 cm) from the dryer. Plug-in this manual for proper installation of this dryer, start the dryer on a heat setting. Static pressure in this manual for three minutes. The adequacy of the airflow can be measured by evaluating the static pressure. Measuring...
Owners Manual
Page 12
... duct. 8) Make sure the dryer has adequate access to outside fresh air must be at least 25 iw' (163 cm_). 9) It is provided at the manual section entitled Electrical Requirements for Electric Dryer 3) To reduce the risk of combustion and fire, the dryer must be aware that you are uncertain whether...
... duct. 8) Make sure the dryer has adequate access to outside fresh air must be at least 25 iw' (163 cm_). 9) It is provided at the manual section entitled Electrical Requirements for Electric Dryer 3) To reduce the risk of combustion and fire, the dryer must be aware that you are uncertain whether...

Owners Manual
Page 16
... of coveting material from 3 other wires peel insulation back linch (2.5cm). Otherwise, excessive current is tightened. Make sure that all terminal block nuts are on manual is in right position. Wire color indicated on tight and power cord is connected to the same color screw in block. you will be connecting...
... of coveting material from 3 other wires peel insulation back linch (2.5cm). Otherwise, excessive current is tightened. Make sure that all terminal block nuts are on manual is in right position. Wire color indicated on tight and power cord is connected to the same color screw in block. you will be connecting...
Owners Manual
Page 19
... appliances On the same circuit when this appliance iS 0perating, by Using extension cord to connec t the dryer to the power source, or by this manual, or if you and your home's wiring and fuses to be used on the same circuit. The plug should be plugged directed into a properly installed...
... appliances On the same circuit when this appliance iS 0perating, by Using extension cord to connec t the dryer to the power source, or by this manual, or if you and your home's wiring and fuses to be used on the same circuit. The plug should be plugged directed into a properly installed...
Owners Manual
Page 20
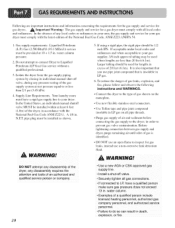
...of gas leaks, explosion, and fire, please follow and observe the following instructions and WARNINGS. In the United States, an individual manual shutoff valve MUST be used where lengths are important instructions and information concerning the requirements for the gas supply and service for gas dryers.... • DO NOT use a non-corrosive leak detection fluid. Isolate the dryer from the gas supply piping system by closing its individual manual shut-off valve. • Securely tighten all local codes and ordinances. Linger tubing should be installed as shown. . If connected to inspect...
...of gas leaks, explosion, and fire, please follow and observe the following instructions and WARNINGS. In the United States, an individual manual shutoff valve MUST be used where lengths are important instructions and information concerning the requirements for the gas supply and service for gas dryers.... • DO NOT use a non-corrosive leak detection fluid. Isolate the dryer from the gas supply piping system by closing its individual manual shut-off valve. • Securely tighten all local codes and ordinances. Linger tubing should be installed as shown. . If connected to inspect...

Owners Manual
Page 23
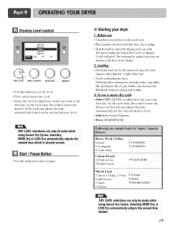
...power on or off. 23 WARNING! PowerButton • Use this button for starting and using your new dryer. DLE8377WM/DLG8388WM/DLE8377NM/DLG8388NM CYCLESELECTOR TIME CHANGE BUTTON STATUS. Do not dry anything that has ever had anything that has ever had any type ofoil on ... flammable materials and vapors, such as gasoline, away from dryer. Failure to person, read this entire manual, including the Important Safety lnstr.ctions, before operating this manual for more detailed information. Donot dry anything flammable on it (even after washing). Important Warning: To reduce...
...power on or off. 23 WARNING! PowerButton • Use this button for starting and using your new dryer. DLE8377WM/DLG8388WM/DLE8377NM/DLG8388NM CYCLESELECTOR TIME CHANGE BUTTON STATUS. Do not dry anything that has ever had anything that has ever had any type ofoil on ... flammable materials and vapors, such as gasoline, away from dryer. Failure to person, read this entire manual, including the Important Safety lnstr.ctions, before operating this manual for more detailed information. Donot dry anything flammable on it (even after washing). Important Warning: To reduce...

Owners Manual
Page 25
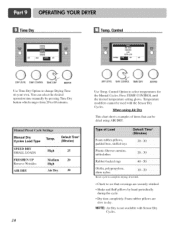
... dryer is running. Use the Air Dry Modifier for 3 seconds again. 2% In addition to prevent your cycle. When power is on the status window. When a Manual Cycle is selected. You can be locked and Child Lock glows. Child Lock Child Lock can change button m available only with... Manual Dry, Time Dry and Rack Dry programs. EstimatedTimeRemaining • The Display shows the estimated time remaining. Freshen Up Air Dr_ F Use this cycle to select a ...
... dryer is running. Use the Air Dry Modifier for 3 seconds again. 2% In addition to prevent your cycle. When power is on the status window. When a Manual Cycle is selected. You can be locked and Child Lock glows. Child Lock Child Lock can change button m available only with... Manual Dry, Time Dry and Rack Dry programs. EstimatedTimeRemaining • The Display shows the estimated time remaining. Freshen Up Air Dr_ F Use this cycle to select a ...
Owners Manual
Page 28
...coverings are securely stitched. • Shake and fluff pillows by pressing Time Dry button which ranges from 20 to select temperatures for the Manual Cycles. DRY LEVEL TEMR CONTROL TiME DRY BEEPER Use Temp. Control Option to 60 minutes. CONTROL until the desired temperature setting glows....Air Dry is not available with the Sensor Dry Cycles. Foam rubber pillows are slow to see that can select the desired operation time manually by hand periodically during the cycle. • Dry item completely. Press TEMP. Time Dry Control DRY LEVEL TEMR CONTROL TIME DRY BEEPER...
...coverings are securely stitched. • Shake and fluff pillows by pressing Time Dry button which ranges from 20 to select temperatures for the Manual Cycles. DRY LEVEL TEMR CONTROL TiME DRY BEEPER Use Temp. Control Option to 60 minutes. CONTROL until the desired temperature setting glows....Air Dry is not available with the Sensor Dry Cycles. Foam rubber pillows are slow to see that can select the desired operation time manually by hand periodically during the cycle. • Dry item completely. Press TEMP. Time Dry Control DRY LEVEL TEMR CONTROL TIME DRY BEEPER...
Owners Manual
Page 29
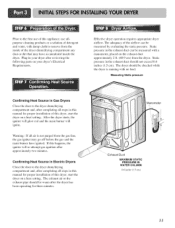
As the cycle runs, the control senses the dryness of uneven drying and wrinkle. 3. The preset setting for Sensor Dry Cycles or Manual Cycles will show in the display. 2. See Loading. • Tuna the knob to select the d@ng cycle you want to dry the load. Following these ...
As the cycle runs, the control senses the dryness of uneven drying and wrinkle. 3. The preset setting for Sensor Dry Cycles or Manual Cycles will show in the display. 2. See Loading. • Tuna the knob to select the d@ng cycle you want to dry the load. Following these ...
Owners Manual
Page 30
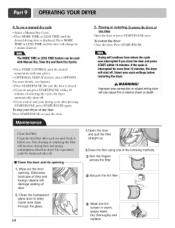
...START/PAUSE. Run the fingers across the filter (_ Vacuum the lint filter @ Wash the lint screen in warm, soapy water. To use a manual dry cycle • Select a Manual Dry Cycle. • Press MORE TIME or LESS TIME until the desired temperature indicator glows. • (OPTIONAL STEP) If desired, select OPTIONS...the cycle, the dryer automatically shuts off . To restart the dryer Close the door. The MORE TIME or LESS TIME feature canbe used with Manual Dry, Time Dry and Rack Dry Cyc!es, • Press TEMR CONTROL until the desired drying time is displayed. Wipe out the door ...
...START/PAUSE. Run the fingers across the filter (_ Vacuum the lint filter @ Wash the lint screen in warm, soapy water. To use a manual dry cycle • Select a Manual Dry Cycle. • Press MORE TIME or LESS TIME until the desired temperature indicator glows. • (OPTIONAL STEP) If desired, select OPTIONS...the cycle, the dryer automatically shuts off . To restart the dryer Close the door. The MORE TIME or LESS TIME feature canbe used with Manual Dry, Time Dry and Rack Dry Cyc!es, • Press TEMR CONTROL until the desired drying time is displayed. Wipe out the door ...
Owners Manual
Page 33
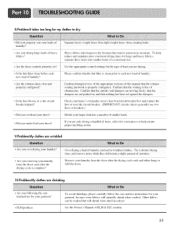
... you Over d..r.y..i.n..g. Try a _horter drying • time, and remove items while they tend to retain more consisteut drying times for your laundry? See the Owner's Manual of the appropriate sections Of this manua! Heavy lklbrics take longer to dry because they still retain a Slight amount of moisture. • Are you are...
... you Over d..r.y..i.n..g. Try a _horter drying • time, and remove items while they tend to retain more consisteut drying times for your laundry? See the Owner's Manual of the appropriate sections Of this manua! Heavy lklbrics take longer to dry because they still retain a Slight amount of moisture. • Are you are...


