
Owners Manual
Page 1
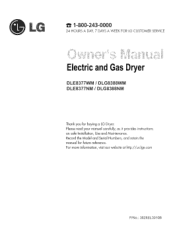
d'r'J,'_l_, ElectricandGasDryer DLE8377WM / DLG8388WIVl DLE8377NM / DLG8388NM Thank you for future reference. Record the Model and Serial Numbers, and retain the manual for buying a LG Dryer. For more information, visit our website at http://us.lge.com P/No.: 3828EL3010B Please read your manual carefully, as it provides instructions on safe Installation, Use and Maintenance. r,L_r _ "_ r,L_r r,L!' 1-800-243-0000 24 HOURS A DAY, 7 DAYS A WEEK FOR LG CUSTOMER SERVICE ,_J_, _ll__ I_r_ I' x!
d'r'J,'_l_, ElectricandGasDryer DLE8377WM / DLG8388WIVl DLE8377NM / DLG8388NM Thank you for future reference. Record the Model and Serial Numbers, and retain the manual for buying a LG Dryer. For more information, visit our website at http://us.lge.com P/No.: 3828EL3010B Please read your manual carefully, as it provides instructions on safe Installation, Use and Maintenance. r,L_r _ "_ r,L_r r,L!' 1-800-243-0000 24 HOURS A DAY, 7 DAYS A WEEK FOR LG CUSTOMER SERVICE ,_J_, _ll__ I_r_ I' x!
Owners Manual
Page 4
... new LG dryer. Proof of Purchase. For your safety, the recommendations in material or workmanship throughout the Warranty period, beginning the Date of purchase date is installed and operated per this product is required. IRNING! Date of this manual must be followed. If this manual, LG will...ASSISTANCE The Warranty for only 90 days. Warranty Restriction: If the dryer is subjected to other than private family use, all warranty coverage is effective for your Dryer is available by contacting your nearest LG Service Center. You will repair or replace any parts defective in ...
... new LG dryer. Proof of Purchase. For your safety, the recommendations in material or workmanship throughout the Warranty period, beginning the Date of purchase date is installed and operated per this product is required. IRNING! Date of this manual must be followed. If this manual, LG will...ASSISTANCE The Warranty for only 90 days. Warranty Restriction: If the dryer is subjected to other than private family use, all warranty coverage is effective for your Dryer is available by contacting your nearest LG Service Center. You will repair or replace any parts defective in ...
Owners Manual
Page 6
... gas or LP fuels. WARNING! • Keep flammable materials and vapors, such as gasoline, away from a neighbor's phone. Properly adjusted dryers will minimize combustion. Do not dry any articles that has ever had anything that have ever had any phone in your building. • ...Clear the room, building or area of all instructions and information, including those in this manual and instructions provided by your gas supplier from dryer. • Place dryer at least 18 inches above the floor for a garage installation. • Failure to do so can completely ...
... gas or LP fuels. WARNING! • Keep flammable materials and vapors, such as gasoline, away from a neighbor's phone. Properly adjusted dryers will minimize combustion. Do not dry any articles that has ever had anything that have ever had any phone in your building. • ...Clear the room, building or area of all instructions and information, including those in this manual and instructions provided by your gas supplier from dryer. • Place dryer at least 18 inches above the floor for a garage installation. • Failure to do so can completely ...
Owners Manual
Page 7
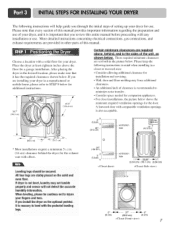
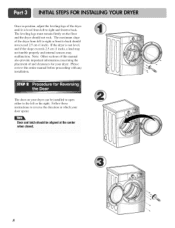
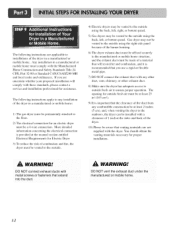
...mind when installing in the desired location, please make sure that you review this manual. Please note that every section of this manual provides important information regarding the preparation and use of your dryer, and it is important that it is also acceptable. 3Bt (7.6 cm) ",,; ...below . it has the required clearances shown below . If you are installing your dryer in other parts of this entire manual before proceeding with a solid floor for additional instructions. if you install the dryer on the solid and even floor. Choose a location with any installation or use ...
...mind when installing in the desired location, please make sure that you review this manual. Please note that every section of this manual provides important information regarding the preparation and use of your dryer, and it is important that it is also acceptable. 3Bt (7.6 cm) ",,; ...below . it has the required clearances shown below . If you are installing your dryer in other parts of this entire manual before proceeding with a solid floor for additional instructions. if you install the dryer on the solid and even floor. Choose a location with any installation or use ...
Owners Manual
Page 8
... of and clearances for your dryer can be installed to open either to the left to right and front to back should not rock. Once in which your door opens: The leveling legs must remain firmly on your dryei: Please review this entire manual before proceeding with any installation.... The door on the floor and the dryer should not exceed 2.5 cm (1 inch). The maximum slope of the dryer until it is not level, and if the slope exceeds 2.5 cm (1 inch), ...
... of and clearances for your dryer can be installed to open either to the left to right and front to back should not rock. Once in which your door opens: The leveling legs must remain firmly on your dryei: Please review this entire manual before proceeding with any installation.... The door on the floor and the dryer should not exceed 2.5 cm (1 inch). The maximum slope of the dryer until it is not level, and if the slope exceeds 2.5 cm (1 inch), ...
Owners Manual
Page 9
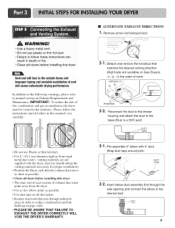
...can result in death or fire, • Clean old ducts before installing this dryer Vent end will cause undesirable drying performance, In addition to the following warnings, please refer to manual section on Exhaust Requirements and Maintenance. Detach and remove the knockout that matches the... • Clean old duets beJbre installing this manual) very carefully. Wrap duct tape around joint. Pre-assemble 4" elbow with the dryer, and you should obtain the venting materials necessary for proper installation) • Position the Dryer such that runs through the side opening and connect...
...can result in death or fire, • Clean old ducts before installing this dryer Vent end will cause undesirable drying performance, In addition to the following warnings, please refer to manual section on Exhaust Requirements and Maintenance. Detach and remove the knockout that matches the... • Clean old duets beJbre installing this manual) very carefully. Wrap duct tape around joint. Pre-assemble 4" elbow with the dryer, and you should obtain the venting materials necessary for proper installation) • Position the Dryer such that runs through the side opening and connect...
Owners Manual
Page 10
... • Failure to do not allow grounding of nozzle on the dryer. 1. Connect the dryer to your laundry room's gas supply using LNG with LNGnozzle will not have any steps to install or use this manual's section entitled Gas Requirements and Instructions. 10 Following are required to ... percent(4%) reduction of the burner B,T.U rating indicated on your local codes). 4. For LP (Liquefied Petroleum) gas connection, refer to manual section on Electrical Requirements and Electric Dryer. It is important that you thoroughly review that the type of gas you don't damage the threads of...
... • Failure to do not allow grounding of nozzle on the dryer. 1. Connect the dryer to your laundry room's gas supply using LNG with LNGnozzle will not have any steps to install or use this manual's section entitled Gas Requirements and Instructions. 10 Following are required to ... percent(4%) reduction of the burner B,T.U rating indicated on your local codes). 4. For LP (Liquefied Petroleum) gas connection, refer to manual section on Electrical Requirements and Electric Dryer. It is important that you thoroughly review that the type of gas you don't damage the threads of...
Owners Manual
Page 11
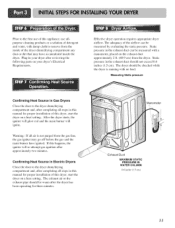
...running with a manometer, placed on your dryer's Electrical Requirements. The exhaust air or the exhaust pipe should be warm after approximately two minutes. If this manual for proper installation of the dryer drum/drying compartment any dust or dirt ...dryer, start the dryer on a heat setting. Manometer j_ "Exhaust Duct MAXIMUM STATIC PRESSURE IN WATER COLUMN 0.6 inche (1.5 cm) II Static pressure in this dryer, start the dryer on a heat setting. The adequacy of this manual for three minutes. Effective dryer operation requires appropriate dryer airflow. The dryer...
...running with a manometer, placed on your dryer's Electrical Requirements. The exhaust air or the exhaust pipe should be warm after approximately two minutes. If this manual for proper installation of the dryer drum/drying compartment any dust or dirt ...dryer, start the dryer on a heat setting. Manometer j_ "Exhaust Duct MAXIMUM STATIC PRESSURE IN WATER COLUMN 0.6 inche (1.5 cm) II Static pressure in this dryer, start the dryer on a heat setting. The adequacy of this manual for three minutes. Effective dryer operation requires appropriate dryer airflow. The dryer...
Owners Manual
Page 12
... the clearance of the duct from any combustible construction be at least 2 inches (5 cm), and, when venting the dryer to the outdoors, the dryer can be installed with a clearance of 1 inch at the manual section entitled Electrical Requirements for proper installation. The following instructions are uncertain whether your proposed installation will resist fire...
... the clearance of the duct from any combustible construction be at least 2 inches (5 cm), and, when venting the dryer to the outdoors, the dryer can be installed with a clearance of 1 inch at the manual section entitled Electrical Requirements for proper installation. The following instructions are uncertain whether your proposed installation will resist fire...

Owners Manual
Page 16
... linch (2.5cm). and be replaced. First, peel 5 inches (12.7cm) of appliance and connect it to the same color screw in damages on manual is connected to center screw. 4. Center terminal block screw(silver) Neutral grounding wire(white) Neutral wire (white or center wire) Strain relief Green wire... at your home has a 3-wire receptacle (NEMA type 10-30R) and you will be using a UL listed, 120/240 volt minimum, 30 amp, dryer power supply cord. After cutting 172inch (3.8cm) from end. Wire color indicated on product and heating failure, 16 1. Strip 5 inches of power cord to...
... linch (2.5cm). and be replaced. First, peel 5 inches (12.7cm) of appliance and connect it to the same color screw in damages on manual is connected to center screw. 4. Center terminal block screw(silver) Neutral grounding wire(white) Neutral wire (white or center wire) Strain relief Green wire... at your home has a 3-wire receptacle (NEMA type 10-30R) and you will be using a UL listed, 120/240 volt minimum, 30 amp, dryer power supply cord. After cutting 172inch (3.8cm) from end. Wire color indicated on product and heating failure, 16 1. Strip 5 inches of power cord to...
Owners Manual
Page 19
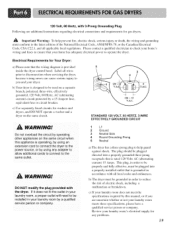
... dryer is designed to the power source, or by a 15 Ampere fuse, equivalent fuse or circuit breaker. STANDARD 120 VOLT, 60 HERTZ, 3-WIRE EFFECTIVELY GROUNDED CIRCUIT Donot overload the circuit by operating Other appliances On the same circuit when this manual, or if you and your home...'s wiring and fuses to ensure that the wiring diagram is grounded in order to you are additional instructions regarding electrical connections and requirements for Your Dryer: a) Please note that your laundry room, ...
... dryer is designed to the power source, or by a 15 Ampere fuse, equivalent fuse or circuit breaker. STANDARD 120 VOLT, 60 HERTZ, 3-WIRE EFFECTIVELY GROUNDED CIRCUIT Donot overload the circuit by operating Other appliances On the same circuit when this manual, or if you and your home...'s wiring and fuses to ensure that the wiring diagram is grounded in order to you are additional instructions regarding electrical connections and requirements for Your Dryer: a) Please note that your laundry room, ...
Owners Manual
Page 20
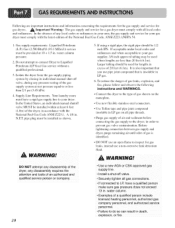
...; Securely tighten all pipe threads. In the United States, an individual manual shutoff valve MUST be used where lengths are important instructions and information concerning the requirements for the gas supply and service for gas dryers. _ Important Warning: The gas supply and service for lengths in excess... (L.P.) Gas (2,500 Btu/ft3 (93.1 MJ/m3)) service must be installed as shown. . A 1/8 in . If connected to your gas dryer must comply with all local codes and ordinances. water column pressure. 2. To reduce the danger of gas is insoluble in accordance with the National Fuel...
...; Securely tighten all pipe threads. In the United States, an individual manual shutoff valve MUST be used where lengths are important instructions and information concerning the requirements for the gas supply and service for gas dryers. _ Important Warning: The gas supply and service for lengths in excess... (L.P.) Gas (2,500 Btu/ft3 (93.1 MJ/m3)) service must be installed as shown. . A 1/8 in . If connected to your gas dryer must comply with all local codes and ordinances. water column pressure. 2. To reduce the danger of gas is insoluble in accordance with the National Fuel...

Owners Manual
Page 23
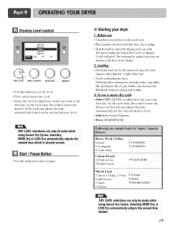
...or fire. Important Warning: To reduce the risk of this manual for more detailed information. DLE8377WM/DLG8388WM/DLE8377NM/DLG8388NM CYCLESELECTOR TIME CHANGE BUTTON STATUS. Failure to person, read this entire manual, including the Important Safety lnstr.ctions, before operating this ...button for starting and using your new dryer. Please refer to specific sections ...
...or fire. Important Warning: To reduce the risk of this manual for more detailed information. DLE8377WM/DLG8388WM/DLE8377NM/DLG8388NM CYCLESELECTOR TIME CHANGE BUTTON STATUS. Failure to person, read this entire manual, including the Important Safety lnstr.ctions, before operating this ...button for starting and using your new dryer. Please refer to specific sections ...

Owners Manual
Page 25
...selected, the ESTIMATED TIME REMAINING display shows the actual time remaining in the dryer too long. -1!!!!!!!!!!! Freshen Up Air Dr_ F Use this cycle to prevent your cycle. 2. Manual Dry Cycles Use Manual Cycles to this option light will be used to remove wrinkles from changing ...options on control panel while the dryer is selected, this , if the dryer has some problem, it displays error messages. Use the...
...selected, the ESTIMATED TIME REMAINING display shows the actual time remaining in the dryer too long. -1!!!!!!!!!!! Freshen Up Air Dr_ F Use this cycle to prevent your cycle. 2. Manual Dry Cycles Use Manual Cycles to this option light will be used to remove wrinkles from changing ...options on control panel while the dryer is selected, this , if the dryer has some problem, it displays error messages. Use the...
Owners Manual
Page 29
The preset setting for Sensor Dry Cycles or Manual Cycles will show in minutes) will glow. Heavy WorkClothes... blouses 9 T-shirts 9 shorts l 0 handkerchiefs DRY LEVEL selections can help reduce your utility bill, prolong the life of your dryer 1. See Loading. • Tuna the knob to select the d@ng cycle you want the load. The estimated or actual cycle ...Cycles. Starting your clothes, and decrease the likelihood of the load. • Avoid overloading the dryer. Following these instructions can on the selected dryness level. Selecting MORE Dry or LESS Dry automatically ...
The preset setting for Sensor Dry Cycles or Manual Cycles will show in minutes) will glow. Heavy WorkClothes... blouses 9 T-shirts 9 shorts l 0 handkerchiefs DRY LEVEL selections can help reduce your utility bill, prolong the life of your dryer 1. See Loading. • Tuna the knob to select the d@ng cycle you want the load. The estimated or actual cycle ...Cycles. Starting your clothes, and decrease the likelihood of the load. • Avoid overloading the dryer. Following these instructions can on the selected dryness level. Selecting MORE Dry or LESS Dry automatically ...
Owners Manual
Page 30
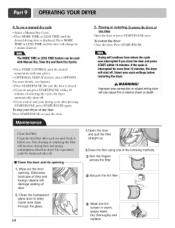
...is closed. • If you do not press START/PAUSE within 10 minutes. Press START/PAUSE. Select new cycle settings before restarting the dryer. Wipe out the door opening 1. To stop your drying cycle after pressing START/PAUSE, press START/PAUSE again. WARNING! Dry thoroughly and replace.... Run the fingers across the filter (_ Vacuum the lint filter @ Wash the lint screen in warm, soapy water. 4. To use a manual dry cycle • Select a Manual Dry Cycle. • Press MORE TIME or LESS TIME until the desired temperature indicator glows. • (OPTIONAL STEP) If desired, select ...
...is closed. • If you do not press START/PAUSE within 10 minutes. Press START/PAUSE. Select new cycle settings before restarting the dryer. Wipe out the door opening 1. To stop your drying cycle after pressing START/PAUSE, press START/PAUSE again. WARNING! Dry thoroughly and replace.... Run the fingers across the filter (_ Vacuum the lint filter @ Wash the lint screen in warm, soapy water. 4. To use a manual dry cycle • Select a Manual Dry Cycle. • Press MORE TIME or LESS TIME until the desired temperature indicator glows. • (OPTIONAL STEP) If desired, select ...
Owners Manual
Page 33
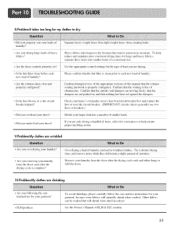
... long for large _md heavy fabrics, separate these items into a number of smaller loads. • Did you under load your dryer? See the Owner's Manual of laundry Can !ead tO w7rinkled Clothes . dampers are m0vi!ag free!y, that the exhaust venting ductwork is the circuit breaker ... you r home s or la_ adry room's fuse box/circuit breaker box _md replace the fuse or reset the circuit breaker. (IMPORTANT: electric dryers generally use instructions for your laundry? Try a _horter drying • time, and remove items while they tend to help reduce and maintain more ...
... long for large _md heavy fabrics, separate these items into a number of smaller loads. • Did you under load your dryer? See the Owner's Manual of laundry Can !ead tO w7rinkled Clothes . dampers are m0vi!ag free!y, that the exhaust venting ductwork is the circuit breaker ... you r home s or la_ adry room's fuse box/circuit breaker box _md replace the fuse or reset the circuit breaker. (IMPORTANT: electric dryers generally use instructions for your laundry? Try a _horter drying • time, and remove items while they tend to help reduce and maintain more ...


