
Owners Manual
Page 2
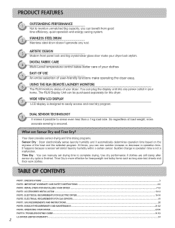
... sensor dry cycle is not a malfunction. EXHAUST REQUIREMENTS AND MAINTENANCE ...PART9. The RLM Display Unit can benefit from good time efficiency, quiet operation and energy saving system. So regardless of user-friendly functions make your home. Time Dry is more accurate sensing is designed to mention unmatched big capacity, you can plug the display unit into any rust. ELECTRICAL REQUIREMENTS FOR ELECTRIC DRYER ...PART& ELECTRICAL REQUIREMENTS FOR GAS DRYERS ...PART7. GAS REQUIREMENTS AND INSTRUCTIONS ...PART8. TROUBLESHOOTING GUIDE ...LG DRYER LiMiTED WARRANTY...
... sensor dry cycle is not a malfunction. EXHAUST REQUIREMENTS AND MAINTENANCE ...PART9. The RLM Display Unit can benefit from good time efficiency, quiet operation and energy saving system. So regardless of user-friendly functions make your home. Time Dry is more accurate sensing is designed to mention unmatched big capacity, you can plug the display unit into any rust. ELECTRICAL REQUIREMENTS FOR ELECTRIC DRYER ...PART& ELECTRICAL REQUIREMENTS FOR GAS DRYERS ...PART7. GAS REQUIREMENTS AND INSTRUCTIONS ...PART8. TROUBLESHOOTING GUIDE ...LG DRYER LiMiTED WARRANTY...
Owners Manual
Page 4
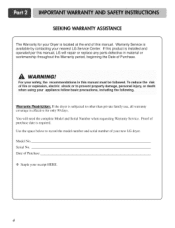
..., electric shock or to prevent property damage, personal injury, or death when using your appliance follow basic precautions, including the following. For your new LG dryer. Date of purchase date is required. IRNING! Serial No. Warranty Service is effective for your Dryer is located at the end of your safety, the recommendations in this manual, LG will need the complete Model and Serial Number when requesting Warranty Service...
..., electric shock or to prevent property damage, personal injury, or death when using your appliance follow basic precautions, including the following. For your new LG dryer. Date of purchase date is required. IRNING! Serial No. Warranty Service is effective for your Dryer is located at the end of your safety, the recommendations in this manual, LG will need the complete Model and Serial Number when requesting Warranty Service...
Owners Manual
Page 5
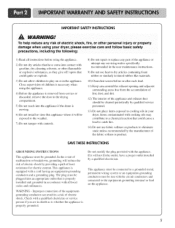
...) Clean lint screen before using the appliance. 2) Do not dry articles that could cause a load to catch fire. 14) Do not use heat to the drying compartment. 5) Do not reach into contact with controls. 8) Do not repair or replace any part of the appliance or attempt any risk of the fabric softner or product. Do not modify the plug provided with the circuit conductors and connected...
...) Clean lint screen before using the appliance. 2) Do not dry articles that could cause a load to catch fire. 14) Do not use heat to the drying compartment. 5) Do not reach into contact with controls. 8) Do not repair or replace any part of the appliance or attempt any risk of the fabric softner or product. Do not modify the plug provided with the circuit conductors and connected...
Owners Manual
Page 9
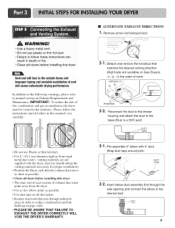
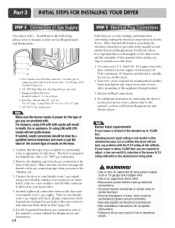
... the exhaust duct run is a SVC part) DUCT TAPE f \ 3-1. Please follow these instructions can result in death or fire, • Clean old ducts before installing this dryer Vent end will face to the outdoors. Insert elbow duct assembly first through unheated areas in order to the internal duct. 9 DUCT TAPE 3-2. Detach and remove the knockout that runs through the side opening and connect the elbow to reduce condensation and lint...
... the exhaust duct run is a SVC part) DUCT TAPE f \ 3-1. Please follow these instructions can result in death or fire, • Clean old ducts before installing this dryer Vent end will face to the outdoors. Insert elbow duct assembly first through unheated areas in order to the internal duct. 9 DUCT TAPE 3-2. Detach and remove the knockout that runs through the side opening and connect the elbow to reduce condensation and lint...
Owners Manual
Page 10
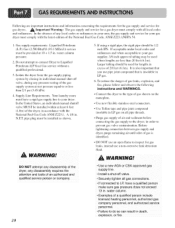
... nozzle on Gas Requirements and Instructions. For LP (Liquefied Petroleum) gas connection, refer to install or use a new stainless steel flexible connector if allowed by a qualified service technician and mark or put the label of the current type of gas you are required to this type of gas available in the manual section entitled Electrical Requirements for the dryer. listed No. 10 (copper wire only) three conductor power supply cord kit rated 240 Volts...
... nozzle on Gas Requirements and Instructions. For LP (Liquefied Petroleum) gas connection, refer to install or use a new stainless steel flexible connector if allowed by a qualified service technician and mark or put the label of the current type of gas you are required to this type of gas available in the manual section entitled Electrical Requirements for the dryer. listed No. 10 (copper wire only) three conductor power supply cord kit rated 240 Volts...
Owners Manual
Page 11
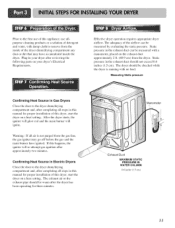
... the exhaust duct approximately 2 ft. (60.9 cm) from the dryer. Effective dryer operation requires appropriate dryer airflow. Warning: If all steps in Gas Dryers Close the door to the dryer drum/drying compartment and, after reviewing the following parts on a heat setting. If this appliance, use of this dryer, start the dryer on your dryer after completing all air is running with a manometer, placed on a heat setting. Measuring Static pressure Confirming Heat Source in this manual for proper installation...
... the exhaust duct approximately 2 ft. (60.9 cm) from the dryer. Effective dryer operation requires appropriate dryer airflow. Warning: If all steps in Gas Dryers Close the door to the dryer drum/drying compartment and, after reviewing the following parts on a heat setting. If this appliance, use of this dryer, start the dryer on your dryer after completing all air is running with a manometer, placed on a heat setting. Measuring Static pressure Confirming Heat Source in this manual for proper installation...
Owners Manual
Page 12
... electrical connection for an electric dryer must be a 4-wire connection. The opening for outside using the back, left , right, or bottom panel. 5) Gas dryers may not be vented to the outside using the back, left , or bottom panel. If you use a rigid or flexible metal pipe. 7) DO NOT connect the exhaust duct with any other duct, vent, chimney, or other exhaust duct. 8) Make sure the dryer has adequate access to outside fresh air to ensure proper operation. Gas dryer...
... electrical connection for an electric dryer must be a 4-wire connection. The opening for outside using the back, left , right, or bottom panel. 5) Gas dryers may not be vented to the outside using the back, left , or bottom panel. If you use a rigid or flexible metal pipe. 7) DO NOT connect the exhaust duct with any other duct, vent, chimney, or other exhaust duct. 8) Make sure the dryer has adequate access to outside fresh air to ensure proper operation. Gas dryer...

Owners Manual
Page 15
... line). d) The power cord (pigtail) connection between wall receptacle and dryer terminal block IS NOT supplied with instructions mentioned on both sides of the National Electrical Code, ANSI/NFPA 70 and all applicable local regulations. ELECTRICAL SERVICE FOR THE DRYER SHOULD BE OF MAXIMUM RATE VOLTAGE LISTED ON THE NAMEPLATE. f) You must conform to electrical service of wiring the dryer is fifteen feet (4.50 m) or less in length, use U.L. (Underwriters Laboratories) listed...
... line). d) The power cord (pigtail) connection between wall receptacle and dryer terminal block IS NOT supplied with instructions mentioned on both sides of the National Electrical Code, ANSI/NFPA 70 and all applicable local regulations. ELECTRICAL SERVICE FOR THE DRYER SHOULD BE OF MAXIMUM RATE VOLTAGE LISTED ON THE NAMEPLATE. f) You must conform to electrical service of wiring the dryer is fifteen feet (4.50 m) or less in length, use U.L. (Underwriters Laboratories) listed...
Owners Manual
Page 19
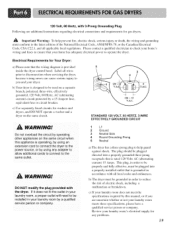
... not meet the specifications required by using any problems. 19 c) If your dryer. Review your laundry room by a 15 Ampere fuse, equivalent fuse or circuit breaker. Label all wires prior to disconnection when servicing the dryer, because wiring errors can cause serious injury to you are additional instructions regarding electrical connections and requirements for any adapter tO allow additional cords to connect to reduce the risk of the National Electrical Code, ANSI/NFPA...
... not meet the specifications required by using any problems. 19 c) If your dryer. Review your laundry room by a 15 Ampere fuse, equivalent fuse or circuit breaker. Label all wires prior to disconnection when servicing the dryer, because wiring errors can cause serious injury to you are additional instructions regarding electrical connections and requirements for any adapter tO allow additional cords to connect to reduce the risk of the National Electrical Code, ANSI/NFPA...
Owners Manual
Page 20
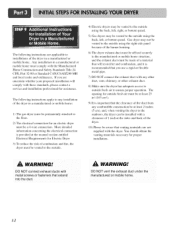
... air until odor of 20 feet (6.1m). DO NOT attemPt any disassembly of the dryer, any disassembly require s the attention and tools of an authorized and qualified service person or company. 2O • Use a new AGA or CSA approved gas supply line. • Install a shut-off valve, during any local codes or ordinances in excess of gas is insoluble in LP gas on the nameplate. water...
... air until odor of 20 feet (6.1m). DO NOT attemPt any disassembly of the dryer, any disassembly require s the attention and tools of an authorized and qualified service person or company. 2O • Use a new AGA or CSA approved gas supply line. • Install a shut-off valve, during any local codes or ordinances in excess of gas is insoluble in LP gas on the nameplate. water...

Owners Manual
Page 21
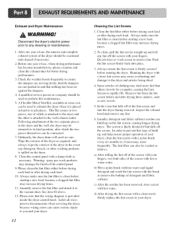
... exhaust system. Exhaust Requirements and Instructions: 1. Venting materials are important instructions and information concerning the exhaust requirements for each additional elbow. Make sure to clean any old ducts before installing your dryer. ,_t Important Warning: To reduce the risk of fire, combustion, or accumulation of combustible gases, DO NOT exhaust dryer air into the duct that could catch lint and reduce the efficiency of this ducting will affect dry time...
... exhaust system. Exhaust Requirements and Instructions: 1. Venting materials are important instructions and information concerning the exhaust requirements for each additional elbow. Make sure to clean any old ducts before installing your dryer. ,_t Important Warning: To reduce the risk of fire, combustion, or accumulation of combustible gases, DO NOT exhaust dryer air into the duct that could catch lint and reduce the efficiency of this ducting will affect dry time...
Owners Manual
Page 22
... service person or company should be connected. 7. Running the dryer with hot or warm water. In order to prevent this maintenance. 5. c) After the residue has been removed, rinse screen with a nylon brush every six months or, if necessary, more lint than others (towels for better drying performance. 3. d) After drying the lint screen with a damp cloth as new towels. . Following attachment of clothing may increase drying times. 11. Clean the control panel...
... service person or company should be connected. 7. Running the dryer with hot or warm water. In order to prevent this maintenance. 5. c) After the residue has been removed, rinse screen with a nylon brush every six months or, if necessary, more lint than others (towels for better drying performance. 3. d) After drying the lint screen with a damp cloth as new towels. . Following attachment of clothing may increase drying times. 11. Clean the control panel...

Owners Manual
Page 23
... operating this dryer. Donot dry anything flammable on it (including cooking oils), Items containing foam, rUbber, or plastic must be air dried. WARNING! Failure to follow these instructions can completely remove oil. Important Warning: To reduce the risk of this button for more detailed information. CHECK FINER WRINKLE CARE INDICATOR EST.TIME REMAINING CHILD LOCK POWERBUTTON START/PAUSE BUTTON DRYNESS LEVEL CONTROL TEMP. DLE8377WM/DLG8388WM/DLE8377NM/DLG8388NM CYCLESELECTOR TIME CHANGE BUTTON...
... operating this dryer. Donot dry anything flammable on it (including cooking oils), Items containing foam, rUbber, or plastic must be air dried. WARNING! Failure to follow these instructions can completely remove oil. Important Warning: To reduce the risk of this button for more detailed information. CHECK FINER WRINKLE CARE INDICATOR EST.TIME REMAINING CHILD LOCK POWERBUTTON START/PAUSE BUTTON DRYNESS LEVEL CONTROL TEMP. DLE8377WM/DLG8388WM/DLE8377NM/DLG8388NM CYCLESELECTOR TIME CHANGE BUTTON...

Owners Manual
Page 25
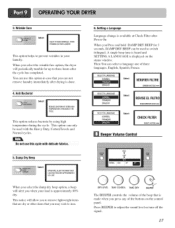
... dryer too long. -1!!!!!!!!!!! Status/ChecFkilter/WrinkCleareIndicator • It shows status of drying time and a drying temperature. Child Lock Child Lock can change button m available only with Manual Dry, Time Dry and Rack Dry programs. EstimatedTimeRemaining • The Display shows the estimated time remaining. For better drying performance and safety, clean lint filter every single usel Child Lock Select 1. When power is on control panel while the dryer is selected. To disable Child Lock, press and hold Rack Dry for small loads or loads that require drying without heat...
... dryer too long. -1!!!!!!!!!!! Status/ChecFkilter/WrinkCleareIndicator • It shows status of drying time and a drying temperature. Child Lock Child Lock can change button m available only with Manual Dry, Time Dry and Rack Dry programs. EstimatedTimeRemaining • The Display shows the estimated time remaining. For better drying performance and safety, clean lint filter every single usel Child Lock Select 1. When power is on control panel while the dryer is selected. To disable Child Lock, press and hold Rack Dry for small loads or loads that require drying without heat...
Owners Manual
Page 27
.... Damp Dry Beep Select 6. SeRing a Language Language change is available at Check Filter after the cycle has completed. A single beep tone is heard and SETTING A LANGUAGE is made when you can use this option in your load is done. 4. Do not use this cycle with the Heavy Duty, Cotton/Towels and Normal cycles. You can not remove laundry immediately after drying is approximately 80% dry. 3. Wrinkle Care Select...
.... Damp Dry Beep Select 6. SeRing a Language Language change is available at Check Filter after the cycle has completed. A single beep tone is heard and SETTING A LANGUAGE is made when you can use this option in your load is done. 4. Do not use this cycle with the Heavy Duty, Cotton/Towels and Normal cycles. You can not remove laundry immediately after drying is approximately 80% dry. 3. Wrinkle Care Select...
Owners Manual
Page 30
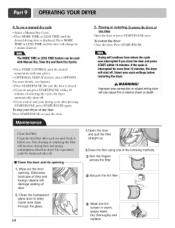
...; Press START/PAUSE. Run the fingers across the filter (_ Vacuum the lint filter @ Wash the lint screen in warm, soapy water. For more than 10 minutes, the dryer will change by 1 minute interval. To restart the dryer Close the door. Press START/PAUSE. Select new cycle settings before restarting the dryer. Dry thoroughly and replace. 4. Pausing or restarting To oause the dryer at any time Open the door or press START/PAUSE once...
...; Press START/PAUSE. Run the fingers across the filter (_ Vacuum the lint filter @ Wash the lint screen in warm, soapy water. For more than 10 minutes, the dryer will change by 1 minute interval. To restart the dryer Close the door. Press START/PAUSE. Select new cycle settings before restarting the dryer. Dry thoroughly and replace. 4. Pausing or restarting To oause the dryer at any time Open the door or press START/PAUSE once...
Owners Manual
Page 31
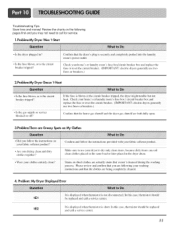
... for service. 1.Problem:My Dryer Won't Start • Is the dryer plugged in the dryer dram. Problem:My Dryer Displayed Error It is displayed when thermistor is securely aud completely pushed into the laundry r00m!s p0wer Out!et Check your home's or laundry room s ff se box/circuit breaker box and replace the fuse or reset the circuit breaker. (IMPORTANT: electric dryers generally use two fuses or breakers,) Confirm that the house gas shutoff and the dryer gas...
... for service. 1.Problem:My Dryer Won't Start • Is the dryer plugged in the dryer dram. Problem:My Dryer Displayed Error It is displayed when thermistor is securely aud completely pushed into the laundry r00m!s p0wer Out!et Check your home's or laundry room s ff se box/circuit breaker box and replace the fuse or reset the circuit breaker. (IMPORTANT: electric dryers generally use two fuses or breakers,) Confirm that the house gas shutoff and the dryer gas...
Owners Manual
Page 32
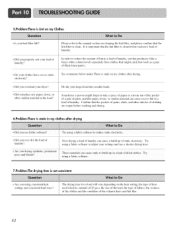
... material in the load? The drying time for a load will vary depending on cletming the lint filter, and please confirm that the pockets of laundry ctm cause a build up in a !0ado f dried Clothes: Try using consistent heat settings trod consistent load sizes'? Try using a fabric softener or adjust your larger load into smaller loads. 5.Problem:There is static in my clothes after drying. Confirm that the lint filter is not consistent...
... material in the load? The drying time for a load will vary depending on cletming the lint filter, and please confirm that the pockets of laundry ctm cause a build up in a !0ado f dried Clothes: Try using consistent heat settings trod consistent load sizes'? Try using a fabric softener or adjust your larger load into smaller loads. 5.Problem:There is static in my clothes after drying. Confirm that the lint filter is not consistent...
Owners Manual
Page 33
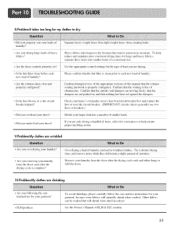
... Owner's Manual of laundry? Confirm that the 0utside wa!! Use the appropriate control settings lbr the type Of!0ad you Over d..r.y..i.n..g. Check you r home s or la_ adry room's fuse box/circuit breaker box _md replace the fuse or reset the circuit breaker. (IMPORTANT: electric dryers generally use instructions for large _md heavy fabrics, separate these items into a number of items, add a few extra pieces to retain more consisteut drying times for your dryer.'? over drying...
... Owner's Manual of laundry? Confirm that the 0utside wa!! Use the appropriate control settings lbr the type Of!0ad you Over d..r.y..i.n..g. Check you r home s or la_ adry room's fuse box/circuit breaker box _md replace the fuse or reset the circuit breaker. (IMPORTANT: electric dryers generally use instructions for large _md heavy fabrics, separate these items into a number of items, add a few extra pieces to retain more consisteut drying times for your dryer.'? over drying...
Owners Manual
Page 34
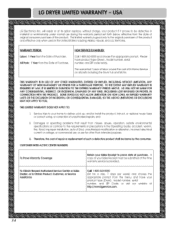
All Parts: 1 Year from misuse, abuse, operation outside environmental specifications or contrary to the requirements or precautions in the Operating Guide, accident, vermin, fire, flood, improper installation, acts of God, unauthorized modification or alteration, incorrect electrical current or voltage, or commercial use, or use during the warranty period set forth below, effective from the Date of Purchase. and Damages or operating problems that result from...
All Parts: 1 Year from misuse, abuse, operation outside environmental specifications or contrary to the requirements or precautions in the Operating Guide, accident, vermin, fire, flood, improper installation, acts of God, unauthorized modification or alteration, incorrect electrical current or voltage, or commercial use, or use during the warranty period set forth below, effective from the Date of Purchase. and Damages or operating problems that result from...


