
Owners Manual
Page 3
For more information, visit our website at http://us.lge.com P/No.: 3828EL3003M ☎ 1-800-243-0000 24 HOURS A DAY, 7 DAYS A WEEK FOR LG CUSTOMER SERVICE DLE9577WM / DLG9588WM DLE9577SM / DLG9588SM Thank you for future reference. Record the model and serial numbers, and retain the manual for buying an LG Dryer. Please read your manual carefully, as it provides instructions on safe Installation, use and maintenance.
For more information, visit our website at http://us.lge.com P/No.: 3828EL3003M ☎ 1-800-243-0000 24 HOURS A DAY, 7 DAYS A WEEK FOR LG CUSTOMER SERVICE DLE9577WM / DLG9588WM DLE9577SM / DLG9588SM Thank you for future reference. Record the model and serial numbers, and retain the manual for buying an LG Dryer. Please read your manual carefully, as it provides instructions on safe Installation, use and maintenance.
Owners Manual
Page 4
... AND MAINTENANCE ...23 PART 9. TABLE OF CONTENTS PART 1. INITIAL STEPS FOR INSTALLING YOUR DRYER ...7 PART 4. ACCESSORIES INSTALLATION ...15 PART 5. ELECTRICAL REQUIREMENTS FOR ELECTRIC DRYER...17 PART 6. TROUBLESHOOTING GUIDE...31 LG DRYER LIMITED WARRANTY...34 2 The RLM Display Unit can be purchased separately for... choose an option, press its button once. No need to press buttons multiple times to select heat level and drying time manually. PRODUCT FEATURES 1 OUTSTANDING PERFORMANCE Besides the large capacity, you like them at the end of the cycle. You can benefit...
... AND MAINTENANCE ...23 PART 9. TABLE OF CONTENTS PART 1. INITIAL STEPS FOR INSTALLING YOUR DRYER ...7 PART 4. ACCESSORIES INSTALLATION ...15 PART 5. ELECTRICAL REQUIREMENTS FOR ELECTRIC DRYER...17 PART 6. TROUBLESHOOTING GUIDE...31 LG DRYER LIMITED WARRANTY...34 2 The RLM Display Unit can be purchased separately for... choose an option, press its button once. No need to press buttons multiple times to select heat level and drying time manually. PRODUCT FEATURES 1 OUTSTANDING PERFORMANCE Besides the large capacity, you like them at the end of the cycle. You can benefit...
Owners Manual
Page 6
... contacting your safety, the recommendations in this manual, LG will need the complete model and serial number when requesting warranty service. Serial Number. For your nearest LG Service Center. proof of fire or explosion, electric shock or to the instructions in this manual. If this product is installed and operated according to prevent property damage...
... contacting your safety, the recommendations in this manual, LG will need the complete model and serial number when requesting warranty service. Serial Number. For your nearest LG Service Center. proof of fire or explosion, electric shock or to the instructions in this manual. If this product is installed and operated according to prevent property damage...
Owners Manual
Page 8
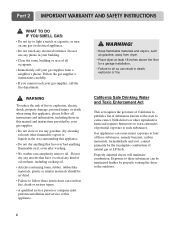
...not try to four of these instructions can result in fire, death or serious injury. • A qualified service person or company must perform installation and service of all occupants. • Immediately call the fire department. ! Follow the gas supplier's instructions carefully. • If you cannot...electric shock, property damage, personal injury or death when using this appliance, please follow all instructions and information, including those in this manual and instructions provided by your building. • Clear the room, building or area of this appliance. • Do not dry ...
...not try to four of these instructions can result in fire, death or serious injury. • A qualified service person or company must perform installation and service of all occupants. • Immediately call the fire department. ! Follow the gas supplier's instructions carefully. • If you cannot...electric shock, property damage, personal injury or death when using this appliance, please follow all instructions and information, including those in this manual and instructions provided by your building. • Clear the room, building or area of this appliance. • Do not dry ...
Owners Manual
Page 9
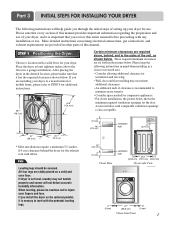
... Certain minimum clearances are provided in other parts of this entire manual before proceeding with comparable ventilation openings is recommended to STEP 9 for a garage installation. A louvered door with any installation or use . If you are installing your dryer. STEP 1 Positioning the Dryer. After placing the ...the picture below shows the minimum required ventilation openings for installation and servicing. • Wall, door and floor molding may not tumble properly and sensor will help guide you review this manual. Please note that it is not level, laundry may...
... Certain minimum clearances are provided in other parts of this entire manual before proceeding with comparable ventilation openings is recommended to STEP 9 for a garage installation. A louvered door with any installation or use . If you are installing your dryer. STEP 1 Positioning the Dryer. After placing the ...the picture below shows the minimum required ventilation openings for installation and servicing. • Wall, door and floor molding may not tumble properly and sensor will help guide you review this manual. Please note that it is not level, laundry may...
Owners Manual
Page 10
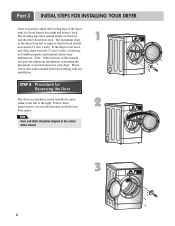
... dryer can be aligned at the center when closed. 1 2 3 8 SSTTEEPP 22: Procedure for your dryer. Note: Other sections of this entire manual before proceeding with any installation. Please review this manual also provide important information concerning the placement of the dryer from left to right or front to back. If the dryer is...
... dryer can be aligned at the center when closed. 1 2 3 8 SSTTEEPP 22: Procedure for your dryer. Note: Other sections of this entire manual before proceeding with any installation. Please review this manual also provide important information concerning the placement of the dryer from left to right or front to back. If the dryer is...
Owners Manual
Page 13
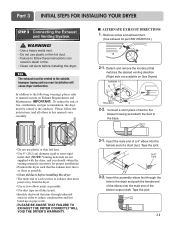
...THE DRYER'S WARRANTY. 3-1. Venting materials are not supplied with the dryer, and you should obtain the venting materials necessary for proper installation) • Position the dryer such that matches the desired venting direction (Right side not available on Exhaust Requirements and Maintenance. Tape ... The exhaust must point away from the dryer. • Use as few elbow joints as possible. • Clean old ducts before installing this manual) very carefully. ■ ALTERNATE EXHAUST DIRECTIONS 1. In addition to the following warnings, please refer to the base. • Do not...
...THE DRYER'S WARRANTY. 3-1. Venting materials are not supplied with the dryer, and you should obtain the venting materials necessary for proper installation) • Position the dryer such that matches the desired venting direction (Right side not available on Exhaust Requirements and Maintenance. Tape ... The exhaust must point away from the dryer. • Use as few elbow joints as possible. • Clean old ducts before installing this manual) very carefully. ■ ALTERNATE EXHAUST DIRECTIONS 1. In addition to the following warnings, please refer to the base. • Do not...

Owners Manual
Page 14
... 3/8" NPT gas connection. 2. Make sure that section and the remainder of this manual's section entitled Gas Requirements and Instructions. 12 STEP 5 Electrical Plug Connections Following are required to install or use this altitude. Note Make sure the burner orifice is located at this ... that you thoroughly review that you don't damage the threads of Gas Supply (Gas dryer only). Part 3 INITIAL STEPS FOR INSTALLING YOUR DRYER STEP 4 Connection of the gas connection pipe when you are several warnings and instructions concerning making electrical connections. •...
... 3/8" NPT gas connection. 2. Make sure that section and the remainder of this manual's section entitled Gas Requirements and Instructions. 12 STEP 5 Electrical Plug Connections Following are required to install or use this altitude. Note Make sure the burner orifice is located at this ... that you thoroughly review that you don't damage the threads of Gas Supply (Gas dryer only). Part 3 INITIAL STEPS FOR INSTALLING YOUR DRYER STEP 4 Connection of the gas connection pipe when you are several warnings and instructions concerning making electrical connections. •...

Owners Manual
Page 15
... 5/8 inches (1.5 cm). Confirming Heat Source in Gas Dryers Close the door to the dryer drum/drying compartment and, after completing all steps in this manual for proper installation of this dryer, start the dryer on your dryer's Electrical Requirements. Effective dryer operation requires appropriate dryer airflow. STEP 8 Dryer Airflow. Confirming Heat Source...
... 5/8 inches (1.5 cm). Confirming Heat Source in Gas Dryers Close the door to the dryer drum/drying compartment and, after completing all steps in this manual for proper installation of this dryer, start the dryer on your dryer's Electrical Requirements. Effective dryer operation requires appropriate dryer airflow. STEP 8 Dryer Airflow. Confirming Heat Source...
Owners Manual
Page 16
... other exhaust duct. 7) Make sure the dryer has adequate access to outside fresh air to ensure proper operation. WARNING! The following instructions are applicable to installations of the dryer in a manufactured or mobile home must comply with the Manufactured Home Construction and Safety Standards Title 24 CFR, Part 32-80 or... clearance of the duct from any combustible construction be at least 2 inches (5 cm), and, when venting the dryer to the outdoors, the dryer can be installed with a clearance of 1 inch at the manual section entitled Electrical Requirements for assistance.
... other exhaust duct. 7) Make sure the dryer has adequate access to outside fresh air to ensure proper operation. WARNING! The following instructions are applicable to installations of the dryer in a manufactured or mobile home must comply with the Manufactured Home Construction and Safety Standards Title 24 CFR, Part 32-80 or... clearance of the duct from any combustible construction be at least 2 inches (5 cm), and, when venting the dryer to the outdoors, the dryer can be installed with a clearance of 1 inch at the manual section entitled Electrical Requirements for assistance.
Owners Manual
Page 20
... 11/2 inch (3.8 cm) from end. Connect neutral wire (white) of appliance and connect it to the same color screw in order for (1) new branch-circuit installations, (2) mobile homes, (3) recreational vehicles, and (4) areas where local codes prohibit grounding through the neutral conductor is connected to center screw. 4. Note • Connect the power... flow may result. Connect red and black wires to the left and right terminal block screws. 3. Make sure that all terminal block nuts are on manual is prohibited for dryer to same color screw.
... 11/2 inch (3.8 cm) from end. Connect neutral wire (white) of appliance and connect it to the same color screw in order for (1) new branch-circuit installations, (2) mobile homes, (3) recreational vehicles, and (4) areas where local codes prohibit grounding through the neutral conductor is connected to center screw. 4. Note • Connect the power... flow may result. Connect red and black wires to the left and right terminal block screws. 3. Make sure that all terminal block nuts are on manual is prohibited for dryer to same color screw.
Owners Manual
Page 23
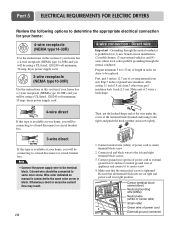
...that is provided inside the dryer control hood. WARNING! c) If your home's wiring and fuses to be plugged directed into a properly installed outlet that your home has adequate electrical power to check your laundry room does not meet the specifications required by using an extension cord ...and all local codes and ordinances. Important Warning: To help guard against shock. The plug should be used on the same circuit when this manual, or if you and your laundry room by a 15 Ampere fuse, equivalent fuse or circuit breaker. Electrical Requirements for gas dryers. ! ...
...that is provided inside the dryer control hood. WARNING! c) If your home's wiring and fuses to be plugged directed into a properly installed outlet that your home has adequate electrical power to check your laundry room does not meet the specifications required by using an extension cord ...and all local codes and ordinances. Important Warning: To help guard against shock. The plug should be used on the same circuit when this manual, or if you and your laundry room by a 15 Ampere fuse, equivalent fuse or circuit breaker. Electrical Requirements for gas dryers. ! ...
Owners Manual
Page 24
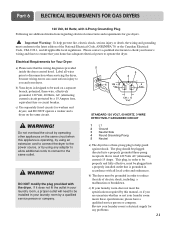
...system at test pressure equal to prevent gas valve contamination. WARNING! • Use a new AGA or CSA approved gas supply line. • Install a shut-off valve during any local codes or ordinances in LP gas. 6. In the absence of a qualified person include licensed heating personnel, ...dryer must comply with the National Fuel Gas Code ANSI Z223.1. Supply Line Requirements. Your laundry room must be installed within at 10 + 1.5 in . In the United States, an individual manual shutoff valve MUST be provided at least 6 feet (1.8 m) of air and sediment before connecting the gas supply...
...system at test pressure equal to prevent gas valve contamination. WARNING! • Use a new AGA or CSA approved gas supply line. • Install a shut-off valve during any local codes or ordinances in LP gas. 6. In the absence of a qualified person include licensed heating personnel, ...dryer must comply with the National Fuel Gas Code ANSI Z223.1. Supply Line Requirements. Your laundry room must be installed within at 10 + 1.5 in . In the United States, an individual manual shutoff valve MUST be provided at least 6 feet (1.8 m) of air and sediment before connecting the gas supply...


