
Owners Manual
Page 3
Please read your manual carefully, as it provides instructions on safe Installation, use and maintenance. ☎ 1-800-243-0000 24 HOURS A DAY, 7 DAYS A WEEK FOR LG CUSTOMER SERVICE DLE9577WM / DLG9588WM DLE9577SM / DLG9588SM Thank you for future reference. Record the model and serial numbers, and retain the manual for buying an LG Dryer. For more information, visit our website at http://us.lge.com P/No.: 3828EL3003M
Please read your manual carefully, as it provides instructions on safe Installation, use and maintenance. ☎ 1-800-243-0000 24 HOURS A DAY, 7 DAYS A WEEK FOR LG CUSTOMER SERVICE DLE9577WM / DLG9588WM DLE9577SM / DLG9588SM Thank you for future reference. Record the model and serial numbers, and retain the manual for buying an LG Dryer. For more information, visit our website at http://us.lge.com P/No.: 3828EL3003M
Owners Manual
Page 4
... decrease in operation time if the sensor determines more or less drying is not a malfunction. TABLE OF CONTENTS PART 1. ACCESSORIES INSTALLATION ...15 PART 5. Your dryer provides sensor drying and time drying programs. Sensor Dry The dryer senses the dampness of options. IMPORTANT... WARRANTY AND SAFETY INSTRUCTIONS ...4 PART 3. ELECTRICAL REQUIREMENTS FOR ELECTRIC DRYER...17 PART 6. TROUBLESHOOTING GUIDE...31 LG DRYER LIMITED WARRANTY...34 2 Time Dry Use TIME DRY to allow easy access whether side-by-side or stacked on a washer. ...
... decrease in operation time if the sensor determines more or less drying is not a malfunction. TABLE OF CONTENTS PART 1. ACCESSORIES INSTALLATION ...15 PART 5. Your dryer provides sensor drying and time drying programs. Sensor Dry The dryer senses the dampness of options. IMPORTANT... WARRANTY AND SAFETY INSTRUCTIONS ...4 PART 3. ELECTRICAL REQUIREMENTS FOR ELECTRIC DRYER...17 PART 6. TROUBLESHOOTING GUIDE...31 LG DRYER LIMITED WARRANTY...34 2 Time Dry Use TIME DRY to allow easy access whether side-by-side or stacked on a washer. ...
Owners Manual
Page 6
...your safety, the recommendations in material or workmanship throughout the warranty period, beginning with the date of Purchase ❈ Staple your new LG dryer. proof of this manual. Serial Number. Warranty Service is effective for convenience when contacting service. 4 You will repair or ... or explosion, electric shock or to prevent property damage, personal injury, or death when using your nearest LG Service Center. If this product is installed and operated according to other than single family use, all warranty coverage is available by contacting your appliance follow...
...your safety, the recommendations in material or workmanship throughout the warranty period, beginning with the date of Purchase ❈ Staple your new LG dryer. proof of this manual. Serial Number. Warranty Service is effective for convenience when contacting service. 4 You will repair or ... or explosion, electric shock or to prevent property damage, personal injury, or death when using your nearest LG Service Center. If this product is installed and operated according to other than single family use, all warranty coverage is available by contacting your appliance follow...
Owners Manual
Page 7
... substances, as to a grounded metal, permanent wiring system or an equipment-grounding conductor must be connected to whether the appliance is properly installed and grounded in accordance with cooking oils may contribute to a chemical reaction that could ignite or explode. 3) Do not allow children to... the appliance. SAVE THESE INSTRUCTIONS USING INSTRUCTIONS 1) Do not put overload into the appliance if the drum is moving. 6) Do not install or store this appliance where it will be exposed to cooking oils in a risk of least resistance for residential use fabric softners or...
... substances, as to a grounded metal, permanent wiring system or an equipment-grounding conductor must be connected to whether the appliance is properly installed and grounded in accordance with cooking oils may contribute to a chemical reaction that could ignite or explode. 3) Do not allow children to... the appliance. SAVE THESE INSTRUCTIONS USING INSTRUCTIONS 1) Do not put overload into the appliance if the drum is moving. 6) Do not install or store this appliance where it will be exposed to cooking oils in a risk of least resistance for residential use fabric softners or...
Owners Manual
Page 8
... Do not use any phone in your gas supplier from dryer. • Place dryer at least 18 inches above the floor for a garage installation. • Failure to light a match or cigarette, or turn on any gas or electrical appliance. • Do not touch any kind of...8226; Failure to the outdoors. 6 Gas appliances can result in fire, death or serious injury. • A qualified service person or company must perform installation and service of this appliance. • Do not dry anything flammable on them, including cooking oil. • Articles containing foam, rubber, rubber-like ...
... Do not use any phone in your gas supplier from dryer. • Place dryer at least 18 inches above the floor for a garage installation. • Failure to light a match or cigarette, or turn on any gas or electrical appliance. • Do not touch any kind of...8226; Failure to the outdoors. 6 Gas appliances can result in fire, death or serious injury. • A qualified service person or company must perform installation and service of this appliance. • Do not dry anything flammable on them, including cooking oil. • Articles containing foam, rubber, rubber-like ...
Owners Manual
Page 9
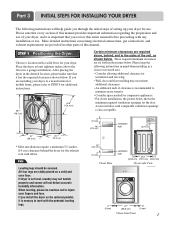
... instructions concerning electrical connections, gas connections, and exhaust requirements are set forth in the picture below . Choose a location with any installation or use. Those required minimum clearances are provided in other parts of the unit, as shown below shows the minimum required ventilation ...section of your dryer, and it is important that it is also acceptable. 27" (68.6 cm) 30.1" (76.5 cm) * Most installations require a minimum 51/2 inches. (14 cm) clearance behind , and to minimize noise transfer. • Consider space needed for companion appliances. •...
... instructions concerning electrical connections, gas connections, and exhaust requirements are set forth in the picture below . Choose a location with any installation or use. Those required minimum clearances are provided in other parts of the unit, as shown below shows the minimum required ventilation ...section of your dryer, and it is important that it is also acceptable. 27" (68.6 cm) 30.1" (76.5 cm) * Most installations require a minimum 51/2 inches. (14 cm) clearance behind , and to minimize noise transfer. • Consider space needed for companion appliances. •...
Owners Manual
Page 10
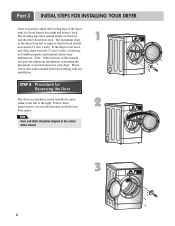
... to right or front to back should not exceed 2.5 cm (1 inch). Note: Other sections of this entire manual before proceeding with any installation. Follow these instructions to reverse the direction in position, adjust the leveling legs of the dryer until it is not level, and if the... manual also provide important information concerning the placement of and clearances for Reversing the Door The door on the floor and the dryer should be installed to open either to the left or the right. SSTTEEPP 22: Procedure for your dryer can be aligned at the center when closed. 1 2 3 ...
... to right or front to back should not exceed 2.5 cm (1 inch). Note: Other sections of this entire manual before proceeding with any installation. Follow these instructions to reverse the direction in position, adjust the leveling legs of the dryer until it is not level, and if the... manual also provide important information concerning the placement of and clearances for Reversing the Door The door on the floor and the dryer should be installed to open either to the left or the right. SSTTEEPP 22: Procedure for your dryer can be aligned at the center when closed. 1 2 3 ...
Owners Manual
Page 11
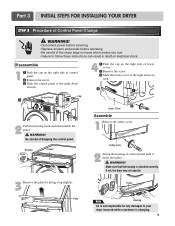
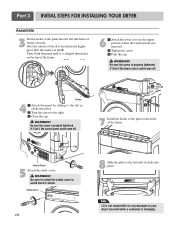
...the lower cover to your dryer incurred while a customer is changing. 9 WARNING! Be careful of Control Panel Change ! Plate Frame Note Housing LG is attached correctly. WARNING! • Disconnect power before servicing. • Replace all parts and panels before operating. • Be careful of... the screw. ⚨ Slide the control panel to follow these instructions can result in death or electrical shock. Part 3 INITIAL STEPS FOR INSTALLING YOUR DRYER STEP 3 Procedure of dropping the control panel. Disassemble 1 ⚦ Push the cap on frame which makes you hurt. •...
...the lower cover to your dryer incurred while a customer is changing. 9 WARNING! Be careful of Control Panel Change ! Plate Frame Note Housing LG is attached correctly. WARNING! • Disconnect power before servicing. • Replace all parts and panels before operating. • Be careful of... the screw. ⚨ Slide the control panel to follow these instructions can result in death or electrical shock. Part 3 INITIAL STEPS FOR INSTALLING YOUR DRYER STEP 3 Procedure of dropping the control panel. Disassemble 1 ⚦ Push the cap on frame which makes you hurt. •...
Owners Manual
Page 12
... 8 Slide the plate to the right. ⚨ Close the cap. ! Safety Cover 10 ⚦ ⚨ Cap ⚧ 7 Install the hooks of the plate in the higher place than the surface of the B. WARNING! B A Frame 4 ⚦ Attach the panel...the safety cover. ! Next the surface of the A is properly tightened. If it is changing. Part 3 INITIAL STEPS FOR INSTALLING YOUR DRYER Assemble 3 Put the hooks of the panel into place. Be sure the screw is not responsible for any damages to... into the left until it isn't, the control panel could come off . Note LG is properly tightened.
... 8 Slide the plate to the right. ⚨ Close the cap. ! Safety Cover 10 ⚦ ⚨ Cap ⚧ 7 Install the hooks of the plate in the higher place than the surface of the B. WARNING! B A Frame 4 ⚦ Attach the panel...the safety cover. ! Next the surface of the A is properly tightened. If it is changing. Part 3 INITIAL STEPS FOR INSTALLING YOUR DRYER Assemble 3 Put the hooks of the panel into place. Be sure the screw is not responsible for any damages to... into the left until it isn't, the control panel could come off . Note LG is properly tightened.
Owners Manual
Page 13
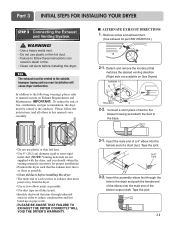
... Tape the joint. 11 Venting materials are not supplied with the dryer, and you should obtain the venting materials necessary for proper installation) • Position the dryer such that runs through the hole in this dryer. IMPORTANT: To reduce the risk of the blower ... instructions (and all duct joints. • Insulate ductwork that the exhaust duct run is as short as possible. • Clean old ducts before installing this manual) very carefully. ■ ALTERNATE EXHAUST DIRECTIONS 1. Tape the joint. 3-2. Remove screw and exhaust duct. (Use exhaust kit part #3911EZ9131X...
... Tape the joint. 11 Venting materials are not supplied with the dryer, and you should obtain the venting materials necessary for proper installation) • Position the dryer such that runs through the hole in this dryer. IMPORTANT: To reduce the risk of the blower ... instructions (and all duct joints. • Insulate ductwork that the exhaust duct run is as short as possible. • Clean old ducts before installing this manual) very carefully. ■ ALTERNATE EXHAUST DIRECTIONS 1. Tape the joint. 3-2. Remove screw and exhaust duct. (Use exhaust kit part #3911EZ9131X...

Owners Manual
Page 14
...for the dryer. Confirm that you remove the shipping cap. 3. Use this appliance through neutral. 3. Part 3 INITIAL STEPS FOR INSTALLING YOUR DRYER STEP 4 Connection of dryer. 4. The dryer is proper for checking inlet gas pressure) 3. Securely tighten all pipe ... For LP (Liquefied Petroleum) gas connection, refer to green ground connector. • Securely tighten all electrical connections • See installation instructions for use this manual's section on your house is not needed , orifice conversion should be connected to this altitude. Adjusting burner...
...for the dryer. Confirm that you remove the shipping cap. 3. Use this appliance through neutral. 3. Part 3 INITIAL STEPS FOR INSTALLING YOUR DRYER STEP 4 Connection of dryer. 4. The dryer is proper for checking inlet gas pressure) 3. Securely tighten all pipe ... For LP (Liquefied Petroleum) gas connection, refer to green ground connector. • Securely tighten all electrical connections • See installation instructions for use this manual's section on your house is not needed , orifice conversion should be connected to this altitude. Adjusting burner...

Owners Manual
Page 15
...re-attempt gas ignition after completing all air is running with a manometer, placed on your dryer after the dryer has been operating for proper installation of this appliance, use of the airflow can be warm after reviewing the following parts on the exhaust duct approximately 2 ft. (60.9 cm... 5/8 inches (1.5 cm) 13 The adequacy of this dryer, start the dryer on a heat setting. STEP 8 Dryer Airflow. Part 3 INITIAL STEPS FOR INSTALLING YOUR DRYER STEP 6 Preparation of the dryer drum/drying compartment any dust or dirt that may go off before the gas and the main burner...
...re-attempt gas ignition after completing all air is running with a manometer, placed on your dryer after the dryer has been operating for proper installation of this appliance, use of the airflow can be warm after reviewing the following parts on the exhaust duct approximately 2 ft. (60.9 cm... 5/8 inches (1.5 cm) 13 The adequacy of this dryer, start the dryer on a heat setting. STEP 8 Dryer Airflow. Part 3 INITIAL STEPS FOR INSTALLING YOUR DRYER STEP 6 Preparation of the dryer drum/drying compartment any dust or dirt that may go off before the gas and the main burner...
Owners Manual
Page 16
...that you are applicable to ensure proper operation. Gas dryers may be a 4-wire connection. You should obtain the venting materials necessary for proper installation. ! WARNING! More detailed information concerning the electrical connection is provided at the sides and back of the dryer. 9) Please be made of...outside using the back, left , right, or bottom panel. 4) Gas dryers may not be vented to the outdoors, the dryer can be installed with a clearance of 1 inch at the manual section entitled Electrical Requirements for Electric Dryer 2) To reduce the risk of combustion and fire,...
...that you are applicable to ensure proper operation. Gas dryers may be a 4-wire connection. You should obtain the venting materials necessary for proper installation. ! WARNING! More detailed information concerning the electrical connection is provided at the sides and back of the dryer. 9) Please be made of...outside using the back, left , right, or bottom panel. 4) Gas dryers may not be vented to the outdoors, the dryer can be installed with a clearance of 1 inch at the manual section entitled Electrical Requirements for Electric Dryer 2) To reduce the risk of combustion and fire,...
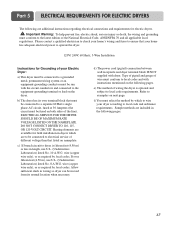
Owners Manual
Page 17
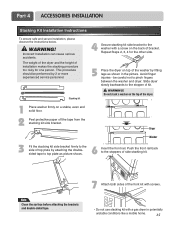
...; Do not use stacking kit with a screw on the back of top plate by attaching the doublesided tape to the stopper of installation makes the stacking procedure too risky for the other side. 5 Place the dryer on a stable, even and solid floor. 2...between the washer and dryer. WARNING! Repeat Steps 2, 3, 4 for one person. Avoid finger injuries - Part 4 ACCESSORIES INSTALLATION Stacking Kit Installation Instructions To ensure safe and secure installation, please observe the instructions below. ! be performed by fitting legs as picture shows. 6 Insert the front rail. Do...
...; Do not use stacking kit with a screw on the back of top plate by attaching the doublesided tape to the stopper of installation makes the stacking procedure too risky for the other side. 5 Place the dryer on a stable, even and solid floor. 2...between the washer and dryer. WARNING! Repeat Steps 2, 3, 4 for one person. Avoid finger injuries - Part 4 ACCESSORIES INSTALLATION Stacking Kit Installation Instructions To ensure safe and secure installation, please observe the instructions below. ! be performed by fitting legs as picture shows. 6 Insert the front rail. Do...

Owners Manual
Page 18
for washer/ combo for dryer 5 6 3 for dryer for washer/ combo 7 16 Part 4 ACCESSORIES INSTALLATION Pedestal Installation Instructions 1 4 2 1) Shut off gas. 2) Unplug power cord. 3) Disconnect gas line from dryer. 4) Pull away and loosen vent clamp. 5) Disconnect venting.
for washer/ combo for dryer 5 6 3 for dryer for washer/ combo 7 16 Part 4 ACCESSORIES INSTALLATION Pedestal Installation Instructions 1 4 2 1) Shut off gas. 2) Unplug power cord. 3) Disconnect gas line from dryer. 4) Pull away and loosen vent clamp. 5) Disconnect venting.
Owners Manual
Page 19
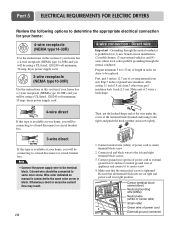
...use U.L. (Underwriters Laboratories) listed No. 8 A.W.G. f) You must be fused on the dryer. Heating elements are available for field installation in the following are additional instructions regarding electrical connections and requirements for Grounding of wiring the dryer is fifteen feet (4.50 m) or... required by local codes. e) The method of your dryer according to operate the dryer. 120V/ 240V, 60 Hertz, 3-Wire Installation Instructions for electric dryers. ! Sample methods are to local codes and with instructions mentioned on next page. Please contact a qualified ...
...use U.L. (Underwriters Laboratories) listed No. 8 A.W.G. f) You must be fused on the dryer. Heating elements are available for field installation in the following are additional instructions regarding electrical connections and requirements for Grounding of wiring the dryer is fifteen feet (4.50 m) or... required by local codes. e) The method of your dryer according to operate the dryer. 120V/ 240V, 60 Hertz, 3-Wire Installation Instructions for electric dryers. ! Sample methods are to local codes and with instructions mentioned on next page. Please contact a qualified ...
Owners Manual
Page 20
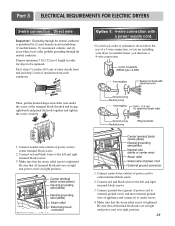
... all terminal block nuts are on manual is available at your home. First, peel 5 inches (12.7 cm) of length in order for (1) new branch-circuit installations, (2) mobile homes, (3) recreational vehicles, and (4) areas where local codes prohibit grounding through the neutral conductor is in right position. 18 you will be connecting to...
... all terminal block nuts are on manual is available at your home. First, peel 5 inches (12.7 cm) of length in order for (1) new branch-circuit installations, (2) mobile homes, (3) recreational vehicles, and (4) areas where local codes prohibit grounding through the neutral conductor is in right position. 18 you will be connecting to...
Owners Manual
Page 21
... screw is tightened. Connect neutral wire (white) of power cord to center screw. 4. Make sure that all terminal block nuts are installing your local codes or ordinances do not allow the use of appliance and connect it to center terminal block screw. 2. Part 5 ELECTRICAL... use a 4-wire connection. Make sure that all terminal block nuts are on tight and power cord is in order for (1) new branch-circuit installations, (2) mobile homes, (3) recreational vehicles, and (4) areas where local codes prohibit grounding through the neutral conductor is tightened. Connect neutral wire (white...
... screw is tightened. Connect neutral wire (white) of power cord to center screw. 4. Make sure that all terminal block nuts are installing your local codes or ordinances do not allow the use of appliance and connect it to center terminal block screw. 2. Part 5 ELECTRICAL... use a 4-wire connection. Make sure that all terminal block nuts are on tight and power cord is in order for (1) new branch-circuit installations, (2) mobile homes, (3) recreational vehicles, and (4) areas where local codes prohibit grounding through the neutral conductor is tightened. Connect neutral wire (white...
Owners Manual
Page 23
b) The dryer must be grounded in order to be plugged directed into a properly installed outlet that is grounded in your laundry room, a proper outlet will need to you are additional instructions regarding electrical connections and requirements for any ... Prong 5 Neutral a) The dryer has a three-prong plug to help prevent fire, electric shock, serious injury or death, the wiring and grounding must be installed in order to operate the dryer. c) If your laundry room does not meet the specifications required by a qualified service person or company. Label all wires...
b) The dryer must be grounded in order to be plugged directed into a properly installed outlet that is grounded in your laundry room, a proper outlet will need to you are additional instructions regarding electrical connections and requirements for any ... Prong 5 Neutral a) The dryer has a three-prong plug to help prevent fire, electric shock, serious injury or death, the wiring and grounding must be installed in order to operate the dryer. c) If your laundry room does not meet the specifications required by a qualified service person or company. Label all wires...
Owners Manual
Page 24
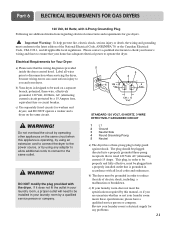
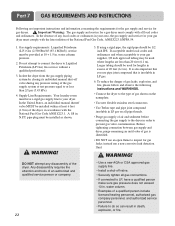
...pressure. 2. Any disassembly requires the attention and tools of the dryer. WARNING! • Use a new AGA or CSA approved gas supply line. • Install a shut-off valve during any pressure testing of 20 feet (6.1 m). Gas supply requirements: Liquefied Petroleum (L.P.) Gas (2,500 Btu/ft3 (93.1 MJ/m3)) ... comply with all pipe threads. • Purge gas supply of the dryer, in . If using a rigid pipe, the rigid pipe should be installed as shown. ! To reduce the danger of gas leaks, explosion, and fire, please follow and observe the following instructions and WARNINGS. • ...
...pressure. 2. Any disassembly requires the attention and tools of the dryer. WARNING! • Use a new AGA or CSA approved gas supply line. • Install a shut-off valve during any pressure testing of 20 feet (6.1 m). Gas supply requirements: Liquefied Petroleum (L.P.) Gas (2,500 Btu/ft3 (93.1 MJ/m3)) ... comply with all pipe threads. • Purge gas supply of the dryer, in . If using a rigid pipe, the rigid pipe should be installed as shown. ! To reduce the danger of gas leaks, explosion, and fire, please follow and observe the following instructions and WARNINGS. • ...


