
Owners Manual
Page 4
... IMPORTANT WARRANTY AND SAFETY INSTRUCTIONS ...4 PART 3. INITIAL STEPS FOR INSTALLING YOUR DRYER ...7 PART 4. GAS REQUIREMENTS AND INSTRUCTIONS ...22 PART 8. ACCESSORIES INSTALLATION ...15 PART 5. ELECTRICAL REQUIREMENTS FOR GAS DRYERS...21 PART 7. No need to press buttons multiple times to select heat ...level and drying time manually. TROUBLESHOOTING GUIDE...31 LG DRYER LIMITED WARRANTY...34 2 TABLE OF CONTENTS PART 1. You...
... IMPORTANT WARRANTY AND SAFETY INSTRUCTIONS ...4 PART 3. INITIAL STEPS FOR INSTALLING YOUR DRYER ...7 PART 4. GAS REQUIREMENTS AND INSTRUCTIONS ...22 PART 8. ACCESSORIES INSTALLATION ...15 PART 5. ELECTRICAL REQUIREMENTS FOR GAS DRYERS...21 PART 7. No need to press buttons multiple times to select heat ...level and drying time manually. TROUBLESHOOTING GUIDE...31 LG DRYER LIMITED WARRANTY...34 2 TABLE OF CONTENTS PART 1. You...
Owners Manual
Page 5
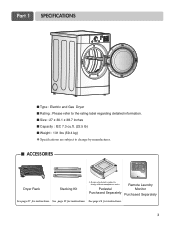
.... See page 15 for instructions. 3 Pedestal Purchased Separately Remote Laundry Monitor Purchased Separately See page 27 for instructions. Part 1 SPECIFICATIONS ■ Type : Electric and Gas Dryer ■ Rating : Please refer to the rating label regarding detailed information. ■ Size : 27 x 30.1 x 38.7 inches ■ Capacity : IEC ...7.3 cu.ft. (22.5 lb) ■ Weight : 131 Ibs (59.4 kg) ❋ Specifications are subject to change by manufacturer. ■ ACCESSORIES Dryer Rack Stacking Kit ❊ Design of pedestals is subject to change without manafaturers notice.
.... See page 15 for instructions. 3 Pedestal Purchased Separately Remote Laundry Monitor Purchased Separately See page 27 for instructions. Part 1 SPECIFICATIONS ■ Type : Electric and Gas Dryer ■ Rating : Please refer to the rating label regarding detailed information. ■ Size : 27 x 30.1 x 38.7 inches ■ Capacity : IEC ...7.3 cu.ft. (22.5 lb) ■ Weight : 131 Ibs (59.4 kg) ❋ Specifications are subject to change by manufacturer. ■ ACCESSORIES Dryer Rack Stacking Kit ❊ Design of pedestals is subject to change without manafaturers notice.
Owners Manual
Page 8
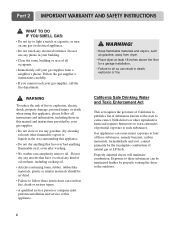
... manual and instructions provided by the incomplete combustion of all occupants. • Immediately call your gas supplier, call the fire department. ! Follow the gas supplier's instructions carefully. • If you cannot reach your gas supplier from dryer. • Place dryer at least 18 inches above the floor for a garage installation. • Failure to cause cancer...
... manual and instructions provided by the incomplete combustion of all occupants. • Immediately call your gas supplier, call the fire department. ! Follow the gas supplier's instructions carefully. • If you cannot reach your gas supplier from dryer. • Place dryer at least 18 inches above the floor for a garage installation. • Failure to cause cancer...
Owners Manual
Page 9
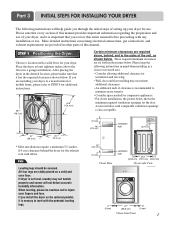
...clearances shown below shows the minimum required ventilation openings for companion appliances. • For closet installations, the picture below . If dryer is not level, laundry may necessitate additional clearances. • An additional inch of this entire manual before proceeding with elbow.... instructions. 38.7" (98.3 cm) 49.8" (126.4 cm) Certain minimum clearances are installing your dryer. More detailed instructions concerning electrical connections, gas connections, and exhaust requirements are set forth in the desired location, please make sure that you install the...
...clearances shown below shows the minimum required ventilation openings for companion appliances. • For closet installations, the picture below . If dryer is not level, laundry may necessitate additional clearances. • An additional inch of this entire manual before proceeding with elbow.... instructions. 38.7" (98.3 cm) 49.8" (126.4 cm) Certain minimum clearances are installing your dryer. More detailed instructions concerning electrical connections, gas connections, and exhaust requirements are set forth in the desired location, please make sure that you install the...
Owners Manual
Page 13
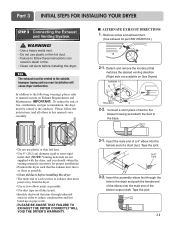
.... ! In addition to the following warnings, please refer to manual section on Gas Dryers) 2-2. Remove screw and exhaust duct. (Use exhaust kit part #3911EZ9131X.) 2-1. Insert the male end of a 4" elbow into the female end of fire, combustion, and gas accumulation, the dryer must be vented to the outdoors. Tape the joint. 3-2. WARNING! • Use...
.... ! In addition to the following warnings, please refer to manual section on Gas Dryers) 2-2. Remove screw and exhaust duct. (Use exhaust kit part #3911EZ9131X.) 2-1. Insert the male end of a 4" elbow into the female end of fire, combustion, and gas accumulation, the dryer must be vented to the outdoors. Tape the joint. 3-2. WARNING! • Use...

Owners Manual
Page 14
... on the dryer. Equipment Shut-Off Valve Installed within 6' (1.8 m) of Gas Supply (Gas dryer only). Shorter than 20' (6.1 m) - More detailed information concerning the electrical connection is provided in a clothes dryer. 2. A four-wire cord is prepared for Natural Gas with a 3/8" NPT gas connection. 2....Certified Connector. 2. 1/8" NPT Pipe Plug (for complete instructions. • Failure to manual section on Electrical Requirements and Electric Dryer. Gas Connection. It is located at this appliance through neutral. 3. Use only a new UL listed No. 10 (copper wire ...
... on the dryer. Equipment Shut-Off Valve Installed within 6' (1.8 m) of Gas Supply (Gas dryer only). Shorter than 20' (6.1 m) - More detailed information concerning the electrical connection is provided in a clothes dryer. 2. A four-wire cord is prepared for Natural Gas with a 3/8" NPT gas connection. 2....Certified Connector. 2. 1/8" NPT Pipe Plug (for complete instructions. • Failure to manual section on Electrical Requirements and Electric Dryer. Gas Connection. It is located at this appliance through neutral. 3. Use only a new UL listed No. 10 (copper wire ...

Owners Manual
Page 15
... Duct MAXIMUM STATIC PRESSURE IN WATER COLUMN 5/8 inches (1.5 cm) 13 Confirming Heat Source in Gas Dryers Close the door to remove from the dryer. Effective dryer operation requires appropriate dryer airflow. Plug-in this manual for proper installation of this dryer, start the dryer on the exhaust duct approximately 2 ft. (60.9 cm) from the inside of the...
... Duct MAXIMUM STATIC PRESSURE IN WATER COLUMN 5/8 inches (1.5 cm) 13 Confirming Heat Source in Gas Dryers Close the door to remove from the dryer. Effective dryer operation requires appropriate dryer airflow. Plug-in this manual for proper installation of this dryer, start the dryer on the exhaust duct approximately 2 ft. (60.9 cm) from the inside of the...
Owners Manual
Page 16
... WARNING! You should obtain the venting materials necessary for Electric Dryer 2) To reduce the risk of the dryer in a manufactured or mobile home must be vented to the outside using the back, left , or bottom panel. Gas dryers may be a 4-wire connection. More detailed information concerning the...apply to the outside using the back, left , right, or bottom panel. 4) Gas dryers may not be vented to any other duct, vent, chimney, or other exhaust duct. 7) Make sure the dryer has adequate access to outside fresh air must be affixed securely to ensure proper operation. ...
... WARNING! You should obtain the venting materials necessary for Electric Dryer 2) To reduce the risk of the dryer in a manufactured or mobile home must be vented to the outside using the back, left , or bottom panel. Gas dryers may be a 4-wire connection. More detailed information concerning the...apply to the outside using the back, left , right, or bottom panel. 4) Gas dryers may not be vented to any other duct, vent, chimney, or other exhaust duct. 7) Make sure the dryer has adequate access to outside fresh air must be affixed securely to ensure proper operation. ...
Owners Manual
Page 17
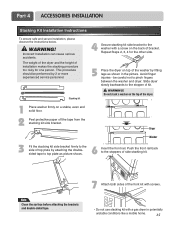
... backwards to the washer with a screw on top of the front kit with screws. • Do not use stacking kit with a gas dryer in the picture. Incorrect Installation can cause serious accidents. Repeat Steps 2, 3, 4 for one person. WARNING! Note Clean the surface before attaching the... the washer by attaching the doublesided tape to the side of installation makes the stacking procedure too risky for the other side. 5 Place the dryer on the back of kit. ! Stacking kit 4 Secure stacking kit side bracket to the stopper of bracket. Part 4 ACCESSORIES INSTALLATION Stacking Kit...
... backwards to the washer with a screw on top of the front kit with screws. • Do not use stacking kit with a gas dryer in the picture. Incorrect Installation can cause serious accidents. Repeat Steps 2, 3, 4 for one person. WARNING! Note Clean the surface before attaching the... the washer by attaching the doublesided tape to the side of installation makes the stacking procedure too risky for the other side. 5 Place the dryer on the back of kit. ! Stacking kit 4 Secure stacking kit side bracket to the stopper of bracket. Part 4 ACCESSORIES INSTALLATION Stacking Kit...

Owners Manual
Page 18
for washer/ combo for dryer 5 6 3 for dryer for washer/ combo 7 16 Part 4 ACCESSORIES INSTALLATION Pedestal Installation Instructions 1 4 2 1) Shut off gas. 2) Unplug power cord. 3) Disconnect gas line from dryer. 4) Pull away and loosen vent clamp. 5) Disconnect venting.
for washer/ combo for dryer 5 6 3 for dryer for washer/ combo 7 16 Part 4 ACCESSORIES INSTALLATION Pedestal Installation Instructions 1 4 2 1) Shut off gas. 2) Unplug power cord. 3) Disconnect gas line from dryer. 4) Pull away and loosen vent clamp. 5) Disconnect venting.
Owners Manual
Page 23
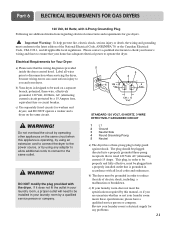
..., CSA C22.1, and all wires prior to disconnection when servicing the dryer, because wiring errors can cause serious injury to you are additional instructions regarding electrical connections and requirements for gas dryers. ! c) Use separately fused circuits for any adapter to allow additional... 120 Volt, 60 Hertz, AC (alternating current) circuit protected by a qualified service person or company. Part 6 ELECTRICAL REQUIREMENTS FOR GAS DRYERS 120 Volt, 60 Hertz, with 3-Prong Grounding Plug Following are uncertain whether or not your laundry room meets these specifications, please have ...
..., CSA C22.1, and all wires prior to disconnection when servicing the dryer, because wiring errors can cause serious injury to you are additional instructions regarding electrical connections and requirements for gas dryers. ! c) Use separately fused circuits for any adapter to allow additional... 120 Volt, 60 Hertz, AC (alternating current) circuit protected by a qualified service person or company. Part 6 ELECTRICAL REQUIREMENTS FOR GAS DRYERS 120 Volt, 60 Hertz, with 3-Prong Grounding Plug Following are uncertain whether or not your laundry room meets these specifications, please have ...
Owners Manual
Page 24
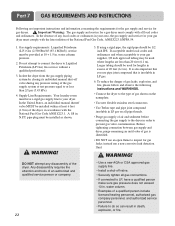
..., explosion, and fire, please follow and observe the following instructions and WARNINGS. • Connect the dryer to inspect for gas dryers. ! instead use an open flame to the type of any local codes or ordinances in . Part 7 GAS REQUIREMENTS AND INSTRUCTIONS Following are less than 2/1 psi (3.45 kPa). 4. Supply Line Requirements. water column. •...
..., explosion, and fire, please follow and observe the following instructions and WARNINGS. • Connect the dryer to inspect for gas dryers. ! instead use an open flame to the type of any local codes or ordinances in . Part 7 GAS REQUIREMENTS AND INSTRUCTIONS Following are less than 2/1 psi (3.45 kPa). 4. Supply Line Requirements. water column. •...

Owners Manual
Page 25
... duct length limitations noted in the chart above recommendations, then a UL-listed flexible metal transition duct may be used between the dryer and and the wall. The exhaust duct should obtain the necessary venting materials locally. Secure all joints with plastic or thin foil... impossible to clean any old ducts before installing your dryer. ! For example, the outer end of exhaust pipe must be kept as short as an attic, wall, ceiling, crawl space, chimney, gas vent, or concealed space of 4" (10.2 cm) diameter flexible metal duct Recommended 0 1 2 3 4" (10.2 cm) 4" 4 (10...
... duct length limitations noted in the chart above recommendations, then a UL-listed flexible metal transition duct may be used between the dryer and and the wall. The exhaust duct should obtain the necessary venting materials locally. Secure all joints with plastic or thin foil... impossible to clean any old ducts before installing your dryer. ! For example, the outer end of exhaust pipe must be kept as short as an attic, wall, ceiling, crawl space, chimney, gas vent, or concealed space of 4" (10.2 cm) diameter flexible metal duct Recommended 0 1 2 3 4" (10.2 cm) 4" 4 (10...
Owners Manual
Page 33
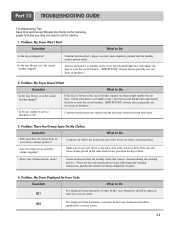
... in ? • Is the fuse blown, or is blown or the circuit breaker tripped, the dryer might tumble but not heat. Confirm that the house gas shutoff and the dryer gas shutoff are actually stains that weren't cleansed during the washing process. Part 10 TROUBLESHOOTING GUIDE Troubleshooting Tips ... room's fuse box/circuit breaker box and replace the fuse or reset the circuit breaker. (IMPORTANT: electric dryers generally use two fuses or breakers.) • Is the gas supply or service blocked or off? Please review and confirm that you are following pages first and you drying...
... in ? • Is the fuse blown, or is blown or the circuit breaker tripped, the dryer might tumble but not heat. Confirm that the house gas shutoff and the dryer gas shutoff are actually stains that weren't cleansed during the washing process. Part 10 TROUBLESHOOTING GUIDE Troubleshooting Tips ... room's fuse box/circuit breaker box and replace the fuse or reset the circuit breaker. (IMPORTANT: electric dryers generally use two fuses or breakers.) • Is the gas supply or service blocked or off? Please review and confirm that you are following pages first and you drying...
Owners Manual
Page 34
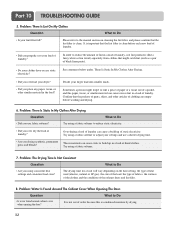
Please refer to the manual section on the heat setting, the type of heat used (electric, natural or LP gas), the size of the load, the type of fabrics, the wetness of the clothes and the condition of the exhaust ducts and lint filer. 8. Sometimes a ... time. • Are you overload your lint filter full? Try using consistent heat settings and consistent load sizes? Question What to Do • Is your dryer? • Did you properly sort your larger load into smaller loads. Problem: There Is Static In My Clothes After Drying Question What to take a piece...
Please refer to the manual section on the heat setting, the type of heat used (electric, natural or LP gas), the size of the load, the type of fabrics, the wetness of the clothes and the condition of the exhaust ducts and lint filer. 8. Sometimes a ... time. • Are you overload your lint filter full? Try using consistent heat settings and consistent load sizes? Question What to Do • Is your dryer? • Did you properly sort your larger load into smaller loads. Problem: There Is Static In My Clothes After Drying Question What to take a piece...


