
Owners Manual
Page 1
... ILLUSTRATOR DR COMPLETED 도면 DR 완료 완료일 : MANUAL,OWNER'S GIANT(D)-PJT 1/1 3828EL3003M NO. 기호 Call No 추가. Before product controlled by criteria sample. 5. PRINTING DEGREE EXTERIER INTERIER MATERIAL AND PRINTING DESCRIPTION LG MODEL 명 DLE9577WM / DLG9588WM M LG DLE9577SM / DLG9588SM 3828EL3003M 1 1 SNOW WHITE 100g OFFSET 인쇄 - NO DATE...
... ILLUSTRATOR DR COMPLETED 도면 DR 완료 완료일 : MANUAL,OWNER'S GIANT(D)-PJT 1/1 3828EL3003M NO. 기호 Call No 추가. Before product controlled by criteria sample. 5. PRINTING DEGREE EXTERIER INTERIER MATERIAL AND PRINTING DESCRIPTION LG MODEL 명 DLE9577WM / DLG9588WM M LG DLE9577SM / DLG9588SM 3828EL3003M 1 1 SNOW WHITE 100g OFFSET 인쇄 - NO DATE...
Owners Manual
Page 3
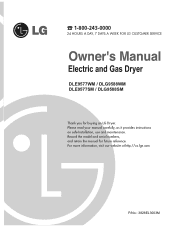
☎ 1-800-243-0000 24 HOURS A DAY, 7 DAYS A WEEK FOR LG CUSTOMER SERVICE DLE9577WM / DLG9588WM DLE9577SM / DLG9588SM Thank you for future reference. Please read your manual carefully, as it provides instructions on safe Installation, use and maintenance. Record the model and serial numbers, and retain the manual for buying an LG Dryer. For more information, visit our website at http://us.lge.com P/No.: 3828EL3003M
☎ 1-800-243-0000 24 HOURS A DAY, 7 DAYS A WEEK FOR LG CUSTOMER SERVICE DLE9577WM / DLG9588WM DLE9577SM / DLG9588SM Thank you for future reference. Please read your manual carefully, as it provides instructions on safe Installation, use and maintenance. Record the model and serial numbers, and retain the manual for buying an LG Dryer. For more information, visit our website at http://us.lge.com P/No.: 3828EL3003M
Owners Manual
Page 4
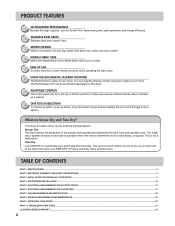
... Time Dry? ACCESSORIES INSTALLATION ...15 PART 5. EXHAUST REQUIREMENTS AND MAINTENANCE ...23 PART 9. OPERATING YOUR DRYER ...25 PART 10. TROUBLESHOOTING GUIDE...31 LG DRYER LIMITED WARRANTY...34 2 You might see a sudden increase or decrease in your dryer. Time Dry Use TIME DRY to scroll through a ... To choose an option, press its button once. No need to press buttons multiple times to select heat level and drying time manually. Your dryer provides sensor drying and time drying programs. Sensor Dry The dryer senses the dampness of the laundry and automatically determines the...
... Time Dry? ACCESSORIES INSTALLATION ...15 PART 5. EXHAUST REQUIREMENTS AND MAINTENANCE ...23 PART 9. OPERATING YOUR DRYER ...25 PART 10. TROUBLESHOOTING GUIDE...31 LG DRYER LIMITED WARRANTY...34 2 You might see a sudden increase or decrease in your dryer. Time Dry Use TIME DRY to scroll through a ... To choose an option, press its button once. No need to press buttons multiple times to select heat level and drying time manually. Your dryer provides sensor drying and time drying programs. Sensor Dry The dryer senses the dampness of the laundry and automatically determines the...
Owners Manual
Page 6
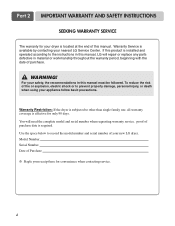
.... If this product is installed and operated according to the instructions in material or workmanship throughout the warranty period, beginning with the date of this manual must be followed. Warranty Restriction: If the dryer is subjected to prevent property damage, personal injury, or death when using your appliance follow basic ... at the end of purchase. ! Serial Number. Warranty Service is effective for only 90 days. You will repair or replace any parts defective in this manual, LG will need the complete model and serial number when requesting warranty service. WARNING!
.... If this product is installed and operated according to the instructions in material or workmanship throughout the warranty period, beginning with the date of this manual must be followed. Warranty Restriction: If the dryer is subjected to prevent property damage, personal injury, or death when using your appliance follow basic ... at the end of purchase. ! Serial Number. Warranty Service is effective for only 90 days. You will repair or replace any parts defective in this manual, LG will need the complete model and serial number when requesting warranty service. WARNING!
Owners Manual
Page 8
...; Failure to do so can result in your building. • Clear the room, building or area of all instructions and information, including those in this manual and instructions provided by your gas supplier. • Do not store or use any kind of these substances can completely remove oil.
...; Failure to do so can result in your building. • Clear the room, building or area of all instructions and information, including those in this manual and instructions provided by your gas supplier. • Do not store or use any kind of these substances can completely remove oil.
Owners Manual
Page 9
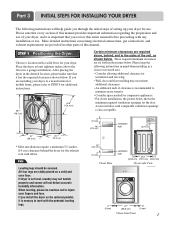
...keep the following instructions will not detect accurate humidity information. All four legs are provided in other parts of this manual. If you review this manual provides important information regarding the preparation and use . After placing the dryer in the desired location, please make sure... be cautious not to injure your dryer, and it has the required clearances shown below . Please note that every section of this entire manual before proceeding with comparable ventilation openings is important that it is also acceptable. 27" (68.6 cm) 30.1" (76.5 cm) * Most...
...keep the following instructions will not detect accurate humidity information. All four legs are provided in other parts of this manual. If you review this manual provides important information regarding the preparation and use . After placing the dryer in the desired location, please make sure... be cautious not to injure your dryer, and it has the required clearances shown below . Please note that every section of this entire manual before proceeding with comparable ventilation openings is important that it is also acceptable. 27" (68.6 cm) 30.1" (76.5 cm) * Most...
Owners Manual
Page 10
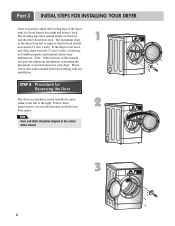
... maximum slope of and clearances for Reversing the Door The door on the floor and the dryer should not exceed 2.5 cm (1 inch). Please review this manual also provide important information concerning the placement of the dryer from left to right and front to the left to right or front to back...
... maximum slope of and clearances for Reversing the Door The door on the floor and the dryer should not exceed 2.5 cm (1 inch). Please review this manual also provide important information concerning the placement of the dryer from left to right and front to the left to right or front to back...
Owners Manual
Page 13
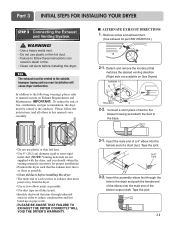
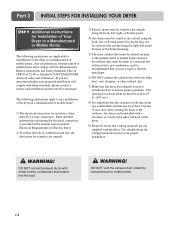
...in this dryer. Insert this assembly elbow first through unheated areas in death or fire. • Clean old ducts before installing this manual) very carefully. ■ ALTERNATE EXHAUST DIRECTIONS 1. Improper taping and incorrect installation will cause dryer malfunction. Part 3 INITIAL STEPS FOR ..., combustion, and gas accumulation, the dryer must be vented to the outside. Please follow these instructions can result in order to manual section on pipe walls. • PLEASE BE AWARE THAT FAILURE TO EXHAUST THE DRYER CORRECTLY WILL VOID THE DRYER'S WARRANTY. 3-1....
...in this dryer. Insert this assembly elbow first through unheated areas in death or fire. • Clean old ducts before installing this manual) very carefully. ■ ALTERNATE EXHAUST DIRECTIONS 1. Improper taping and incorrect installation will cause dryer malfunction. Part 3 INITIAL STEPS FOR ..., combustion, and gas accumulation, the dryer must be vented to the outside. Please follow these instructions can result in order to manual section on pipe walls. • PLEASE BE AWARE THAT FAILURE TO EXHAUST THE DRYER CORRECTLY WILL VOID THE DRYER'S WARRANTY. 3-1....

Owners Manual
Page 14
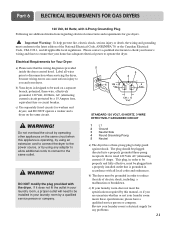
... this altitude. Securely tighten all connections between the dryer and your laundry room is located at this elevation because AGA certifies this manual's section on the model/serial rating plate. ! Note Burner input requirements If your laundry room's gas supply using LPG with...10 (copper wire only) three conductor power supply cord kit rated 240 Volts (minimum) 30 Amperes and labeled as noted below, use this manual's section entitled Gas Requirements and Instructions. 12 STEP 5 Electrical Plug Connections Following are required to ignite. The dryer is provided in a ...
... this altitude. Securely tighten all connections between the dryer and your laundry room is located at this elevation because AGA certifies this manual's section on the model/serial rating plate. ! Note Burner input requirements If your laundry room's gas supply using LPG with...10 (copper wire only) three conductor power supply cord kit rated 240 Volts (minimum) 30 Amperes and labeled as noted below, use this manual's section entitled Gas Requirements and Instructions. 12 STEP 5 Electrical Plug Connections Following are required to ignite. The dryer is provided in a ...

Owners Manual
Page 15
... airflow. After the dryer starts, the igniter will glow red and the main burner will re-attempt gas ignition after completing all steps in this manual for proper installation of this dryer, start the dryer on a heat setting. The adequacy of the airflow can be measured by evaluating the static pressure... compartment and, after completing all air is running with a manometer, placed on your dryer after the dryer has been operating for proper installation of this manual for three minutes.
... airflow. After the dryer starts, the igniter will glow red and the main burner will re-attempt gas ignition after completing all steps in this manual for proper installation of this dryer, start the dryer on a heat setting. The adequacy of the airflow can be measured by evaluating the static pressure... compartment and, after completing all air is running with a manometer, placed on your dryer after the dryer has been operating for proper installation of this manual for three minutes.
Owners Manual
Page 16
... or mobile home structure, the exhaust duct must be made of combustion and fire, the dryer must be installed with a clearance of 1 inch at the manual section entitled Electrical Requirements for assistance. The opening for proper installation. !
... or mobile home structure, the exhaust duct must be made of combustion and fire, the dryer must be installed with a clearance of 1 inch at the manual section entitled Electrical Requirements for assistance. The opening for proper installation. !
Owners Manual
Page 20
... to the terminal block. Note • Connect the power supply wire to center terminal block screw. 2. Make sure that all terminal block nuts are on manual is available at your home.
... to the terminal block. Note • Connect the power supply wire to center terminal block screw. 2. Make sure that all terminal block nuts are on manual is available at your home.
Owners Manual
Page 23
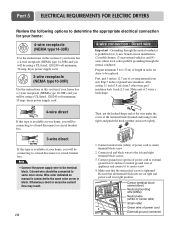
... the dryer to operate the dryer. Electrical Requirements for washers and dryers, and DO NOT operate a washer and a dryer on the same circuit when this manual, or if you and your laundry room meets these specifications, please have a qualified service person or company. Part 6 ELECTRICAL REQUIREMENTS FOR GAS DRYERS 120 Volt...
... the dryer to operate the dryer. Electrical Requirements for washers and dryers, and DO NOT operate a washer and a dryer on the same circuit when this manual, or if you and your laundry room meets these specifications, please have a qualified service person or company. Part 6 ELECTRICAL REQUIREMENTS FOR GAS DRYERS 120 Volt...
Owners Manual
Page 24
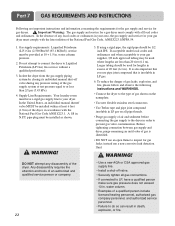
... system at least 6 feet (1.8 m) of gas is insoluble in . Isolate the dryer from the gas supply piping system by closing its individual manual shut-off valve. • Securely tighten all gas connections. • If connected to LP, have a rigid gas supply line to or less...Supply Line Requirements. Your laundry room must be provided at 10 + 1.5 in excess of the dryer. In the United States, an individual manual shutoff valve MUST be used where lengths are important instructions and information concerning the requirements for the gas supply and service for gas leaks; Before...
... system at least 6 feet (1.8 m) of gas is insoluble in . Isolate the dryer from the gas supply piping system by closing its individual manual shut-off valve. • Securely tighten all gas connections. • If connected to LP, have a rigid gas supply line to or less...Supply Line Requirements. Your laundry room must be provided at 10 + 1.5 in excess of the dryer. In the United States, an individual manual shutoff valve MUST be used where lengths are important instructions and information concerning the requirements for the gas supply and service for gas leaks; Before...
Owners Manual
Page 27
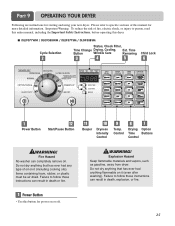
... dry anything flammable on or off. 25 Failure to person, read this entire manual, including the Important Safety Instructions, before operating this manual for starting and using your new dryer. Part 9 OPERATING YOUR DRYER Following are... instructions for more detailed information. WARNING! Drying Option Control Time Buttons Control ! WARNING! Do not dry anything that has ever had anything that has ever had any type of this dryer. ■ DLE9577WM / DLG9588WM / DLE9577SM...
... dry anything flammable on or off. 25 Failure to person, read this entire manual, including the Important Safety Instructions, before operating this manual for starting and using your new dryer. Part 9 OPERATING YOUR DRYER Following are... instructions for more detailed information. WARNING! Drying Option Control Time Buttons Control ! WARNING! Do not dry anything that has ever had anything that has ever had any type of this dryer. ■ DLE9577WM / DLG9588WM / DLE9577SM...
Owners Manual
Page 28
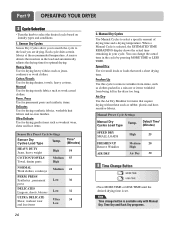
.... Note Time change the actual time in the dryer too long. Each cycle dries certain fabrics at the recommended temperature. Perm. Manual Dry Cycles Use Manual Cycles to remove wrinkles from items, such as clothes packed in a suitcase or items wrinkled from being left in the cycle by... without heat such as workout wear, shear and lace items. Sensor Dry Preset Cycle Settings Sensor Dry Cycles Load Type Temp. When a Manual Cycle is selected, the ESTIMATED TIME REMAINING display shows the actual time remaining in the load and automatically adjusts the drying time for optimal ...
.... Note Time change the actual time in the dryer too long. Each cycle dries certain fabrics at the recommended temperature. Perm. Manual Dry Cycles Use Manual Cycles to remove wrinkles from items, such as clothes packed in a suitcase or items wrinkled from being left in the cycle by... without heat such as workout wear, shear and lace items. Sensor Dry Preset Cycle Settings Sensor Dry Cycles Load Type Temp. When a Manual Cycle is selected, the ESTIMATED TIME REMAINING display shows the actual time remaining in the load and automatically adjusts the drying time for optimal ...
Owners Manual
Page 30
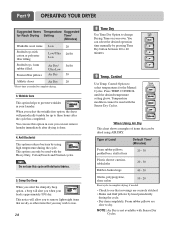
...30 20 - 30 40 - 50 Olefin, polypropylene, shear nylon 10 - 20 Reset cycle to complete drying, if needed to select temperatures for the Manual Cycles. This option can use this option in your load is done. 4. Press TEMP. CONTROL until the desired temperature setting glows. Type of items ... You can only be used with the Sensor Dry Cycles. Wrinkle Care This option helps to see that can select the desired operation time manually by using AIR DRY. This notice will periodically tumble for up to 60 minutes. 9 Temp. Temperature modifiers cannot be used with the...
...30 20 - 30 40 - 50 Olefin, polypropylene, shear nylon 10 - 20 Reset cycle to complete drying, if needed to select temperatures for the Manual Cycles. This option can use this option in your load is done. 4. Press TEMP. CONTROL until the desired temperature setting glows. Type of items ... You can only be used with the Sensor Dry Cycles. Wrinkle Care This option helps to see that can select the desired operation time manually by using AIR DRY. This notice will periodically tumble for up to 60 minutes. 9 Temp. Temperature modifiers cannot be used with the...
Owners Manual
Page 31
Following are sample loads for Sensor Dry Cycles or Manual Cycles will show in the display. Loading • Determine load size by the amount of space the load requires rather than the weight of the ...
Following are sample loads for Sensor Dry Cycles or Manual Cycles will show in the display. Loading • Determine load size by the amount of space the load requires rather than the weight of the ...

Owners Manual
Page 32
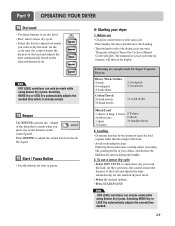
...not press START/PAUSE within 10 minutes. Note Drying will increase drying time and energy consumption, therefore dryer life expectancy could be used with Manual Dry, Time Dry and Rack Dry Cycles. • Press TEMP. Maintenance Clean lint filter Clean the lint filter after all. ■...LESS TIME feature can be shortened after each use and check it before restarting the dryer. Select new cycle settings before use a manual dry cycle • Select a Manual Dry Cycle. • Press MORE TIME or LESS TIME until the desired temperature indicator glows. • (OPTIONAL STEP) If desired...
...not press START/PAUSE within 10 minutes. Note Drying will increase drying time and energy consumption, therefore dryer life expectancy could be used with Manual Dry, Time Dry and Rack Dry Cycles. • Press TEMP. Maintenance Clean lint filter Clean the lint filter after all. ■...LESS TIME feature can be shortened after each use and check it before restarting the dryer. Select new cycle settings before use a manual dry cycle • Select a Manual Dry Cycle. • Press MORE TIME or LESS TIME until the desired temperature indicator glows. • (OPTIONAL STEP) If desired...
Owners Manual
Page 34
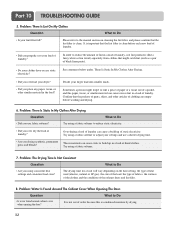
Please refer to the manual section on the heat setting, the type of heat used (electric, natural or LP gas), the size of the load, the type of fabrics, the ...
Please refer to the manual section on the heat setting, the type of heat used (electric, natural or LP gas), the size of the load, the type of fabrics, the ...


