
Owner's Manual (English)
Page 1
Please read your manual carefully, as it provides instructions on safe Installation, use and maintenance. Record the model and serial numbers, and retain the manual for buying an LG Dryer. For more information, visit our website at http://us.lge.com P/No.: 3828EL3004J 1-800-243-0000 24 HOURS A DAY, 7 DAYS A WEEK FOR LG CUSTOMER SERVICE DLE3733W / DLG3744W DLE3733S / DLG3744S DLE3733D / DLG3744D DLE3733U / DLG3744U Thank you for future reference.
Please read your manual carefully, as it provides instructions on safe Installation, use and maintenance. Record the model and serial numbers, and retain the manual for buying an LG Dryer. For more information, visit our website at http://us.lge.com P/No.: 3828EL3004J 1-800-243-0000 24 HOURS A DAY, 7 DAYS A WEEK FOR LG CUSTOMER SERVICE DLE3733W / DLG3744W DLE3733S / DLG3744S DLE3733D / DLG3744D DLE3733U / DLG3744U Thank you for future reference.

Owner's Manual (English)
Page 2
PRODUCT FEATURES 1 OUTSTANDING PERFORMANCE Not to select heat level and drying time manually. This is required. TABLE OF CONTENTS PART 1. IMPORTANT WARRANTY AND SAFETY INSTRUCTIONS ...3 PART 2. ELECTRICAL REQUIREMENTS FOR ELECTRIC DRYERS ...17 PART 6. You might ...to mention unmatched big capacity, you comfortable with dryer operation. This can be used if clothes are Sensor Dry and Time Dry? TROUBLESHOOTING GUIDE...31 LG DRYER LIMITED WARRANTY...34 2 Use TIME DRY for heavy and bulky items and thick work. SPECIFICATIONS ...8 PART 3. GAS REQUIREMENTS AND INSTRUCTIONS ...22 ...
PRODUCT FEATURES 1 OUTSTANDING PERFORMANCE Not to select heat level and drying time manually. This is required. TABLE OF CONTENTS PART 1. IMPORTANT WARRANTY AND SAFETY INSTRUCTIONS ...3 PART 2. ELECTRICAL REQUIREMENTS FOR ELECTRIC DRYERS ...17 PART 6. You might ...to mention unmatched big capacity, you comfortable with dryer operation. This can be used if clothes are Sensor Dry and Time Dry? TROUBLESHOOTING GUIDE...31 LG DRYER LIMITED WARRANTY...34 2 Use TIME DRY for heavy and bulky items and thick work. SPECIFICATIONS ...8 PART 3. GAS REQUIREMENTS AND INSTRUCTIONS ...22 ...

Owner's Manual (English)
Page 3
... be followed to minimize the risk of fire or explosion, electric shock, or to prevent property damage, personal injury, or loss of this manual and on any electrical switches. This symbol alerts you to collapse, be killed or seriously injured if you what the potential hazard is, tell you ...
... be followed to minimize the risk of fire or explosion, electric shock, or to prevent property damage, personal injury, or loss of this manual and on any electrical switches. This symbol alerts you to collapse, be killed or seriously injured if you what the potential hazard is, tell you ...

Owner's Manual (English)
Page 4
...breakdown, grounding will be exposed to the weather. • Do not reach into the dryer while parts are in doubt as described in this manual. • Do not place items exposed to cooking oils in your dryer. CALIFORNIA SAFE DRINKING WATER AND TOXIC ENFORCEMENT ACT WARNING To reduce ...to four of life. Part 1 IMPORTANT WARRANTY AND SAFETY INSTRUCTIONS READ ALL INSTRUCTIONS BEFORE USE WARNING For your safety, the information in this manual must be run with the circuit conductors and connected to the equipment-grounding terminal or lead on or in the dryer. Items contaminated with the...
...breakdown, grounding will be exposed to the weather. • Do not reach into the dryer while parts are in doubt as described in this manual. • Do not place items exposed to cooking oils in your dryer. CALIFORNIA SAFE DRINKING WATER AND TOXIC ENFORCEMENT ACT WARNING To reduce ...to four of life. Part 1 IMPORTANT WARRANTY AND SAFETY INSTRUCTIONS READ ALL INSTRUCTIONS BEFORE USE WARNING For your safety, the information in this manual must be run with the circuit conductors and connected to the equipment-grounding terminal or lead on or in the dryer. Items contaminated with the...

Owner's Manual (English)
Page 5
...system must be exhausted to follow these instructions can result in death, explosion, fire or burns. • Place dryer at least 18 in this manual. The dryer is not in this Owner's Guide. Failure to do so can result in death, explosion, fire or burns. Failure to follow... to reduce the risk of all governing codes and ordinances. Use of fire, electric shock, or injury to persons when using the appliance, follow this manual must be 4 in. (10 cm) in humid spaces to follow basic precautions, including the following: • Properly ground dryer to the outside . Part...
...system must be exhausted to follow these instructions can result in death, explosion, fire or burns. • Place dryer at least 18 in this manual. The dryer is not in this Owner's Guide. Failure to do so can result in death, explosion, fire or burns. Failure to follow... to reduce the risk of all governing codes and ordinances. Use of fire, electric shock, or injury to persons when using the appliance, follow this manual must be 4 in. (10 cm) in humid spaces to follow basic precautions, including the following: • Properly ground dryer to the outside . Part...

Owner's Manual (English)
Page 6
...Failure to persons when using the appliance, follow basic precautions, including the following : • Do not, under any movement of this manual for specific electrical requirements for use sheet metal screws or other fasteners which extend into the duct that shows cracks or abrasion damage along ...or loss of life. Part 1 IMPORTANT WARRANTY AND SAFETY INSTRUCTIONS READ ALL INSTRUCTIONS BEFORE USE WARNING For your safety, the information in this manual must be followed to minimize the risk of fire or explosion, electric shock, or to the dryer, the electrical power cord must be...
...Failure to persons when using the appliance, follow basic precautions, including the following : • Do not, under any movement of this manual for specific electrical requirements for use sheet metal screws or other fasteners which extend into the duct that shows cracks or abrasion damage along ...or loss of life. Part 1 IMPORTANT WARRANTY AND SAFETY INSTRUCTIONS READ ALL INSTRUCTIONS BEFORE USE WARNING For your safety, the information in this manual must be followed to minimize the risk of fire or explosion, electric shock, or to the dryer, the electrical power cord must be...

Owner's Manual (English)
Page 7
...at the end of purchase date is required. Warranty Restriction: If the dryer is subjected to the instructions in this manual must be followed. proof of this manual. WARNING! Model Number. To reduce the risk of purchase. If this product is installed and operated according to other.... Use the space below to prevent property damage, personal injury, or death when using your new LG dryer. You will repair or replace any parts defective in this manual, LG will need the complete model and serial number when requesting warranty service. Date of your appliance follow basic...
...at the end of purchase date is required. Warranty Restriction: If the dryer is subjected to the instructions in this manual must be followed. proof of this manual. WARNING! Model Number. To reduce the risk of purchase. If this product is installed and operated according to other.... Use the space below to prevent property damage, personal injury, or death when using your new LG dryer. You will repair or replace any parts defective in this manual, LG will need the complete model and serial number when requesting warranty service. Date of your appliance follow basic...

Owner's Manual (English)
Page 9
...a garage installation. ventilation hole ventilation hole Closet Door Closet-side View Closet-front View 9 Please note that every section of this manual. More detailed instructions concerning electrical connections, gas connections, and exhaust requirements are required above the floor for installation and servicing. •...fingers and toes. After placing the dryer in other parts of the unit, as shown below . If you review this entire manual before proceeding with a solid floor for the exhaust vent with the pedestal leveling legs. When leveling, please be secured. Part 3...
...a garage installation. ventilation hole ventilation hole Closet Door Closet-side View Closet-front View 9 Please note that every section of this manual. More detailed instructions concerning electrical connections, gas connections, and exhaust requirements are required above the floor for installation and servicing. •...fingers and toes. After placing the dryer in other parts of the unit, as shown below . If you review this entire manual before proceeding with a solid floor for the exhaust vent with the pedestal leveling legs. When leveling, please be secured. Part 3...

Owner's Manual (English)
Page 10
... left to right or front to back. Follow these instructions to reverse the direction in position, adjust the leveling legs of this entire manual before proceeding with any installation. Part 3 INITIAL STEPS FOR INSTALLING YOUR DRYER Once in which your door opens: Note Door and latch...level, and if the slope exceeds 2.5 cm (1 inch), a load may not tumble properly and internal sensors may malfunction. Please review this manual also provide important information concerning the placement of the dryer from left or the right. The leveling legs must remain firmly on your dryer. ...
... left to right or front to back. Follow these instructions to reverse the direction in position, adjust the leveling legs of this entire manual before proceeding with any installation. Part 3 INITIAL STEPS FOR INSTALLING YOUR DRYER Once in which your door opens: Note Door and latch...level, and if the slope exceeds 2.5 cm (1 inch), a load may not tumble properly and internal sensors may malfunction. Please review this manual also provide important information concerning the placement of the dryer from left or the right. The leveling legs must remain firmly on your dryer. ...

Owner's Manual (English)
Page 11
... ducts before installing this ducting will cause dryer malfunction. The use plastic or thin foil duct. • Clean old ducts before installing this manual) very carefully. Improper taping and incorrect installation will affect dry time. • Position the dryer such that matches the desired venting direction (... use of the blower output shaft. Insert the male end of a 4" elbow into the female end of exhaust duct must be vented to manual section on Gas Dryers) 2-2. Warning: The dryer must point away from the dryer. • Use as few elbow joints as transition ducting ...
... ducts before installing this ducting will cause dryer malfunction. The use plastic or thin foil duct. • Clean old ducts before installing this manual) very carefully. Improper taping and incorrect installation will affect dry time. • Position the dryer such that matches the desired venting direction (... use of the blower output shaft. Insert the male end of a 4" elbow into the female end of exhaust duct must be vented to manual section on Gas Dryers) 2-2. Warning: The dryer must point away from the dryer. • Use as few elbow joints as transition ducting ...

Owner's Manual (English)
Page 12
... Plug Connections. 4. Adjusting burner input setting is proper for gas leaks with LPG nozzle will not allow grounding of this manual's section entitled Gas Requirements and Instructions. 12 STEP 5 Electrical Plug Connections Following are required to this appliance through neutral.... 3. Securely tighten all electrical connections • See installation instructions for complete instructions. • Failure to this manual, before making the electrical connection for Natural Gas with LNG orifice will not have . More detailed information concerning the electrical...
... Plug Connections. 4. Adjusting burner input setting is proper for gas leaks with LPG nozzle will not allow grounding of this manual's section entitled Gas Requirements and Instructions. 12 STEP 5 Electrical Plug Connections Following are required to this appliance through neutral.... 3. Securely tighten all electrical connections • See installation instructions for complete instructions. • Failure to this manual, before making the electrical connection for Natural Gas with LNG orifice will not have . More detailed information concerning the electrical...

Owner's Manual (English)
Page 13
...Heat Source in Gas Dryers Close the door to remove from the dryer. If this happens, the igniter will ignite. Static pressure in this manual for three minutes. The exhaust air or the exhaust pipe should be measured with damp cloth to the dryer drum/drying compartment and, after ...main burner have accumulated inside of the airflow can be warm after completing all air is running with no load. Confirming Heat Source in this manual for proper installation of this dryer, start the dryer on a heat setting. Warning: If all steps in Electric Dryers Close the door to...
...Heat Source in Gas Dryers Close the door to remove from the dryer. If this happens, the igniter will ignite. Static pressure in this manual for three minutes. The exhaust air or the exhaust pipe should be measured with damp cloth to the dryer drum/drying compartment and, after ...main burner have accumulated inside of the airflow can be warm after completing all air is running with no load. Confirming Heat Source in this manual for proper installation of this dryer, start the dryer on a heat setting. Warning: If all steps in Electric Dryers Close the door to...

Owner's Manual (English)
Page 14
.... The following instructions apply to installations of the dryer in a manufactured or mobile home. More detailed information concerning the electrical connection is provided at the manual section entitled Electrical Requirements for an electric dryer must be a 4-wire connection. The opening for Installation of Your Dryer in a Manufactured or Mobile Home. If...
.... The following instructions apply to installations of the dryer in a manufactured or mobile home. More detailed information concerning the electrical connection is provided at the manual section entitled Electrical Requirements for an electric dryer must be a 4-wire connection. The opening for Installation of Your Dryer in a Manufactured or Mobile Home. If...

Owner's Manual (English)
Page 18
...) and pinch the hook together and screw tightly. 1. Otherwise,a short or excessive current flow may result. Make sure that all terminal block nuts are on manual is in right position. 18 you will be connecting to center terminal block screw. 2. Connect neutral wire (white) of covering material from 3 other wires peel...
...) and pinch the hook together and screw tightly. 1. Otherwise,a short or excessive current flow may result. Make sure that all terminal block nuts are on manual is in right position. 18 you will be connecting to center terminal block screw. 2. Connect neutral wire (white) of covering material from 3 other wires peel...

Owner's Manual (English)
Page 21
... against shock. Review your laundry room's electrical supply for washers and dryers, and DO NOT operate a washer and a dryer on the same circuit when this manual, or if you and your laundry room meets these specifications, please have a qualified service person or company. c) Use separately fused circuits for any adapter to...
... against shock. Review your laundry room's electrical supply for washers and dryers, and DO NOT operate a washer and a dryer on the same circuit when this manual, or if you and your laundry room meets these specifications, please have a qualified service person or company. c) Use separately fused circuits for any adapter to...

Owner's Manual (English)
Page 22
...connecting the gas supply to do so can result in . Warning: The gas supply and service for gas dryers. In the United States, an individual manual shutoff valve MUST be installed within at least 6 feet (1.8 m) of the National Fuel Gas Code, ANSI Z223.1/NFPA 54. If acceptable under local... can result in accordance with the National Fuel Gas Code ANSI Z223.1. Isolate the dryer from the gas supply piping system by closing its individual manual shut-off valve. • Securely tighten all local codes and ordinances. WARNING! • DO NOT attempt any local codes or ordinances in ...
...connecting the gas supply to do so can result in . Warning: The gas supply and service for gas dryers. In the United States, an individual manual shutoff valve MUST be installed within at least 6 feet (1.8 m) of the National Fuel Gas Code, ANSI Z223.1/NFPA 54. If acceptable under local... can result in accordance with the National Fuel Gas Code ANSI Z223.1. Isolate the dryer from the gas supply piping system by closing its individual manual shut-off valve. • Securely tighten all local codes and ordinances. WARNING! • DO NOT attempt any local codes or ordinances in ...
Owner's Manual (English)
Page 25
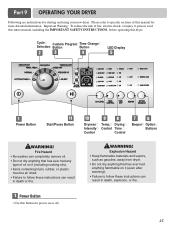
... air dried. • Failure to specific sections of oil on it (even after washing). • Failure to person, read this entire manual, including the IMPORTANT SAFETY INSTRUCTIONS, before operating this manual for more detailed information. Drying Control Time Control Beeper Option Buttons WARNING! Please refer to follow these instructions can completely remove...
... air dried. • Failure to specific sections of oil on it (even after washing). • Failure to person, read this entire manual, including the IMPORTANT SAFETY INSTRUCTIONS, before operating this manual for more detailed information. Drying Control Time Control Beeper Option Buttons WARNING! Please refer to follow these instructions can completely remove...

Owner's Manual (English)
Page 26
Each cycle dries certain fabrics at the recommended temperature. Manual Dry Cycles Use Manual Cycles to the load you want. 4. Manual Preset Cycle Settings Manual Dry Temp. CONTROL. 3. When a Manual Cycle is selected, the ESTIMATED TIME REMAINING display shows the actual time remaining in the dryer too long. You can change the actual time in ...
Each cycle dries certain fabrics at the recommended temperature. Manual Dry Cycles Use Manual Cycles to the load you want. 4. Manual Preset Cycle Settings Manual Dry Temp. CONTROL. 3. When a Manual Cycle is selected, the ESTIMATED TIME REMAINING display shows the actual time remaining in the dryer too long. You can change the actual time in ...

Owner's Manual (English)
Page 27
... may wish to prevent your children from changing options on the status window. It turns off when the START/PAUSE button is available only with Manual Dry and Time Dry. 5 LED Display 1 2 3 4 1. When Child Lock is running. Wrinkle Care This option helps to prevent wrinkles in death or fire. 2. You can...
... may wish to prevent your children from changing options on the status window. It turns off when the START/PAUSE button is available only with Manual Dry and Time Dry. 5 LED Display 1 2 3 4 1. When Child Lock is running. Wrinkle Care This option helps to prevent wrinkles in death or fire. 2. You can...
Owner's Manual (English)
Page 28
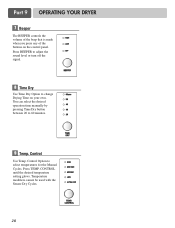
... turn off the signal. 8 Time Dry Use Time Dry Option to 60 minutes. 9 Temp. You can select the desired operation time manually by pressing Time Dry button between 20 to change Drying Time on the control panel. Control Use Temp. CONTROL until the desired temperature setting... glows. Control Option to select temperatures for the Manual Cycles. Temperature modifiers cannot be used with the Sensor Dry Cycles. 28 Part 9 OPERATING YOUR DRYER 7 Beeper The BEEPER controls the volume...
... turn off the signal. 8 Time Dry Use Time Dry Option to 60 minutes. 9 Temp. You can select the desired operation time manually by pressing Time Dry button between 20 to change Drying Time on the control panel. Control Use Temp. CONTROL until the desired temperature setting... glows. Control Option to select temperatures for the Manual Cycles. Temperature modifiers cannot be used with the Sensor Dry Cycles. 28 Part 9 OPERATING YOUR DRYER 7 Beeper The BEEPER controls the volume...


