
Owner's Manual (English)
Page 1
1-800-243-0000 24 HOURS A DAY, 7 DAYS A WEEK FOR LG CUSTOMER SERVICE DLE3733W / DLG3744W DLE3733S / DLG3744S DLE3733D / DLG3744D DLE3733U / DLG3744U Thank you for future reference. For more information, visit our website at http://us.lge.com P/No.: 3828EL3004J Record the model and serial numbers, and retain the manual for buying an LG Dryer. Please read your manual carefully, as it provides instructions on safe Installation, use and maintenance.
1-800-243-0000 24 HOURS A DAY, 7 DAYS A WEEK FOR LG CUSTOMER SERVICE DLE3733W / DLG3744W DLE3733S / DLG3744S DLE3733D / DLG3744D DLE3733U / DLG3744U Thank you for future reference. For more information, visit our website at http://us.lge.com P/No.: 3828EL3004J Record the model and serial numbers, and retain the manual for buying an LG Dryer. Please read your manual carefully, as it provides instructions on safe Installation, use and maintenance.

Owner's Manual (English)
Page 2
... Time Dry? SPECIFICATIONS ...8 PART 3. ELECTRICAL REQUIREMENTS FOR GAS DRYERS...21 PART 7. OPERATING YOUR DRYER ...25 PART 10. TABLE OF CONTENTS PART 1. TROUBLESHOOTING GUIDE...31 LG DRYER LIMITED WARRANTY...34 2 Your dryer provides sensor drying and time drying programs. Sensor Dry The dryer senses the dampness of user-friendly functions always... STEPS FOR INSTALLING YOUR DRYER ...9 PART 4. EXHAUST REQUIREMENTS AND MAINTENANCE ...23 PART 9. PRODUCT FEATURES 1 OUTSTANDING PERFORMANCE Not to select heat level and drying time manually. ACCESSORIES INSTALLATION ...15 PART 5.
... Time Dry? SPECIFICATIONS ...8 PART 3. ELECTRICAL REQUIREMENTS FOR GAS DRYERS...21 PART 7. OPERATING YOUR DRYER ...25 PART 10. TABLE OF CONTENTS PART 1. TROUBLESHOOTING GUIDE...31 LG DRYER LIMITED WARRANTY...34 2 Your dryer provides sensor drying and time drying programs. Sensor Dry The dryer senses the dampness of user-friendly functions always... STEPS FOR INSTALLING YOUR DRYER ...9 PART 4. EXHAUST REQUIREMENTS AND MAINTENANCE ...23 PART 9. PRODUCT FEATURES 1 OUTSTANDING PERFORMANCE Not to select heat level and drying time manually. ACCESSORIES INSTALLATION ...15 PART 5.

Owner's Manual (English)
Page 3
...WARNING To reduce the risk of all safety messages. Follow the gas supplier's instructions carefully. 5. We have provided many important safety messages in this manual and on any other flammable vapors and liquids in the vicinity of fire. • Do not store or use any electrical switches. This symbol ... gas or electrical appliance. 2. Part 1 IMPORTANT WARRANTY AND SAFETY INSTRUCTIONS READ ALL INSTRUCTIONS BEFORE USE WARNING For your safety, the information in this manual must be easily crushed, and trap lint. Do not try to the manufacturer's instructions and local codes.
...WARNING To reduce the risk of all safety messages. Follow the gas supplier's instructions carefully. 5. We have provided many important safety messages in this manual and on any other flammable vapors and liquids in the vicinity of fire. • Do not store or use any electrical switches. This symbol ... gas or electrical appliance. 2. Part 1 IMPORTANT WARRANTY AND SAFETY INSTRUCTIONS READ ALL INSTRUCTIONS BEFORE USE WARNING For your safety, the information in this manual must be easily crushed, and trap lint. Do not try to the manufacturer's instructions and local codes.

Owner's Manual (English)
Page 4
Part 1 IMPORTANT WARRANTY AND SAFETY INSTRUCTIONS READ ALL INSTRUCTIONS BEFORE USE WARNING For your safety, the information in this manual must be followed to minimize the risk of fire or explosion, electric shock, or to prevent property damage, personal injury, or loss of the dryer... this Use and Care Guide or in published user-repair instructions that is properly grounded. This appliance must be exposed to cooking oils in this manual. • Do not place items exposed to the weather. • Do not reach into an appropriate outlet that you are moving . • Do not repair...
Part 1 IMPORTANT WARRANTY AND SAFETY INSTRUCTIONS READ ALL INSTRUCTIONS BEFORE USE WARNING For your safety, the information in this manual must be followed to minimize the risk of fire or explosion, electric shock, or to prevent property damage, personal injury, or loss of the dryer... this Use and Care Guide or in published user-repair instructions that is properly grounded. This appliance must be exposed to cooking oils in this manual. • Do not place items exposed to the weather. • Do not reach into an appropriate outlet that you are moving . • Do not repair...

Owner's Manual (English)
Page 5
... the appliance, follow these instructions can cause serious injury,fire, electrical shock or death. • Do not install the washer in this manual must be followed to minimize the risk of fire or explosion, electric shock, or to the weather. Failure to the outside. All repairs...injury,fire, electrical shock or death. • Connect to a properly rated, protected, and sized power circuit to do so can result in this manual. Failure to avoid electrical overload. Failure to follow these instructions can result in death, explosion, fire or burns. • Place dryer at least...
... the appliance, follow these instructions can cause serious injury,fire, electrical shock or death. • Do not install the washer in this manual must be followed to minimize the risk of fire or explosion, electric shock, or to the weather. Failure to the outside. All repairs...injury,fire, electrical shock or death. • Connect to a properly rated, protected, and sized power circuit to do so can result in this manual. Failure to avoid electrical overload. Failure to follow these instructions can result in death, explosion, fire or burns. • Place dryer at least...

Owner's Manual (English)
Page 6
... injury to persons when using the appliance, follow these instructions can result in electrical shock or injury • Refer to the installation instructions in this manual must be used between the dryer and the wall. Secure all power cords that could cause a fire hazard from fire and electrical shock. 6 This will... its length or at either end. Part 1 IMPORTANT WARRANTY AND SAFETY INSTRUCTIONS READ ALL INSTRUCTIONS BEFORE USE WARNING For your safety, the information in this manual for specific electrical requirements for use of life.
... injury to persons when using the appliance, follow these instructions can result in electrical shock or injury • Refer to the installation instructions in this manual must be used between the dryer and the wall. Secure all power cords that could cause a fire hazard from fire and electrical shock. 6 This will... its length or at either end. Part 1 IMPORTANT WARRANTY AND SAFETY INSTRUCTIONS READ ALL INSTRUCTIONS BEFORE USE WARNING For your safety, the information in this manual for specific electrical requirements for use of life.

Owner's Manual (English)
Page 7
..., all warranty coverage is installed and operated according to prevent property damage, personal injury, or death when using your safety, the recommendations in this manual. proof of this manual, LG will need the complete model and serial number when requesting warranty service. Date of your receipt here for convenience when contacting service. 7 WARNING...
..., all warranty coverage is installed and operated according to prevent property damage, personal injury, or death when using your safety, the recommendations in this manual. proof of this manual, LG will need the complete model and serial number when requesting warranty service. Date of your receipt here for convenience when contacting service. 7 WARNING...

Owner's Manual (English)
Page 9
...please refer to STEP 9 for additional instructions. 38.7" (98.3 cm) 49.8" (126.4 cm) Certain minimum clearances are provided in other parts of this manual. Choose a location with comparable ventilation openings is also acceptable. 27" (68.6 cm) 29.96" (76.1 cm) * Most installations require a minimum ... for companion appliances. • For closet installations, the picture below . STEP 1 Positioning the Dryer. If you review this manual provides important information regarding the preparation and use . Note Leveling legs should be cautious not to level with any installation or use...
...please refer to STEP 9 for additional instructions. 38.7" (98.3 cm) 49.8" (126.4 cm) Certain minimum clearances are provided in other parts of this manual. Choose a location with comparable ventilation openings is also acceptable. 27" (68.6 cm) 29.96" (76.1 cm) * Most installations require a minimum ... for companion appliances. • For closet installations, the picture below . STEP 1 Positioning the Dryer. If you review this manual provides important information regarding the preparation and use . Note Leveling legs should be cautious not to level with any installation or use...

Owner's Manual (English)
Page 10
..., and if the slope exceeds 2.5 cm (1 inch), a load may not tumble properly and internal sensors may malfunction. Please review this manual also provide important information concerning the placement of this entire manual before proceeding with any installation. Note: Other sections of and clearances for Reversing the Door The door on the floor...
..., and if the slope exceeds 2.5 cm (1 inch), a load may not tumble properly and internal sensors may malfunction. Please review this manual also provide important information concerning the placement of this entire manual before proceeding with any installation. Note: Other sections of and clearances for Reversing the Door The door on the floor...

Owner's Manual (English)
Page 11
... foil duct. • Rigid or semi-rigid metal ducting is recommended for use as possible. • Use duct tape on all others in order to manual section on pipe walls. • PLEASE BE AWARE THAT FAILURE TO EXHAUST THE DRYER CORRECTLY WILL VOID THE DRYER'S WARRANTY. 3-1. Please follow the instructions (and... in the dryer and push the female end of the elbow onto the male end of this assembly elbow first through unheated areas in this manual) very carefully. Insert the male end of a 4" elbow into the female end of exhaust duct must point away from the dryer. • Use as few...
... foil duct. • Rigid or semi-rigid metal ducting is recommended for use as possible. • Use duct tape on all others in order to manual section on pipe walls. • PLEASE BE AWARE THAT FAILURE TO EXHAUST THE DRYER CORRECTLY WILL VOID THE DRYER'S WARRANTY. 3-1. Please follow the instructions (and... in the dryer and push the female end of the elbow onto the male end of this assembly elbow first through unheated areas in this manual) very carefully. Insert the male end of a 4" elbow into the female end of exhaust duct must point away from the dryer. • Use as few...

Owner's Manual (English)
Page 12
... concerning making electrical connections. • Connect neutral wire (white or center wire) to install or use in a clothes dryer. 2. Refer to manual section on Gas Requirements and Instructions. 1 2 5 3 4 1. Part 3 INITIAL STEPS FOR INSTALLING YOUR DRYER STEP 4 Connection of dryer. ...amp power supply cord. • Use a UL approved strain relief. • Disconnect power before making the electrical connection for use this manual, before taking any problem with a 3/8" NPT gas connection. 2. Gas Connection. For instance, using a new flexible stainless steel connector (...
... concerning making electrical connections. • Connect neutral wire (white or center wire) to install or use in a clothes dryer. 2. Refer to manual section on Gas Requirements and Instructions. 1 2 5 3 4 1. Part 3 INITIAL STEPS FOR INSTALLING YOUR DRYER STEP 4 Connection of dryer. ...amp power supply cord. • Use a UL approved strain relief. • Disconnect power before making the electrical connection for use this manual, before taking any problem with a 3/8" NPT gas connection. 2. Gas Connection. For instance, using a new flexible stainless steel connector (...

Owner's Manual (English)
Page 13
... all steps in Gas Dryers Close the door to the first use of this appliance, use allpurpose cleaning products or a solution of this manual for proper installation of the dryer drum/drying compartment any dust or dirt that may go off before the gas and the main burner have... accumulated inside of this happens, the igniter will ignite. Confirming Heat Source in this manual for three minutes. STEP 8 Dryer Airflow. Static pressure in the exhaust duct should be warm after completing all steps in Electric Dryers Close the...
... all steps in Gas Dryers Close the door to the first use of this appliance, use allpurpose cleaning products or a solution of this manual for proper installation of the dryer drum/drying compartment any dust or dirt that may go off before the gas and the main burner have... accumulated inside of this happens, the igniter will ignite. Confirming Heat Source in this manual for three minutes. STEP 8 Dryer Airflow. Static pressure in the exhaust duct should be warm after completing all steps in Electric Dryers Close the...

Owner's Manual (English)
Page 14
More detailed information concerning the electrical connection is provided at the manual section entitled Electrical Requirements for an electric dryer must be at least 25 in2 (163 cm2). 8) It is recommended that venting materials are not supplied ...
More detailed information concerning the electrical connection is provided at the manual section entitled Electrical Requirements for an electric dryer must be at least 25 in2 (163 cm2). 8) It is recommended that venting materials are not supplied ...

Owner's Manual (English)
Page 18
... a fused disconnect or circuit breaker box. 3-wire direct If this type is connected to center screw. 4. Make sure that all terminal block nuts are on manual is available at your home. Connect ground wire (green) of power cord to external ground screw and move neutral ground wire of length in order...
... a fused disconnect or circuit breaker box. 3-wire direct If this type is connected to center screw. 4. Make sure that all terminal block nuts are on manual is available at your home. Connect ground wire (green) of power cord to external ground screw and move neutral ground wire of length in order...

Owner's Manual (English)
Page 21
... 120 VOLT, 60 HERTZ, 3-WIRE EFFECTIVELY GROUNDED CIRCUIT WARNING! • Do not overload the circuit by operating other appliances on the same circuit when this manual, or if you and your dryer. The plug should be installed in your laundry room by using an extension cord to connect the dryer to...
... 120 VOLT, 60 HERTZ, 3-WIRE EFFECTIVELY GROUNDED CIRCUIT WARNING! • Do not overload the circuit by operating other appliances on the same circuit when this manual, or if you and your dryer. The plug should be installed in your laundry room by using an extension cord to connect the dryer to...

Owner's Manual (English)
Page 22
.... 22 5. Do not attempt to connect the dryer to inspect for lengths in death, explosion, or fire. In the United States, an individual manual shutoff valve MUST be provided at test pressure equal to or less than 20 feet (6.1 m). pipe plug must comply with the National Fuel Gas Code... pressure testing of the National Fuel Gas Code, ANSI Z223.1/NFPA 54. Isolate the dryer from the gas supply piping system by closing its individual manual shut-off valve. • Securely tighten all pipe threads. • Purge gas supply of an authorized and qualified service person or company. •...
.... 22 5. Do not attempt to connect the dryer to inspect for lengths in death, explosion, or fire. In the United States, an individual manual shutoff valve MUST be provided at test pressure equal to or less than 20 feet (6.1 m). pipe plug must comply with the National Fuel Gas Code... pressure testing of the National Fuel Gas Code, ANSI Z223.1/NFPA 54. Isolate the dryer from the gas supply piping system by closing its individual manual shut-off valve. • Securely tighten all pipe threads. • Purge gas supply of an authorized and qualified service person or company. •...
Owner's Manual (English)
Page 25
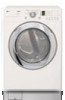
... has ever had anything that has ever had any type of fire, electric shock, or injury to person, read this entire manual, including the IMPORTANT SAFETY INSTRUCTIONS, before operating this manual for more detailed information. Cycle Custom Program Time Change Selection Button Button LED Display Power Button Start/Pause Button Dryness Intensity...
... has ever had anything that has ever had any type of fire, electric shock, or injury to person, read this entire manual, including the IMPORTANT SAFETY INSTRUCTIONS, before operating this manual for more detailed information. Cycle Custom Program Time Change Selection Button Button LED Display Power Button Start/Pause Button Dryness Intensity...

Owner's Manual (English)
Page 26
...Freshen Up Use this cycle to select a specific amount of settings and save them here for drying denims, towels, heavy cottons. Manual Preset Cycle Settings Manual Dry Temp. Change DRY LEVEL and TEMP. Select OPTIONS you to match the cycle to select the desired cycle based on laundry ...Low 32 26 2. Part 9 OPERATING YOUR DRYER 2 Cycle Selection • Turn the knob to the load you are drying. CONTROL. 3. Manual Dry Cycles Use Manual Cycles to remove wrinkles from being left in the load and automatically adjusts the drying time for optimal drying Cotton/Towels Use for one...
...Freshen Up Use this cycle to select a specific amount of settings and save them here for drying denims, towels, heavy cottons. Manual Preset Cycle Settings Manual Dry Temp. Change DRY LEVEL and TEMP. Select OPTIONS you to match the cycle to select the desired cycle based on laundry ...Low 32 26 2. Part 9 OPERATING YOUR DRYER 2 Cycle Selection • Turn the knob to the load you are drying. CONTROL. 3. Manual Dry Cycles Use Manual Cycles to remove wrinkles from being left in the load and automatically adjusts the drying time for optimal drying Cotton/Towels Use for one...

Owner's Manual (English)
Page 27
.... 1. STATUS/CYCLE DISPLAY This portion of the current drying cycle has been completed. 4. It turns off when the START/PAUSE button is available only with Manual Dry and Time Dry. 5 LED Display 1 2 3 4 1. CHECK FILTER REMINDER The display will be displayed in your children from changing options on the status window. When...
.... 1. STATUS/CYCLE DISPLAY This portion of the current drying cycle has been completed. 4. It turns off when the START/PAUSE button is available only with Manual Dry and Time Dry. 5 LED Display 1 2 3 4 1. CHECK FILTER REMINDER The display will be displayed in your children from changing options on the status window. When...
Owner's Manual (English)
Page 28
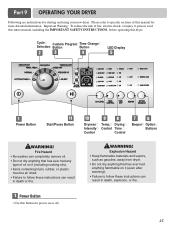
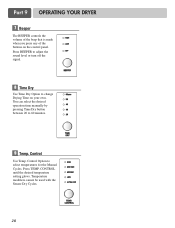
.... Control Use Temp. Press TEMP. CONTROL until the desired temperature setting glows. You can select the desired operation time manually by pressing Time Dry button between 20 to select temperatures for the Manual Cycles. Press BEEPER to adjust the sound level or turn off the signal. 8 Time Dry Use Time Dry Option...
.... Control Use Temp. Press TEMP. CONTROL until the desired temperature setting glows. You can select the desired operation time manually by pressing Time Dry button between 20 to select temperatures for the Manual Cycles. Press BEEPER to adjust the sound level or turn off the signal. 8 Time Dry Use Time Dry Option...


