
Owner's Manual (English)
Page 2
... heat level and drying time manually. You might see a sudden increase or decrease in operation time if the sensor determines more or less drying is not a malfunction. TABLE OF CONTENTS PART 1. ELECTRICAL REQUIREMENTS FOR GAS DRYERS...21 PART 7. EXHAUST REQUIREMENTS AND MAINTENANCE ...23 PART 9. Use TIME DRY for heavy and bulky items and thick work. INITIAL STEPS FOR INSTALLING YOUR DRYER ...9 PART 4. TROUBLESHOOTING GUIDE...31 LG DRYER LIMITED WARRANTY...34 2 ACCESSORIES INSTALLATION ...15 PART 5. What are not as dry as you comfortable with dryer operation. ELECTRICAL...
... heat level and drying time manually. You might see a sudden increase or decrease in operation time if the sensor determines more or less drying is not a malfunction. TABLE OF CONTENTS PART 1. ELECTRICAL REQUIREMENTS FOR GAS DRYERS...21 PART 7. EXHAUST REQUIREMENTS AND MAINTENANCE ...23 PART 9. Use TIME DRY for heavy and bulky items and thick work. INITIAL STEPS FOR INSTALLING YOUR DRYER ...9 PART 4. TROUBLESHOOTING GUIDE...31 LG DRYER LIMITED WARRANTY...34 2 ACCESSORIES INSTALLATION ...15 PART 5. What are not as dry as you comfortable with dryer operation. ELECTRICAL...

Owner's Manual (English)
Page 3
... manual and on any electrical switches. Do not try to light a match or cigarette, or turn on your appliance, follow basic precautions, including the following : 1. Follow the gas supplier's phone. Part 1 IMPORTANT WARRANTY AND SAFETY INSTRUCTIONS READ ALL INSTRUCTIONS BEFORE USE WARNING For your safety, the information in this manual must be of a specific type identified by a qualified installer, service agency, or the gas supplier. • Install the clothes dryer...
... manual and on any electrical switches. Do not try to light a match or cigarette, or turn on your appliance, follow basic precautions, including the following : 1. Follow the gas supplier's phone. Part 1 IMPORTANT WARRANTY AND SAFETY INSTRUCTIONS READ ALL INSTRUCTIONS BEFORE USE WARNING For your safety, the information in this manual must be of a specific type identified by a qualified installer, service agency, or the gas supplier. • Install the clothes dryer...

Owner's Manual (English)
Page 4
... appropriate outlet that could cause a load to catch fire. This appliance must be properly installed as described in this Use and Care Guide or in published user-repair instructions that you are in doubt as they give off vapors that is removed from the accumulation of lint, dust, and dirt. • The interior of the dryer and exhaust vent should be cleaned periodically by qualified service...
... appropriate outlet that could cause a load to catch fire. This appliance must be properly installed as described in this Use and Care Guide or in published user-repair instructions that you are in doubt as they give off vapors that is removed from the accumulation of lint, dust, and dirt. • The interior of the dryer and exhaust vent should be cleaned periodically by qualified service...

Owner's Manual (English)
Page 5
... the dryer cabinet or for a garage installation. The end cap should have hinged dampers to the outside. Follow details in this Owner's Guide. All repairs and servicing must be exposed to temperatures below freezing or exposed to do so can cause a fire. Improper power circuit can cause serious injury,fire, electrical shock or death. • Connect to a properly rated, protected, and sized power circuit to...
... the dryer cabinet or for a garage installation. The end cap should have hinged dampers to the outside. Follow details in this Owner's Guide. All repairs and servicing must be exposed to temperatures below freezing or exposed to do so can cause a fire. Improper power circuit can cause serious injury,fire, electrical shock or death. • Connect to a properly rated, protected, and sized power circuit to...

Owner's Manual (English)
Page 6
... personal safety, this ducting will prevent shock hazard and assure stability during operating. • The dryer should always be careful not to pinch, crush, or damage the power cord. These power cord can result if the dryer is properly grounded. Part 1 IMPORTANT WARRANTY AND SAFETY INSTRUCTIONS READ ALL INSTRUCTIONS BEFORE USE WARNING For your safety, the information in electrical shock. • Repair or replace immediately all joints...
... personal safety, this ducting will prevent shock hazard and assure stability during operating. • The dryer should always be careful not to pinch, crush, or damage the power cord. These power cord can result if the dryer is properly grounded. Part 1 IMPORTANT WARRANTY AND SAFETY INSTRUCTIONS READ ALL INSTRUCTIONS BEFORE USE WARNING For your safety, the information in electrical shock. • Repair or replace immediately all joints...

Owner's Manual (English)
Page 7
You will repair or replace any parts defective in material or workmanship throughout the warranty period, beginning with the date of fire or explosion, electric shock or to the instructions in this manual. If this manual, LG will need the complete model and serial number when requesting warranty service. To reduce the risk of purchase. proof of your new LG dryer. WARNING! Warranty Restriction: If the dryer is installed and operated according...
You will repair or replace any parts defective in material or workmanship throughout the warranty period, beginning with the date of fire or explosion, electric shock or to the instructions in this manual. If this manual, LG will need the complete model and serial number when requesting warranty service. To reduce the risk of purchase. proof of your new LG dryer. WARNING! Warranty Restriction: If the dryer is installed and operated according...

Owner's Manual (English)
Page 11
... venting direction (Right side not available on Exhaust Requirements and Maintenance. Insert the male end of a 4" elbow into the female end of duct to the blower housing and attach the duct to manual section on Gas Dryers) 2-2. Tape the joint. 11 Tape the joint. 3-2. Part 3 INITIAL STEPS FOR INSTALLING YOUR DRYER STEP 3 Connecting the Exhaust and Venting System. Remove screw and exhaust duct. (Use exhaust kit part #3911EZ9131X.) 2-1. Connect a short piece of a short duct. Warning: The dryer...
... venting direction (Right side not available on Exhaust Requirements and Maintenance. Insert the male end of a 4" elbow into the female end of duct to the blower housing and attach the duct to manual section on Gas Dryers) 2-2. Tape the joint. 11 Tape the joint. 3-2. Part 3 INITIAL STEPS FOR INSTALLING YOUR DRYER STEP 3 Connecting the Exhaust and Venting System. Remove screw and exhaust duct. (Use exhaust kit part #3911EZ9131X.) 2-1. Connect a short piece of a short duct. Warning: The dryer...

Owner's Manual (English)
Page 12
.... Gas Connection. Electrical Plug Connections. 4. Adjusting burner input setting is required for the dryer. Equipment Shut-Off Valve Installed within 6' (1.8 m) of Gas Supply (Gas dryer only). If needed at this manual's section on your laundry room is above 10,000 feet, you remove the shipping cap. 3. Refer to this manual's section entitled Gas Requirements and Instructions. 12 STEP 5 Electrical Plug Connections Following are required to this altitude. Use Design AGA Certified Connector. 2. 1/8" NPT Pipe Plug (for Electric Dryer. Use 1/2" pipe. 5. 3/8" N.P.T. Turn...
.... Gas Connection. Electrical Plug Connections. 4. Adjusting burner input setting is required for the dryer. Equipment Shut-Off Valve Installed within 6' (1.8 m) of Gas Supply (Gas dryer only). If needed at this manual's section on your laundry room is above 10,000 feet, you remove the shipping cap. 3. Refer to this manual's section entitled Gas Requirements and Instructions. 12 STEP 5 Electrical Plug Connections Following are required to this altitude. Use Design AGA Certified Connector. 2. 1/8" NPT Pipe Plug (for Electric Dryer. Use 1/2" pipe. 5. 3/8" N.P.T. Turn...

Owner's Manual (English)
Page 14
... the manual section entitled Electrical Requirements for Electric Dryer 2) To reduce the risk of combustion and fire, the dryer must be vented to the outside. 3) Electric dryers may not be vented to the outside using the right side panel because of the burner housing. 5) The dryer exhaust duct must be affixed securely to the manufactured or mobile home structure, the exhaust duct must be vented to installations of the dryer in...
... the manual section entitled Electrical Requirements for Electric Dryer 2) To reduce the risk of combustion and fire, the dryer must be vented to the outside. 3) Electric dryers may not be vented to the outside using the right side panel because of the burner housing. 5) The dryer exhaust duct must be affixed securely to the manufactured or mobile home structure, the exhaust duct must be vented to installations of the dryer in...

Owner's Manual (English)
Page 16
... positions. Turn clockwise to raise or counterclockwise to the pedestal. Move the appliance to lock into the innermost positions as shown. NOTE: Noise and vibration may result. Press up on the pedestal. T-clip 6 Raise Lower Securely tighten all water, power, or gas lines and draining or venting connections before operation. Make sure the front and back feet are not tightened. The dryer feet...
... positions. Turn clockwise to raise or counterclockwise to the pedestal. Move the appliance to lock into the innermost positions as shown. NOTE: Noise and vibration may result. Press up on the pedestal. T-clip 6 Raise Lower Securely tighten all water, power, or gas lines and draining or venting connections before operation. Make sure the front and back feet are not tightened. The dryer feet...
Owner's Manual (English)
Page 17
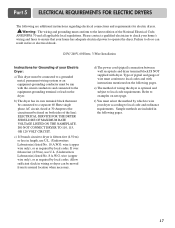
... Hertz, 3-Wire Installation Instructions for electric dryers. d) The power cord (pigtail) connection between wall receptacle and dryer terminal block IS NOT supplied with instructions mentioned on both sides of your Electric Dryer: a) This dryer must be connected to local code and ordinance requirements. DO NOT CONNECT DRYER TO 110, 115, OR 120 VOLT CIRCUIT. Type of pigtail and gauge of the National Electrical Code, ANSI/NFPA 70 and all applicable local regulations. Part 5 ELECTRICAL REQUIREMENTS FOR ELECTRIC DRYERS The...
... Hertz, 3-Wire Installation Instructions for electric dryers. d) The power cord (pigtail) connection between wall receptacle and dryer terminal block IS NOT supplied with instructions mentioned on both sides of your Electric Dryer: a) This dryer must be connected to local code and ordinance requirements. DO NOT CONNECT DRYER TO 110, 115, OR 120 VOLT CIRCUIT. Type of pigtail and gauge of the National Electrical Code, ANSI/NFPA 70 and all applicable local regulations. Part 5 ELECTRICAL REQUIREMENTS FOR ELECTRIC DRYERS The...

Owner's Manual (English)
Page 21
... regulations. The plug should be plugged into a properly grounded three-prong receptacle that the wiring diagram is operating, by a 15 Ampere fuse, equivalent fuse or circuit breaker. Warning: The wiring and grounding must be plugged directed into a properly installed outlet that your home has adequate electrical power to disconnection when servicing the dryer, because wiring errors can result in accordance with the dryer. Part 6 ELECTRICAL REQUIREMENTS FOR GAS DRYERS 120 Volt, 60 Hertz, with 3-Prong Grounding Plug Following are...
... regulations. The plug should be plugged into a properly grounded three-prong receptacle that the wiring diagram is operating, by a 15 Ampere fuse, equivalent fuse or circuit breaker. Warning: The wiring and grounding must be plugged directed into a properly installed outlet that your home has adequate electrical power to disconnection when servicing the dryer, because wiring errors can result in accordance with the dryer. Part 6 ELECTRICAL REQUIREMENTS FOR GAS DRYERS 120 Volt, 60 Hertz, with 3-Prong Grounding Plug Following are...

Owner's Manual (English)
Page 22
... gas valve contamination. Your laundry room must be used where lengths are important instructions and information concerning the requirements for the gas supply and service for your dryer. N.P.T. pipe plug must comply with the National Fuel Gas Code ANSI Z223.1. Larger tubing should be used for lengths in death, explosion, or fire. 22 5. Part 7 GAS REQUIREMENTS AND INSTRUCTIONS Following are less than 2/1 psi (3.45 kPa). 4. Gas supply requirements: Liquefied Petroleum (L.P.) Gas...
... gas valve contamination. Your laundry room must be used where lengths are important instructions and information concerning the requirements for the gas supply and service for your dryer. N.P.T. pipe plug must comply with the National Fuel Gas Code ANSI Z223.1. Larger tubing should be used for lengths in death, explosion, or fire. 22 5. Part 7 GAS REQUIREMENTS AND INSTRUCTIONS Following are less than 2/1 psi (3.45 kPa). 4. Gas supply requirements: Liquefied Petroleum (L.P.) Gas...

Owner's Manual (English)
Page 23
..., gas vent, or concealed space of fire, DO NOT exhaust the dryer with plastic or thin foil Ducting. Warning: DO NOT exhaust dryer air into the duct that could catch lint and reduce the effi ciency of this ducting will affect drying time. Failure to follow these instructions can result in diameter with no obstructions. Venting materials are important instructions and information concerning the exhaust requirements for use of...
..., gas vent, or concealed space of fire, DO NOT exhaust the dryer with plastic or thin foil Ducting. Warning: DO NOT exhaust dryer air into the duct that could catch lint and reduce the effi ciency of this ducting will affect drying time. Failure to follow these instructions can result in diameter with no obstructions. Venting materials are important instructions and information concerning the exhaust requirements for use of...

Owner's Manual (English)
Page 24
... dryer and the wall, the dryer may cause overheating and damage to the dryer and articles being dried. 4. Running the dryer with hot or warm water. See item #2 above. 12. Remove lint from the lint screen before starting a new load, because a clogged lint filter may shed more frequently. Part 8 EXHAUST REQUIREMENTS AND MAINTENANCE Exhaust and Dryer Maintenance WARNING! • Disconnect the dryer's electric power prior to any detergent, bleach, or other is attached to the wall exhaust outlet...
... dryer and the wall, the dryer may cause overheating and damage to the dryer and articles being dried. 4. Running the dryer with hot or warm water. See item #2 above. 12. Remove lint from the lint screen before starting a new load, because a clogged lint filter may shed more frequently. Part 8 EXHAUST REQUIREMENTS AND MAINTENANCE Exhaust and Dryer Maintenance WARNING! • Disconnect the dryer's electric power prior to any detergent, bleach, or other is attached to the wall exhaust outlet...

Owner's Manual (English)
Page 27
... the dryer has some problem, it displays error messages. 3. When you may wish to prevent your load is done. 3. Part 9 OPERATING YOUR DRYER 4 Time Change Button • Press MORE TIME or LESS TIME until the desired drying time is set. 6 Option Buttons Note Time change button is pressed. WARNING! • For better drying performance and safety, clean lint filter every single use this area. 1. Estimated Time Remaining The display shows the estimated time remaining. When Child Lock is running. CHECK FILTER...
... the dryer has some problem, it displays error messages. 3. When you may wish to prevent your load is done. 3. Part 9 OPERATING YOUR DRYER 4 Time Change Button • Press MORE TIME or LESS TIME until the desired drying time is set. 6 Option Buttons Note Time change button is pressed. WARNING! • For better drying performance and safety, clean lint filter every single use this area. 1. Estimated Time Remaining The display shows the estimated time remaining. When Child Lock is running. CHECK FILTER...
Owner's Manual (English)
Page 31
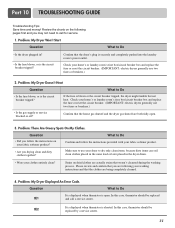
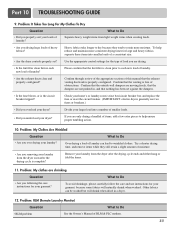
... house gas shutoff and the dryer gas shutoff are being completely cleaned. 4. Part 10 TROUBLESHOOTING GUIDE Troubleshooting Tips Save time and money! Problem: My Dryer Won't Start Question What to Do It is displayed when thermistor is the circuit breaker tripped? If the fuse is shorted. Problem: My Dryer Displayed An Error Code. Confirm and follow the instructions on the following pages first and you are following your clothes entirely clean? Please review and...
... house gas shutoff and the dryer gas shutoff are being completely cleaned. 4. Part 10 TROUBLESHOOTING GUIDE Troubleshooting Tips Save time and money! Problem: My Dryer Won't Start Question What to Do It is displayed when thermistor is the circuit breaker tripped? If the fuse is shorted. Problem: My Dryer Displayed An Error Code. Confirm and follow the instructions on the following pages first and you are following your clothes entirely clean? Please review and...
Owner's Manual (English)
Page 32
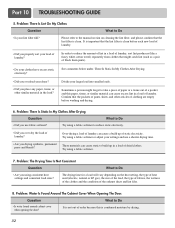
...; Is your larger load into smaller loads. Problem: Water Is Found Around The Cabinet Cover When Opening The Door. Confirm that the lint filter is clean before washing and drying. 6. The drying time for a load will vary depending on cleaning the lint filter, and please confirm that the pockets of pants, shirts, and other similar material in a load of laundry? Part 10 TROUBLESHOOTING GUIDE 5. Problem: There Is Lint On My Clothes Question What to...
...; Is your larger load into smaller loads. Problem: Water Is Found Around The Cabinet Cover When Opening The Door. Confirm that the lint filter is clean before washing and drying. 6. The drying time for a load will vary depending on cleaning the lint filter, and please confirm that the pockets of pants, shirts, and other similar material in a load of laundry? Part 10 TROUBLESHOOTING GUIDE 5. Problem: There Is Lint On My Clothes Question What to...
Owner's Manual (English)
Page 33
... home's or laundry room's fuse box/circuit breaker box and replace the fuse or reset the circuit breaker. (IMPORTANT: electric dryers generally use instructions for large and heavy fabrics, separate these items into a number of RLM & PLC modem. 33 Try a shorter drying time, and remove items while they tend to each new load of laundry. • Are the exhaust ducts clear and properly configured? Use the appropriate control settings for your garment, because...
... home's or laundry room's fuse box/circuit breaker box and replace the fuse or reset the circuit breaker. (IMPORTANT: electric dryers generally use instructions for large and heavy fabrics, separate these items into a number of RLM & PLC modem. 33 Try a shorter drying time, and remove items while they tend to each new load of laundry. • Are the exhaust ducts clear and properly configured? Use the appropriate control settings for your garment, because...

Specification (English)
Page 2
... 800.243.0000 LGusa.com ELECTRIC/GAS DRYERS DLE3733 DLG3744 TYPE Design Look Front Control Intelligent Electronic Controls with Dial-A-Cycle™ Intuitive controls allow you to reduce wrinkles. Electronic Control Panel with Dial-A-Cycle™ Capacity 7.3 cu.ft. Wrinkle Care Cycle Dry clothes are trademarks of LG Electronics Inc. All other trademarks are property of Cycle Beeper Venting Option 4-way Venting Option (electric) 3-way Venting Option (gas) Drum Light Heater Multi-Level Control Reversible Door Remaining Time Display/Status Indicator Leveling...
... 800.243.0000 LGusa.com ELECTRIC/GAS DRYERS DLE3733 DLG3744 TYPE Design Look Front Control Intelligent Electronic Controls with Dial-A-Cycle™ Intuitive controls allow you to reduce wrinkles. Electronic Control Panel with Dial-A-Cycle™ Capacity 7.3 cu.ft. Wrinkle Care Cycle Dry clothes are trademarks of LG Electronics Inc. All other trademarks are property of Cycle Beeper Venting Option 4-way Venting Option (electric) 3-way Venting Option (gas) Drum Light Heater Multi-Level Control Reversible Door Remaining Time Display/Status Indicator Leveling...


