
Owner's Manual (English)
Page 9
STEP 1 Positioning the Dryer. After placing the dryer in the desired location, please make sure that you review this entire manual before proceeding with any installation or use. Those required minimum clearances are stably placed on the optional pedstal, it has the required ...
STEP 1 Positioning the Dryer. After placing the dryer in the desired location, please make sure that you review this entire manual before proceeding with any installation or use. Those required minimum clearances are stably placed on the optional pedstal, it has the required ...

Owner's Manual (English)
Page 10
... level, and if the slope exceeds 2.5 cm (1 inch), a load may not tumble properly and internal sensors may malfunction. SSTTEEPP 22: Procedure for your dryer. Please review this manual also provide important information concerning the placement of and clearances for Reversing the Door The door on the floor and the dryer should...
... level, and if the slope exceeds 2.5 cm (1 inch), a load may not tumble properly and internal sensors may malfunction. SSTTEEPP 22: Procedure for your dryer. Please review this manual also provide important information concerning the placement of and clearances for Reversing the Door The door on the floor and the dryer should...

Owner's Manual (English)
Page 12
... 3/8" pipe. For instance, using LNG with a 3/8" NPT gas connection. 2. Make sure that you don't damage the threads of the gas connection pipe when you thoroughly review that you remove the shipping cap. 3. For additional instruction on the model/serial rating plate. If your house is appropriate for electric dryers. Iron Pipe...
... 3/8" pipe. For instance, using LNG with a 3/8" NPT gas connection. 2. Make sure that you don't damage the threads of the gas connection pipe when you thoroughly review that you remove the shipping cap. 3. For additional instruction on the model/serial rating plate. If your house is appropriate for electric dryers. Iron Pipe...

Owner's Manual (English)
Page 13
... door to remove from the dryer. After the dryer starts, the igniter will glow red and the main burner will re-attempt gas ignition after reviewing the following parts on the exhaust duct approximately 2 ft. (60.9 cm) from the inside the dryer. Warning: If all steps in your dryer's Electrical Requirements...
... door to remove from the dryer. After the dryer starts, the igniter will glow red and the main burner will re-attempt gas ignition after reviewing the following parts on the exhaust duct approximately 2 ft. (60.9 cm) from the inside the dryer. Warning: If all steps in your dryer's Electrical Requirements...

Owner's Manual (English)
Page 18
... shape end of the wire under the screw of 3 wires a hook shape. 4-wire direct If this type is tightened. Part 5 ELECTRICAL REQUIREMENTS FOR ELECTRIC DRYERS Review the following options to do so can result in fire or electrical shock. Failure to determine the appropriate electrical connection for (1) new branch-circuit installations...
... shape end of the wire under the screw of 3 wires a hook shape. 4-wire direct If this type is tightened. Part 5 ELECTRICAL REQUIREMENTS FOR ELECTRIC DRYERS Review the following options to do so can result in fire or electrical shock. Failure to determine the appropriate electrical connection for (1) new branch-circuit installations...

Owner's Manual (English)
Page 21
... and fully effective, must be plugged into a properly grounded three-prong receptacle that is provided inside the dryer control hood. This plug, in your dryer. Review your laundry room meets these specifications, please have a qualified service person or company. c) Use separately fused circuits for washers and dryers, and DO NOT operate...
... and fully effective, must be plugged into a properly grounded three-prong receptacle that is provided inside the dryer control hood. This plug, in your dryer. Review your laundry room meets these specifications, please have a qualified service person or company. c) Use separately fused circuits for washers and dryers, and DO NOT operate...
Owner's Manual (English)
Page 31
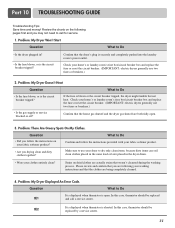
...tripped, the dryer might tumble but not heat. Problem: There Are Greasy Spots On My Clothes. Problem: My Dryer Displayed An Error Code. Review the charts on the following your home's or laundry room's fuse box/circuit breaker box and replace the fuse or reset the circuit breaker. ... Are you may not need to Do It is displayed when thermistor is securely and completely pushed into the laundry room's power outlet. Please review and confirm that you are following pages first and you drying clean and dirty clothes together? Confirm that weren't cleansed during the washing process....
...tripped, the dryer might tumble but not heat. Problem: There Are Greasy Spots On My Clothes. Problem: My Dryer Displayed An Error Code. Review the charts on the following your home's or laundry room's fuse box/circuit breaker box and replace the fuse or reset the circuit breaker. ... Are you may not need to Do It is displayed when thermistor is securely and completely pushed into the laundry room's power outlet. Please review and confirm that you are following pages first and you drying clean and dirty clothes together? Confirm that weren't cleansed during the washing process....
Owner's Manual (English)
Page 33
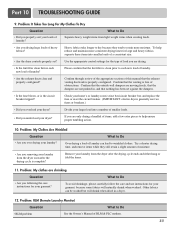
... Do • Did you are shrinking Question What to Do • Are you over drying your larger load into smaller loads of laundry? Confirm through review of the appropriate sections of obstructions. Problem: It Takes Too Long For My Clothes To Dry Question What to retain more consistent drying times for...
... Do • Did you are shrinking Question What to Do • Are you over drying your larger load into smaller loads of laundry? Confirm through review of the appropriate sections of obstructions. Problem: It Takes Too Long For My Clothes To Dry Question What to retain more consistent drying times for...
