
Owners Manual
Page 2
... Appliance 15 Reversing the Door 16 Installing the Vent Kit 17 Stacking the Appliance 18 Venting the Dryer 19 Connecting Gas Dryers 21 Connecting Electric Dryers 24 Final Installation Check 28 OPERATION 28 Before Use 29 Loading the Dryer 31 Control Panel 33 Dry Cycles 36 Cycle Modifiers 37 Options and Extra Functions 39 SMART FUNCTIONS 39 LG ThinQ Application 39 Smart DiagnosisTM Function 40 MAINTENANCE 40 Regular Cleaning 42 TROUBLESHOOTING 42 FAQs 43 Before Calling for Service 47 WARRANTY 47...
... Appliance 15 Reversing the Door 16 Installing the Vent Kit 17 Stacking the Appliance 18 Venting the Dryer 19 Connecting Gas Dryers 21 Connecting Electric Dryers 24 Final Installation Check 28 OPERATION 28 Before Use 29 Loading the Dryer 31 Control Panel 33 Dry Cycles 36 Cycle Modifiers 37 Options and Extra Functions 39 SMART FUNCTIONS 39 LG ThinQ Application 39 Smart DiagnosisTM Function 40 MAINTENANCE 40 Regular Cleaning 42 TROUBLESHOOTING 42 FAQs 43 Before Calling for Service 47 WARRANTY 47...
Owners Manual
Page 4
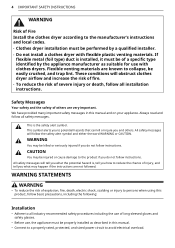
... collapse, be easily crushed, and trap lint. 4 IMPORTANT SAFETY INSTRUCTIONS WARNING Risk of Fire Install the clothes dryer according to the manufacturer's instructions and local codes. • Clothes dryer installation must be properly installed as suitable for use , the appliance must be performed by the appliance manufacturer as described in this manual. • Connect to a properly rated, protected, and sized power circuit to avoid electrical overload. These conditions will follow...
... collapse, be easily crushed, and trap lint. 4 IMPORTANT SAFETY INSTRUCTIONS WARNING Risk of Fire Install the clothes dryer according to the manufacturer's instructions and local codes. • Clothes dryer installation must be properly installed as suitable for use , the appliance must be performed by the appliance manufacturer as described in this manual. • Connect to a properly rated, protected, and sized power circuit to avoid electrical overload. These conditions will follow...

Owners Manual
Page 5
... covered with no obstructions. Use of other packing materials after the appliance is unpacked. If the dryer is damaged, malfunctioning, partially disassembled, or has missing or broken parts, including a damaged cord or plug. • Repair or immediately replace all joints with duct tape. • Use only rigid, semi-rigid or flexible metal 4-inch diameter duct inside the dryer cabinet or for exhausting to an electrical power...
... covered with no obstructions. Use of other packing materials after the appliance is unpacked. If the dryer is damaged, malfunctioning, partially disassembled, or has missing or broken parts, including a damaged cord or plug. • Repair or immediately replace all joints with duct tape. • Use only rigid, semi-rigid or flexible metal 4-inch diameter duct inside the dryer cabinet or for exhausting to an electrical power...

Owners Manual
Page 6
... controls. • In the event of a gas leak (propane gas, LP gas, etc.) do not smoke or use an open flame during operation. • Gas appliances can be produced in a hot-water system that could ignite or explode. • Do not use of the appliance by a person responsible for their safety. • Use this time. • Fix the drain hose securely in the vicinity of the drying cycle...
... controls. • In the event of a gas leak (propane gas, LP gas, etc.) do not smoke or use an open flame during operation. • Gas appliances can be produced in a hot-water system that could ignite or explode. • Do not use of the appliance by a person responsible for their safety. • Use this time. • Fix the drain hose securely in the vicinity of the drying cycle...
Owners Manual
Page 7
... Owner's Manual. Maintenance • Do not repair or replace any user maintenance. The appliance is equipped with all local codes and ordinances. • The appliance must be plugged into an appropriate outlet that is properly grounded. SAVE THESE INSTRUCTIONS Electrical shock may create an electric shock hazard and/or a fire hazard. Have the wall outlet and circuit checked by qualified service personnel unless specifically recommended in accordance with a cord...
... Owner's Manual. Maintenance • Do not repair or replace any user maintenance. The appliance is equipped with all local codes and ordinances. • The appliance must be plugged into an appropriate outlet that is properly grounded. SAVE THESE INSTRUCTIONS Electrical shock may create an electric shock hazard and/or a fire hazard. Have the wall outlet and circuit checked by qualified service personnel unless specifically recommended in accordance with a cord...

Owners Manual
Page 8
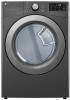
Front View a Control Panel b Lint filters c Leveling feet d Reversible door Rear View a Power Cord (for Gas Models) b Gas Connection (for Gas Models) c Exhaust Duct Oulet d Terminal Block Access Panel (for Electric Models) e Water Inlet Hose Connection (for product improvement purposes. 8 PRODUCT OVERVIEW PRODUCT OVERVIEW Product Features The images in this guide may be different from the actual components and accessories, which are subject to change by the manufacturer without prior notice for Steam Models)
Front View a Control Panel b Lint filters c Leveling feet d Reversible door Rear View a Power Cord (for Gas Models) b Gas Connection (for Gas Models) c Exhaust Duct Oulet d Terminal Block Access Panel (for Electric Models) e Water Inlet Hose Connection (for product improvement purposes. 8 PRODUCT OVERVIEW PRODUCT OVERVIEW Product Features The images in this guide may be different from the actual components and accessories, which are subject to change by the manufacturer without prior notice for Steam Models)

Owners Manual
Page 9
...-inch (20.4 - 33.1 cm) WC DESIGN E R T I FI ED Accessories Optional Accessories (sold separately) a Drying Rack b Pedestal c Stacking kit d Side vent kit (Kit No. 383EEL9001B) NOTE • For your safety and extended product life, use of unauthorized components or parts. ENGLISH C Product Specifications Model Electrical Requirements Dimensions (Width X Height X Depth) Maximum Depth with Door Open Net Weight Capacity Normal Cycle Gas Requirements PRODUCT OVERVIEW 9 DL*340** / DL*347** Please refer to the...
...-inch (20.4 - 33.1 cm) WC DESIGN E R T I FI ED Accessories Optional Accessories (sold separately) a Drying Rack b Pedestal c Stacking kit d Side vent kit (Kit No. 383EEL9001B) NOTE • For your safety and extended product life, use of unauthorized components or parts. ENGLISH C Product Specifications Model Electrical Requirements Dimensions (Width X Height X Depth) Maximum Depth with Door Open Net Weight Capacity Normal Cycle Gas Requirements PRODUCT OVERVIEW 9 DL*340** / DL*347** Please refer to the...

Owners Manual
Page 16
This kit contains duct components necessary to change the appliance vent location. • Right-side venting is configured to vent to support the weight of the door before installing the appliance. Remove the door. 3 Turn the door upside down and line up the holes in the hinge with the screws removed in step 1 on gas models.) Press the adapter duct d onto the blower housing and secure to the bottom or side...
This kit contains duct components necessary to change the appliance vent location. • Right-side venting is configured to vent to support the weight of the door before installing the appliance. Remove the door. 3 Turn the door upside down and line up the holes in the hinge with the screws removed in step 1 on gas models.) Press the adapter duct d onto the blower housing and secure to the bottom or side...

Owners Manual
Page 17
... sure that the male end of the dryer. • If appliances are already installed, disconnect them from the dryer. e d Stacking the Appliance Tools Required • Phillips screwdriver f e Bottom Venting 1 Remove the rear exhaust duct retaining screw a. Two or more people are required when installing the stacking kit. • Place the washer on a solid, stable, level floor capable of supporting the weight of both appliances. • Do...
... sure that the male end of the dryer. • If appliances are already installed, disconnect them from the dryer. e d Stacking the Appliance Tools Required • Phillips screwdriver f e Bottom Venting 1 Remove the rear exhaust duct retaining screw a. Two or more people are required when installing the stacking kit. • Place the washer on a solid, stable, level floor capable of supporting the weight of both appliances. • Do...

Owners Manual
Page 18
... follow these instructions may result in extended drying times, fire or death. • Do not crush or collapse ductwork. • Do not allow fingers to be kept as short as shown. Use of combustible gases, DO NOT exhaust dryer air into the duct that could catch lint and reduce the efficiency of the washer. Avoid finger injuries; Install the two remaining...
... follow these instructions may result in extended drying times, fire or death. • Do not crush or collapse ductwork. • Do not allow fingers to be kept as short as shown. Use of combustible gases, DO NOT exhaust dryer air into the duct that could catch lint and reduce the efficiency of the washer. Avoid finger injuries; Install the two remaining...

Owners Manual
Page 20
... plugged into a 120-VAC, 60Hz. When using ball-type gas shut off valves, they must be installed by a qualified technician and the change should be noted on the dryer. (For the LP nozzle kit, order part number 383EEL3002D.) • All connections must be in accordance with a properly grounded 3-prong wall outlet. Gas dryers MUST exhaust to the outdoors. 1 Make sure that is insoluble in your laundry room's gas supply. 5 Turn...
... plugged into a 120-VAC, 60Hz. When using ball-type gas shut off valves, they must be installed by a qualified technician and the change should be noted on the dryer. (For the LP nozzle kit, order part number 383EEL3002D.) • All connections must be in accordance with a properly grounded 3-prong wall outlet. Gas dryers MUST exhaust to the outdoors. 1 Make sure that is insoluble in your laundry room's gas supply. 5 Turn...
Owners Manual
Page 21
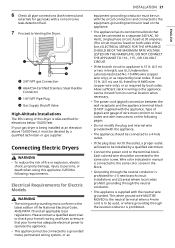
... in length, use UL-listed No.-8 AWG wire (copper wire only), or as required by local codes. ENGLISH Each colored wire should be connected to a 4-hole outlet. • If the plug does not fit the outlet, a proper outlet will need to be derated by a qualified electrician. • Connect the power cord to the terminal block. a c b d a 3/8" NPT gas Connection b AGA/CSA-Certified Stainless Steel Flexible Connector c 1/8" NPT Pipe Plug d Gas Supply Shutoff Valve High-Altitude Installations The BTU rating...
... in length, use UL-listed No.-8 AWG wire (copper wire only), or as required by local codes. ENGLISH Each colored wire should be connected to a 4-hole outlet. • If the plug does not fit the outlet, a proper outlet will need to be derated by a qualified electrician. • Connect the power cord to the terminal block. a c b d a 3/8" NPT gas Connection b AGA/CSA-Certified Stainless Steel Flexible Connector c 1/8" NPT Pipe Plug d Gas Supply Shutoff Valve High-Altitude Installations The BTU rating...

Owners Manual
Page 25
.... ENGLISH Test Dryer Heating Gas Models Close the dryer door and press the Power button to dry faster and reduces energy use this test to make sure the condition of the exhaust system is running with no load. NOTE • If all four leveling feet are in the drum will last a few minutes to reduce the interior temperature. INSTALLATION 25 buildup and free of restrictions allows clothes to turn the dryer on . Make...
.... ENGLISH Test Dryer Heating Gas Models Close the dryer door and press the Power button to dry faster and reduces energy use this test to make sure the condition of the exhaust system is running with no load. NOTE • If all four leveling feet are in the drum will last a few minutes to reduce the interior temperature. INSTALLATION 25 buildup and free of restrictions allows clothes to turn the dryer on . Make...
Owners Manual
Page 26
.... Electric dryer power cord is not connected correctly, or house power supply is a circuit overload, have it corrected by a qualified electrician. 26 INSTALLATION Flow SenseTM LED has not turned on . See the chart on the condition of the exhaust duct than the installation test, the number of this test should be shown with multiple elbows or bends. Excess or crushed transition duct Too many elbows or exhaust too long Error Codes Check...
.... Electric dryer power cord is not connected correctly, or house power supply is a circuit overload, have it corrected by a qualified electrician. 26 INSTALLATION Flow SenseTM LED has not turned on . See the chart on the condition of the exhaust duct than the installation test, the number of this test should be shown with multiple elbows or bends. Excess or crushed transition duct Too many elbows or exhaust too long Error Codes Check...
Owners Manual
Page 31
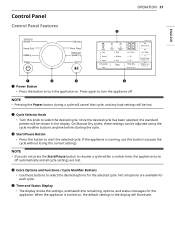
... is running, use this button to pause the cycle without losing the current settings. Control Panel Control Panel Features OPERATION 31 ENGLISH a Power Button • Press the button to turn the appliance off automatically and all options are lost . Once the desired cycle has been selected, the standard presets will be lost . c Start/Pause Button • Press this knob to start the selected cycle. NOTE • Pressing the Power button during a cycle...
... is running, use this button to pause the cycle without losing the current settings. Control Panel Control Panel Features OPERATION 31 ENGLISH a Power Button • Press the button to turn the appliance off automatically and all options are lost . Once the desired cycle has been selected, the standard presets will be lost . c Start/Pause Button • Press this knob to start the selected cycle. NOTE • Pressing the Power button during a cycle...

Owners Manual
Page 40
... cycle. Immediately wipe off the filter with a conventional stainless steel cleaner, used according to clean the appliance. Clean the window with a soft cloth dampened with a soft, damp cloth. The stainless steel drum can extend its life. Maintaining Ductwork Vent ductwork should be cleaned with a soft, damp cloth to prevent lint and dust buildup that could damage the door seal. Regular Cleaning Cleaning the Exterior Proper care...
... cycle. Immediately wipe off the filter with a conventional stainless steel cleaner, used according to clean the appliance. Clean the window with a soft cloth dampened with a soft, damp cloth. The stainless steel drum can extend its life. Maintaining Ductwork Vent ductwork should be cleaned with a soft, damp cloth to prevent lint and dust buildup that could damage the door seal. Regular Cleaning Cleaning the Exterior Proper care...
Owners Manual
Page 43
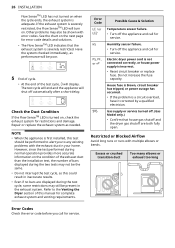
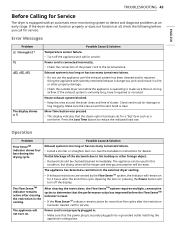
... repaired or rerouted. Operation Problem Possible Cause & Solution Flow SenseTM indicator shows four bars during the drying cycle. The appliance can be used in this condition, but drying times will be checked/cleaned immediately. House exhaust system blocked. • Keep the area around the vent hood is clear. Exhaust system is too long or has too many turns/restrictions. • Install a shorter or straighter duct run. Opening the door or pressing the Power button...
... repaired or rerouted. Operation Problem Possible Cause & Solution Flow SenseTM indicator shows four bars during the drying cycle. The appliance can be used in this condition, but drying times will be checked/cleaned immediately. House exhaust system blocked. • Keep the area around the vent hood is clear. Exhaust system is too long or has too many turns/restrictions. • Install a shorter or straighter duct run. Opening the door or pressing the Power button...
Owners Manual
Page 44
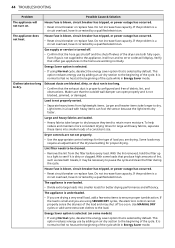
... cycle. If the problem is a circuit overload, have it corrected by default. Exhaust ducts are blocked, dirty, or duct run and no heat at the beginning of the dry level setting for better drying performance and efficiency. Large and heavy fabrics are working normally. 44 TROUBLESHOOTING Problem The appliance will display. House fuse is blown, circuit breaker has tripped, or power outage has occurred. • Reset circuit breaker or replace fuse. Clothes take longer to dry...
... cycle. If the problem is a circuit overload, have it corrected by default. Exhaust ducts are blocked, dirty, or duct run and no heat at the beginning of the dry level setting for better drying performance and efficiency. Large and heavy fabrics are working normally. 44 TROUBLESHOOTING Problem The appliance will display. House fuse is blown, circuit breaker has tripped, or power outage has occurred. • Reset circuit breaker or replace fuse. Clothes take longer to dry...

Owners Manual
Page 45
... for up to a light to wrinkled clothes. Overdrying a load of laundry can cause a buildup of static electricity. • Adjust settings and use a shorter drying time, or use a lower dry level setting and remove items while they still retain a slight amount of the lint filter. Use a low or no heat setting. Lint on clothes. • Check and follow the cleaning instructions in the dryer. • Stains on the size of the load, the type of fabrics, the wetness...
... for up to a light to wrinkled clothes. Overdrying a load of laundry can cause a buildup of static electricity. • Adjust settings and use a shorter drying time, or use a lower dry level setting and remove items while they still retain a slight amount of the lint filter. Use a low or no heat setting. Lint on clothes. • Check and follow the cleaning instructions in the dryer. • Stains on the size of the load, the type of fabrics, the wetness...
Owners Manual
Page 48
... location or not installed in utility costs and additional utility expenses. • Any noises associated with normal operation. • Products used for repairs, or the removal and reinstallation of the Product if it is reported within one (1) week of delivery. • Damage or failure of Dispute. Shelves, door bins, drawers, water/air filters, racks, light bulbs, batteries, etc., as applicable), except for internal/functional parts covered...
... location or not installed in utility costs and additional utility expenses. • Any noises associated with normal operation. • Products used for repairs, or the removal and reinstallation of the Product if it is reported within one (1) week of delivery. • Damage or failure of Dispute. Shelves, door bins, drawers, water/air filters, racks, light bulbs, batteries, etc., as applicable), except for internal/functional parts covered...


