
Owner's Manual
Page 1
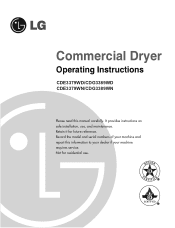
It provides instructions on safe installation, use . Record the model and serial numbers of your machine requires service. Commercial Dryer Operating Instructions CDE3379WD/CDG3389WD CDE3379WN/CDG3389WN Please read this information to your dealer if your machine and report this manual carefully. Not for future reference. DESIGN ERTIFIE D C Retain it for residential use , and maintenance.
It provides instructions on safe installation, use . Record the model and serial numbers of your machine requires service. Commercial Dryer Operating Instructions CDE3379WD/CDG3389WD CDE3379WN/CDG3389WN Please read this information to your dealer if your machine and report this manual carefully. Not for future reference. DESIGN ERTIFIE D C Retain it for residential use , and maintenance.

Owner's Manual
Page 2
... less tangling and wrinkling of user-friendly functions makes operating the dryer easy. PROGRAMMING MODE ...12 PART 6. DEFAULT DRYER SETTINGS ...37 PART 9. PRODUCT FEATURES OUTSTANDING PERFORMANCE The dryer features the largest capacity, quick drying times, quiet operation, and an energy-saving system. SPECIFCATIONS ...8 PART 3. ERROR MODE ...37 PART 7. WARRANTY ...38 2 ARTISTIC DESIGN Modern front panel look and big clear glass door make your dryer look stylish EASY OF USE An entire selection...
... less tangling and wrinkling of user-friendly functions makes operating the dryer easy. PROGRAMMING MODE ...12 PART 6. DEFAULT DRYER SETTINGS ...37 PART 9. PRODUCT FEATURES OUTSTANDING PERFORMANCE The dryer features the largest capacity, quick drying times, quiet operation, and an energy-saving system. SPECIFCATIONS ...8 PART 3. ERROR MODE ...37 PART 7. WARRANTY ...38 2 ARTISTIC DESIGN Modern front panel look and big clear glass door make your dryer look stylish EASY OF USE An entire selection...
Owner's Manual
Page 3
... drum or any other part is moving. • Do not repair or replace any servicing unless specifically recommended in this manual. • Do not place items exposed to cooking oils in your dryer. All safety messages will follow instructions. BASIC SAFETY PRECAUTIONS WARNING: To reduce the risk of fire, electric shock, or injury to persons when using the dryer. • Before use heat to dry...
... drum or any other part is moving. • Do not repair or replace any servicing unless specifically recommended in this manual. • Do not place items exposed to cooking oils in your dryer. All safety messages will follow instructions. BASIC SAFETY PRECAUTIONS WARNING: To reduce the risk of fire, electric shock, or injury to persons when using the dryer. • Before use heat to dry...
Owner's Manual
Page 4
... this manual must be followed to minimize the risk of life. • Do not store or use any phone in this appliance or qualified installer, service agency, or the gas any other appliances. Clear the room, building, or area of these substances can be performed by properly venting the dryer to light a match or cigarette, or turn on any electrical switches...
... this manual must be followed to minimize the risk of life. • Do not store or use any phone in this appliance or qualified installer, service agency, or the gas any other appliances. Clear the room, building, or area of these substances can be performed by properly venting the dryer to light a match or cigarette, or turn on any electrical switches...
Owner's Manual
Page 5
... to temperatures below freezing or exposed to the weather. • All repairs and servicing must be performed by a qualified electrician. Electrical shock can result if the dryer is not properly grounded. Packaging material can cause serious injury, fire, electrical shock, or death. • Connect to a properly rated, protected, and sized power circuit to follow this Owner's Guide. Part 1 IMPORTANT SAFETY INFORMATION READ ALL INSTRUCTIONS BEFORE USE...
... to temperatures below freezing or exposed to the weather. • All repairs and servicing must be performed by a qualified electrician. Electrical shock can result if the dryer is not properly grounded. Packaging material can cause serious injury, fire, electrical shock, or death. • Connect to a properly rated, protected, and sized power circuit to follow this Owner's Guide. Part 1 IMPORTANT SAFETY INFORMATION READ ALL INSTRUCTIONS BEFORE USE...

Owner's Manual
Page 6
... use or during installation. • Ductwork is impossible to follow basic precautions, including the following: • Do not open the dryer door during or after the steam cycle. Secure all joints with gasoline, dry-cleaning solvents, or other combustible ductwork can result in fire or death. • The exhaust duct must be 4 in. (10 cm) in use between the dryer and wall connection only...
... use or during installation. • Ductwork is impossible to follow basic precautions, including the following: • Do not open the dryer door during or after the steam cycle. Secure all joints with gasoline, dry-cleaning solvents, or other combustible ductwork can result in fire or death. • The exhaust duct must be 4 in. (10 cm) in use between the dryer and wall connection only...
Owner's Manual
Page 7
... using this manual for specific electrical requirements for your model. This provides the best performance and also prevents overloading house wiring circuits which has a voltage rating that have become frayed or otherwise damaged. SAFETY INSTRUCTIONS FOR CONNECTING ELECTRICITY WARNING: To reduce the risk of fire, electric shock, or injury to the dryer, the electrical power cord must be plugged into a properly grounded outlet. Part 1 IMPORTANT SAFETY INFORMATION READ ALL INSTRUCTIONS BEFORE USE...
... using this manual for specific electrical requirements for your model. This provides the best performance and also prevents overloading house wiring circuits which has a voltage rating that have become frayed or otherwise damaged. SAFETY INSTRUCTIONS FOR CONNECTING ELECTRICITY WARNING: To reduce the risk of fire, electric shock, or injury to the dryer, the electrical power cord must be plugged into a properly grounded outlet. Part 1 IMPORTANT SAFETY INFORMATION READ ALL INSTRUCTIONS BEFORE USE...

Owner's Manual
Page 8
ft. (22.5 lbs.) 126 Ibs (57.2 kg) Note Specifications subject to the rating label regarding detailed information. 27 x 29.9 x 38.7 (inch) IEC 7.3 cu. Part 2 SPECIFICATIONS Type: Rating: Size: Capacity: Weight: Electric or Gas Dryer Please refer to change by manufacturer. 8
ft. (22.5 lbs.) 126 Ibs (57.2 kg) Note Specifications subject to the rating label regarding detailed information. 27 x 29.9 x 38.7 (inch) IEC 7.3 cu. Part 2 SPECIFICATIONS Type: Rating: Size: Capacity: Weight: Electric or Gas Dryer Please refer to change by manufacturer. 8

Owner's Manual
Page 11
... open the door, the dryer defaults to 15 minutes/25¢ (default), when the START button or the chosen course button has been pressed. (The card should be changed. 6 Cycle finish After the COOL DOWN of the remaining time are always for a selected cycle. Note Owner can control the additional time and money setting (top off (To add more time) After a debit card is inserted, the operating time...
... open the door, the dryer defaults to 15 minutes/25¢ (default), when the START button or the chosen course button has been pressed. (The card should be changed. 6 Cycle finish After the COOL DOWN of the remaining time are always for a selected cycle. Note Owner can control the additional time and money setting (top off (To add more time) After a debit card is inserted, the operating time...
Owner's Manual
Page 12
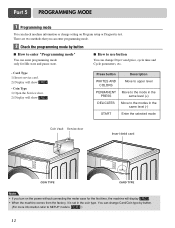
... machine comes from the factory, it is set in the coin type. Coin Type 1) Open the Service door. 2) Display will show Press button Description WHITES AND COLORS Move to upper level PERMANENT Move to the mode in the PRESS same level (+) DELICATES Move to use button You can change Dryer vend price, cycle time and Cycle parameters, etc. - You can change Card/Coin type by button How to SETUP...
... machine comes from the factory, it is set in the coin type. Coin Type 1) Open the Service door. 2) Display will show Press button Description WHITES AND COLORS Move to upper level PERMANENT Move to the mode in the PRESS same level (+) DELICATES Move to use button You can change Dryer vend price, cycle time and Cycle parameters, etc. - You can change Card/Coin type by button How to SETUP...
Owner's Manual
Page 14
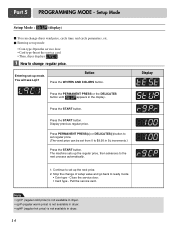
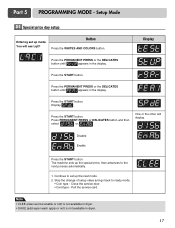
... the START button. Entering set from 0 to set regular price. (The vend price can change dryer vend price, cycle time, and cycle parameters, etc. Setup Mode Setup Mode : (display) You can be set up the next price. 2. Press the PERMANENT PRESS or the DELICATES button until appears in dryer. 14 Display Part 5 PROGRAMMING MODE - Entering set up mode • Coin type-Open the service door. • Card type-Insert the service card...
... the START button. Entering set from 0 to set regular price. (The vend price can change dryer vend price, cycle time, and cycle parameters, etc. Setup Mode Setup Mode : (display) You can be set up the next price. 2. Press the PERMANENT PRESS or the DELICATES button until appears in dryer. 14 Display Part 5 PROGRAMMING MODE - Entering set up mode • Coin type-Open the service door. • Card type-Insert the service card...
Owner's Manual
Page 15
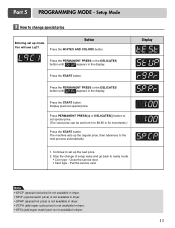
... available in dryer. • SCPA (add super cycle price) is not available in dryer. • SPCt (add super wash type) is not available in the display. Press the START button. Continue to set from 0 to ready mode. • Coin type - Press the PERMANENT PRESS or the DELICATES button until appears in 5¢ increments.) Press the START button. Stop the change special price...
... available in dryer. • SCPA (add super cycle price) is not available in dryer. • SPCt (add super wash type) is not available in the display. Press the START button. Continue to set from 0 to ready mode. • Coin type - Press the PERMANENT PRESS or the DELICATES button until appears in 5¢ increments.) Press the START button. Stop the change special price...
Owner's Manual
Page 17
... START button. Continue to ready mode. • Coin type - Close the service door. • Card type - Stop the change of setup value and go back to set up the special price, then advances to the next process automatically. 1. Display . Display Press the PERMANENT PRESS or the DELICATES button until appears in the display. Press the START button. Setup Mode 3-1 Special price day setup Entering set...
... START button. Continue to ready mode. • Coin type - Close the service door. • Card type - Stop the change of setup value and go back to set up the special price, then advances to the next process automatically. 1. Display . Display Press the PERMANENT PRESS or the DELICATES button until appears in the display. Press the START button. Setup Mode 3-1 Special price day setup Entering set...
Owner's Manual
Page 24
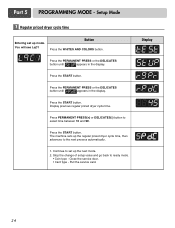
... priced dryer cycle time, then advances to select time between 10 and 99. Press the PERMANENT PRESS or the DELICATES button until appears in the display. Continue to ready mode. • Coin type - Press the START button. Press the START button. Press the START button. Stop the change of setup value and go back to set up the next mode. 2. Setup Mode 7 Regular priced dryer cycle time Entering set up...
... priced dryer cycle time, then advances to select time between 10 and 99. Press the PERMANENT PRESS or the DELICATES button until appears in the display. Continue to ready mode. • Coin type - Press the START button. Press the START button. Press the START button. Stop the change of setup value and go back to set up the next mode. 2. Setup Mode 7 Regular priced dryer cycle time Entering set up...
Owner's Manual
Page 25
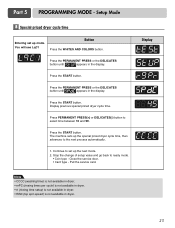
... Button Press the WHITES AND COLORS button. Press PERMANENT PRESS(+) or DELICATES(-) button to ready mode. • Coin type - Setup Mode 8 Special priced dryer cycle time Entering set up the special priced dryer cycle time, then advances to set up mode. Stop the change of setup value and go back to select time between 10 and 99. Pull the service card. Part 5 PROGRAMMING MODE - Press the START button. Press the START button...
... Button Press the WHITES AND COLORS button. Press PERMANENT PRESS(+) or DELICATES(-) button to ready mode. • Coin type - Setup Mode 8 Special priced dryer cycle time Entering set up the special priced dryer cycle time, then advances to set up mode. Stop the change of setup value and go back to select time between 10 and 99. Pull the service card. Part 5 PROGRAMMING MODE - Press the START button. Press the START button...

Owner's Manual
Page 30
...~239) Current temperature (5~70) (Displays the temperature inside the drum in ° Celsius.) Current temperature (5~70) (Displays the temperature inside the drum in the display. Motor + Heater 1 +Heater 2 (5400W) ■ GAS TYPE: GAS valve runs. Test ends. WHITES AND COLORS 3. START Insert service card (card type), open . Enter the diagnostic test mode. 1 Pressing the START button cycles to the next test function. Motor+Valve LED & KEY CHECK Press WHITES AND COLORS button. Door switch (Motor & Heater Off, Buzzer beeps seven times) Test goes back at...
...~239) Current temperature (5~70) (Displays the temperature inside the drum in ° Celsius.) Current temperature (5~70) (Displays the temperature inside the drum in the display. Motor + Heater 1 +Heater 2 (5400W) ■ GAS TYPE: GAS valve runs. Test ends. WHITES AND COLORS 3. START Insert service card (card type), open . Enter the diagnostic test mode. 1 Pressing the START button cycles to the next test function. Motor+Valve LED & KEY CHECK Press WHITES AND COLORS button. Door switch (Motor & Heater Off, Buzzer beeps seven times) Test goes back at...
Owner's Manual
Page 31
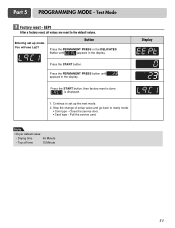
... START button, then factory reset is displayed. 1. Stop the change of setup value and go back to the default values. Display Note • Dryer default value - Part 5 PROGRAMMING MODE - Test Mode 2 Factory reset - EEPt After a factory reset, all values are reset to ready mode. • Coin type - Continue to set up the next mode. 2. Close the service door. • Card type - Pull the service card. Press the START button...
... START button, then factory reset is displayed. 1. Stop the change of setup value and go back to the default values. Display Note • Dryer default value - Part 5 PROGRAMMING MODE - Test Mode 2 Factory reset - EEPt After a factory reset, all values are reset to ready mode. • Coin type - Continue to set up the next mode. 2. Close the service door. • Card type - Pull the service card. Press the START button...

Owner's Manual
Page 35
... 4. START Insert service card(card type), open the service door(coin type). Move to each data list that the owner can 't enter.) Number of Topoff cycles ( 0~65535 ) Number of Service cycles ( 0~65535 ) Interval Cycles('Interval' means 'Since last data collecting') Accumulated Cycles('Accumulated'means 'Total cycles in the display. Abbreviation Meaning 1 rgPr Regular Price 2 rgCP Regular Cold Price 3 rgrP Regular Warm Price 4 rgHP Regular Hot Price 5 dELC Dryer Moisture...
... 4. START Insert service card(card type), open the service door(coin type). Move to each data list that the owner can 't enter.) Number of Topoff cycles ( 0~65535 ) Number of Service cycles ( 0~65535 ) Interval Cycles('Interval' means 'Since last data collecting') Accumulated Cycles('Accumulated'means 'Total cycles in the display. Abbreviation Meaning 1 rgPr Regular Price 2 rgCP Regular Cold Price 3 rgrP Regular Warm Price 4 rgHP Regular Hot Price 5 dELC Dryer Moisture...

Owner's Manual
Page 37
... occurrence or problem. Dryer error code PROBLEM POSSIBLE CAUSE It is displayed when thermistor is restored, then the machine will restart. Thermistor should be replaced. Part 6 ERROR MODE Meaning of power failure the machine stops running but the time display remains on, showing the time just before power failure. SOLUTION Thermistor should be replaced. Check the card reader wire. Disconnection of card reader wire. Press the START button after the power is open. It...
... occurrence or problem. Dryer error code PROBLEM POSSIBLE CAUSE It is displayed when thermistor is restored, then the machine will restart. Thermistor should be replaced. Part 6 ERROR MODE Meaning of power failure the machine stops running but the time display remains on, showing the time just before power failure. SOLUTION Thermistor should be replaced. Check the card reader wire. Disconnection of card reader wire. Press the START button after the power is open. It...
Owner's Manual
Page 38
.... Electronic controls: Main control board and user interface board. This warranty gives you specific legal rights and you . Damage resulting from the date of light bulbs, filters or any questions, please call or write: Product Registration Information LG Commercial Product Support: Model: P. Damage or failure caused by LG. 9. Products with original serial numbers that vary from the menu. Damage or failure caused by incorrect electrical current...
.... Electronic controls: Main control board and user interface board. This warranty gives you specific legal rights and you . Damage resulting from the date of light bulbs, filters or any questions, please call or write: Product Registration Information LG Commercial Product Support: Model: P. Damage or failure caused by LG. 9. Products with original serial numbers that vary from the menu. Damage or failure caused by incorrect electrical current...


