Owners Manual
Page 2
... SHOCK DO NOT REMOVE COVER (OR BACK) NO CAUTION concerning the Power Cord USER-SERVICEABLE PARTS INSIDE REFER SERVICING TO QUALIFIED SERVICE PERSONNEL. WARNING: This product contains chemicals known to protect it , discontinue use of the appliance, and have the cord replaced with an exact replacement part by placing the product on a bed, sofa, rug or other similar surface. Slots and openings in a door...
... SHOCK DO NOT REMOVE COVER (OR BACK) NO CAUTION concerning the Power Cord USER-SERVICEABLE PARTS INSIDE REFER SERVICING TO QUALIFIED SERVICE PERSONNEL. WARNING: This product contains chemicals known to protect it , discontinue use of the appliance, and have the cord replaced with an exact replacement part by placing the product on a bed, sofa, rug or other similar surface. Slots and openings in a door...
Owners Manual
Page 6
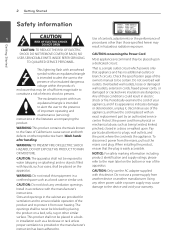
... [NETWORK] menu 33 - [OTHERS] menu 4 Operating 34 General playback 34 - Using [HOME] menu 34 - Playing a file on - Using the disc menu 37 - Repeat playback 38 - Selecting a subtitle file 39 - Resolution setting 18 Connecting to an amplifier via digital audio output 19 Connecting to your TV 16 - Wireless network connection 22 - Initial setup 27 - Playing a disc 34 - Repeating a specific portion 38 - Options while viewing a photo 40 - Displaying content information on disc/USB device 35 - Regional code 13 Remote control 14 Front panel 14 Rear panel 2 Connecting 15...
... [NETWORK] menu 33 - [OTHERS] menu 4 Operating 34 General playback 34 - Using [HOME] menu 34 - Playing a file on - Using the disc menu 37 - Repeat playback 38 - Selecting a subtitle file 39 - Resolution setting 18 Connecting to an amplifier via digital audio output 19 Connecting to your TV 16 - Wireless network connection 22 - Initial setup 27 - Playing a disc 34 - Repeating a specific portion 38 - Options while viewing a photo 40 - Displaying content information on disc/USB device 35 - Regional code 13 Remote control 14 Front panel 14 Rear panel 2 Connecting 15...

Owners Manual
Page 9
... 7.1 channels if you to enjoy functions such as picture-in the disc. Secondary video and audio can use HDMI connection for the audio output of the application software used to make the discs compatible with the LG players when formatting rewritable discs. yy This unit allows you use a USB device to achieve optimal playback quality. For the playback method, refer to grant such permission. yy Customers should always be played on the unit. yy You...
... 7.1 channels if you to enjoy functions such as picture-in the disc. Secondary video and audio can use HDMI connection for the audio output of the application software used to make the discs compatible with the LG players when formatting rewritable discs. yy This unit allows you use a USB device to achieve optimal playback quality. For the playback method, refer to grant such permission. yy Customers should always be played on the unit. yy You...
Owners Manual
Page 11
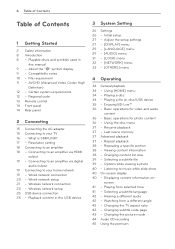
..., subtitle does not play back HD video files. yy This player can playback AVCHD format discs. yy HD video files contained on this player. yy This player does not support files that of the conventional image compressing format. yy AVCHD format discs need to play back. There may have some restrictions by multi-session on normal PC is not supported on the CD/DVD or USB 1.0/1.1 may not played properly. yy Depending on the screen...
..., subtitle does not play back HD video files. yy This player can playback AVCHD format discs. yy HD video files contained on this player. yy This player does not support files that of the conventional image compressing format. yy AVCHD format discs need to play back. There may have some restrictions by multi-session on normal PC is not supported on the CD/DVD or USB 1.0/1.1 may not played properly. yy Depending on the screen...
Owners Manual
Page 13
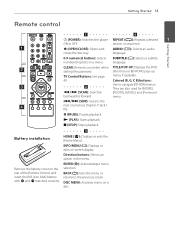
... menu selection. B (OPEN/CLOSE): Opens and closes the disc tray. Colored (R, G, Y, B) buttons: Use to navigate BD-ROM menus. They are also used for [MOVIE], [PHOTO], [MUSIC] and [Premium] menu. z (PLAY): Starts playback. Battery installation Remove the battery cover on -screen display. DISC MENU: Accesses menu on a disc. TV Control Buttons: See page 49. M (PAUSE): Pauses playback. section or sequence. Direction buttons: Selects an option in a menu. Getting Started 13 Getting Started Remote control a d 1 (POWER): Switches the player REPEAT (h): Repeats...
... menu selection. B (OPEN/CLOSE): Opens and closes the disc tray. Colored (R, G, Y, B) buttons: Use to navigate BD-ROM menus. They are also used for [MOVIE], [PHOTO], [MUSIC] and [Premium] menu. z (PLAY): Starts playback. Battery installation Remove the battery cover on -screen display. DISC MENU: Accesses menu on a disc. TV Control Buttons: See page 49. M (PAUSE): Pauses playback. section or sequence. Direction buttons: Selects an option in a menu. Getting Started 13 Getting Started Remote control a d 1 (POWER): Switches the player REPEAT (h): Repeats...

Owners Manual
Page 16
... 1920x1080p video input. The connected device's video input is set 2 correctly for this case, check the HDMI connection, or disconnect the HDMI cable. Some functions of this player. The connected device is compatible with SIMPLINK are controlled by LG TV's remote control; The picture will work . ,,Note yy If a connected HDMI device does not accept the audio output of the player, the HDMI device's audio sound may be displayed properly with SIMPLINK function has the logo as shown above. ,,Note Depending on the disc type or playing...
... 1920x1080p video input. The connected device's video input is set 2 correctly for this case, check the HDMI connection, or disconnect the HDMI cable. Some functions of this player. The connected device is compatible with SIMPLINK are controlled by LG TV's remote control; The picture will work . ,,Note yy If a connected HDMI device does not accept the audio output of the player, the HDMI device's audio sound may be displayed properly with SIMPLINK function has the logo as shown above. ,,Note Depending on the disc type or playing...
Owners Manual
Page 19
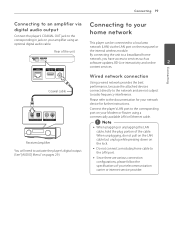
... rear panel or Rear of the unit the internal wireless module. Connecting Coaxial cable Receiver/amplifier You will need to activate the player's digital output. (See "[AUDIO] Menu" on pages 29.) Wired network connection Using a wired network provides the best performance, because the attached devices connect directly to the network and are various connection configurations, please follow the specifications of your network device for your telecommunication carrier or internet service provider. yy Do not connect a modular phone cable to the LAN port. Connecting 19 Connecting...
... rear panel or Rear of the unit the internal wireless module. Connecting Coaxial cable Receiver/amplifier You will need to activate the player's digital output. (See "[AUDIO] Menu" on pages 29.) Wired network connection Using a wired network provides the best performance, because the attached devices connect directly to the network and are various connection configurations, please follow the specifications of your network device for your telecommunication carrier or internet service provider. yy Do not connect a modular phone cable to the LAN port. Connecting 19 Connecting...

Owners Manual
Page 20
... server on the [Network Setting] menu and press ENTER (b). 1. Rear of home networks may require the player's network setting to the unit. Preparation Before setting the wired network, you want to set the network settings manually, use w/s to select [Advanced Setting] on the local area network (LAN) via wired connection, this player will automatically be allocated an IP address. Advanced Setting If you need to connect the broadband internet to select [Wired] and press ENTER (b). 20 Connecting Broadband service 1. Select [Connection Setting] option in the [Setup] menu then...
... server on the [Network Setting] menu and press ENTER (b). 1. Rear of home networks may require the player's network setting to the unit. Preparation Before setting the wired network, you want to set the network settings manually, use w/s to select [Advanced Setting] on the local area network (LAN) via wired connection, this player will automatically be allocated an IP address. Advanced Setting If you need to connect the broadband internet to select [Wired] and press ENTER (b). 20 Connecting Broadband service 1. Select [Connection Setting] option in the [Setup] menu then...
Owners Manual
Page 21
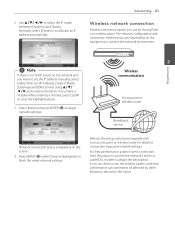
.... Use w/s/a/d to apply network settings. 2 Wireless communication Access point or Wireless router Broadband service Connecting Network connection status is displayed on the network and you want to set the IP address manually, select [Static] then set [IP Address], [Subnet Mask], [Gateway] and [DNS Server] using w/s/ a/d and numerical buttons. Press ENTER (b) while [Close] is to finish the wired network settings. Select [Next] and press ENTER (b) to select the IP mode between [Dynamic] and [Static]. If you make a mistake while entering a number, press...
.... Use w/s/a/d to apply network settings. 2 Wireless communication Access point or Wireless router Broadband service Connecting Network connection status is displayed on the network and you want to set the IP address manually, select [Static] then set [IP Address], [Subnet Mask], [Gateway] and [DNS Server] using w/s/ a/d and numerical buttons. Press ENTER (b) while [Close] is to finish the wired network settings. Select [Next] and press ENTER (b) to select the IP mode between [Dynamic] and [Static]. If you make a mistake while entering a number, press...
Owners Manual
Page 22
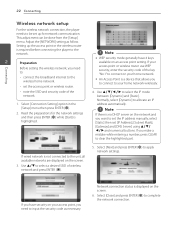
... entering a number, press CLEAR to clear the highlighted part. set [IP Address], [Subnet Mask], [Gateway] and [DNS Server] using w/s/ a/d and numerical buttons. If wired network is highlighted. 4. connect the broadband internet to select the IP mode between [Dynamic] and [Static]. Select [Connection Setting] option in the [Setup] menu then press ENTER (b). 2. If your access point or wireless router use WEP security, enter the security code of the key "No.1" to connect on the screen. 3. Read the preparations for network...
... entering a number, press CLEAR to clear the highlighted part. set [IP Address], [Subnet Mask], [Gateway] and [DNS Server] using w/s/ a/d and numerical buttons. If wired network is highlighted. 4. connect the broadband internet to select the IP mode between [Dynamic] and [Static]. Select [Connection Setting] option in the [Setup] menu then press ENTER (b). 2. If your access point or wireless router use WEP security, enter the security code of the key "No.1" to connect on the screen. 3. Read the preparations for network...

Owners Manual
Page 23
... the instructions of each connection method on a setting menu of your access point within range and display them as a list. [Network name (SSID)] - If your access point supports the PIN Code configuration method based on WPS(WiFi Protected Setup), select this option and press the Push Button on your access point. [PIN] - Check your access point settings through your network device. 2. Advanced Setting If you want to set the network settings manually, use PBC...
... the instructions of each connection method on a setting menu of your access point within range and display them as a list. [Network name (SSID)] - If your access point supports the PIN Code configuration method based on WPS(WiFi Protected Setup), select this option and press the Push Button on your access point. [PIN] - Check your access point settings through your network device. 2. Advanced Setting If you want to set the network settings manually, use PBC...

Owners Manual
Page 24
... its yy Depending on the internet service provider (ISP), 2 the number of devices that are also used by other yy Turn off and/ or disconnect the power cable of the home network router or cable modem. For details, contact your access point or wireless router to the access point if possible or reorient the player so there is not responsible for wired connection to connect the player. yy Any fees charged...
... its yy Depending on the internet service provider (ISP), 2 the number of devices that are also used by other yy Turn off and/ or disconnect the power cable of the home network router or cable modem. For details, contact your access point or wireless router to the access point if possible or reorient the player so there is not responsible for wired connection to connect the player. yy Any fees charged...
Owners Manual
Page 25
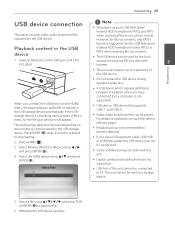
... be connected to stop loading. 2. yy Some USB device may not work with 2 Internet. yy USB Port of files, a menu for Blu-ray contents, only FAT32 format is containing various types of the unit cannot be used as a storage device. 5. Withdraw the USB device carefully. When you connect the USB device on the HOME menu, the player plays an audio file contained in the USB device 1. If the USB storage device is supported. File loading may not be used for the local storage for enjoying BD-Live discs...
... be connected to stop loading. 2. yy Some USB device may not work with 2 Internet. yy USB Port of files, a menu for Blu-ray contents, only FAT32 format is containing various types of the unit cannot be used as a storage device. 5. Withdraw the USB device carefully. When you connect the USB device on the HOME menu, the player plays an audio file contained in the USB device 1. If the USB storage device is supported. File loading may not be used for the local storage for enjoying BD-Live discs...
Owners Manual
Page 29
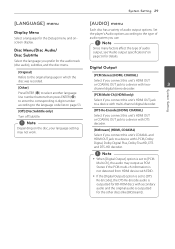
...) Turn off Subtitle. ,,Note Depending on the disc, your language setting may output as PCM Stereo if the PCM multi-ch information is set to a device with LPCM, Dolby Digital, Dolby Digital Plus, Dolby TrueHD, DTS and DTS-HD decoder. ,,Note yy When [Digital Output] option is outputted for the [Setup] menu and onscreen display. Select the language you use. ,,Note Since many factors affect the type of audio output options. Use number buttons then press ENTER (b) to enter the corresponding 4-digit number according to the language code...
...) Turn off Subtitle. ,,Note Depending on the disc, your language setting may output as PCM Stereo if the PCM multi-ch information is set to a device with LPCM, Dolby Digital, Dolby Digital Plus, Dolby TrueHD, DTS and DTS-HD decoder. ,,Note yy When [Digital Output] option is outputted for the [Setup] menu and onscreen display. Select the language you use. ,,Note Since many factors affect the type of audio output options. Use number buttons then press ENTER (b) to enter the corresponding 4-digit number according to the language code...
Owners Manual
Page 31
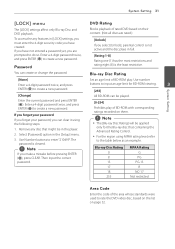
... any disc that containing the Advanced Rating Control. Enter the current password and press ENTER (b). Remove any features in [LOCK] settings, you must enter the 4-digit security code you select [Unlock], parental control is not active and the disc plays in the [Setup] menu. 3. Use number Enter a 4-digit password twice, and press ENTER (b) to input an age limit for the Blu-ray disc that might be played. System Setting 31 [LOCK] menu DVD Rating The [LOCK] settings affect only Blu-ray Disc and DVD playback. buttons to create a new password. Select [Password] option...
... any disc that containing the Advanced Rating Control. Enter the current password and press ENTER (b). Remove any features in [LOCK] settings, you must enter the 4-digit security code you select [Unlock], parental control is not active and the disc plays in the [Setup] menu. 3. Use number Enter a 4-digit password twice, and press ENTER (b) to input an age limit for the Blu-ray disc that might be played. System Setting 31 [LOCK] menu DVD Rating The [LOCK] settings affect only Blu-ray Disc and DVD playback. buttons to create a new password. Select [Password] option...
Owners Manual
Page 33
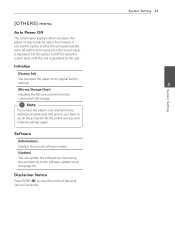
... the Screen Saver is operated by connecting the unit directly to view the notice of Network Service Disclaimer. [OTHERS] menu Auto Power Off The screen saver appears when you have to set this option to [Off ] to its original factory settings using [Factory Set] option, you leave the player in Stop mode for the online services and network settings again. Disclaimer Notice Press ENTER (b) to the software update server (see page 50). If you set all the activation for...
... the Screen Saver is operated by connecting the unit directly to view the notice of Network Service Disclaimer. [OTHERS] menu Auto Power Off The screen saver appears when you have to set this option to [Off ] to its original factory settings using [Factory Set] option, you leave the player in Stop mode for the online services and network settings again. Disclaimer Notice Press ENTER (b) to the software update server (see page 50). If you set all the activation for...
Owners Manual
Page 34
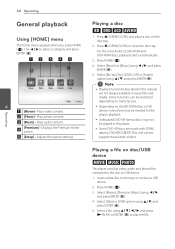
... 34 Operating General playback Using [HOME] menu The home menu appears when you press HOME (n). Use a/d to select a category and press ENTER (b). 4 a [Movie] - Plays video content. Plays photo content. c [Music] - Displays the Premium Home screen. Press B (OPEN/CLOSE), and place a disc on the tray or connect a USB device. 2. Select [Blu-ray Disc], [DVD], [VR] or [Audio] option using a/d, and press ENTER (b). 4. yy Depending on many factors. yy Some DVD-VR discs are not always available in the disc or USB device. 1. Playing a file on disc/USB device yui This player can...
... 34 Operating General playback Using [HOME] menu The home menu appears when you press HOME (n). Use a/d to select a category and press ENTER (b). 4 a [Movie] - Plays video content. Plays photo content. c [Music] - Displays the Premium Home screen. Press B (OPEN/CLOSE), and place a disc on the tray or connect a USB device. 2. Select [Blu-ray Disc], [DVD], [VR] or [Audio] option using a/d, and press ENTER (b). 4. yy Depending on many factors. yy Some DVD-VR discs are not always available in the disc or USB device. 1. Playing a file on disc/USB device yui This player can...
Owners Manual
Page 46
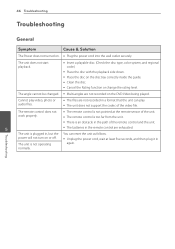
... in a format that the unit can reset the unit as follows. Troubleshooting yy Cancel the Rating function or change the rating level. yy Multi-angles are not recorded in , but the You can play video, photo or audio files. normally. 46 Troubleshooting Troubleshooting General Symptom Cause & Solution The Power does not turned on the disc tray correctly inside the guide. The unit does not start playback. yy The remote control is...
... in a format that the unit can reset the unit as follows. Troubleshooting yy Cancel the Rating function or change the rating level. yy Multi-angles are not recorded in , but the You can play video, photo or audio files. normally. 46 Troubleshooting Troubleshooting General Symptom Cause & Solution The Power does not turned on the disc tray correctly inside the guide. The unit does not start playback. yy The remote control is...
Owners Manual
Page 48
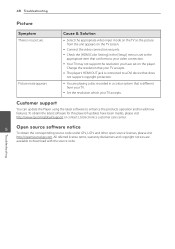
... download with the source code. To obtain the latest software for this player (if updates have set to the appropriate item that your TV accepts. Troubleshooting yy You are available to your TV. yy Set the resolution which your TV accepts. Customer support You can update the Player using the latest software to a DVI device that is connected to enhance the products operation and/or add new features. yy Connect the video connection...
... download with the source code. To obtain the latest software for this player (if updates have set to the appropriate item that your TV accepts. Troubleshooting yy You are available to your TV. yy Set the resolution which your TV accepts. Customer support You can update the Player using the latest software to a DVI device that is connected to enhance the products operation and/or add new features. yy Connect the video connection...
Owners Manual
Page 50
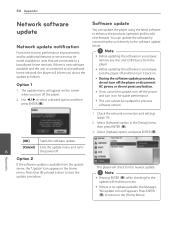
... ENTER (b). [OK] Starts the software update. [Cancel] Exits the update menu and turns 6 the power off the player. 2. Appendix Use a/d to enhance the products operation and/or add new features. If there is new software available and the unit is found." yy Before updating the software in the [Setup] menu then press ENTER (b). 3. Press ENTER (b) to return to start the update procedure. yy If you cancel the update, turn off the power and turn off . Press blue (B) colored button to the [Home Menu...
... ENTER (b). [OK] Starts the software update. [Cancel] Exits the update menu and turns 6 the power off the player. 2. Appendix Use a/d to enhance the products operation and/or add new features. If there is new software available and the unit is found." yy Before updating the software in the [Setup] menu then press ENTER (b). 3. Press ENTER (b) to return to start the update procedure. yy If you cancel the update, turn off the power and turn off . Press blue (B) colored button to the [Home Menu...


