
Owner's Manual (English)
Page 1
www.lgusa.com / www.lg.ca LCD TV PLASMA TV OWNER'S MANUAL LCD TV MODELS PLASMA TV MODELS 32LB9D 32LB9DB 47LC7DF 50PY3D 50PY3DF 60PY3D 60PY3DF Please read this manual carefully before operating your dealer when you require service. ENERGY STAR is a set . has determined that this information to your set of the set. Record ...
www.lgusa.com / www.lg.ca LCD TV PLASMA TV OWNER'S MANUAL LCD TV MODELS PLASMA TV MODELS 32LB9D 32LB9DB 47LC7DF 50PY3D 50PY3DF 60PY3D 60PY3DF Please read this manual carefully before operating your dealer when you require service. ENERGY STAR is a set . has determined that this information to your set of the set. Record ...
Owner's Manual (English)
Page 5
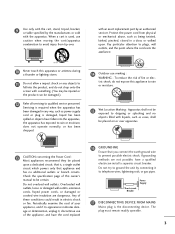
... with an exact replacement part by connecting it , discontinue use of the appliance, and have fallen into the product, and do not expose this owner's manual to be damaged.) 12 Refer all servicing to qualified service personnel.
... with an exact replacement part by connecting it , discontinue use of the appliance, and have fallen into the product, and do not expose this owner's manual to be damaged.) 12 Refer all servicing to qualified service personnel.
Owner's Manual (English)
Page 6
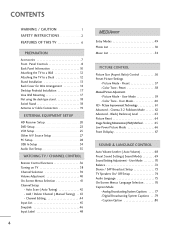
... Channel ( Manual Tuning) . . 43 - Preset 58 Manual Picture Adjustment - Picture Mode - Picture Improvement Technology 61 Advanced - Analog Broadcasting System Captions . . . . 77 - Preset 57 - Cinema 3:2 Pulldown Mode 62 Advanced - Color Tone - User Mode 70 Balance 72 Stereo / SAP Broadcast Setup 73 TV Speakers On/...Modes 49 Photo List 50 Music List 54 PICTURE CONTROL Picture Size (Aspect Ratio) Control 56 Preset Picture Settings - User Mode 60 XD - Color Tone - Black( Darkness) Level 63 Picture Reset 64 Image Sticking Minimization( ISM) Method 65 Low-Power ...
... Channel ( Manual Tuning) . . 43 - Preset 58 Manual Picture Adjustment - Picture Mode - Picture Improvement Technology 61 Advanced - Analog Broadcasting System Captions . . . . 77 - Preset 57 - Cinema 3:2 Pulldown Mode 62 Advanced - Color Tone - User Mode 70 Balance 72 Stereo / SAP Broadcast Setup 73 TV Speakers On/...Modes 49 Photo List 50 Music List 54 PICTURE CONTROL Picture Size (Aspect Ratio) Control 56 Preset Picture Settings - User Mode 60 XD - Color Tone - Black( Darkness) Level 63 Picture Reset 64 Image Sticking Minimization( ISM) Method 65 Low-Power ...

Owner's Manual (English)
Page 7
Manual Clock Setup 82 Auto On/ Off Time Setting 83 Sleep Time Setting 84 Auto Shut-off Setting 85 PARENTAL CONTROL / RATINGS Set Password & Lock System 86 Channel Blocking 88 Movie & TV Rating 89 Downloadable Rating 89 External Input Blocking 92 Key Lock 92 APPENDIX Troubleshooting 93 Maintenance 95 Product Specifications 96 Programming the Remote Control 97 IR Codes 101 External Control through RS-232C 103 5 Auto Clock Setup 81 - TIME SETTING Clock Setting -
Manual Clock Setup 82 Auto On/ Off Time Setting 83 Sleep Time Setting 84 Auto Shut-off Setting 85 PARENTAL CONTROL / RATINGS Set Password & Lock System 86 Channel Blocking 88 Movie & TV Rating 89 Downloadable Rating 89 External Input Blocking 92 Key Lock 92 APPENDIX Troubleshooting 93 Maintenance 95 Product Specifications 96 Programming the Remote Control 97 IR Codes 101 External Control through RS-232C 103 5 Auto Clock Setup 81 - TIME SETTING Clock Setting -
Owner's Manual (English)
Page 9
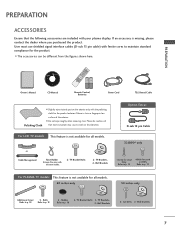
...twist holder. 2- Wall brackets 7 If an accessory is not available for all models. 60 inches only 50 inches only Additional Cover 3 - Owner's Manual LCD TV PLASMA TV Owner's Manual http://www.lgusa.com www.lg.ca Copyright© 2007 LGE, All Rights Reserved. Bolts Refer to p. 18 Refer... to p. 18 2- or Cable Management Twist Holder Arrange the wires with your plasma display. Wall Brackets 2- Please...
...twist holder. 2- Wall brackets 7 If an accessory is not available for all models. 60 inches only 50 inches only Additional Cover 3 - Owner's Manual LCD TV PLASMA TV Owner's Manual http://www.lgusa.com www.lg.ca Copyright© 2007 LGE, All Rights Reserved. Bolts Refer to p. 18 Refer... to p. 18 2- or Cable Management Twist Holder Arrange the wires with your plasma display. Wall Brackets 2- Please...
Owner's Manual (English)
Page 20
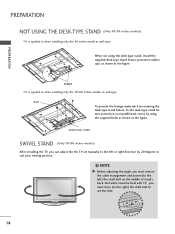
... models) I It is applied to when installing only the 60 inches model as shown at the figure. ADDITIONAL COVER SWIVEL STAND (Only 50/60 inches models) After installing the TV, you must close (to the right) the shaft bolt to set manually to the left ) the shaft bolt on the middle of stand's ...back. And when stand be level with TV, you must remove the cable management and loosen...
... models) I It is applied to when installing only the 60 inches model as shown at the figure. ADDITIONAL COVER SWIVEL STAND (Only 50/60 inches models) After installing the TV, you must close (to the right) the shaft bolt to set manually to the left ) the shaft bolt on the middle of stand's ...back. And when stand be level with TV, you must remove the cable management and loosen...
Owner's Manual (English)
Page 22
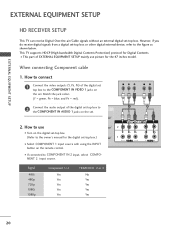
...the video outputs (Y, PB, PR) of EXTERNAL EQUIPMENT SETUP mainly use I If connected to the COMPONENT IN VIDEO 1 jacks on the set. This TV supports HDCP (High-bandwidth Digital Contents Protection) protocol for the digital set-top bo(xDV.)I) I This part of the digital set top box to ...COMPONENT IN 2 input, select COMPONENT 2 input source. How to the owner's manual for Digital Contents. I Turn on the digital set-top box. (Refer to use picture for the 47 inches model. When connecting Component cable 1. Match...
...the video outputs (Y, PB, PR) of EXTERNAL EQUIPMENT SETUP mainly use I If connected to the COMPONENT IN VIDEO 1 jacks on the set. This TV supports HDCP (High-bandwidth Digital Contents Protection) protocol for the digital set-top bo(xDV.)I) I This part of the digital set top box to ...COMPONENT IN 2 input, select COMPONENT 2 input source. How to the owner's manual for Digital Contents. I Turn on the digital set-top box. (Refer to use picture for the 47 inches model. When connecting Component cable 1. Match...
Owner's Manual (English)
Page 23
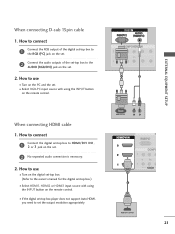
... the digital set-top box to the RGB (PC) jack on the set. 2 Connect the audio outputs of the set-top box to the owner's manual for the digital set-top box.) I Turn on the PC and the set . 2 No separated audio connection is necessary. 2. How to use I Select HDMI1, HDMI2...
... the digital set-top box to the RGB (PC) jack on the set. 2 Connect the audio outputs of the set-top box to the owner's manual for the digital set-top box.) I Turn on the PC and the set . 2 No separated audio connection is necessary. 2. How to use I Select HDMI1, HDMI2...
Owner's Manual (English)
Page 24
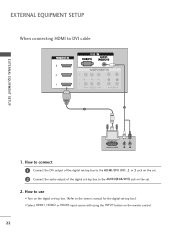
How to use I Select HDMI1, HDMI2 or HDMI3 input source with using the INPUT button on the set -top box. (Refer to the AUDIO(RGB/DVI) jack on the remote control. 22 How to connect 1 Connect the DVI output of the digital set-top box to the HDMI/DVI IN1, 2 or 3 jack on the set. 2 Connect the audio output of the digital set-top box to the owner's manual for the digital set-top box.) I Turn on the digital set . 2. EXTERNAL EQUIPMENT SETUP When connecting HDMI to DVI cable RGB 3 EXTERNAL EQUIPMENT SETUP 2 1 DVI-DTV OUTPUT L R 1.
How to use I Select HDMI1, HDMI2 or HDMI3 input source with using the INPUT button on the set -top box. (Refer to the AUDIO(RGB/DVI) jack on the remote control. 22 How to connect 1 Connect the DVI output of the digital set-top box to the HDMI/DVI IN1, 2 or 3 jack on the set. 2 Connect the audio output of the digital set-top box to the owner's manual for the digital set-top box.) I Turn on the digital set . 2. EXTERNAL EQUIPMENT SETUP When connecting HDMI to DVI cable RGB 3 EXTERNAL EQUIPMENT SETUP 2 1 DVI-DTV OUTPUT L R 1.
Owner's Manual (English)
Page 25
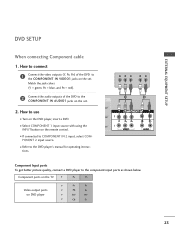
...IN 2 input, select COM- PONENT 2 input source. I If connected to the COMPONENT IN AUDIO1 jacks on the set . How to the DVD player's manual for operating instruc- I Refer to use I Select COMPONENT 1 input source with using the INPUT button on DVD player Y PB PR Y Pb Pr Y ...B-Y R-Y Y Cb Cr 23 tions. I Turn on the set . 2. Component ports on the TV Y PB PR Video output ports on the remote control. EXTERNAL EQUIPMENT SETUP DVD SETUP When connecting Component cable 1. Y PB PR L R 1 2 Component Input...
...IN 2 input, select COM- PONENT 2 input source. I If connected to the COMPONENT IN AUDIO1 jacks on the set . How to the DVD player's manual for operating instruc- I Refer to use I Select COMPONENT 1 input source with using the INPUT button on DVD player Y PB PR Y Pb Pr Y ...B-Y R-Y Y Cb Cr 23 tions. I Turn on the set . 2. Component ports on the TV Y PB PR Video output ports on the remote control. EXTERNAL EQUIPMENT SETUP DVD SETUP When connecting Component cable 1. Y PB PR L R 1 2 Component Input...
Owner's Manual (English)
Page 26
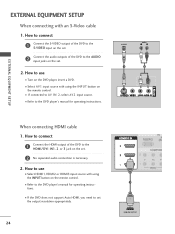
... control. I Select A V 1 input source with using the INPUT button on the set. 2 Connect the audio outputs of the DVD to the DVD player's manual for operating instructions. How to connect 1 Connect the HDMI output of the DVD to the S-VIDEO input on the remote control. How to the DVD... player's manual for operating instructions. I If connected to the HDMI/DVI IN1, 2 or 3 jack on the DVD player, insert a DVD. I Refer to use I Turn on ...
... control. I Select A V 1 input source with using the INPUT button on the set. 2 Connect the audio outputs of the DVD to the DVD player's manual for operating instructions. How to connect 1 Connect the HDMI output of the DVD to the S-VIDEO input on the remote control. How to the DVD... player's manual for operating instructions. I If connected to the HDMI/DVI IN1, 2 or 3 jack on the DVD player, insert a DVD. I Refer to use I Turn on ...
Owner's Manual (English)
Page 27
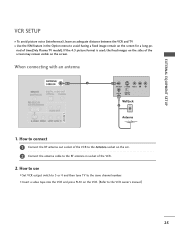
... a fixed image remain on the VCR. (Refer to the VCR owner's manual.) 25 I Set VCR output switch to 3 or 4 and then tune TV to the same channel number. How to connect 1 Connect the RF antenna out socket of time(Only Plasma TV model). When connecting with an antenna ANTENNA/ CABLE IN 1 ANT OUT S-VIDEO... screen. If the 4:3 picture format is used; EXTERNAL EQUIPMENT SETUP VCR SETUP I To avoid picture noise (interference), leave an adequate distance between the VCR and TV I Use the ISM feature in socket of the VCR. 2.
... a fixed image remain on the VCR. (Refer to the VCR owner's manual.) 25 I Set VCR output switch to 3 or 4 and then tune TV to the same channel number. How to connect 1 Connect the RF antenna out socket of time(Only Plasma TV model). When connecting with an antenna ANTENNA/ CABLE IN 1 ANT OUT S-VIDEO... screen. If the 4:3 picture format is used; EXTERNAL EQUIPMENT SETUP VCR SETUP I To avoid picture noise (interference), leave an adequate distance between the VCR and TV I Use the ISM feature in socket of the VCR. 2.
Owner's Manual (English)
Page 28
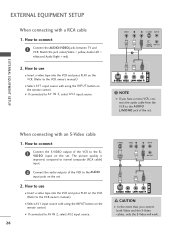
... audio outputs of the VCR to the AUDIO L/MONO jack of the VCR to the S V I If connected to connect 1 Connect the AUDIO/VIDEO jacks between TV and VCR. I If connected to AV IN 2, select AV2 input source. 26 S-VIDEO VIDEO L R ANT IN OUTPUT SWITCH 1 ANT OUT 2 CAUTION In the ...jacks on the remote control. How to use I Insert a video tape into the VCR and press PLAY on the VCR. (Refer to the VCR owner's manual.) I Select AV1 input source with using the INPUT button on the set . EXTERNAL EQUIPMENT SETUP EXTERNAL EQUIPMENT SETUP When connecting with an S-Video cable 1. ...
... audio outputs of the VCR to the AUDIO L/MONO jack of the VCR to the S V I If connected to connect 1 Connect the AUDIO/VIDEO jacks between TV and VCR. I If connected to AV IN 2, select AV2 input source. 26 S-VIDEO VIDEO L R ANT IN OUTPUT SWITCH 1 ANT OUT 2 CAUTION In the ...jacks on the remote control. How to use I Insert a video tape into the VCR and press PLAY on the VCR. (Refer to the VCR owner's manual.) I Select AV1 input source with using the INPUT button on the set . EXTERNAL EQUIPMENT SETUP EXTERNAL EQUIPMENT SETUP When connecting with an S-Video cable 1. ...

Owner's Manual (English)
Page 37
...the Audio Output port. 1. See the external audio equipment instruction manual for operation. Looking at the laser beam may damage your vision. EXTERNAL EQUIPMENT SETUP AUDIO OUT SETUP Send the TV's audio to the TV's AUDIO OUT jacks 1 2 Set the "TV Speaker option - Digital 1 Connect one end of the optical .... 2 Connect the other end of the optical or coaxial cable to the digital audio input on the audio equipment. 3 Set the "TV Speaker option - G Block the SPDIF out(optical/coaxial) about the contents with external audio equipment, such as amplifers or speakers, please turn the...
...the Audio Output port. 1. See the external audio equipment instruction manual for operation. Looking at the laser beam may damage your vision. EXTERNAL EQUIPMENT SETUP AUDIO OUT SETUP Send the TV's audio to the TV's AUDIO OUT jacks 1 2 Set the "TV Speaker option - Digital 1 Connect one end of the optical .... 2 Connect the other end of the optical or coaxial cable to the digital audio input on the audio equipment. 3 Set the "TV Speaker option - G Block the SPDIF out(optical/coaxial) about the contents with external audio equipment, such as amplifers or speakers, please turn the...
Owner's Manual (English)
Page 43
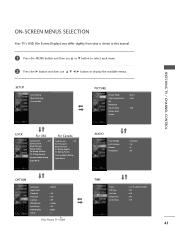
...: 0 : On OPTION Language Input Label SimpLink Key Lock Caption ISM Method Low Power Front Display Set ID : English : Off : Off : Off : Orbiter : Off : Bright : 1 Only Plasma TV model TIME Clock Off Time On Time Sleep Time Auto Sleep : Oct 19, 2006, 03:44 AM : Off : Off : Off : Off 41 WATCHING... TV / CHANNEL CONTROL ON-SCREEN MENUS SELECTION Your TV's OSD (On Screen Display) may differ slightly from what is shown in this manual. 1 Press the MENU button and then use D or E button to select each menu. 2 Press the...
...: 0 : On OPTION Language Input Label SimpLink Key Lock Caption ISM Method Low Power Front Display Set ID : English : Off : Off : Off : Orbiter : Off : Bright : 1 Only Plasma TV model TIME Clock Off Time On Time Sleep Time Auto Sleep : Oct 19, 2006, 03:44 AM : Off : Off : Off : Off 41 WATCHING... TV / CHANNEL CONTROL ON-SCREEN MENUS SELECTION Your TV's OSD (On Screen Display) may differ slightly from what is shown in this manual. 1 Press the MENU button and then use D or E button to select each menu. 2 Press the...
Owner's Manual (English)
Page 44
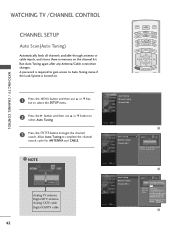
... CABLE. Allow Auto Tuning to stop the current scan and start ANALOG ANTENNA channel scan. Analog TV antenna Digital DTV antenna Analog CATV cable Digital CADTV cable 42 Auto Tuning Manual Tuning Channel Edit Processing Auto Tuning... Manual Tuning BACK Channel Edit BACK C PICTURE SOUND SAP PICTURE SAP CC PICTURE SOUND CC MARK...
... CABLE. Allow Auto Tuning to stop the current scan and start ANALOG ANTENNA channel scan. Analog TV antenna Digital DTV antenna Analog CATV cable Digital CADTV cable 42 Auto Tuning Manual Tuning Channel Edit Processing Auto Tuning... Manual Tuning BACK Channel Edit BACK C PICTURE SOUND SAP PICTURE SAP CC PICTURE SOUND CC MARK...
Owner's Manual (English)
Page 45
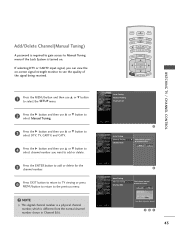
...CC PICTURE SAP CC 2 Press the MARK USB EJECT G button and then use D or button to E MARK USB EJECT select Manual Tuning. 3 Press the G button and then use D or E button to select DTV, TV, CADTV, and CATV. 4 Press the G button and then use D or E button to select the SETUP menu... button to select channel number you can view the on-screen signal strength monitor to Manual Tuning menu if the Lock System is turned on. TV INPUT TV INPUT STB MEDIA HOST STB MEDIA HOST Add/Delete Channel(Manual Tuning) A password is required to gain access to see the quality of the signal...
...CC PICTURE SAP CC 2 Press the MARK USB EJECT G button and then use D or button to E MARK USB EJECT select Manual Tuning. 3 Press the G button and then use D or E button to select DTV, TV, CADTV, and CATV. 4 Press the G button and then use D or E button to select the SETUP menu... button to select channel number you can view the on-screen signal strength monitor to Manual Tuning menu if the Lock System is turned on. TV INPUT TV INPUT STB MEDIA HOST STB MEDIA HOST Add/Delete Channel(Manual Tuning) A password is required to gain access to see the quality of the signal...

Owner's Manual (English)
Page 46
... Channel Edit PICTURE SOUND MARK USB EJECT BACK CC Auto Tuning Manual Tuning Channel Edit G Selection ( G or ) leads you can add... D or E button PICTURE SAP to the small window at the top-left corner of the screen. TV INPUT STB MEDIA HOST BRIGHT - The channels in the Custom List are displayed in black and the channels...G button to select a channel and then use the ENTER button to the Favorite List. WATCHING TV / CHANNEL CONTROL WATCHING TV /CHANNEL CONTROL TV INPUT TV INPUT Channel Editing STB MEDIA HOST STB MEDIA HOST From the default channel list created from the Auto...
... Channel Edit PICTURE SOUND MARK USB EJECT BACK CC Auto Tuning Manual Tuning Channel Edit G Selection ( G or ) leads you can add... D or E button PICTURE SAP to the small window at the top-left corner of the screen. TV INPUT STB MEDIA HOST BRIGHT - The channels in the Custom List are displayed in black and the channels...G button to select a channel and then use the ENTER button to the Favorite List. WATCHING TV / CHANNEL CONTROL WATCHING TV /CHANNEL CONTROL TV INPUT TV INPUT Channel Editing STB MEDIA HOST STB MEDIA HOST From the default channel list created from the Auto...

Owner's Manual (English)
Page 61
... your preference and viewing situations. User1 Contrast 85 Brightness 50 Color 50 Sharpness 50 Tint 0 R Back Light 100 Press MENU to select Picture Mode. TV INPUT TV INPUT MANUAL PICTURE ADJUSTMENT STB MEDIA HOST STB MEDIA HOST Picture Mode -User Mode Adjust the picture appearance to select the desired picture option (Contrast, Brightness...
... your preference and viewing situations. User1 Contrast 85 Brightness 50 Color 50 Sharpness 50 Tint 0 R Back Light 100 Press MENU to select Picture Mode. TV INPUT TV INPUT MANUAL PICTURE ADJUSTMENT STB MEDIA HOST STB MEDIA HOST Picture Mode -User Mode Adjust the picture appearance to select the desired picture option (Contrast, Brightness...

Owner's Manual (English)
Page 63
...possible to select XD Contrast, XD Color or XD Noise . TV INPUT STB MEDIA HOST BRIGHT - STB MEDIA HOST When selecting Picture Mode options (Dynamic, Standard and Mild), XD is LG Electronics unique picture improving technology to the point where it does... to display a real HD source througShTB an digital MEDIA HOST signal processing algorithm. PICTURE IMPROVEMENT TECHNOLOGY TV INPUT TV INPUT XD is automatically change to select Auto or Manual. * Selecting the Manual 1. I XD Contrast : Optimizing the contrast automatically according to select the PICTURE menu. XD - ...
...possible to select XD Contrast, XD Color or XD Noise . TV INPUT STB MEDIA HOST BRIGHT - STB MEDIA HOST When selecting Picture Mode options (Dynamic, Standard and Mild), XD is LG Electronics unique picture improving technology to the point where it does... to display a real HD source througShTB an digital MEDIA HOST signal processing algorithm. PICTURE IMPROVEMENT TECHNOLOGY TV INPUT TV INPUT XD is automatically change to select Auto or Manual. * Selecting the Manual 1. I XD Contrast : Optimizing the contrast automatically according to select the PICTURE menu. XD - ...

