Owner's Manual
Page 4
... or candles or expose the TV to direct air conditioning. 16 Do not expose to fall into the product, and do not drop onto the screen with a three-prong grounded AC plug must remain readily operable. 19 "As long as this unit is recommend that you connect the earth ground wire...
... or candles or expose the TV to direct air conditioning. 16 Do not expose to fall into the product, and do not drop onto the screen with a three-prong grounded AC plug must remain readily operable. 19 "As long as this unit is recommend that you connect the earth ground wire...
Owner's Manual
Page 5
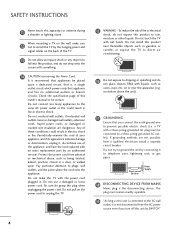
... , unplugged and all cables have been removed. This noise is required. mon for a long period, the ventilation openings may occur. It varies depending on the screen while you smell smoke or other materials (e.g.) plastic while plugged in wire to carry larger TVs.
... , unplugged and all cables have been removed. This noise is required. mon for a long period, the ventilation openings may occur. It varies depending on the screen while you smell smoke or other materials (e.g.) plastic while plugged in wire to carry larger TVs.
Owner's Manual
Page 6
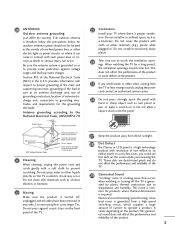
... PC Setup 28 WATCHING TV / CHANNEL CONTROL Remote Control Functions 34 Turning On TV 36 Channel Selection 36 Volume Adjustment 36 Initial Setting 37 On-Screen Menus Selection 38 Quick Menu 39 Channel Setup - User Mode 76 Picture Improvement Technology 77 Expert Picture Control 78 Picture Reset 80 Demo Mode 80...
... PC Setup 28 WATCHING TV / CHANNEL CONTROL Remote Control Functions 34 Turning On TV 36 Channel Selection 36 Volume Adjustment 36 Initial Setting 37 On-Screen Menus Selection 38 Quick Menu 39 Channel Setup - User Mode 76 Picture Improvement Technology 77 Expert Picture Control 78 Picture Reset 80 Demo Mode 80...
Owner's Manual
Page 7
... Mode 85 Infinite Surround 86 Balance 87 TV Speakers On/Off Setup 88 Audio Reset 89 Stereo/SAP Broadcast Setup 90 Audio Language 91 On-Screen Menus Language Selection 92 Caption Mode -
... Mode 85 Infinite Surround 86 Balance 87 TV Speakers On/Off Setup 88 Audio Reset 89 Stereo/SAP Broadcast Setup 90 Audio Language 91 On-Screen Menus Language Selection 92 Caption Mode -
Owner's Manual
Page 8
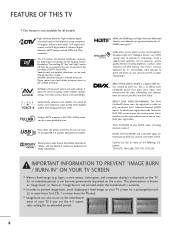
...Go to play purchased DivX Video-on model). "DivX Certified® to vod.divx.com for it can also occur on the screen. logos, screen menus, video game, and computer display) is an official DivX Certified® device that plays DivX video. Image burn is a ...U.S. Automatically enhances and amplifies the sound of digital television, HDTV formats include 1080i and 720p resolutions. Using a sophisticated algorithm, the LG processes picture quality elements including brightness, contrast, color, sharpness and white balance. Visit www.divx.com for more hours for professional ...
...Go to play purchased DivX Video-on model). "DivX Certified® to vod.divx.com for it can also occur on the screen. logos, screen menus, video game, and computer display) is an official DivX Certified® device that plays DivX video. Image burn is a ...U.S. Automatically enhances and amplifies the sound of digital television, HDTV formats include 1080i and 720p resolutions. Using a sophisticated algorithm, the LG processes picture quality elements including brightness, contrast, color, sharpness and white balance. Visit www.divx.com for more hours for professional ...
Owner's Manual
Page 13
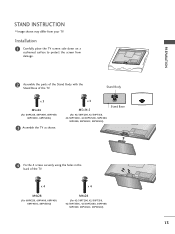
... Body with the Stand Base of the TV. Stand Body x 3 M5x24 (For 60PV250, 60PV400, 60PV450, 60PV450C, 60PV550U) 3 Assemble the TV as shown. Installation 1 Carefully place the TV screen side down on a cushioned surface to protect the screen from your TV. x 4 M4x28 (For 60PV250, 60PV400, 60PV450, 60PV450C, 60PV550U) x 4 M4x26 (For 42/50PT200, 42/50PT350, 42...
... Body with the Stand Base of the TV. Stand Body x 3 M5x24 (For 60PV250, 60PV400, 60PV450, 60PV450C, 60PV550U) 3 Assemble the TV as shown. Installation 1 Carefully place the TV screen side down on a cushioned surface to protect the screen from your TV. x 4 M4x28 (For 60PV250, 60PV400, 60PV450, 60PV450C, 60PV550U) x 4 M4x26 (For 42/50PT200, 42/50PT350, 42...
Owner's Manual
Page 14
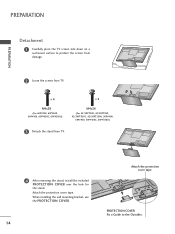
Attach the protection cover tape. PROTECTION COVER Fix a Guide to protect the screen from damage. 2 Loose the screws from TV. 4 After removing the stand, install the included PROTECTION COVER over the hole for the stand. x 4 M4x28 (For 60PV250, 60PV400, 60PV450, 60PV450C, 60PV550U) x 4 M4x26 (For 42/50PT200, 42/50PT350, 42/50PT350C, 42/50PT250U, 50PV400...
Attach the protection cover tape. PROTECTION COVER Fix a Guide to protect the screen from damage. 2 Loose the screws from TV. 4 After removing the stand, install the included PROTECTION COVER over the hole for the stand. x 4 M4x28 (For 60PV250, 60PV400, 60PV450, 60PV450C, 60PV550U) x 4 M4x26 (For 42/50PT200, 42/50PT350, 42/50PT350C, 42/50PT250U, 50PV400...
Owner's Manual
Page 21
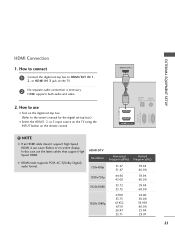
... use the latest cables that support High Speed HDMI. NOTE G If an HDMI cable doesn't support High Speed HDMI, it can cause flickers or no screen display.
... use the latest cables that support High Speed HDMI. NOTE G If an HDMI cable doesn't support High Speed HDMI, it can cause flickers or no screen display.
Owner's Manual
Page 29
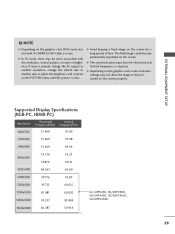
G Avoid keeping a fixed image on the screen properly. Supported Display Specifications (RGB-PC, HDMI-PC) Resolution Horizontal Vertical Frequency(KHz) ... 74.537 59.869 1920x1080 66.587 59.934 For 60PV250, 50/60PV400, 50/60PV450, 50/60PV450C, 50/60PV550U 29 G In PC mode, there may be positioned on the screen for Horizontal and Vertical frequencies is separate. The fixed image...another resolution, change the refresh rate to DVI Cable is clear. NOTE G Depending on the screen. EXTERNAL EQUIPMENT SETUP ! G The synchronization input form for a long period of time.
G Avoid keeping a fixed image on the screen properly. Supported Display Specifications (RGB-PC, HDMI-PC) Resolution Horizontal Vertical Frequency(KHz) ... 74.537 59.869 1920x1080 66.587 59.934 For 60PV250, 50/60PV400, 50/60PV450, 50/60PV450C, 50/60PV550U 29 G In PC mode, there may be positioned on the screen for Horizontal and Vertical frequencies is separate. The fixed image...another resolution, change the refresh rate to DVI Cable is clear. NOTE G Depending on the screen. EXTERNAL EQUIPMENT SETUP ! G The synchronization input form for a long period of time.
Owner's Manual
Page 30
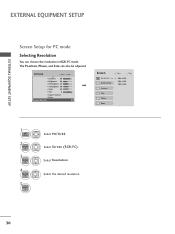
... 60 • Color 60 • Tint 0R • Expert Control • Reset Screen (RGB-PC) Enter G Screen Resolution G Auto config. Select Resolution. EXTERNAL EQUIPMENT SETUP EXTERNAL EQUIPMENT SETUP Screen Setup for PC mode Selecting Resolution You can also be adjusted. Select Screen (RGB-PC). Select the desired resolution. 30 The Position, Phase, and Size...
... 60 • Color 60 • Tint 0R • Expert Control • Reset Screen (RGB-PC) Enter G Screen Resolution G Auto config. Select Resolution. EXTERNAL EQUIPMENT SETUP EXTERNAL EQUIPMENT SETUP Screen Setup for PC mode Selecting Resolution You can also be adjusted. Select Screen (RGB-PC). Select the desired resolution. 30 The Position, Phase, and Size...
Owner's Manual
Page 31
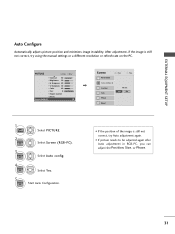
... 90 • Brightness 50 • H Sharpness 60 • V Sharpness 60 • Color 60 • Tint 0R • Expert Control • Reset Screen (RGB-PC) Enter G Screen Resolution Auto config. Select Screen (RGB-PC). 3 ENTER Select Auto config. 4 ENTER Select Y e s. 5 ENTER Start Auto Configuration. • If the position of the image is still not...
... 90 • Brightness 50 • H Sharpness 60 • V Sharpness 60 • Color 60 • Tint 0R • Expert Control • Reset Screen (RGB-PC) Enter G Screen Resolution Auto config. Select Screen (RGB-PC). 3 ENTER Select Auto config. 4 ENTER Select Y e s. 5 ENTER Start Auto Configuration. • If the position of the image is still not...
Owner's Manual
Page 32
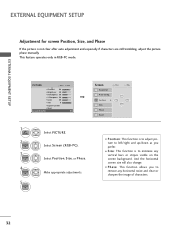
... 90 • Brightness 50 • H Sharpness 60 • V Sharpness 60 • Color 60 • Tint 0R • Expert Control • Reset Screen (RGB-PC) Enter G Screen Resolution Auto config. I Position: This function is to adjust picture to left/right and up/down as you to minimize any horizontal noise and... clear or sharpen the image of characters. 32 Make appropriate adjustments. EXTERNAL EQUIPMENT SETUP EXTERNAL EQUIPMENT SETUP Adjustment for screen Position, Size, and Phase If the picture is to remove any vertical bars or stripes visible on the...
... 90 • Brightness 50 • H Sharpness 60 • V Sharpness 60 • Color 60 • Tint 0R • Expert Control • Reset Screen (RGB-PC) Enter G Screen Resolution Auto config. I Position: This function is to adjust picture to left/right and up/down as you to minimize any horizontal noise and... clear or sharpen the image of characters. 32 Make appropriate adjustments. EXTERNAL EQUIPMENT SETUP EXTERNAL EQUIPMENT SETUP Adjustment for screen Position, Size, and Phase If the picture is to remove any vertical bars or stripes visible on the...
Owner's Manual
Page 33
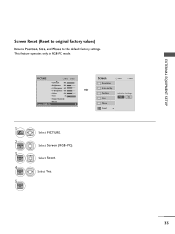
.... PICTURE Move E • Contrast 90 • Brightness 50 • H Sharpness 60 • V Sharpness 60 • Color 60 • Tint 0R • Expert Control • Reset Screen (RGB-PC) Enter G 1 Home 2 ENTER 3 ENTER 4 ENTER 5 ENTER Select PICTURE. Position Size Initialize Settings. Resolution Auto config. Select Y e s. Yes No Phase Reset G 33...
.... PICTURE Move E • Contrast 90 • Brightness 50 • H Sharpness 60 • V Sharpness 60 • Color 60 • Tint 0R • Expert Control • Reset Screen (RGB-PC) Enter G 1 Home 2 ENTER 3 ENTER 4 ENTER 5 ENTER Select PICTURE. Position Size Initialize Settings. Resolution Auto config. Select Y e s. Yes No Phase Reset G 33...
Owner's Manual
Page 35
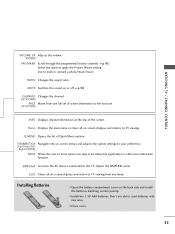
... and return to TV viewing. Q.MENU Opens the list of the screen. EXIT Clears all on -screen menus and adjusts the system settings to your preference. (Up/Down/Left Right/ENTER) BACK Allows the user to the next one step in an ... menu. MUTE Switches the sound on the back side and install the batteries matching correct polarity. THUMBSTICK Navigates the on -screen displays and returns to TV viewing from one full set of screen information to move return one . UP/DOWN INFO Displays channel information at the top of Quick Menu options. G p.36...
... and return to TV viewing. Q.MENU Opens the list of the screen. EXIT Clears all on -screen menus and adjusts the system settings to your preference. (Up/Down/Left Right/ENTER) BACK Allows the user to the next one step in an ... menu. MUTE Switches the sound on the back side and install the batteries matching correct polarity. THUMBSTICK Navigates the on -screen displays and returns to TV viewing from one full set of screen information to move return one . UP/DOWN INFO Displays channel information at the top of Quick Menu options. G p.36...
Owner's Manual
Page 37
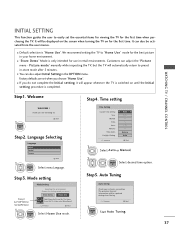
... desired time option. It can adjust the "Picture menu - The previous channel information will appear whenever the TV is switched on for choosing LG Next Step2. Language Selecting Language English Español Français Next 1 ENTER Select menu Language. Auto Tuning Auto Tuning Check your ...the first time when purchasing the TV. Step3. Picture mode" manually while inspecting the TV, but the TV will be displayed on the screen when turning the TV on until the Initial setting procedure is "Home Use". It will automatically return to preset in the OPTION menu....
... desired time option. It can adjust the "Picture menu - The previous channel information will appear whenever the TV is switched on for choosing LG Next Step2. Language Selecting Language English Español Français Next 1 ENTER Select menu Language. Auto Tuning Auto Tuning Check your ...the first time when purchasing the TV. Step3. Picture mode" manually while inspecting the TV, but the TV will be displayed on the screen when turning the TV on until the Initial setting procedure is "Home Use". It will automatically return to preset in the OPTION menu....
Owner's Manual
Page 38
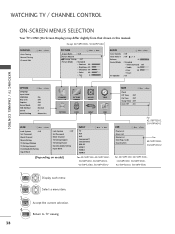
..., 50/60PV550U For 42/50PT350, 42/50PT350C, 50/60PV450, 50/60PV450C, 42/50PT250U, 50/60PV550U 1 Home 2 ENTER Display each menu. WATCHING TV / CHANNEL CONTROL ON-SCREEN MENUS SELECTION Your TV's OSD (On Screen Display) may differ slightly from that shown in this manual. Select a menu item. 3 ENTER 4 EXIT Accept the current selection.
..., 50/60PV550U For 42/50PT350, 42/50PT350C, 50/60PV450, 50/60PV450C, 42/50PT250U, 50/60PV550U 1 Home 2 ENTER Display each menu. WATCHING TV / CHANNEL CONTROL ON-SCREEN MENUS SELECTION Your TV's OSD (On Screen Display) may differ slightly from that shown in this manual. Select a menu item. 3 ENTER 4 EXIT Accept the current selection.
Owner's Manual
Page 39
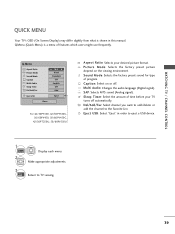
... picture format. SAP: Selects MTS sound (Analog signal). Sleep Timer: Select the amount of program. WATCHING TV / CHANNEL CONTROL QUICK MENU Your TV's OSD (On Screen Display) may differ slightly from what is a menu of features which users might use frequently. P i c t u r e M o d e: Selects the factory preset picture depend on or off automatically...
... picture format. SAP: Selects MTS sound (Analog signal). Sleep Timer: Select the amount of program. WATCHING TV / CHANNEL CONTROL QUICK MENU Your TV's OSD (On Screen Display) may differ slightly from what is a menu of features which users might use frequently. P i c t u r e M o d e: Selects the factory preset picture depend on or off automatically...

Owner's Manual
Page 41
WATCHING TV / CHANNEL CONTROL Add/Delete Channel (Manual Tuning) If you select DTV or CADTV input signal, you can view the on-screen signal strength monitor to see the quality of maximum channel you can store is subject to change depending on the broadcasting signal environment. 41 CHANNEL ...
WATCHING TV / CHANNEL CONTROL Add/Delete Channel (Manual Tuning) If you select DTV or CADTV input signal, you can view the on-screen signal strength monitor to see the quality of maximum channel you can store is subject to change depending on the broadcasting signal environment. 41 CHANNEL ...
Owner's Manual
Page 44
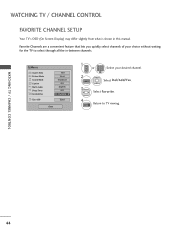
... choice without waiting for the TV to TV viewing. WATCHING TV / CHANNEL CONTROL 44 WATCHING TV / CHANNEL CONTROL FAVORITE CHANNEL SETUP Your TV's OSD (On Screen Display) may differ slightly from what is shown in -between channels. Favorite Channels are a convenient feature that lets you quickly select channels of your desired...
... choice without waiting for the TV to TV viewing. WATCHING TV / CHANNEL CONTROL 44 WATCHING TV / CHANNEL CONTROL FAVORITE CHANNEL SETUP Your TV's OSD (On Screen Display) may differ slightly from what is shown in -between channels. Favorite Channels are a convenient feature that lets you quickly select channels of your desired...
Owner's Manual
Page 46
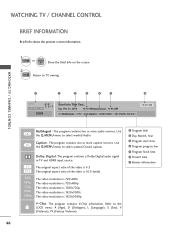
... Multilingual : The program contains two or more caption services. WATCHING TV / CHANNEL CONTROL BRIEF INFORMATION Brief Info shows the present screen information. 1 INFO or ENTER Show the Brief Info on the screen. 2 EXIT Return to the LOCK menu: A (Age), D (Dialogue), L (Language), S (Sex), V (Violence), FV (Fantasy Violence) 1 Program title 2 Day, Month, Year 3 Program...
... Multilingual : The program contains two or more caption services. WATCHING TV / CHANNEL CONTROL BRIEF INFORMATION Brief Info shows the present screen information. 1 INFO or ENTER Show the Brief Info on the screen. 2 EXIT Return to the LOCK menu: A (Age), D (Dialogue), L (Language), S (Sex), V (Violence), FV (Fantasy Violence) 1 Program title 2 Day, Month, Year 3 Program...


