Owner's Manual
Page 8
... following U.S. This TV contains the detailed calibrations necessary for Plasma). Please contact your files into DivX video. It includes Cinema, Sports, and Game Modes. View videos and photos and listen to offer. Using a sophisticated algorithm, the LG processes picture quality elements including brightness, contrast, color, sharpness and white balance. The result is three...
... following U.S. This TV contains the detailed calibrations necessary for Plasma). Please contact your files into DivX video. It includes Cinema, Sports, and Game Modes. View videos and photos and listen to offer. Using a sophisticated algorithm, the LG processes picture quality elements including brightness, contrast, color, sharpness and white balance. The result is three...
Owner's Manual
Page 12
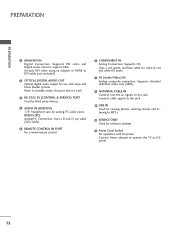
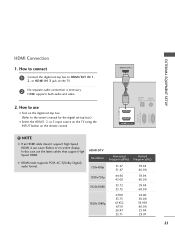
...: Never attempt to DVI cable (not included) 2 OPTICAL DIGITAL AUDIO OUT Optical digital audio output for analog PC audio input. Supports standard definition video only (480i). 8 ANTENNA/CABLE IN Connect over-the air signals to MP3s. 10 SERVICE ONLY Used for audio. 7 AV (Audio.../Video) IN Analog composite connection. Supports HD video and Digital audio. Uses a D-sub 15 pin cable (VGA cable). 5 REMOTE CONTROL IN PORT For a wired remote control. 6 COMPONENT IN Analog Connection. Accepts DVI video using an adapter or HDMI to operate the TV on...
...: Never attempt to DVI cable (not included) 2 OPTICAL DIGITAL AUDIO OUT Optical digital audio output for analog PC audio input. Supports standard definition video only (480i). 8 ANTENNA/CABLE IN Connect over-the air signals to MP3s. 10 SERVICE ONLY Used for audio. 7 AV (Audio.../Video) IN Analog composite connection. Supports HD video and Digital audio. Uses a D-sub 15 pin cable (VGA cable). 5 REMOTE CONTROL IN PORT For a wired remote control. 6 COMPONENT IN Analog Connection. Accepts DVI video using an adapter or HDMI to operate the TV on...
Owner's Manual
Page 20
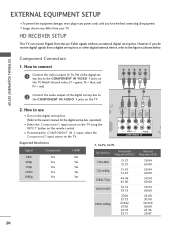
...'s manual for the digital set -top box. However, if you have finished connecting all equipment. O IN /DVI) REMOTE CONTROL IN AV IN 1 VIDEO /MONO AUDIO 2 L R 1 VIDEO AUDIO COMPONENT IN ANT CA Supported Resolutions Signal 480i 480p 720p 1080i 1080p Component Yes Yes Yes Yes Yes HDMI No Yes Yes Yes... HD RECEIVER SETUP This TV can receive Digital Over-the-air/Cable signals without an external digital set -top box. How to connect 1 Connect the video outputs (Y, PB, PR) of the digital set-top box to the COMPONENT IN AUDIO 1 jacks on the digital set-top box. (Refer to ...
...'s manual for the digital set -top box. However, if you have finished connecting all equipment. O IN /DVI) REMOTE CONTROL IN AV IN 1 VIDEO /MONO AUDIO 2 L R 1 VIDEO AUDIO COMPONENT IN ANT CA Supported Resolutions Signal 480i 480p 720p 1080i 1080p Component Yes Yes Yes Yes Yes HDMI No Yes Yes Yes... HD RECEIVER SETUP This TV can receive Digital Over-the-air/Cable signals without an external digital set -top box. How to connect 1 Connect the video outputs (Y, PB, PR) of the digital set-top box to the COMPONENT IN AUDIO 1 jacks on the digital set-top box. (Refer to ...
Owner's Manual
Page 21
...-DTV OUTPUT 1 OPTICAL DIGITAL AUDIO AUDIO OUT (RGB/DVI) 2 1 HDMI/DVI IN RS-232C IN (CONTROL & SERVICE) RGB IN(PC) ! HDMI supports both audio and video. 2. NOTE G If an HDMI cable doesn't support High Speed HDMI, it can cause flickers or no screen display. In this case use I Select the HDMI1...
...-DTV OUTPUT 1 OPTICAL DIGITAL AUDIO AUDIO OUT (RGB/DVI) 2 1 HDMI/DVI IN RS-232C IN (CONTROL & SERVICE) RGB IN(PC) ! HDMI supports both audio and video. 2. NOTE G If an HDMI cable doesn't support High Speed HDMI, it can cause flickers or no screen display. In this case use I Select the HDMI1...
Owner's Manual
Page 23
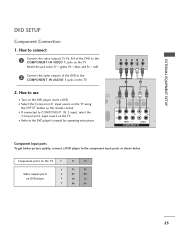
...of the DVD to COMPONENT IN 2 input, select the Component2 input source on the TV. I If connected to the COMPONENT IN VIDEO 1 jacks on the TV. I Turn on DVD player Y Y PB PR PB PR B-Y R-Y Cb Cr Pb Pr 23 How to connect 1 ...below. EXTERNAL EQUIPMENT SETUP DVD SETUP Component Connection 1. Y PB PR L R 1 2 2. DIO IN B/DVI) REMOTE CONTROL IN AV IN 1 VIDEO /MONO AUDIO 2 L R 1 VIDEO AUDIO A COMPONENT IN Component Input ports To get better picture quality, connect a DVD player to the DVD player's manual for operating instructions. Component ...
...of the DVD to COMPONENT IN 2 input, select the Component2 input source on the TV. I If connected to the COMPONENT IN VIDEO 1 jacks on the TV. I Turn on DVD player Y Y PB PR PB PR B-Y R-Y Cb Cr Pb Pr 23 How to connect 1 ...below. EXTERNAL EQUIPMENT SETUP DVD SETUP Component Connection 1. Y PB PR L R 1 2 2. DIO IN B/DVI) REMOTE CONTROL IN AV IN 1 VIDEO /MONO AUDIO 2 L R 1 VIDEO AUDIO A COMPONENT IN Component Input ports To get better picture quality, connect a DVD player to the DVD player's manual for operating instructions. Component ...
Owner's Manual
Page 24
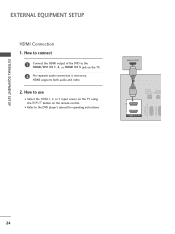
How to use I Refer to the HDMI/DVI IN 1, 2, or HDMI IN 3 jack on the remote control. How to connect 1 Connect the HDMI output of the DVD to the DVD player's manual for operating instructions. I Select the HDMI1, 2, or 3 input source on the TV using the INPUT button on the TV. 2 No separate audio connection is necessary. HDMI supports both audio and video. 2. EXTERNAL EQUIPMENT SETUP EXTERNAL EQUIPMENT SETUP HDMI Connection 1. HDMI-DTV OUTPUT 1 OPTICAL DIGITAL AUDIO AUDIO OUT (RGB/DV 2 1 HDMI/DVI IN RS-232C IN (CONTROL & SERVICE) RGB IN(PC) 24
How to use I Refer to the HDMI/DVI IN 1, 2, or HDMI IN 3 jack on the remote control. How to connect 1 Connect the HDMI output of the DVD to the DVD player's manual for operating instructions. I Select the HDMI1, 2, or 3 input source on the TV using the INPUT button on the TV. 2 No separate audio connection is necessary. HDMI supports both audio and video. 2. EXTERNAL EQUIPMENT SETUP EXTERNAL EQUIPMENT SETUP HDMI Connection 1. HDMI-DTV OUTPUT 1 OPTICAL DIGITAL AUDIO AUDIO OUT (RGB/DV 2 1 HDMI/DVI IN RS-232C IN (CONTROL & SERVICE) RGB IN(PC) 24
Owner's Manual
Page 25
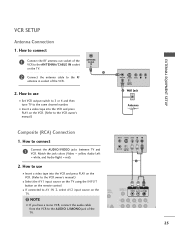
... on the VCR. (Refer to AV IN 2, select AV2 input source on the TV. How to use I If connected to the VCR owner's manual.) I Insert a video tape into the VCR and press PLAY on the remote control. I Select the A V 1 input source on the TV using the INPUT button on the VCR.... (Refer to the same channel number. I Set VCR output switch to 3 or 4 and then tune TV to the VCR owner's manual.) ANT OUT S-VIDEO VIDEO L R ANT IN OUTPUT SWITCH 2 Wall Jack Antenna Composite (RCA) Connection 1. How to the ANTENNA/CABLE IN socket on the TV. ! How to connect 1 Connect the...
... on the VCR. (Refer to AV IN 2, select AV2 input source on the TV. How to use I If connected to the VCR owner's manual.) I Insert a video tape into the VCR and press PLAY on the remote control. I Select the A V 1 input source on the TV using the INPUT button on the VCR.... (Refer to the same channel number. I Set VCR output switch to 3 or 4 and then tune TV to the VCR owner's manual.) ANT OUT S-VIDEO VIDEO L R ANT IN OUTPUT SWITCH 2 Wall Jack Antenna Composite (RCA) Connection 1. How to the ANTENNA/CABLE IN socket on the TV. ! How to connect 1 Connect the...
Owner's Manual
Page 26
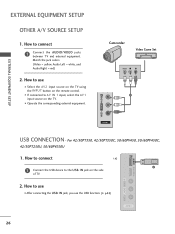
Match the jack colors. (Video = yellow, Audio Left = white, and Audio Right = red) 2. How to use the USB function. (G p.52) AV IN 2 26 I If connected to AV IN 1 input, select ... on the TV using the INPUT button on the TV. How to connect 1 Connect the AUDIO/VIDEO jacks between TV and external equipment. USB IN Camcorder Video Game Set VIDEO L R 1 EXTERNAL EQUIPMENT SETUP VIDEO L/MONO AUDIO R HDMI IN 3 AV IN 2 VIDEO L/MONO AUDIO R HDMI IN 3 USB IN USB CONNECTION - EXTERNAL EQUIPMENT SETUP OTHER A/V SOURCE SETUP...
Match the jack colors. (Video = yellow, Audio Left = white, and Audio Right = red) 2. How to use the USB function. (G p.52) AV IN 2 26 I If connected to AV IN 1 input, select ... on the TV using the INPUT button on the TV. How to connect 1 Connect the AUDIO/VIDEO jacks between TV and external equipment. USB IN Camcorder Video Game Set VIDEO L R 1 EXTERNAL EQUIPMENT SETUP VIDEO L/MONO AUDIO R HDMI IN 3 AV IN 2 VIDEO L/MONO AUDIO R HDMI IN 3 USB IN USB CONNECTION - EXTERNAL EQUIPMENT SETUP OTHER A/V SOURCE SETUP...
Owner's Manual
Page 28
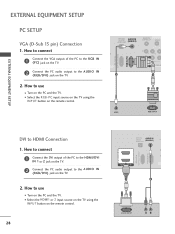
... HDMI1 or 2 input source on the TV using the INPUT button on the TV. 2. OPTICAL DIGITAL AUDIO OUT AUDIO IN (RGB/DVI) REMOTE CONTROL IN VIDEO 2 2 1 VIDEO COMPONEN 1 RS-232C IN (CONTROL & SERVICE) RGB IN (PC) 2 1 AUDIO RGB OUTPUT DVI to the AUDIO IN (RGB/DVI) jack on the remote control. 28...
... HDMI1 or 2 input source on the TV using the INPUT button on the TV. 2. OPTICAL DIGITAL AUDIO OUT AUDIO IN (RGB/DVI) REMOTE CONTROL IN VIDEO 2 2 1 VIDEO COMPONEN 1 RS-232C IN (CONTROL & SERVICE) RGB IN (PC) 2 1 AUDIO RGB OUTPUT DVI to the AUDIO IN (RGB/DVI) jack on the remote control. 28...

Owner's Manual
Page 34
... Energy Saving. The remote control may differ from standby or off to standby. Color Access special functions in some menus. G p.49 INPUT Rotates through preset Video and Audio modes. Control buttons Controls the SIMPLINK compatible devices. POWER Turns the TV on from standby. button USB, SIMPLINK Controls USB (List photo, List...
... Energy Saving. The remote control may differ from standby or off to standby. Color Access special functions in some menus. G p.49 INPUT Rotates through preset Video and Audio modes. Control buttons Controls the SIMPLINK compatible devices. POWER Turns the TV on from standby. button USB, SIMPLINK Controls USB (List photo, List...
Owner's Manual
Page 46
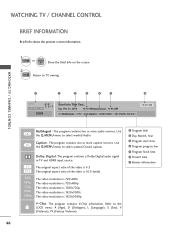
.... 4:3 16:9 480i 480p 720p 1080i 1080p The original aspect ratio of the video is 4:3 The original aspect ratio of the video is 16:9 (wide) The video resolution is 720x480i The video resolution is 720x480p The video resolution is 1280x720p The video resolution is 1920x1080i The video resolution is 1920x1080p V-Chip: The program contains V-Chip information. Use the...
.... 4:3 16:9 480i 480p 720p 1080i 1080p The original aspect ratio of the video is 4:3 The original aspect ratio of the video is 16:9 (wide) The video resolution is 720x480i The video resolution is 720x480p The video resolution is 1280x720p The video resolution is 1920x1080i The video resolution is 1920x1080p V-Chip: The program contains V-Chip information. Use the...
Owner's Manual
Page 49
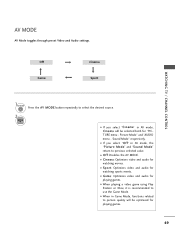
...Cinema" in AV mode, Cinema will be selected both for "PICTURE menu - AV MODE AV Mode toggles through preset Video and Audio settings. Picture Mode" and "AUDIO menu - I When playing a video game using Play Station or Xbox, it is recommended to picture quality will be optimized for watching movies. I Cinema...: Optimizes video and audio for playing games. 49 I If you select "O f f" in Game Mode, functions related to use the Game Mode. Off Game Cinema Sport...
...Cinema" in AV mode, Cinema will be selected both for "PICTURE menu - AV MODE AV Mode toggles through preset Video and Audio settings. Picture Mode" and "AUDIO menu - I When playing a video game using Play Station or Xbox, it is recommended to picture quality will be optimized for watching movies. I Cinema...: Optimizes video and audio for playing games. 49 I If you select "O f f" in Game Mode, functions related to use the Game Mode. Off Game Cinema Sport...
Owner's Manual
Page 57
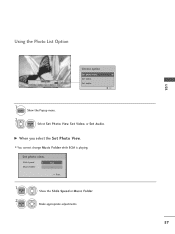
G When you select the Set Photo View. Make appropriate adjustments. 57 Set audio. Set photo view. Slide Speed Fast Music Folder ... Exit USB 1 Q.MENU Show the Popup menu. 2 ENTER Select Set Photo View, Set Video, or Set Audio. I You cannot change Music Folder while BGM is playing. Using the Photo List Option Slide show BGM 1/17 Q.MENU Option Delete Hide Choose option Set photo view. Set video. Prev. 1 ENTER 2 ENTER Show the Slide Speed or Music Folder.
G When you select the Set Photo View. Make appropriate adjustments. 57 Set audio. Set photo view. Slide Speed Fast Music Folder ... Exit USB 1 Q.MENU Show the Popup menu. 2 ENTER Select Set Photo View, Set Video, or Set Audio. I You cannot change Music Folder while BGM is playing. Using the Photo List Option Slide show BGM 1/17 Q.MENU Option Delete Hide Choose option Set photo view. Set video. Prev. 1 ENTER 2 ENTER Show the Slide Speed or Music Folder.

Owner's Manual
Page 58
Set video. Sound Mode Auto Volume Clear Voice ll Balance Cinema Off Off 0 L R Prev. 1 ENTER 2 ENTER Show the Sound Mode, Auto Volume, Clear Voice II and Balance. Picture Mode Contrast Brightness Sharpness Color Tint Color Temperature Noise Reduction Reset Vivid 100 50 70 80 0 W C 0 W C Medium Prev. 1 ENTER 2 ENTER Show the Picture Mode. Make appropriate adjustments. G When you select the Set Video. I APS mode is not supported in Set Video function. Set audio. Make appropriate adjustments. 58 USB USB G When you select the Set Audio.
Set video. Sound Mode Auto Volume Clear Voice ll Balance Cinema Off Off 0 L R Prev. 1 ENTER 2 ENTER Show the Sound Mode, Auto Volume, Clear Voice II and Balance. Picture Mode Contrast Brightness Sharpness Color Tint Color Temperature Noise Reduction Reset Vivid 100 50 70 80 0 W C 0 W C Medium Prev. 1 ENTER 2 ENTER Show the Picture Mode. Make appropriate adjustments. G When you select the Set Video. I APS mode is not supported in Set Video function. Set audio. Make appropriate adjustments. 58 USB USB G When you select the Set Audio.

Owner's Manual
Page 62
... information in an external subtitle file should be arranged in the USB folder that doesn't support high speed may not work properly with videos. 62 G Video files other than the specified types and formats may not work properly. G USB storage devices below USB 2.0 are supported as delete ... the supported languages are not supported in subtitles. But they may not work properly. WMV series are not supported in subtitles. G The video file encoded by the GMC (Global Motion Compensation) is supported in ASCII CODE is not supported. G Only the files saved in subtitles....
... information in an external subtitle file should be arranged in the USB folder that doesn't support high speed may not work properly with videos. 62 G Video files other than the specified types and formats may not work properly. G USB storage devices below USB 2.0 are supported as delete ... the supported languages are not supported in subtitles. But they may not work properly. WMV series are not supported in subtitles. G The video file encoded by the GMC (Global Motion Compensation) is supported in ASCII CODE is not supported. G Only the files saved in subtitles....

Owner's Manual
Page 63
... Duration 00: 03:33 00: 04:45 00: 01:13 00: 03:13 00: 02:51 MARK Mark Exit ! G The name of the video file and the subtitle file must be the same to upper level folder. 2 Preview: Display the title/folder name of marked movie files. 5 Usable ... Corresponding buttons on the remote control. USB Screen Components 1 Home Select U S B. 2 ENTER ENTER Select Mo v i e Li s t. 1 Moves to view the subtitles normally 63 NOTE G The video file and the subtitle file must be located in the selected folder. 3 Current page/Total pages. 2 4 Total number of the movie in the same folder.
... Duration 00: 03:33 00: 04:45 00: 01:13 00: 03:13 00: 02:51 MARK Mark Exit ! G The name of the video file and the subtitle file must be the same to upper level folder. 2 Preview: Display the title/folder name of marked movie files. 5 Usable ... Corresponding buttons on the remote control. USB Screen Components 1 Home Select U S B. 2 ENTER ENTER Select Mo v i e Li s t. 1 Moves to view the subtitles normally 63 NOTE G The video file and the subtitle file must be located in the selected folder. 3 Current page/Total pages. 2 4 Total number of the movie in the same folder.

Owner's Manual
Page 66
...Changes the Language Group of the subtitles. 1 Show the Picture size, audio Language, or Subtitle Language. 2 Make appropriate adjustments. Sync . G Sync: the video is not synchronized with a single audio track cannot be selected. G Picture size: Selects your desired picture format for TV speaker, Set Audio features in choose... options will not work. 1 Q.MENU Show the Popup menu. 2 ENTER Select Set Video Play, Set Video, or Set Audio. G Subtitle Language: The subtitles can be turned on or off. USB G When you select "Off" for...
...Changes the Language Group of the subtitles. 1 Show the Picture size, audio Language, or Subtitle Language. 2 Make appropriate adjustments. Sync . G Sync: the video is not synchronized with a single audio track cannot be selected. G Picture size: Selects your desired picture format for TV speaker, Set Audio features in choose... options will not work. 1 Q.MENU Show the Popup menu. 2 ENTER Select Set Video Play, Set Video, or Set Audio. G Subtitle Language: The subtitles can be turned on or off. USB G When you select "Off" for...

Owner's Manual
Page 67
G When you select the Set Audio. Set video. Set audio. USB G When you select the Set Video. Picture Mode Contrast Brightness Sharpness Color Tint Color Temperature Noise Reduction Reset Standard 100 50 70 80 0 W C 0 W C Low Prev. 1 ENTER 2 ENTER Show the Picture Mode. Make appropriate adjustments. Sound Mode Auto Volume Clear Voice ll Balance Cinema Off Off 0 L R Prev. 1 ENTER Show the Sound Mode, Auto Volume, Clear Voice II and Balance. 2 ENTER Make appropriate adjustments. 67
G When you select the Set Audio. Set video. Set audio. USB G When you select the Set Video. Picture Mode Contrast Brightness Sharpness Color Tint Color Temperature Noise Reduction Reset Standard 100 50 70 80 0 W C 0 W C Low Prev. 1 ENTER 2 ENTER Show the Picture Mode. Make appropriate adjustments. Sound Mode Auto Volume Clear Voice ll Balance Cinema Off Off 0 L R Prev. 1 ENTER Show the Sound Mode, Auto Volume, Clear Voice II and Balance. 2 ENTER Make appropriate adjustments. 67
Owner's Manual
Page 68
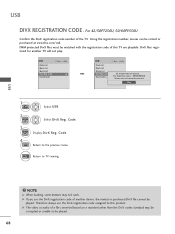
... List Music List Movie List DivX Reg. Code Deactivation Move Enter USB Photo List Music List Movie List DivX Reg. Code Deactivation Move Enter i DivX(R) Video On Demand Your registration code is : XXXXXXXXXX To learn more visit www.divx.com/vod Close 1 Home Select U S B. 2 ENTER Select DivX Reg. For 42/50PT250U... registration code number of a file converted based on a standard other than the DivX codec standard may not work. EHXoImTe Return to the previous menu. G The video or audio of the TV. Code. 3 ENTER Display DivX Reg. USB USB DIVX REGISTRATION CODE -
... List Music List Movie List DivX Reg. Code Deactivation Move Enter USB Photo List Music List Movie List DivX Reg. Code Deactivation Move Enter i DivX(R) Video On Demand Your registration code is : XXXXXXXXXX To learn more visit www.divx.com/vod Close 1 Home Select U S B. 2 ENTER Select DivX Reg. For 42/50PT250U... registration code number of a file converted based on a standard other than the DivX codec standard may not work. EHXoImTe Return to the previous menu. G The video or audio of the TV. Code. 3 ENTER Display DivX Reg. USB USB DIVX REGISTRATION CODE -
Owner's Manual
Page 69
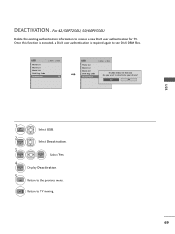
... is required again to deactivate your device? Code Deactivation Move Enter USB Photo List Music List Movie List DivX Reg. Code Deactivation Move Enter DivX(R) Video On Demand Do yoiu want to see DivX DRM files. Select Deactivation. 3 ENTER ENTER Select Y e s. 4 ENTER Display Deactivation. 5 BACK Return to receive a new DivX user...
... is required again to deactivate your device? Code Deactivation Move Enter USB Photo List Music List Movie List DivX Reg. Code Deactivation Move Enter DivX(R) Video On Demand Do yoiu want to see DivX DRM files. Select Deactivation. 3 ENTER ENTER Select Y e s. 4 ENTER Display Deactivation. 5 BACK Return to receive a new DivX user...


