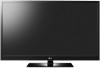
Owner's Manual
Page 4
... appliances be connected to rain, moisture or other liquids. Do not make sure 12 not to be certain. Be sure do not drop onto the screen with an exact replacement part by the hanging power and signal cables on the back of these conditions could result in . To reduce the risk...
... appliances be connected to rain, moisture or other liquids. Do not make sure 12 not to be certain. Be sure do not drop onto the screen with an exact replacement part by the hanging power and signal cables on the back of these conditions could result in . To reduce the risk...
Owner's Manual
Page 5
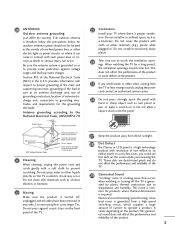
... 23 Ventilation Install your TV where there is gener- It varies depending on the TV as nail, pencil or pen, or make a scratch on the screen while you'reviewing the TV. mon for products where thermal deformation is com- Do not install in the proudct. 25 If you could see fine...
... 23 Ventilation Install your TV where there is gener- It varies depending on the TV as nail, pencil or pen, or make a scratch on the screen while you'reviewing the TV. mon for products where thermal deformation is com- Do not install in the proudct. 25 If you could see fine...
Owner's Manual
Page 6
... PC Setup 28 WATCHING TV / CHANNEL CONTROL Remote Control Functions 34 Turning On TV 36 Channel Selection 36 Volume Adjustment 36 Initial Setting 37 On-Screen Menus Selection 38 Quick Menu 39 Channel Setup -
... PC Setup 28 WATCHING TV / CHANNEL CONTROL Remote Control Functions 34 Turning On TV 36 Channel Selection 36 Volume Adjustment 36 Initial Setting 37 On-Screen Menus Selection 38 Quick Menu 39 Channel Setup -
Owner's Manual
Page 7
... Mode 85 Infinite Surround 86 Balance 87 TV Speakers On/Off Setup 88 Audio Reset 89 Stereo/SAP Broadcast Setup 90 Audio Language 91 On-Screen Menus Language Selection 92 Caption Mode - Analog Broadcasting System Captions 93 -
... Mode 85 Infinite Surround 86 Balance 87 TV Speakers On/Off Setup 88 Audio Reset 89 Stereo/SAP Broadcast Setup 90 Audio Language 91 On-Screen Menus Language Selection 92 Caption Mode - Analog Broadcasting System Captions 93 -
Owner's Manual
Page 8
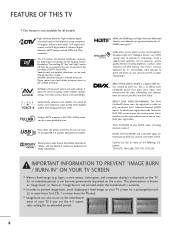
...-resolution digital television broadcast and playback system composed of roughly a million or more detailed picture. Using a sophisticated algorithm, the LG processes picture quality elements including brightness, contrast, color, sharpness and white balance. ABOUT DIVX VIDEO-ON-DEMAND: This DivX Certified... not covered under license from Dolby Laboratories. It allows the viewer to help keep dialogue audible when background noise swells. logos, screen menus, video game, and computer display) is a digital video format created by one or more of the following U.S. Manufactured...
...-resolution digital television broadcast and playback system composed of roughly a million or more detailed picture. Using a sophisticated algorithm, the LG processes picture quality elements including brightness, contrast, color, sharpness and white balance. ABOUT DIVX VIDEO-ON-DEMAND: This DivX Certified... not covered under license from Dolby Laboratories. It allows the viewer to help keep dialogue audible when background noise swells. logos, screen menus, video game, and computer display) is a digital video format created by one or more of the following U.S. Manufactured...
Owner's Manual
Page 13
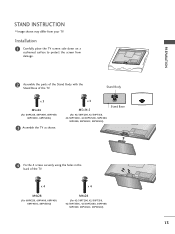
..., 60PV450, 60PV450C, 60PV550U) 3 Assemble the TV as shown. x 4 M4x28 (For 60PV250, 60PV400, 60PV450, 60PV450C, 60PV550U) x 4 M4x26 (For 42/50PT200, 42/50PT350, 42/50PT350C, 42/50PT250U, 50PV400, 50PV450, 50PV450C, 50PV550U) 13 PREPARATION STAND INSTRUCTION I Image shown may .../50PT250U, 50PV400, 50PV450, 50PV450C, 50PV550U) Stand Base 4 Fix the 4 screws securely using the holes in the back of the TV. Installation 1 Carefully place the TV screen side down on a cushioned surface to protect the...
..., 60PV450, 60PV450C, 60PV550U) 3 Assemble the TV as shown. x 4 M4x28 (For 60PV250, 60PV400, 60PV450, 60PV450C, 60PV550U) x 4 M4x26 (For 42/50PT200, 42/50PT350, 42/50PT350C, 42/50PT250U, 50PV400, 50PV450, 50PV450C, 50PV550U) 13 PREPARATION STAND INSTRUCTION I Image shown may .../50PT250U, 50PV400, 50PV450, 50PV450C, 50PV550U) Stand Base 4 Fix the 4 screws securely using the holes in the back of the TV. Installation 1 Carefully place the TV screen side down on a cushioned surface to protect the...
Owner's Manual
Page 14
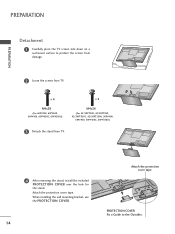
x 4 M4x28 (For 60PV250, 60PV400, 60PV450, 60PV450C, 60PV550U) x 4 M4x26 (For 42/50PT200, 42/50PT350, 42/50PT350C, 42/50PT250U, 50PV400, 50PV450, 50PV450C, 50PV550U) 3 Detach the stand from TV. Attach the protection cover tape. PROTECTION COVER Fix a Guide to protect the screen from damage. 2 Loose the screws from TV. 4 After removing the stand, install .... When installing the wall mounting bracket, use the PROTECTION COVER. 14 Attach the protection cover tape. PREPARATION PREPARATION Detachment 1 Carefully place the TV screen side down on a cushioned surface to the Outsides.
x 4 M4x28 (For 60PV250, 60PV400, 60PV450, 60PV450C, 60PV550U) x 4 M4x26 (For 42/50PT200, 42/50PT350, 42/50PT350C, 42/50PT250U, 50PV400, 50PV450, 50PV450C, 50PV550U) 3 Detach the stand from TV. Attach the protection cover tape. PROTECTION COVER Fix a Guide to protect the screen from damage. 2 Loose the screws from TV. 4 After removing the stand, install .... When installing the wall mounting bracket, use the PROTECTION COVER. 14 Attach the protection cover tape. PREPARATION PREPARATION Detachment 1 Carefully place the TV screen side down on a cushioned surface to the Outsides.
Owner's Manual
Page 21
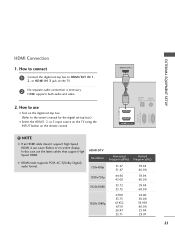
... 59.939 60.00 23.94 29.97 21 NOTE G If an HDMI cable doesn't support High Speed HDMI, it can cause flickers or no screen display. EXTERNAL EQUIPMENT SETUP HDMI Connection 1. How to connect 1 Connect the digital set-top box to the owner's manual for the digital set -top box...
... 59.939 60.00 23.94 29.97 21 NOTE G If an HDMI cable doesn't support High Speed HDMI, it can cause flickers or no screen display. EXTERNAL EQUIPMENT SETUP HDMI Connection 1. How to connect 1 Connect the digital set-top box to the owner's manual for the digital set -top box...
Owner's Manual
Page 29
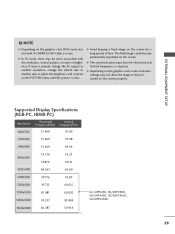
...another resolution, change the refresh rate to another rate or adjust the brightness and contrast on the screen properly. The fixed image could become permanently imprinted on the graphics card, some resolution settings may ... pattern, contrast or brightness. G The synchronization input form for a long period of time. G Depending on the screen. Supported Display Specifications (RGB-PC, HDMI-PC) Resolution Horizontal Vertical Frequency(KHz) Frequency(Hz) 640x350 31.468 70...59.869 1920x1080 66.587 59.934 For 60PV250, 50/60PV400, 50/60PV450, 50/60PV450C, 50/60PV550U 29
...another resolution, change the refresh rate to another rate or adjust the brightness and contrast on the screen properly. The fixed image could become permanently imprinted on the graphics card, some resolution settings may ... pattern, contrast or brightness. G The synchronization input form for a long period of time. G Depending on the screen. Supported Display Specifications (RGB-PC, HDMI-PC) Resolution Horizontal Vertical Frequency(KHz) Frequency(Hz) 640x350 31.468 70...59.869 1920x1080 66.587 59.934 For 60PV250, 50/60PV400, 50/60PV450, 50/60PV450C, 50/60PV550U 29
Owner's Manual
Page 30
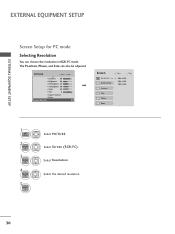
...). Position Size Phase Reset Move Prev. 1024 x 768 1280 x 768 1360 x 768 1 Home 2 ENTER 3 ENTER 4 ENTER 5 ENTER Select PICTURE. EXTERNAL EQUIPMENT SETUP EXTERNAL EQUIPMENT SETUP Screen Setup for PC mode Selecting Resolution You can also be adjusted. PICTURE Move E • Contrast 90 • Brightness 50 • H Sharpness 60 • V Sharpness 60...
...). Position Size Phase Reset Move Prev. 1024 x 768 1280 x 768 1360 x 768 1 Home 2 ENTER 3 ENTER 4 ENTER 5 ENTER Select PICTURE. EXTERNAL EQUIPMENT SETUP EXTERNAL EQUIPMENT SETUP Screen Setup for PC mode Selecting Resolution You can also be adjusted. PICTURE Move E • Contrast 90 • Brightness 50 • H Sharpness 60 • V Sharpness 60...
Owner's Manual
Page 31
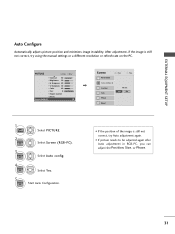
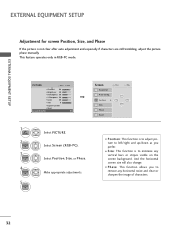
Select Screen (RGB-PC). 3 ENTER Select Auto config. 4 ENTER Select Y e s. 5 ENTER Start Auto Configuration. • If the position of the image is still not correct, try Auto .... PICTURE Move E • Contrast 90 • Brightness 50 • H Sharpness 60 • V Sharpness 60 • Color 60 • Tint 0R • Expert Control • Reset Screen (RGB-PC) Enter G Screen Resolution Auto config. EXTERNAL EQUIPMENT SETUP Auto Configure Automatically adjusts picture position and minimizes image instability.
Select Screen (RGB-PC). 3 ENTER Select Auto config. 4 ENTER Select Y e s. 5 ENTER Start Auto Configuration. • If the position of the image is still not correct, try Auto .... PICTURE Move E • Contrast 90 • Brightness 50 • H Sharpness 60 • V Sharpness 60 • Color 60 • Tint 0R • Expert Control • Reset Screen (RGB-PC) Enter G Screen Resolution Auto config. EXTERNAL EQUIPMENT SETUP Auto Configure Automatically adjusts picture position and minimizes image instability.
Owner's Manual
Page 32
...Select Position, Si ze, or Phase. I Position: This function is to adjust picture to remove any vertical bars or stripes visible on the screen background. PICTURE Move E • Contrast 90 • Brightness 50 • H Sharpness 60 • V Sharpness 60 • Color 60... • Tint 0R • Expert Control • Reset Screen (RGB-PC) Enter G Screen Resolution Auto config. I S i z e: This function is not clear after auto adjustment and especially if characters are still trembling, adjust the ...
...Select Position, Si ze, or Phase. I Position: This function is to adjust picture to remove any vertical bars or stripes visible on the screen background. PICTURE Move E • Contrast 90 • Brightness 50 • H Sharpness 60 • V Sharpness 60 • Color 60... • Tint 0R • Expert Control • Reset Screen (RGB-PC) Enter G Screen Resolution Auto config. I S i z e: This function is not clear after auto adjustment and especially if characters are still trembling, adjust the ...
Owner's Manual
Page 33
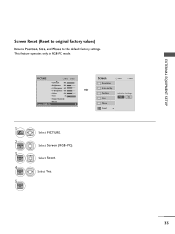
... factory values) Returns Position, S i z e, and Phase to the default factory settings. This feature operates only in RGB-PC mode. Select Screen (RGB-PC). Yes No Phase Reset G 33 Select Reset. Select Y e s. Screen Move Prev. PICTURE Move E • Contrast 90 • Brightness 50 • H Sharpness 60 • V Sharpness 60 • Color 60 •...
... factory values) Returns Position, S i z e, and Phase to the default factory settings. This feature operates only in RGB-PC mode. Select Screen (RGB-PC). Yes No Phase Reset G 33 Select Reset. Select Y e s. Screen Move Prev. PICTURE Move E • Contrast 90 • Brightness 50 • H Sharpness 60 • V Sharpness 60 • Color 60 •...
Owner's Manual
Page 35
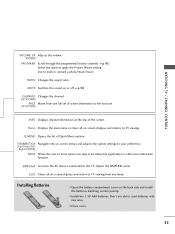
... viewing. Home Displays the main menu or clears all on the back side and install the batteries matching correct polarity. EXIT Clears all on -screen menus and adjusts the system settings to your preference. (Up/Down/Left Right/ENTER) BACK Allows the user to TV viewing from one full...; Don't mix old or used batteries with new ones. RATIO Changes the aspect ratio. UP/DOWN INFO Displays channel information at the top of the screen. G p.36 CHANNEL Changes the channel. I Close cover. 35 Use to apply the Picture Wizard setting. MUTE Switches the sound on or off. SIMPLINK ...
... viewing. Home Displays the main menu or clears all on the back side and install the batteries matching correct polarity. EXIT Clears all on -screen menus and adjusts the system settings to your preference. (Up/Down/Left Right/ENTER) BACK Allows the user to TV viewing from one full...; Don't mix old or used batteries with new ones. RATIO Changes the aspect ratio. UP/DOWN INFO Displays channel information at the top of the screen. G p.36 CHANNEL Changes the channel. I Close cover. 35 Use to apply the Picture Wizard setting. MUTE Switches the sound on or off. SIMPLINK ...
Owner's Manual
Page 37
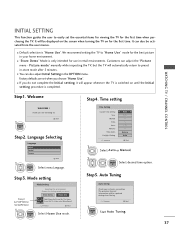
... Use Select [Home Use] to easily set when you want. Step4. The previous channel information will appear whenever the TV is switched on for choosing LG Next Step2. I If you for the first time. WATCHING TV / CHANNEL CONTROL Step1. Previous Next Select H om e U s e mode. Time setting Time .... 37 I You can adjust the "Picture menu - Picture mode" manually while inspecting the TV, but the TV will be displayed on the screen when turning the TV on until the Initial setting procedure is "Home Use". Factory defaults are set the essential items for viewing the TV for...
... Use Select [Home Use] to easily set when you want. Step4. The previous channel information will appear whenever the TV is switched on for choosing LG Next Step2. I If you for the first time. WATCHING TV / CHANNEL CONTROL Step1. Previous Next Select H om e U s e mode. Time setting Time .... 37 I You can adjust the "Picture menu - Picture mode" manually while inspecting the TV, but the TV will be displayed on the screen when turning the TV on until the Initial setting procedure is "Home Use". Factory defaults are set the essential items for viewing the TV for...
Owner's Manual
Page 38
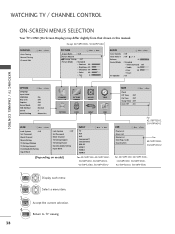
... On Time : Off Sleep Timer : Off Auto Off : On Move Enter USB Photo List Music List Movie List DivX Reg. WATCHING TV / CHANNEL CONTROL ON-SCREEN MENUS SELECTION Your TV's OSD (On Screen Display) may differ slightly from that shown in this manual. Return to TV viewing.
... On Time : Off Sleep Timer : Off Auto Off : On Move Enter USB Photo List Music List Movie List DivX Reg. WATCHING TV / CHANNEL CONTROL ON-SCREEN MENUS SELECTION Your TV's OSD (On Screen Display) may differ slightly from that shown in this manual. Return to TV viewing.
Owner's Manual
Page 39
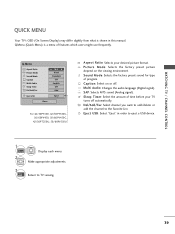
... order to the Favorite List. P i c t u r e M o d e: Selects the factory preset picture depend on or off automatically. WATCHING TV / CHANNEL CONTROL QUICK MENU Your TV's OSD (On Screen Display) may differ slightly from what is a menu of features which users might use frequently. Sound Mode: Selects the factory preset sound for type of...
... order to the Favorite List. P i c t u r e M o d e: Selects the factory preset picture depend on or off automatically. WATCHING TV / CHANNEL CONTROL QUICK MENU Your TV's OSD (On Screen Display) may differ slightly from what is a menu of features which users might use frequently. Sound Mode: Selects the factory preset sound for type of...

Owner's Manual
Page 41
... Good Add Close I When setting the Auto tuning or Manual tuning, the number of maximum channel you can store is subject to change depending on -screen signal strength monitor to allow a channel search. CHANNEL Auto Tuning Manual Tuning Channel Edit Move Enter F DTV G Select channel type and RF-channel number. Select...
... Good Add Close I When setting the Auto tuning or Manual tuning, the number of maximum channel you can store is subject to change depending on -screen signal strength monitor to allow a channel search. CHANNEL Auto Tuning Manual Tuning Channel Edit Move Enter F DTV G Select channel type and RF-channel number. Select...
Owner's Manual
Page 44
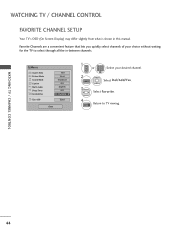
... A G E 2 Q.MENU 123 456 Select your choice without waiting for the TV to TV viewing. WATCHING TV / CHANNEL CONTROL FAVORITE CHANNEL SETUP Your TV's OSD (On Screen Display) may differ slightly from what is shown in -between channels.
... A G E 2 Q.MENU 123 456 Select your choice without waiting for the TV to TV viewing. WATCHING TV / CHANNEL CONTROL FAVORITE CHANNEL SETUP Your TV's OSD (On Screen Display) may differ slightly from what is shown in -between channels.
Owner's Manual
Page 46
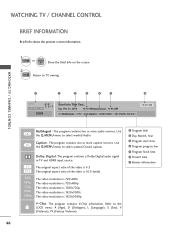
... Multilingual : The program contains two or more caption services. WATCHING TV / CHANNEL CONTROL BRIEF INFORMATION Brief Info shows the present screen information. 1 INFO or ENTER Show the Brief Info on the screen. 2 EXIT Return to select wanted Closed caption. Caption : The program contains one or more audio services. Use CC the Q.MENU...
... Multilingual : The program contains two or more caption services. WATCHING TV / CHANNEL CONTROL BRIEF INFORMATION Brief Info shows the present screen information. 1 INFO or ENTER Show the Brief Info on the screen. 2 EXIT Return to select wanted Closed caption. Caption : The program contains one or more audio services. Use CC the Q.MENU...


