

Owner's Manual
Page 1
LED LCD TV MODELS 42LV3700 42LV5500 32LW5700 47LW6500 47LV3700 47LV5500 42LW5700 55LW6500 55LV3700 55LV5500 47LW5700 65LW6500 42LV5400 42LW5600 55LW5700 47LW7700 47LV5400 47LW5600 72LZ9700 55LW7700 55LV5400 55LW5600 47LW9500 55LW9500 P/NO : SAC34134226 (1102-REV01) 60LW9500 LCD TV MODELS 42LK530 47LK530 55LK530 42LK550 47LK550 PLASMA TV MODELS 50PZ750 60PZ750 50PZ950 60PZ950 50PZ950U 60PZ950U www.lg.com OWNER'S MANUAL LED LCD TV / LCD TV / PLASMA TV Please read this manual carefully before operating the set and retain it for future reference.
LED LCD TV MODELS 42LV3700 42LV5500 32LW5700 47LW6500 47LV3700 47LV5500 42LW5700 55LW6500 55LV3700 55LV5500 47LW5700 65LW6500 42LV5400 42LW5600 55LW5700 47LW7700 47LV5400 47LW5600 72LZ9700 55LW7700 55LV5400 55LW5600 47LW9500 55LW9500 P/NO : SAC34134226 (1102-REV01) 60LW9500 LCD TV MODELS 42LK530 47LK530 55LK530 42LK550 47LK550 PLASMA TV MODELS 50PZ750 60PZ750 50PZ950 60PZ950 50PZ950U 60PZ950U www.lg.com OWNER'S MANUAL LED LCD TV / LCD TV / PLASMA TV Please read this manual carefully before operating the set and retain it for future reference.
Owner's Manual
Page 8
Attaching the stand 30 - Registering Magic Motion Remote Control 39 - Connecting an antenna or basic cable 40 - Setting up the TV 23 - Registration LG Apps 59 - Connecting USB storage devices 63 - Browsing files 68 - When watching 3D imaging 77 - Mounting on a wall 33 - Precautions to Take...13 Optional Extras 14 Parts and buttons 23 Lifting and moving the TV 23 Setting up channels 45 - Using My Apps 62 Smart Share Function 62 - Sign in with LG Apps account 60 - When a security code is already set 55 - Connecting to a wireless network 52 - Tidying cables 34 REMOTE ...
Attaching the stand 30 - Registering Magic Motion Remote Control 39 - Connecting an antenna or basic cable 40 - Setting up the TV 23 - Registration LG Apps 59 - Connecting USB storage devices 63 - Browsing files 68 - When watching 3D imaging 77 - Mounting on a wall 33 - Precautions to Take...13 Optional Extras 14 Parts and buttons 23 Lifting and moving the TV 23 Setting up channels 45 - Using My Apps 62 Smart Share Function 62 - Sign in with LG Apps account 60 - When a security code is already set 55 - Connecting to a wireless network 52 - Tidying cables 34 REMOTE ...
Owner's Manual
Page 9
... 112 MAINTENANCE 112 Updating the TV Firmware 113 Cleaning Your TV 113 - Screen and frame 113 - TABLE OF CONTENTS 9 ENEGNLGISH 78 - CHANNEL Settings 82 - RGB Connection 107 Connecting to a Headphone ( LCD ) 110 Connecting the Wireless Media Box 111 SIMPLINK Connection 111 - Power cord 113... 124 IR CODES 126 EXTERNAL CONTROL DEVICE SETUP 134 OPEN SOURCE LICENSE NETWORK Settings 96 - Digital Optical Audio Connection 109 Connecting to a USB 109 Connecting to an Audio System 107 - SUPPORT Settings 97 MAKING CONNECTIONS 98 Connection Overview 99 Connecting to a PC 104 - ...
... 112 MAINTENANCE 112 Updating the TV Firmware 113 Cleaning Your TV 113 - Screen and frame 113 - TABLE OF CONTENTS 9 ENEGNLGISH 78 - CHANNEL Settings 82 - RGB Connection 107 Connecting to a Headphone ( LCD ) 110 Connecting the Wireless Media Box 111 SIMPLINK Connection 111 - Power cord 113... 124 IR CODES 126 EXTERNAL CONTROL DEVICE SETUP 134 OPEN SOURCE LICENSE NETWORK Settings 96 - Digital Optical Audio Connection 109 Connecting to a USB 109 Connecting to an Audio System 107 - SUPPORT Settings 97 MAKING CONNECTIONS 98 Connection Overview 99 Connecting to a PC 104 - ...
Owner's Manual
Page 15
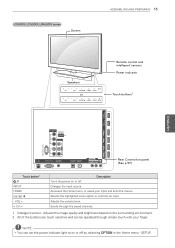
... power on or off . SETUP. Adjusts the image quality and brightness based on the surrounding environment. 2 All of the buttons are touch sensitive and can set the power indicator light to on or off by selecting OPTION in the Home menu - Scrolls through simple touch with your input and exits the...
... power on or off . SETUP. Adjusts the image quality and brightness based on the surrounding environment. 2 All of the buttons are touch sensitive and can set the power indicator light to on or off by selecting OPTION in the Home menu - Scrolls through simple touch with your input and exits the...
Owner's Manual
Page 16
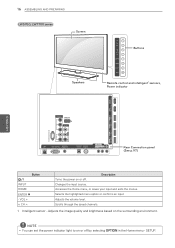
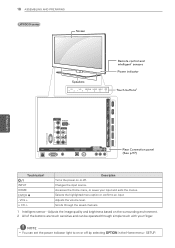
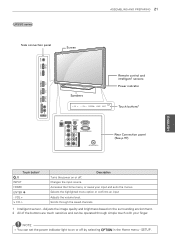
.../ODVINI) OPATUICDAILODOIGUITTAL ACNATBELNENINA/ AV IN 2 AUDIO / VIDEO COMPONENT IN 2 H/P AUDIO / Y PB PR Rear Connection panel (See p.97) Button / I INPUT HOME ENTER ꔉ - NOTE yyYou can set the power indicator light to on or off by selecting OPTION in the Home menu - VOL + v CH ^ Description Turns the power on or off . Adjusts...
.../ODVINI) OPATUICDAILODOIGUITTAL ACNATBELNENINA/ AV IN 2 AUDIO / VIDEO COMPONENT IN 2 H/P AUDIO / Y PB PR Rear Connection panel (See p.97) Button / I INPUT HOME ENTER ꔉ - NOTE yyYou can set the power indicator light to on or off by selecting OPTION in the Home menu - VOL + v CH ^ Description Turns the power on or off . Adjusts...
Owner's Manual
Page 17
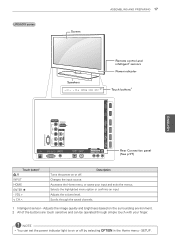
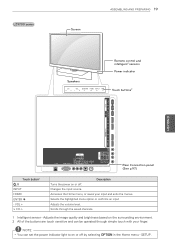
... input Adjusts the volume level. Adjusts the image quality and brightness based on the surrounding environment. 2 All of the buttons are touch sensitive and can set the power indicator light to on or off by selecting OPTION in the Home menu - NOTE yyYou can be operated through the saved channels. 1 Intelligent...
... input Adjusts the volume level. Adjusts the image quality and brightness based on the surrounding environment. 2 All of the buttons are touch sensitive and can set the power indicator light to on or off by selecting OPTION in the Home menu - NOTE yyYou can be operated through the saved channels. 1 Intelligent...
Owner's Manual
Page 18
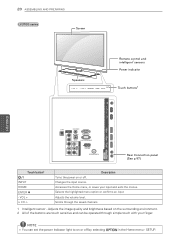
Changes the input source. Selects the highlighted menu option or confirms an input Adjusts the volume level. NOTE yyYou can set the power indicator light to on the surrounding environment. 2 All of the buttons are touch sensitive and can be operated through the saved channels. 1 Intelligent ...
Changes the input source. Selects the highlighted menu option or confirms an input Adjusts the volume level. NOTE yyYou can set the power indicator light to on the surrounding environment. 2 All of the buttons are touch sensitive and can be operated through the saved channels. 1 Intelligent ...
Owner's Manual
Page 19
... button2 / I INPUT HOME ENTER ꔉ - Adjusts the image quality and brightness based on the surrounding environment. 2 All of the buttons are touch sensitive and can set the power indicator light to on or off by selecting OPTION in the Home menu - NOTE yyYou can be operated through the saved channels. 1 Intelligent...
... button2 / I INPUT HOME ENTER ꔉ - Adjusts the image quality and brightness based on the surrounding environment. 2 All of the buttons are touch sensitive and can set the power indicator light to on or off by selecting OPTION in the Home menu - NOTE yyYou can be operated through the saved channels. 1 Intelligent...
Owner's Manual
Page 20
... input and exits the menus. Adjusts the image quality and brightness based on the surrounding environment. 2 All of the buttons are touch sensitive and can set the power indicator light to on or off by selecting OPTION in the Home menu - 20 ASSEMBLING AND PREPARING LV3700 series Screen Speakers CH VOL...
... input and exits the menus. Adjusts the image quality and brightness based on the surrounding environment. 2 All of the buttons are touch sensitive and can set the power indicator light to on or off by selecting OPTION in the Home menu - 20 ASSEMBLING AND PREPARING LV3700 series Screen Speakers CH VOL...
Owner's Manual
Page 21
... menu, or saves your finger. Adjusts the image quality and brightness based on the surrounding environment. 2 All of the buttons are touch sensitive and can set the power indicator light to on or off by selecting OPTION in the Home menu - SETUP. LK550 series Side connection panel Screen ASSEMBLING AND PREPARING...
... menu, or saves your finger. Adjusts the image quality and brightness based on the surrounding environment. 2 All of the buttons are touch sensitive and can set the power indicator light to on or off by selecting OPTION in the Home menu - SETUP. LK550 series Side connection panel Screen ASSEMBLING AND PREPARING...

Owner's Manual
Page 23
... TV upright, never turn the TV on a table or wall. yyBefore moving or lifting the TV, read the following to prevent the TV from damage. Setting up the TV Put your TV on a pedestal stand and mount the TV on its type and size. Make sure not to hold the TV...
... TV upright, never turn the TV on a table or wall. yyBefore moving or lifting the TV, read the following to prevent the TV from damage. Setting up the TV Put your TV on a pedestal stand and mount the TV on its type and size. Make sure not to hold the TV...

Owner's Manual
Page 41
...LW9500 series) Auto Tuning Scans and saves available channels automatically. 4 When the basic settings are complete, press ENTER. Network Setting Sets your home environment, select Home Use. ENEGNLGISH Select a language and customize the basic settings. 1 Connect the power cord to a power outlet. 2 In Standby mode, press... turn the TV on. yyDisconnect the power cord from the power outlet when you select Store Demo, the any customized settings will appear whenever the TV turns on. yyPower Indicator feature is suitable for the home environment. WATCHING TV 41 Turning the...
...LW9500 series) Auto Tuning Scans and saves available channels automatically. 4 When the basic settings are complete, press ENTER. Network Setting Sets your home environment, select Home Use. ENEGNLGISH Select a language and customize the basic settings. 1 Connect the power cord to a power outlet. 2 In Standby mode, press... turn the TV on. yyDisconnect the power cord from the power outlet when you select Store Demo, the any customized settings will appear whenever the TV turns on. yyPower Indicator feature is suitable for the home environment. WATCHING TV 41 Turning the...
Owner's Manual
Page 42
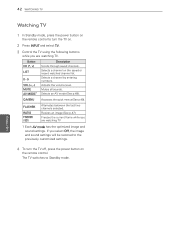
... level. Selects an AV mode (See p.48). Q.MENU Accesses the quick menus (See p.49). If you select Off, the image and sound settings will be restored to Standby mode. ENEGNLGISH FLASHBK RATIO FREEZE ( ) Plasma Alternates between the last two channels selected. Freezes the current frame while you... button on the saved or recent watched channel list. Mutes all sounds. Resizes an image (See p.47). The TV switches to the previously customized settings. 4 To turn the TV on. 2 Press INPUT and select TV. 3 Control the TV using the following buttons while you are watching TV ...
... level. Selects an AV mode (See p.48). Q.MENU Accesses the quick menus (See p.49). If you select Off, the image and sound settings will be restored to Standby mode. ENEGNLGISH FLASHBK RATIO FREEZE ( ) Plasma Alternates between the last two channels selected. Freezes the current frame while you... button on the saved or recent watched channel list. Mutes all sounds. Resizes an image (See p.47). The TV switches to the previously customized settings. 4 To turn the TV on. 2 Press INPUT and select TV. 3 Control the TV using the following buttons while you are watching TV ...

Owner's Manual
Page 43
... Hot New Weather Info World Nature 5:05 ~ 5:55 Photo Album 8 INPUT SETUP FAVORITE Social Network Service 9 Search LG Apps Web Browser Media Link Arrow Sudoku My Apps Option 1 2 3 4 5 6 7 8 9 Description Current Date, Time Channel program info Function card: You can enjoy various content files ... Home menu. 2 Press the Navigation buttons to scroll to one of the following menus and press ENTER. 3 Press the Navigation buttons to scroll to the setting or option you want and press ENTER. 4 When you are finished, press EXIT. ENEGNLGISH 1 23 4 56 Sat.
... Hot New Weather Info World Nature 5:05 ~ 5:55 Photo Album 8 INPUT SETUP FAVORITE Social Network Service 9 Search LG Apps Web Browser Media Link Arrow Sudoku My Apps Option 1 2 3 4 5 6 7 8 9 Description Current Date, Time Channel program info Function card: You can enjoy various content files ... Home menu. 2 Press the Navigation buttons to scroll to one of the following menus and press ENTER. 3 Press the Navigation buttons to scroll to the setting or option you want and press ENTER. 4 When you are finished, press EXIT. ENEGNLGISH 1 23 4 56 Sat.
Owner's Manual
Page 44
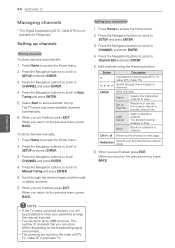
... ENTER. 5 Select Start to 1000 channels. yyYou can store differs depending on the broadcasting signal environment. Add/ Delete Adds or deletes a channel. Setting up to start automatic tuning. Set as Favorite Registers or cancels the current channel in blue. The number of channels that you are stored in the order of DTV...
... ENTER. 5 Select Start to 1000 channels. yyYou can store differs depending on the broadcasting signal environment. Add/ Delete Adds or deletes a channel. Setting up to start automatic tuning. Set as Favorite Registers or cancels the current channel in blue. The number of channels that you are stored in the order of DTV...
Owner's Manual
Page 47
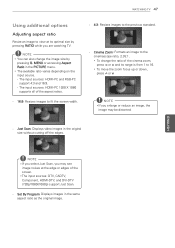
... pressing Q. The input sources: HDMI-PC and RGB-PC support 4:3 and 16:9. - yyTo change the image size by pressing RATIO while you may be distorted. - Set By Program: Displays images in the PICTURE menu. yyThe available ratio varies depending on the input source. - WATCHING TV 47 Using additional options Adjusting aspect...
... pressing Q. The input sources: HDMI-PC and RGB-PC support 4:3 and 16:9. - yyTo change the image size by pressing RATIO while you may be distorted. - Set By Program: Displays images in the PICTURE menu. yyThe available ratio varies depending on the input source. - WATCHING TV 47 Using additional options Adjusting aspect...
Owner's Manual
Page 48
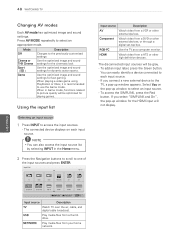
... over the air, cable, and digital cable broadcast. 48 WATCHING TV ENEGNLGISH Changing AV modes Each AV mode has optimized image and sound settings. When playing a video game using PlayStation or Xbox, it is recommended to access the input sources. - Using the input list Selecting ...Component Watch video from your home network. Press AV MODE repeatedly to the previously customized settings Use the optimized image and sound settings for the cinematic look Use the optimized image and sound settings for the HDMI input will be optimized for fast gaming. When in the Home ...
... over the air, cable, and digital cable broadcast. 48 WATCHING TV ENEGNLGISH Changing AV modes Each AV mode has optimized image and sound settings. When playing a video game using PlayStation or Xbox, it is recommended to access the input sources. - Using the input list Selecting ...Component Watch video from your home network. Press AV MODE repeatedly to the previously customized settings Use the optimized image and sound settings for the cinematic look Use the optimized image and sound settings for the HDMI input will be optimized for fast gaming. When in the Home ...
Owner's Manual
Page 49
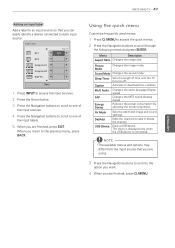
... the input source that you return to the previous menu, press BACK. When you can easily identify a device connected to each input source. Sleep Timer Sets the length of the input labels. 5 When you are finished, press EXIT. MENU. The menu is displayed only when the USB device is connected. WATCHING... you are finished, press Q. Using the quick menu Customize frequently used menus. 1 Press Q. Sound Mode Changes the sound mode. AV Mode Del/Add USB Device Sets the optimized image and sound...
... the input source that you return to the previous menu, press BACK. When you can easily identify a device connected to each input source. Sleep Timer Sets the length of the input labels. 5 When you are finished, press EXIT. MENU. The menu is displayed only when the USB device is connected. WATCHING... you are finished, press Q. Using the quick menu Customize frequently used menus. 1 Press Q. Sound Mode Changes the sound mode. AV Mode Del/Add USB Device Sets the optimized image and sound...
Owner's Manual
Page 50
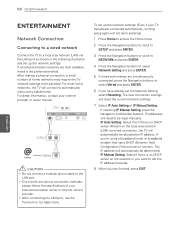
...wireless networks are various connection methods, please follow the specifications of home networks may require the TV network settings to be determined. - yyAfter connecting the LAN port, use the Premium or LG Apps menu. USB IN 1 USB IN 2 5 If wired and wireless are simultaneously connected, press ...the Navigation buttons to select Wired and press ENTER. /DVI IN 4 /DVI 6 If you have already set the IP address manually. 8 When you 're ...
...wireless networks are various connection methods, please follow the specifications of home networks may require the TV network settings to be determined. - yyAfter connecting the LAN port, use the Premium or LG Apps menu. USB IN 1 USB IN 2 5 If wired and wireless are simultaneously connected, press ...the Navigation buttons to select Wired and press ENTER. /DVI IN 4 /DVI 6 If you have already set the IP address manually. 8 When you 're ...
Owner's Manual
Page 51
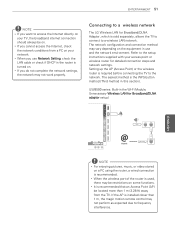
...there may not perform as expected due to frequency interference. Connecting to a wireless network The LG Wireless LAN for Broadband/DLNA Adaptor, which is turned on. yyIf you do not complete the network settings, the network may vary depending on the equipment in the router is sold separately, allows... 51 NOTE yyIf you want to access the Internet directly on your TV, the broadband internet connection should always be restrictions on some functions. Setting up the AP (Access Point) or the wireless router is recommended that an Access Point (AP) be located more than 1 m, the magic...
...there may not perform as expected due to frequency interference. Connecting to a wireless network The LG Wireless LAN for Broadband/DLNA Adaptor, which is turned on. yyIf you do not complete the network settings, the network may vary depending on the equipment in the router is sold separately, allows... 51 NOTE yyIf you want to access the Internet directly on your TV, the broadband internet connection should always be restrictions on some functions. Setting up the AP (Access Point) or the wireless router is recommended that an Access Point (AP) be located more than 1 m, the magic...

