
Owner's Manual (English)
Page 1
LCD TV OWNER'S MANUAL LCD TV MODELS 42LBX 47LBX 52LBX Please read this manual carefully before operating your dealer when you require service. Retain it for energy efficiency. www.lgusa.com / www.lg.ca Environmental Protection Agency(EPA). As an ENERGY STAR Partner LGE U. A.,Inc. See the label attached on the back cover and quote this product meets the ENERGY STAR guidelines for future reference. has determined that this information to your set. S. ENERGY STAR is a set . Record model number and serial number of the set of power-saving guidelines issued by the U.S.
LCD TV OWNER'S MANUAL LCD TV MODELS 42LBX 47LBX 52LBX Please read this manual carefully before operating your dealer when you require service. Retain it for energy efficiency. www.lgusa.com / www.lg.ca Environmental Protection Agency(EPA). As an ENERGY STAR Partner LGE U. A.,Inc. See the label attached on the back cover and quote this product meets the ENERGY STAR guidelines for future reference. has determined that this information to your set. S. ENERGY STAR is a set . Record model number and serial number of the set of power-saving guidelines issued by the U.S.
Owner's Manual (English)
Page 6
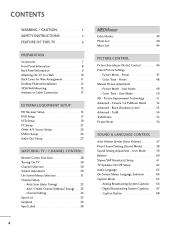
... Demo 55 Picture Reset 56 SOUND & LANGUAGE CONTROL Auto Volume Leveler (Auto Volume 57 Preset Sound Setting (Sound Mode 58 Sound Setting Adjustment - User Mode 49 - User Mode 59 Balance 60 Stereo/SAP Broadcasts Setup 61 TV Speakers On/Off Setup 62 Audio Language 63 On-Screen Menus Language Selection 64 Caption Mode...
... Demo 55 Picture Reset 56 SOUND & LANGUAGE CONTROL Auto Volume Leveler (Auto Volume 57 Preset Sound Setting (Sound Mode 58 Sound Setting Adjustment - User Mode 49 - User Mode 59 Balance 60 Stereo/SAP Broadcasts Setup 61 TV Speakers On/Off Setup 62 Audio Language 63 On-Screen Menus Language Selection 64 Caption Mode...

Owner's Manual (English)
Page 7
Auto Clock Setup 69 Manual Clock Setup 70 Auto On/Off Timer Setting 71 Sleep Time Setting 72 Auto Shut-off Setting 73 PARENTAL CONTROL / RATINGS Set Password & Lock System 74 Channel Blocking 76 Movie & TV Rating 77 External Input Blocking 80 Key Lock 80 APPENDIX Troubleshooting 81 Maintenance 83 Product Specifications 84 Programming the Remote Control 85 IR Codes 89 External Control Through RS-232C 91 5 TIME SETTING Clock Setting -
Auto Clock Setup 69 Manual Clock Setup 70 Auto On/Off Timer Setting 71 Sleep Time Setting 72 Auto Shut-off Setting 73 PARENTAL CONTROL / RATINGS Set Password & Lock System 74 Channel Blocking 76 Movie & TV Rating 77 External Input Blocking 80 Key Lock 80 APPENDIX Troubleshooting 81 Maintenance 83 Product Specifications 84 Programming the Remote Control 85 IR Codes 89 External Control Through RS-232C 91 5 TIME SETTING Clock Setting -
Owner's Manual (English)
Page 10
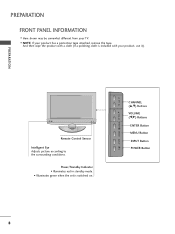
...Buttons VOL ENTER Button MENU Button INPUT Button POWER Button 8 Power/Standby Indicator • Illuminates red in standby mode. • Illuminates green when the set is included with a cloth (If a polishing cloth is switched on. PREPARATION Remote Control Sensor Intelligent Eye Adjusts picture according to the surrounding conditions. ...VOL ENTER MENU INPUT /I NOTE: If your product has a protection tape attached, remove the tape. And then wipe the product with your TV. PREPARATION FRONT PANEL INFORMATION I Here shown may be somewhat different from your product, use it).
...Buttons VOL ENTER Button MENU Button INPUT Button POWER Button 8 Power/Standby Indicator • Illuminates red in standby mode. • Illuminates green when the set is included with a cloth (If a polishing cloth is switched on. PREPARATION Remote Control Sensor Intelligent Eye Adjusts picture according to the surrounding conditions. ...VOL ENTER MENU INPUT /I NOTE: If your product has a protection tape attached, remove the tape. And then wipe the product with your TV. PREPARATION FRONT PANEL INFORMATION I Here shown may be somewhat different from your product, use it).

Owner's Manual (English)
Page 12
...holes in the product. Match the height of the bracket that you set up the TV close to a wall so it cannot fall over if pushed backwards. I Here shown may be somewhat different from the TV. I Insert the eye-bolts (or TV brackets and bolts) to tighten the product to the wall as ... purchase separately) to tie the product. It is safer to tie the rope so it cannot be attached to the wall. PREPARATION PREPARATION ATTACHING THE TV TO A WALL I Use a sturdy rope (not provided as parts of the product, must purchase separately ) to a wall so it becomes horizontal between the wall...
...holes in the product. Match the height of the bracket that you set up the TV close to a wall so it cannot fall over if pushed backwards. I Here shown may be somewhat different from the TV. I Insert the eye-bolts (or TV brackets and bolts) to tighten the product to the wall as ... purchase separately) to tie the product. It is safer to tie the rope so it cannot be attached to the wall. PREPARATION PREPARATION ATTACHING THE TV TO A WALL I Use a sturdy rope (not provided as parts of the product, must purchase separately ) to a wall so it becomes horizontal between the wall...

Owner's Manual (English)
Page 16
... do receive digital signals from a digital set -top box. When connecting Component cable () (RGB/DVI) CONTRO 1. Y PB PR L R I Turn on the digital set . EXTERNAL EQUIPMENT SETUP EXTERNAL EQUIPMENT SETUP HD RECEIVER SETUP This TV can receive Digital Over-the-air/Cable signals... without an external digital set -top box or other digital external device, refer to the figure as...
... do receive digital signals from a digital set -top box. When connecting Component cable () (RGB/DVI) CONTRO 1. Y PB PR L R I Turn on the digital set . EXTERNAL EQUIPMENT SETUP EXTERNAL EQUIPMENT SETUP HD RECEIVER SETUP This TV can receive Digital Over-the-air/Cable signals... without an external digital set -top box or other digital external device, refer to the figure as...

Owner's Manual (English)
Page 17
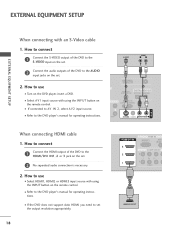
How to use I Turn on the digital se(t-to) p box. (Refer to the owner's manual for the digital set-top box.) I If the digital set-top box player does not support Auto HDMI, you need to HDMI/DVI IN1, 2 or 3 jack on the remote control. When connecting HDMI cable 1. Supported.../DVI IN 3 2 RGB IN RGB(PC) AUDIO (RGB/DV COMPONENT IN 2 1 1 VIDEO 1 HDMI-DTV OUTPUT 15 EXTERNAL EQUIPMENT SETUP How to connect 1 Connect the digital set-top box to set . 2 No separated audio connection is necessary. 2. I Select HDMI1, HDMI2 or HDMI3 input source with using the INPUT button on the...
How to use I Turn on the digital se(t-to) p box. (Refer to the owner's manual for the digital set-top box.) I If the digital set-top box player does not support Auto HDMI, you need to HDMI/DVI IN1, 2 or 3 jack on the remote control. When connecting HDMI cable 1. Supported.../DVI IN 3 2 RGB IN RGB(PC) AUDIO (RGB/DV COMPONENT IN 2 1 1 VIDEO 1 HDMI-DTV OUTPUT 15 EXTERNAL EQUIPMENT SETUP How to connect 1 Connect the digital set-top box to set . 2 No separated audio connection is necessary. 2. I Select HDMI1, HDMI2 or HDMI3 input source with using the INPUT button on the...

Owner's Manual (English)
Page 18
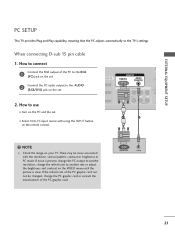
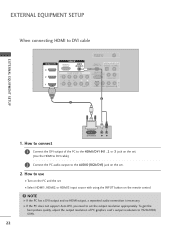
How to connect 1 Connect the DVI output of the digital set-top box to the HDMI/DVI IN1, 2 or 3 jack on the set. 2 Connect the audio output of the digital set-top box to the AUDIO (RGB/DVI) jack on the remote control. 16 EXTERNAL EQUIPMENT SETUP EXTERNAL EQUIPMENT SETUP When connecting... HDMI to the owner's manual for the digital set-top box.) I Turn on the digital set-top box. (Refer to DVI cable HDMI/DVI IN 3 2 RGB IN RGB(PC) AUDIO (RGB/DVI) COMPONENT IN 2 1 1 VIDEO AUDIO ...
How to connect 1 Connect the DVI output of the digital set-top box to the HDMI/DVI IN1, 2 or 3 jack on the set. 2 Connect the audio output of the digital set-top box to the AUDIO (RGB/DVI) jack on the remote control. 16 EXTERNAL EQUIPMENT SETUP EXTERNAL EQUIPMENT SETUP When connecting... HDMI to the owner's manual for the digital set-top box.) I Turn on the digital set-top box. (Refer to DVI cable HDMI/DVI IN 3 2 RGB IN RGB(PC) AUDIO (RGB/DVI) COMPONENT IN 2 1 1 VIDEO AUDIO ...

Owner's Manual (English)
Page 19
...2 Connect the audio outputs of the DVD to the COMPONENT IN VIDEO1 jacks on the DVD player, insert a DVD. Component ports on the TV Y PB PR Video output ports on the remote control. I Select Component 1 input source with using the INPUT button on DVD player Y ...PB PR Y Pb Pr Y B-Y R-Y Y Cb Cr 17 I Turn on the set . 1 VIDEO AUDIO S-VI ( ) 2. I Refer to the DVD player's manual for operating instructions. 1 2 Y PB PR L R Component Input ports To get better picture...
...2 Connect the audio outputs of the DVD to the COMPONENT IN VIDEO1 jacks on the DVD player, insert a DVD. Component ports on the TV Y PB PR Video output ports on the remote control. I Select Component 1 input source with using the INPUT button on DVD player Y ...PB PR Y Pb Pr Y B-Y R-Y Y Cb Cr 17 I Turn on the set . 1 VIDEO AUDIO S-VI ( ) 2. I Refer to the DVD player's manual for operating instructions. 1 2 Y PB PR L R Component Input ports To get better picture...
Owner's Manual (English)
Page 20
... HDMI, you need to the HDMI/DVI IN1, 2 or 3 jack on the set . 2. How to connect 1 Connect the S-VIDEO output of the DVD to the S-VIDEO input on the set. 2 Connect the audio outputs of the DVD to set the output resolution appropriately. 18 HDMI/DVI IN 3 2 RGB IN RGB(PC) ...AUD (RGB/ COMPONENT 2 1 1 VIDEO 1 HDMI-DVD OUTPUT How to the AUDIO input jacks on the set . 2 No separated audio( c)onnection is necessary. 2. How to connect 1 Connect the HDMI output of the DVD to use I Turn on the DVD player, insert a ...
... HDMI, you need to the HDMI/DVI IN1, 2 or 3 jack on the set . 2. How to connect 1 Connect the S-VIDEO output of the DVD to the S-VIDEO input on the set. 2 Connect the audio outputs of the DVD to set the output resolution appropriately. 18 HDMI/DVI IN 3 2 RGB IN RGB(PC) ...AUD (RGB/ COMPONENT 2 1 1 VIDEO 1 HDMI-DVD OUTPUT How to the AUDIO input jacks on the set . 2 No separated audio( c)onnection is necessary. 2. How to connect 1 Connect the HDMI output of the DVD to use I Turn on the DVD player, insert a ...

Owner's Manual (English)
Page 21
How to connect 1 Connect the RF antenna out socket of the VCR. 2. I Set VCR output switch to 3 or 4 and then tune TV to the same channel number. the fixed images on the sides of the screen may remain visible on the set. 2 Connect the antenna cable to the RF antenna in socket of the... press PLAY on the VCR. (Refer to the VCR owner's manual.) ( ) 19 I To avoid picture noise (interference), leave an adequate distance between the VCR and TV.
How to connect 1 Connect the RF antenna out socket of the VCR. 2. I Set VCR output switch to 3 or 4 and then tune TV to the same channel number. the fixed images on the sides of the screen may remain visible on the set. 2 Connect the antenna cable to the RF antenna in socket of the... press PLAY on the VCR. (Refer to the VCR owner's manual.) ( ) 19 I To avoid picture noise (interference), leave an adequate distance between the VCR and TV.

Owner's Manual (English)
Page 22
... to connect 1 Connect the S-VIDEO output of the VCR to the VCR owner's manual.) I Insert a video tape into the VCR and press PLAY on the set. 2. Match the jack colors (Video = yellow, Audio Left = white, and Audio Right = red) ( ) ANT IN S-VIDEO VIDEO L R ANT OUT OUTPUT SWITCH EXTERNAL ...of the VCR to normal composite (RCA cable) input. 2 Connect the audio outputs of the set . compared to the AUDIO input jacks on the VCR. (Refer to connect 1 Connect the AUDIO/VIDEO jacks between TV and VCR. The picture quality is improved; How to use ANT OUT OUTPUT SWITCH N AUDIO...
... to connect 1 Connect the S-VIDEO output of the VCR to the VCR owner's manual.) I Insert a video tape into the VCR and press PLAY on the set. 2. Match the jack colors (Video = yellow, Audio Left = white, and Audio Right = red) ( ) ANT IN S-VIDEO VIDEO L R ANT OUT OUTPUT SWITCH EXTERNAL ...of the VCR to normal composite (RCA cable) input. 2 Connect the audio outputs of the set . compared to the AUDIO input jacks on the VCR. (Refer to connect 1 Connect the AUDIO/VIDEO jacks between TV and VCR. The picture quality is improved; How to use ANT OUT OUTPUT SWITCH N AUDIO...
Owner's Manual (English)
Page 23
... the PC audio output to the AUDIO (RGB/DVI) jack on the PC and the set . How to another rate or adjust the brightness and contrast on your TV. If the refresh rate of the PC graphic card can not be noise associated with using the INPUT button on the remote control... to use I Select RGB-PC input source with the resolution, vertical pattern, contrast or brightness in PC mode. RGB OUTPUT AUDIO ( 21 PC SETUP This TV provides Plug and Play capability, meaning that the PC adjusts automatically to another resolution, change the PC graphic card or consult the manufacturer of the...
... the PC audio output to the AUDIO (RGB/DVI) jack on the PC and the set . How to another rate or adjust the brightness and contrast on your TV. If the refresh rate of the PC graphic card can not be noise associated with using the INPUT button on the remote control... to use I Select RGB-PC input source with the resolution, vertical pattern, contrast or brightness in PC mode. RGB OUTPUT AUDIO ( 21 PC SETUP This TV provides Plug and Play capability, meaning that the PC adjusts automatically to another resolution, change the PC graphic card or consult the manufacturer of the...
Owner's Manual (English)
Page 24
... get the best picture quality, adjust the output resolution of the PC to the HDMI/DVI IN1, 2 or 3 jack on the set . (Use the HDMI to DVI cable) 2 Connect the PC audio output to 1920x1080, 60Hz. 22 G If the PC does not support Auto DVI, you need ...to use I Turn on the remote control. How to set I Select HDMI1, HDMI2 or HDMI3 input source with using the INPUT button on the PC and the set the output resolution appropriately. NOTE G If the PC has a DVI output and no HDMI output, a separated...
... get the best picture quality, adjust the output resolution of the PC to the HDMI/DVI IN1, 2 or 3 jack on the set . (Use the HDMI to DVI cable) 2 Connect the PC audio output to 1920x1080, 60Hz. 22 G If the PC does not support Auto DVI, you need ...to use I Turn on the remote control. How to set I Select HDMI1, HDMI2 or HDMI3 input source with using the INPUT button on the PC and the set the output resolution appropriately. NOTE G If the PC has a DVI output and no HDMI output, a separated...

Owner's Manual (English)
Page 26
... you to the screen adjustment menu. 24 EXTERNAL EQUIPMENT SETUP EXTERNAL EQUIPMENT SETUP Screen Setup for PC mode Overview When the RGB input of the set is connected to enter the screen adjustment menu. Picture Mode Color Temperature XD Advanced Aspect Ratio Picture Reset Screen TruM Demo : User1 : Cool : 16:9 Picture...
... you to the screen adjustment menu. 24 EXTERNAL EQUIPMENT SETUP EXTERNAL EQUIPMENT SETUP Screen Setup for PC mode Overview When the RGB input of the set is connected to enter the screen adjustment menu. Picture Mode Color Temperature XD Advanced Aspect Ratio Picture Reset Screen TruM Demo : User1 : Cool : 16:9 Picture...

Owner's Manual (English)
Page 27
... adjustments. I The Size adjustment range is you to select the Default Sync Time. Size This function is -16 ~ +16. Resolution Position Size Phase Reset G Initialize Settings.
... adjustments. I The Size adjustment range is you to select the Default Sync Time. Size This function is -16 ~ +16. Resolution Position Size Phase Reset G Initialize Settings.

Owner's Manual (English)
Page 28
...Left = white, and S-VIDEO Audio Right = red) VIDEO L/MONO AUDIO R 2. I If connected to connect 1 Connect the AUDIO/VIDEO jacks between TV and external equipment. EXTERNAL EQUIPMENT SETUP EXTERNAL EQUIPMENT SETUP OTHER A/V SOURCE SETUP 1. How to use I After connecting the USB IN jacks, you use AV... IN 2 I Operate the corresponding external equipment. 1 VIDEO L R Camcorder Video Game Set USB IN SETUP The TV has a special signal output capability which allows you to the USB IN jacks on the remote control. I Select AV2 input source ...
...Left = white, and S-VIDEO Audio Right = red) VIDEO L/MONO AUDIO R 2. I If connected to connect 1 Connect the AUDIO/VIDEO jacks between TV and external equipment. EXTERNAL EQUIPMENT SETUP EXTERNAL EQUIPMENT SETUP OTHER A/V SOURCE SETUP 1. How to use I After connecting the USB IN jacks, you use AV... IN 2 I Operate the corresponding external equipment. 1 VIDEO L R Camcorder Video Game Set USB IN SETUP The TV has a special signal output capability which allows you to the USB IN jacks on the remote control. I Select AV2 input source ...
Owner's Manual (English)
Page 29
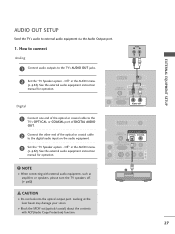
.... G Block the SPDIF out(optical/coaxial) about the contents with external audio equipment, such as amplifers or speakers, please turn the TV speakers off. (G p.62) AV IN 1 CAUTION G Do not look into the optical output port. EXTERNAL EQUIPMENT SETUP AUDIO OUT SETUP Send the... TV's audio to the digital audio input on the audio equipment. 3 Set the "TV Speaker option - Off" in the AUDIO menu. (G p.62). Looking at the laser beam may damage your vision. Off"...
.... G Block the SPDIF out(optical/coaxial) about the contents with external audio equipment, such as amplifers or speakers, please turn the TV speakers off. (G p.62) AV IN 1 CAUTION G Do not look into the optical output port. EXTERNAL EQUIPMENT SETUP AUDIO OUT SETUP Send the... TV's audio to the digital audio input on the audio equipment. 3 Set the "TV Speaker option - Off" in the AUDIO menu. (G p.62). Looking at the laser beam may damage your vision. Off"...
Owner's Manual (English)
Page 30
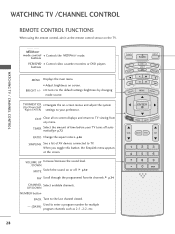
...a program number for multiple program channels such as 2-1, 2-2, etc. EXIT Clear all on-screen displays and return to the default settings brightness by changing mode source. When you toggle this button, the SimpLink menu appears at the remote control sensor on or off...I Controls the MEDIAHOST mode. VOLUME UP Increase/decrease the sound level. /DOWN MUTE Switch the sound on the TV. TV INPUT STB MEDIA HOST BRIGHT - THUMBSTICK I It turns to TV viewing from any menu. p.30 FAV Scroll through the programmed Favorite channels. BRIGHT +/- p.34 CHANNEL Select available ...
...a program number for multiple program channels such as 2-1, 2-2, etc. EXIT Clear all on-screen displays and return to the default settings brightness by changing mode source. When you toggle this button, the SimpLink menu appears at the remote control sensor on or off...I Controls the MEDIAHOST mode. VOLUME UP Increase/decrease the sound level. /DOWN MUTE Switch the sound on the TV. TV INPUT STB MEDIA HOST BRIGHT - THUMBSTICK I It turns to TV viewing from any menu. p.30 FAV Scroll through the programmed Favorite channels. BRIGHT +/- p.34 CHANNEL Select available ...

Owner's Manual (English)
Page 32
... (D or E) button. BACK PICTURE SOUND SAP CC MARK TV INPUT USB EJECT 3 When finished using the INPUT button on vacation, disconnect the power plug from the wall power outlet. I This TV is programmed to remember which mode it was last set to, even if you intend to standby mode. BACK PICTURE... SOUND SAP CC 30 MARK USB EJECT TV INPUT STB MEDIA HOST BACK PICTURE SOUND SAP CC MARK USB EJECT...
... (D or E) button. BACK PICTURE SOUND SAP CC MARK TV INPUT USB EJECT 3 When finished using the INPUT button on vacation, disconnect the power plug from the wall power outlet. I This TV is programmed to remember which mode it was last set to, even if you intend to standby mode. BACK PICTURE... SOUND SAP CC 30 MARK USB EJECT TV INPUT STB MEDIA HOST BACK PICTURE SOUND SAP CC MARK USB EJECT...


