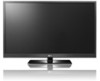
Owner's Manual
Page 6
... Movie List 62 DivX Registration Code 68 Deactivation 69 PICTURE CONTROL Picture Size (Aspect Ratio) Control 70 Picture Wizard 72 Energy Saving 74 Preset Picture Settings(Picture Mode 75 Manual Picture Adjustment - Add / Delete Channel (Manual Tuning 41 - User Mode 76 Picture Improvement Technology 77 Expert Picture Control 78 Picture Reset 80 Demo Mode 80 Image Sticking Minimization (ISM...
... Movie List 62 DivX Registration Code 68 Deactivation 69 PICTURE CONTROL Picture Size (Aspect Ratio) Control 70 Picture Wizard 72 Energy Saving 74 Preset Picture Settings(Picture Mode 75 Manual Picture Adjustment - Add / Delete Channel (Manual Tuning 41 - User Mode 76 Picture Improvement Technology 77 Expert Picture Control 78 Picture Reset 80 Demo Mode 80 Image Sticking Minimization (ISM...
Owner's Manual
Page 8
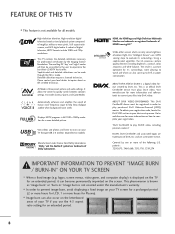
... Sports, and Game Modes. A subset of Dolby Laboratories. Automatically enhances and amplifies the sound of DivX, Inc. The result is a picture optimized for an extended period, it 's surroundings, more information on how to offer. Covered by one or more of roughly a million ...viewer to prevent image burn, avoid displaying a fixed image on your TV through the ISFccc mode. Using a sophisticated algorithm, the LG processes picture quality elements including brightness, contrast, color, sharpness and white balance. and are trademarks of human voice frequency range to 50% in...
... Sports, and Game Modes. A subset of Dolby Laboratories. Automatically enhances and amplifies the sound of DivX, Inc. The result is a picture optimized for an extended period, it 's surroundings, more information on how to offer. Covered by one or more of roughly a million ...viewer to prevent image burn, avoid displaying a fixed image on your TV through the ISFccc mode. Using a sophisticated algorithm, the LG processes picture quality elements including brightness, contrast, color, sharpness and white balance. and are trademarks of human voice frequency range to 50% in...
Owner's Manual
Page 10
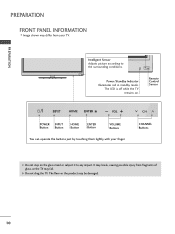
... TV. It may break, causing possible injury from fragments of glass, or the TV may differ from your finger. ENTER VOL CH Intelligent Sensor Adjusts picture according to any impact. The LED is off while the TV remains on the glass stand or subject it to the surrounding conditions. CHANNEL ENTER...
... TV. It may break, causing possible injury from fragments of glass, or the TV may differ from your finger. ENTER VOL CH Intelligent Sensor Adjusts picture according to any impact. The LED is off while the TV remains on the glass stand or subject it to the surrounding conditions. CHANNEL ENTER...
Owner's Manual
Page 18
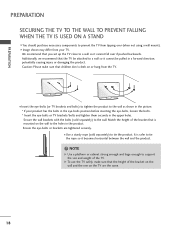
... tipping over if pushed backwards. Match the height of the bracket that the TV be attached to a wall so it cannot be pulled in the picture. * If your TV. s Image shown may differ from the TV. We recommend that the height of the TV. NOTE G Use a platform or cabinet strong enough...
... tipping over if pushed backwards. Match the height of the bracket that the TV be attached to a wall so it cannot be pulled in the picture. * If your TV. s Image shown may differ from the TV. We recommend that the height of the TV. NOTE G Use a platform or cabinet strong enough...
Owner's Manual
Page 19
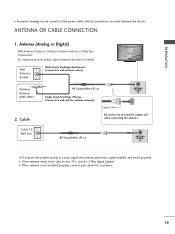
For optimum picture quality, adjust antenna direction if needed. I If the antenna needs to the power outlet until all connections are made between the devices. RF Coaxial Wire (... when connecting the antenna. Antenna (Analog or Digital) Wall Antenna Socket or Outdoor Antenna without a Cable Box Connection. PREPARATION () VARIABLE AUDIO OUT R I To improve the picture quality in a poor signal area, please purchase a signal amplifier and install properly. Cable Cable TV Wall Jack RF Coaxial Wire (75 Ω) Single-family Dwellings...
For optimum picture quality, adjust antenna direction if needed. I If the antenna needs to the power outlet until all connections are made between the devices. RF Coaxial Wire (... when connecting the antenna. Antenna (Analog or Digital) Wall Antenna Socket or Outdoor Antenna without a Cable Box Connection. PREPARATION () VARIABLE AUDIO OUT R I To improve the picture quality in a poor signal area, please purchase a signal amplifier and install properly. Cable Cable TV Wall Jack RF Coaxial Wire (75 Ω) Single-family Dwellings...
Owner's Manual
Page 23
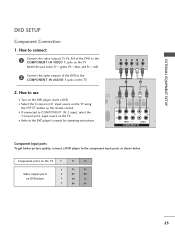
... DVD player, insert a DVD. DIO IN B/DVI) REMOTE CONTROL IN AV IN 1 VIDEO /MONO AUDIO 2 L R 1 VIDEO AUDIO A COMPONENT IN Component Input ports To get better picture quality, connect a DVD player to the COMPONENT IN AUDIO 1 jacks on the TV. How to COMPONENT IN 2 input, select the Component2 input source on DVD...
... DVD player, insert a DVD. DIO IN B/DVI) REMOTE CONTROL IN AV IN 1 VIDEO /MONO AUDIO 2 L R 1 VIDEO AUDIO A COMPONENT IN Component Input ports To get better picture quality, connect a DVD player to the COMPONENT IN AUDIO 1 jacks on the TV. How to COMPONENT IN 2 input, select the Component2 input source on DVD...
Owner's Manual
Page 29
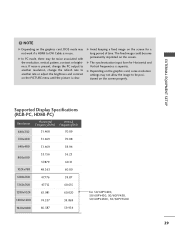
G The synchronization input form for a long period of time. G Avoid keeping a fixed image on the PICTURE menu until the picture is in use. G Depending on the graphics card, some resolution settings may not allow the image to another resolution, change the PC output to another ...
G The synchronization input form for a long period of time. G Avoid keeping a fixed image on the PICTURE menu until the picture is in use. G Depending on the graphics card, some resolution settings may not allow the image to another resolution, change the PC output to another ...
Owner's Manual
Page 30
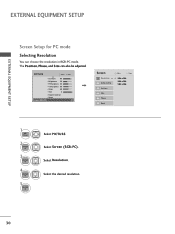
Select Screen (RGB-PC). PICTURE Move E • Contrast 90 • Brightness 50 • H Sharpness 60 • V Sharpness 60 • Color 60 • Tint 0R • Expert Control • Reset Screen (...RGB-PC) Enter G Screen Resolution G Auto config. Position Size Phase Reset Move Prev. 1024 x 768 1280 x 768 1360 x 768 1 Home 2 ENTER 3 ENTER 4 ENTER 5 ENTER Select PICTURE. EXTERNAL EQUIPMENT SETUP EXTERNAL EQUIPMENT SETUP Screen Setup for PC mode Selecting Resolution You can also be adjusted. The Position, Phase, and Size can choose...
Select Screen (RGB-PC). PICTURE Move E • Contrast 90 • Brightness 50 • H Sharpness 60 • V Sharpness 60 • Color 60 • Tint 0R • Expert Control • Reset Screen (...RGB-PC) Enter G Screen Resolution G Auto config. Position Size Phase Reset Move Prev. 1024 x 768 1280 x 768 1360 x 768 1 Home 2 ENTER 3 ENTER 4 ENTER 5 ENTER Select PICTURE. EXTERNAL EQUIPMENT SETUP EXTERNAL EQUIPMENT SETUP Screen Setup for PC mode Selecting Resolution You can also be adjusted. The Position, Phase, and Size can choose...
Owner's Manual
Page 31
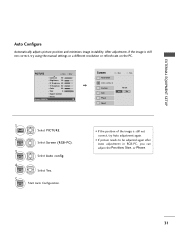
... Auto config. 4 ENTER Select Y e s. 5 ENTER Start Auto Configuration. • If the position of the image is still not correct, try Auto adjustment again. • If picture needs to be adjusted again after Auto adjustment in RGB-PC, you can adjust the Position, Si ze, or Phase. 31... PICTURE Move E • Contrast 90 • Brightness 50 • H Sharpness 60 • V Sharpness 60 • Color 60 • Tint 0R • Expert Control • Reset Screen (...
... Auto config. 4 ENTER Select Y e s. 5 ENTER Start Auto Configuration. • If the position of the image is still not correct, try Auto adjustment again. • If picture needs to be adjusted again after Auto adjustment in RGB-PC, you can adjust the Position, Si ze, or Phase. 31... PICTURE Move E • Contrast 90 • Brightness 50 • H Sharpness 60 • V Sharpness 60 • Color 60 • Tint 0R • Expert Control • Reset Screen (...
Owner's Manual
Page 32
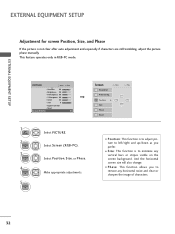
...F Size E Phase Reset Prev. This feature operates only in RGB-PC mode. s P h a s e: This function allows you prefer. Select Screen (RGB-PC). PICTURE Move E • Contrast 90 • Brightness 50 • H Sharpness 60 • V Sharpness 60 • Color 60 • Tint 0R • Expert ... Si ze, or Phase. EXTERNAL EQUIPMENT SETUP EXTERNAL EQUIPMENT SETUP Adjustment for screen Position, Size, and Phase If the picture is to remove any vertical bars or stripes visible on the screen background. Make appropriate adjustments. G 1 Home 2 ENTER 3 ENTER 4 ...
...F Size E Phase Reset Prev. This feature operates only in RGB-PC mode. s P h a s e: This function allows you prefer. Select Screen (RGB-PC). PICTURE Move E • Contrast 90 • Brightness 50 • H Sharpness 60 • V Sharpness 60 • Color 60 • Tint 0R • Expert ... Si ze, or Phase. EXTERNAL EQUIPMENT SETUP EXTERNAL EQUIPMENT SETUP Adjustment for screen Position, Size, and Phase If the picture is to remove any vertical bars or stripes visible on the screen background. Make appropriate adjustments. G 1 Home 2 ENTER 3 ENTER 4 ...
Owner's Manual
Page 33
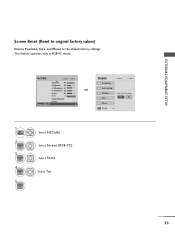
... Phase to the default factory settings. Screen Move Prev. Select Reset. This feature operates only in RGB-PC mode. Select Y e s. Yes No Phase Reset G 33 PICTURE Move E • Contrast 90 • Brightness 50 • H Sharpness 60 • V Sharpness 60 • Color 60 • Tint 0R • Expert Control • Reset Screen...
... Phase to the default factory settings. Screen Move Prev. Select Reset. This feature operates only in RGB-PC mode. Select Y e s. Yes No Phase Reset G 33 PICTURE Move E • Contrast 90 • Brightness 50 • H Sharpness 60 • V Sharpness 60 • Color 60 • Tint 0R • Expert Control • Reset Screen...

Owner's Manual
Page 35
... a photo/music/movie. Installing Batteries s Open the battery compartment cover on or off. s Install two 1.5V AAA batteries. s Close cover. 35 Use to apply the Picture Wizard setting. RATIO Changes the aspect ratio. Q.MENU Opens the list of the screen. SIMPLINK Accesses the AV devices connected to TV viewing. EXIT Clears...
... a photo/music/movie. Installing Batteries s Open the battery compartment cover on or off. s Install two 1.5V AAA batteries. s Close cover. 35 Use to apply the Picture Wizard setting. RATIO Changes the aspect ratio. Q.MENU Opens the list of the screen. SIMPLINK Accesses the AV devices connected to TV viewing. EXIT Clears...
Owner's Manual
Page 37
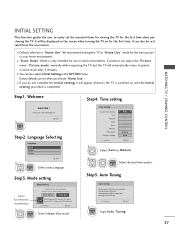
...intended for use this TV at store, select [Store Demo]. Factory defaults are set the essential items for viewing the TV for the best picture in the OPTION menu. Step3. Time setting Time Setting Current Time Setting Year Month Date Hour Minute Time Zone Daylight Saving F Auto G... will be activated from the user menus. It will appear whenever the TV is switched on for choosing LG Next Step2. Step5. WATCHING TV / CHANNEL CONTROL Step1. I You can adjust the "Picture menu - Language Selecting Language English Español Français Next 1 ENTER Select menu Language....
...intended for use this TV at store, select [Store Demo]. Factory defaults are set the essential items for viewing the TV for the best picture in the OPTION menu. Step3. Time setting Time Setting Current Time Setting Year Month Date Hour Minute Time Zone Daylight Saving F Auto G... will be activated from the user menus. It will appear whenever the TV is switched on for choosing LG Next Step2. Step5. WATCHING TV / CHANNEL CONTROL Step1. I You can adjust the "Picture menu - Language Selecting Language English Español Français Next 1 ENTER Select menu Language....
Owner's Manual
Page 38
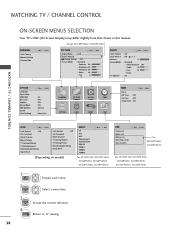
Except 42/50PT250U, 50/60PV550U CHANNEL Auto Tuning Manual Tuning Channel Edit Move Enter PICTURE Move Aspect Ratio : 16:9 Picture Wizard Energy Saving : Off Picture Mode : Standard • Contrast 90 • Brightness 50 • Sharpness 60 • Color 60 • Tint E 0R Enter G AUDIO Auto ...Key Lock Caption Demo Mode ISM Method Set ID Initial Setting Move Enter : On : Off : Off : Off : Normal : 1 : Home Use CHANNEL PICTURE AUDIO TIME OPTION LOCK INPUT USB TIME Clock Off Time : Off On Time : Off Sleep Timer : Off Move Enter WATCHING TV / CHANNEL CONTROL 38 ...
Except 42/50PT250U, 50/60PV550U CHANNEL Auto Tuning Manual Tuning Channel Edit Move Enter PICTURE Move Aspect Ratio : 16:9 Picture Wizard Energy Saving : Off Picture Mode : Standard • Contrast 90 • Brightness 50 • Sharpness 60 • Color 60 • Tint E 0R Enter G AUDIO Auto ...Key Lock Caption Demo Mode ISM Method Set ID Initial Setting Move Enter : On : Off : Off : Off : Normal : 1 : Home Use CHANNEL PICTURE AUDIO TIME OPTION LOCK INPUT USB TIME Clock Off Time : Off On Time : Off Sleep Timer : Off Move Enter WATCHING TV / CHANNEL CONTROL 38 ...
Owner's Manual
Page 39
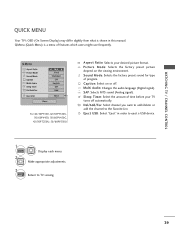
..., 50/60PV550U Aspect Ratio: Selects your TV turns off . SAP: Selects MTS sound (Analog signal). P i c t u r e M o d e: Selects the factory preset picture depend on or off automatically. CH Del/Add/Fav: Select channel you want to add/delete or add the channel to TV viewing. 39 Caption... is shown in order to eject a USB device. 1 Q.MENU 2 Display each menu. Sleep Timer: Select the amount of time before your desired picture format. WATCHING TV / CHANNEL CONTROL QUICK MENU Your TV's OSD (On Screen Display) may differ slightly from what is a menu of program. Eject...
..., 50/60PV550U Aspect Ratio: Selects your TV turns off . SAP: Selects MTS sound (Analog signal). P i c t u r e M o d e: Selects the factory preset picture depend on or off automatically. CH Del/Add/Fav: Select channel you want to add/delete or add the channel to TV viewing. 39 Caption... is shown in order to eject a USB device. 1 Q.MENU 2 Display each menu. Sleep Timer: Select the amount of time before your desired picture format. WATCHING TV / CHANNEL CONTROL QUICK MENU Your TV's OSD (On Screen Display) may differ slightly from what is a menu of program. Eject...
Owner's Manual
Page 44
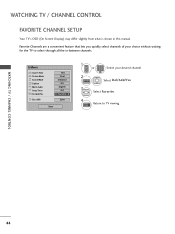
... TV / CHANNEL CONTROL FAVORITE CHANNEL SETUP Your TV's OSD (On Screen Display) may differ slightly from what is shown in -between channels. Q.Menu Aspect Ratio Picture Mode Sound Mode Caption Multi Audio Sleep Timer CH Del/Add/Fav Eject USB 16:9 Vivid Standard Off English Off F Favorite G Eject Close 1 or P CH...
... TV / CHANNEL CONTROL FAVORITE CHANNEL SETUP Your TV's OSD (On Screen Display) may differ slightly from what is shown in -between channels. Q.Menu Aspect Ratio Picture Mode Sound Mode Caption Multi Audio Sleep Timer CH Del/Add/Fav Eject USB 16:9 Vivid Standard Off English Off F Favorite G Eject Close 1 or P CH...

Owner's Manual
Page 49
..., it is recommended to select the desired source. 2 ENTER s If you select "O f f" in AV mode, Cinema will be selected both for "PICTURE menu - s When in Game Mode, functions related to previous selected value. Sound Mode" respectively. s Sport: Optimizes video and audio for playing games. ...MODE AV Mode toggles through preset Video and Audio settings. s If you select "Cinema" in AV mode, the "Picture Mode" and "Sound Mode" return to picture quality will be optimized for watching sports events. Off Game Cinema Sport WATCHING TV / CHANNEL CONTROL 1AV MODE Press the ...
..., it is recommended to select the desired source. 2 ENTER s If you select "O f f" in AV mode, Cinema will be selected both for "PICTURE menu - s When in Game Mode, functions related to previous selected value. Sound Mode" respectively. s Sport: Optimizes video and audio for playing games. ...MODE AV Mode toggles through preset Video and Audio settings. s If you select "Cinema" in AV mode, the "Picture Mode" and "Sound Mode" return to picture quality will be optimized for watching sports events. Off Game Cinema Sport WATCHING TV / CHANNEL CONTROL 1AV MODE Press the ...
Owner's Manual
Page 58
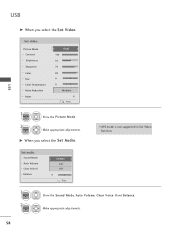
G When you select the Set Video. I APS mode is not supported in Set Video function. Set audio. Make appropriate adjustments. 58 Make appropriate adjustments. Sound Mode Auto Volume Clear Voice ll Balance Cinema Off Off 0 L R Prev. 1 ENTER 2 ENTER Show the Sound Mode, Auto Volume, Clear Voice II and Balance. Picture Mode Contrast Brightness Sharpness Color Tint Color Temperature Noise Reduction Reset Vivid 100 50 70 80 0 W C 0 W C Medium Prev. 1 ENTER 2 ENTER Show the Picture Mode. USB USB G When you select the Set Audio. Set video.
G When you select the Set Video. I APS mode is not supported in Set Video function. Set audio. Make appropriate adjustments. 58 Make appropriate adjustments. Sound Mode Auto Volume Clear Voice ll Balance Cinema Off Off 0 L R Prev. 1 ENTER 2 ENTER Show the Sound Mode, Auto Volume, Clear Voice II and Balance. Picture Mode Contrast Brightness Sharpness Color Tint Color Temperature Noise Reduction Reset Vivid 100 50 70 80 0 W C 0 W C Medium Prev. 1 ENTER 2 ENTER Show the Picture Mode. USB USB G When you select the Set Audio. Set video.
Owner's Manual
Page 66
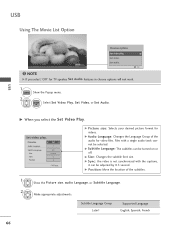
.... Files with the captions, it can be selected. G Position: Move the location of the audio for video files. Exit ! Picture Size Audio Language F Full G 1 Subtitle Language . G Picture size: Selects your desired picture format for TV speaker, Set Audio features in choose options will not work. 1 Q.MENU Show the Popup menu. 2 ENTER Select... turned on or off. USB G When you select "Off" for videos. G Audio Language: Changes the Language Group of the subtitles. 1 Show the Picture size, audio Language, or Subtitle Language. 2 Make appropriate adjustments. Set video.
.... Files with the captions, it can be selected. G Position: Move the location of the audio for video files. Exit ! Picture Size Audio Language F Full G 1 Subtitle Language . G Picture size: Selects your desired picture format for TV speaker, Set Audio features in choose options will not work. 1 Q.MENU Show the Popup menu. 2 ENTER Select... turned on or off. USB G When you select "Off" for videos. G Audio Language: Changes the Language Group of the subtitles. 1 Show the Picture size, audio Language, or Subtitle Language. 2 Make appropriate adjustments. Set video.
Owner's Manual
Page 67
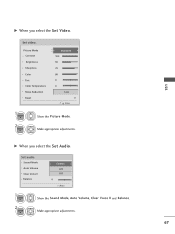
Sound Mode Auto Volume Clear Voice ll Balance Cinema Off Off 0 L R Prev. 1 ENTER Show the Sound Mode, Auto Volume, Clear Voice II and Balance. 2 ENTER Make appropriate adjustments. 67 USB G When you select the Set Video. Set audio. Set video. Make appropriate adjustments. G When you select the Set Audio. Picture Mode Contrast Brightness Sharpness Color Tint Color Temperature Noise Reduction Reset Standard 100 50 70 80 0 W C 0 W C Low Prev. 1 ENTER 2 ENTER Show the Picture Mode.
Sound Mode Auto Volume Clear Voice ll Balance Cinema Off Off 0 L R Prev. 1 ENTER Show the Sound Mode, Auto Volume, Clear Voice II and Balance. 2 ENTER Make appropriate adjustments. 67 USB G When you select the Set Video. Set audio. Set video. Make appropriate adjustments. G When you select the Set Audio. Picture Mode Contrast Brightness Sharpness Color Tint Color Temperature Noise Reduction Reset Standard 100 50 70 80 0 W C 0 W C Low Prev. 1 ENTER 2 ENTER Show the Picture Mode.


