User Manual
Page 1
... : 42PQ1100-ZE 6633 : 50PQ1100-ZE 6023: 42PQ2000-ZA 6320 : 42PQ2010-ZB 6024: 50PQ2000-ZA 6319 : 50PQ2010-ZB 6025: 42PQ3000-ZA 6020: 50PQ3000-ZA 6026: 42PQ6000-ZA 6875 : 42PQ6010-ZB 6029: 50PQ6000-ZA 6884 : 50PS2000-ZB 6322 : 50PS3000-ZB 6341: 50PS6000-ZC 6609 : 60PS4000-ZA... 50PQ60** 50PS20** 50PS30** 50PS60** 60PS40** Please read this manual carefully before operating your dealer when requiring any service. Changing the factory default picture setting or enabling other features will be achieved. To your TV. Model : Serial No. : This product qualifies for future reference. Retain it...
... : 42PQ1100-ZE 6633 : 50PQ1100-ZE 6023: 42PQ2000-ZA 6320 : 42PQ2010-ZB 6024: 50PQ2000-ZA 6319 : 50PQ2010-ZB 6025: 42PQ3000-ZA 6020: 50PQ3000-ZA 6026: 42PQ6000-ZA 6875 : 42PQ6010-ZB 6029: 50PQ6000-ZA 6884 : 50PS2000-ZB 6322 : 50PS3000-ZB 6341: 50PS6000-ZC 6609 : 60PS4000-ZA... 50PQ60** 50PS20** 50PS30** 50PS60** 60PS40** Please read this manual carefully before operating your dealer when requiring any service. Changing the factory default picture setting or enabling other features will be achieved. To your TV. Model : Serial No. : This product qualifies for future reference. Retain it...
User Manual
Page 4
... MODE) - Button Function in 8 Day Guide Mode . . . . 68 - Picture Mode-Preset 74 Manual Picture Adjustment - Button Function in Schedule List Mode . . . . 70 PICTURE CONTROL Picture Size (Aspect Ratio) Control 71 ENERGY SAVING / POWER SAVING . . . . .73 Preset Picture Settings - Picture Mode-User option 75 Picture Improvement Technology 76 Expert Picture Control 78 2 Button Function in NOW/NEXT Guide Mode...
... MODE) - Button Function in 8 Day Guide Mode . . . . 68 - Picture Mode-Preset 74 Manual Picture Adjustment - Button Function in Schedule List Mode . . . . 70 PICTURE CONTROL Picture Size (Aspect Ratio) Control 71 ENERGY SAVING / POWER SAVING . . . . .73 Preset Picture Settings - Picture Mode-User option 75 Picture Improvement Technology 76 Expert Picture Control 78 2 Button Function in NOW/NEXT Guide Mode...
User Manual
Page 5
CONTENTS Picture Reset 81 Image Sticking Minimization (ISM) Method . . . 82 Demo Mode 83 Mode Setting 84 SOUND & LANGUAGE CONTROL Auto Volume Leveler 85 Preset Sound Settings - Sound ...
CONTENTS Picture Reset 81 Image Sticking Minimization (ISM) Method . . . 82 Demo Mode 83 Mode Setting 84 SOUND & LANGUAGE CONTROL Auto Volume Leveler 85 Preset Sound Settings - Sound ...
User Manual
Page 6
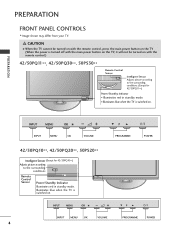
...P P POWER PROGRAMME POWER 42/50PQ10**, 42/50PQ20**, 50PS20** INPUT MENU OK P Intelligent Sensor (Except for 42/50PQ10**) Adjusts picture according to the surrounding conditions. (Except for 42/50PQ11**) Power/Standby Indicator • Illuminates red in standby mode. Illuminates blue when...will not be turned on with the remote control.) 42/50PQ11**, 42/50PQ30**, 50PS30** Remote Control Sensor Intelligent Sensor Adjusts picture according to the surrounding conditions Remote Control Sensor Power/Standby Indicator Illuminates red in standby mode. • Illuminates blue when...
...P P POWER PROGRAMME POWER 42/50PQ10**, 42/50PQ20**, 50PS20** INPUT MENU OK P Intelligent Sensor (Except for 42/50PQ10**) Adjusts picture according to the surrounding conditions. (Except for 42/50PQ11**) Power/Standby Indicator • Illuminates red in standby mode. Illuminates blue when...will not be turned on with the remote control.) 42/50PQ11**, 42/50PQ30**, 50PS30** Remote Control Sensor Intelligent Sensor Adjusts picture according to the surrounding conditions Remote Control Sensor Power/Standby Indicator Illuminates red in standby mode. • Illuminates blue when...

User Manual
Page 7
PREPARATION 42/50PQ60**, 50PS60** P PROGRAMME P Remote Control Sensor Intelligent Sensor Adjusts picture according to the surrounding conditions Power/Standby Indicator • Illuminates red in standby mode. • illuminates green when the TV is off while the TV ...
PREPARATION 42/50PQ60**, 50PS60** P PROGRAMME P Remote Control Sensor Intelligent Sensor Adjusts picture according to the surrounding conditions Power/Standby Indicator • Illuminates red in standby mode. • illuminates green when the TV is off while the TV ...

User Manual
Page 11
...The TV can be installed in various ways such as shown in the picture. (If your TV has bolts in the eyebolts, loosen then bolts.)...! Ensure that wall mounting be performed by connecting it to telephone wires, lightening rods or gas pipes. A LG recommends that children do not climb or hang from the market. G The surface that you connect the earth ... a qualified electrician install a separate circuit breaker. A We recommend that wall mount is mounted on the wall. e.g. G LG is used . G To use the TV safely make sure that you purchase a wall mounting bracket which may cause TV to...
...The TV can be installed in various ways such as shown in the picture. (If your TV has bolts in the eyebolts, loosen then bolts.)...! Ensure that wall mounting be performed by connecting it to telephone wires, lightening rods or gas pipes. A LG recommends that children do not climb or hang from the market. G The surface that you connect the earth ... a qualified electrician install a separate circuit breaker. A We recommend that wall mount is mounted on the wall. e.g. G LG is used . G To use the TV safely make sure that you purchase a wall mounting bracket which may cause TV to...

User Manual
Page 12
... connection. SWIVEL STAND After installing the TV, you can adjust the TV manually to the left or right direction by 20 degrees to achieve better picture quality it may be split for two TVs,use an antenna signal splitter for outdoor antenna) Antenna UHF Signal Amplifier VHF I An antenna cable and... (75 ohm) Single-family Dwellings /Houses (Connect to the antenna as shown above. I In poor signal areas, to suit your viewing position. 10 I For optimum picture quality, adjust antenna direction.
... connection. SWIVEL STAND After installing the TV, you can adjust the TV manually to the left or right direction by 20 degrees to achieve better picture quality it may be split for two TVs,use an antenna signal splitter for outdoor antenna) Antenna UHF Signal Amplifier VHF I An antenna cable and... (75 ohm) Single-family Dwellings /Houses (Connect to the antenna as shown above. I In poor signal areas, to suit your viewing position. 10 I For optimum picture quality, adjust antenna direction.
User Manual
Page 15
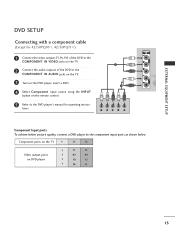
... Y B-Y R-Y Y Cb Cr Y Pb Pr 13 EXTERNAL EQUIPMENT SETUP DVD SETUP Connecting with a component cable (Except for operating instruc- tions. 1 2 Component Input ports To achieve better picture quality, connect a DVD player to the component input ports as shown below.
... Y B-Y R-Y Y Cb Cr Y Pb Pr 13 EXTERNAL EQUIPMENT SETUP DVD SETUP Connecting with a component cable (Except for operating instruc- tions. 1 2 Component Input ports To achieve better picture quality, connect a DVD player to the component input ports as shown below.

User Manual
Page 18
R S-VIDEO HDMI IN 3 16 Connecting with a RF Cable 1 ANT OUT S-VIDEO VIDEO L R ANT IN OUTPUT SWITCH Wall Jack 2 Antenna 1 Connect the ANT OUT socket of the VCR to the ANTENNA IN socket on the TV. 2 Connect the antenna cable to the ANT IN socket of the VCR. 3 Press the PLAY button on the VCR and match the appropriate channel between the VCR and TV. EXTERNAL EQUIPMENT SETUP EXTERNAL EQUIPMENT SETUP VCR SETUP I To avoid picture noise (interference), allow adequate distance between the TV and VCR for viewing.
R S-VIDEO HDMI IN 3 16 Connecting with a RF Cable 1 ANT OUT S-VIDEO VIDEO L R ANT IN OUTPUT SWITCH Wall Jack 2 Antenna 1 Connect the ANT OUT socket of the VCR to the ANTENNA IN socket on the TV. 2 Connect the antenna cable to the ANT IN socket of the VCR. 3 Press the PLAY button on the VCR and match the appropriate channel between the VCR and TV. EXTERNAL EQUIPMENT SETUP EXTERNAL EQUIPMENT SETUP VCR SETUP I To avoid picture noise (interference), allow adequate distance between the TV and VCR for viewing.
User Manual
Page 20
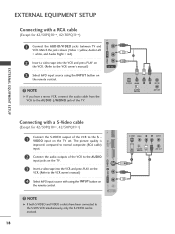
... VCR. (Refer to the S VIDEO input on the TV set. NOTE G If you have been connected to normal composite (RCA cable) input. AV IN 3 ! The picture quality is improved; NOTE G If both S-VIDEO and VIDEO sockets have a mono VCR, connect the audio cable from the VCR to the AUDIO L/MONO jack...
... VCR. (Refer to the S VIDEO input on the TV set. NOTE G If you have been connected to normal composite (RCA cable) input. AV IN 3 ! The picture quality is improved; NOTE G If both S-VIDEO and VIDEO sockets have a mono VCR, connect the audio cable from the VCR to the AUDIO L/MONO jack...

User Manual
Page 25
..., 60Hz (42PQ20**, 42PQ30**, 42PQ60**) / 1360x768, 60Hz ( 50PQ20**, 50PQ30**, 50PQ60**) / 1920x1080, 60Hz(50PS20**, 50PS30**, 50PS60**, 60PS40**) for the PC mode, they provide the best picture quality. G If the graphic card on the PC does output analog and digital RGB simultaneously, set the TV to either RGB or HDMI IN (or... HDMI/DVI IN) to the HDMI IN (or HDMI/DVI IN) port on the screen. This provides the best picture quality. 23 G There may be interference on the TV. G We recommend using a sound card, adjust PC sound as required. G Connect the audio cable...
..., 60Hz (42PQ20**, 42PQ30**, 42PQ60**) / 1360x768, 60Hz ( 50PQ20**, 50PQ30**, 50PQ60**) / 1920x1080, 60Hz(50PS20**, 50PS30**, 50PS60**, 60PS40**) for the PC mode, they provide the best picture quality. G If the graphic card on the PC does output analog and digital RGB simultaneously, set the TV to either RGB or HDMI IN (or... HDMI/DVI IN) to the HDMI IN (or HDMI/DVI IN) port on the screen. This provides the best picture quality. 23 G There may be interference on the TV. G We recommend using a sound card, adjust PC sound as required. G Connect the audio cable...

User Manual
Page 26
... 42/50PQ10**, 42/50PQ11**) Screen Reset Returns Position, Size and Phase to the previous menu screen. 24 EXTERNAL EQUIPMENT SETUP PICTURE SSccrreeeenn Move OK E • Contrast 100 • Brightness 50 • Sharpness 70 • Colour 70 • Tint 0R G... • Advanced Control • Picture Reset 1 MENU Select PICTURE. 2 OK Select Screen. 3 OK Select Reset. 4 OK Select Y e s. 5 OK Run R e s e t. Position Size Phase To Set Yes No...
... 42/50PQ10**, 42/50PQ11**) Screen Reset Returns Position, Size and Phase to the previous menu screen. 24 EXTERNAL EQUIPMENT SETUP PICTURE SSccrreeeenn Move OK E • Contrast 100 • Brightness 50 • Sharpness 70 • Colour 70 • Tint 0R G... • Advanced Control • Picture Reset 1 MENU Select PICTURE. 2 OK Select Screen. 3 OK Select Reset. 4 OK Select Y e s. 5 OK Run R e s e t. Position Size Phase To Set Yes No...

User Manual
Page 27
...Auto configure This function is for automatic adjustment of the image is still not correct, try Auto adjustment again. • If picture needs to be unstable for a few seconds while the auto configuration is functioning properly but needs further adjustment. EXTERNAL EQUIPMENT SETUP ...Auto Configure (RGB [PC] mode only) Automatically adjust the picture position and minimizes image instability. G Position Size Phase Reset Move RETURN Prev. After adjustment, if the image is still not correct,...
...Auto configure This function is for automatic adjustment of the image is still not correct, try Auto adjustment again. • If picture needs to be unstable for a few seconds while the auto configuration is functioning properly but needs further adjustment. EXTERNAL EQUIPMENT SETUP ...Auto Configure (RGB [PC] mode only) Automatically adjust the picture position and minimizes image instability. G Position Size Phase Reset Move RETURN Prev. After adjustment, if the image is still not correct,...

User Manual
Page 28
EXTERNAL EQUIPMENT SETUP EXTERNAL EQUIPMENT SETUP Selecting Resolution To view a normal picture, match the resolution of RGB mode and selection of PC mode. Select the desired resolution. SCREEN Resolution G Auto Config. Select Resolution. Position Size Phase Reset ... normal TV viewing. • Press the RETURN button to move to the previous menu screen. 26 This function works in the following mode: RGB[PC] PICTURE SSccrreeeenn Move OK E • Contrast 100 • Brightness 50 • Sharpness 70 • Colour 70 • Tint 0R G • Advanced Control •...
EXTERNAL EQUIPMENT SETUP EXTERNAL EQUIPMENT SETUP Selecting Resolution To view a normal picture, match the resolution of RGB mode and selection of PC mode. Select the desired resolution. SCREEN Resolution G Auto Config. Select Resolution. Position Size Phase Reset ... normal TV viewing. • Press the RETURN button to move to the previous menu screen. 26 This function works in the following mode: RGB[PC] PICTURE SSccrreeeenn Move OK E • Contrast 100 • Brightness 50 • Sharpness 70 • Colour 70 • Tint 0R G • Advanced Control •...

User Manual
Page 29
... not clear after auto adjustment and especially if characters are still trembling, adjust the picture phase manually. SCREEN Resolution Auto Config. D F G E • Press the MENU button to return to normal TV viewing. • Press the RETURN button to move.... Select Position, Size or Phase. Position G Size Phase Reset Move RETURN Prev. This function works in the following mode : RGB[PC]. 1 MENU 2 OK 3 OK 4 PICTURE SSccrreeeenn Move OK E • Contrast 100 • Brightness 50 • Sharpness 70 • Colour 70 • Tint 0R G • Advanced Control •...
... not clear after auto adjustment and especially if characters are still trembling, adjust the picture phase manually. SCREEN Resolution Auto Config. D F G E • Press the MENU button to return to normal TV viewing. • Press the RETURN button to move.... Select Position, Size or Phase. Position G Size Phase Reset Move RETURN Prev. This function works in the following mode : RGB[PC]. 1 MENU 2 OK 3 OK 4 PICTURE SSccrreeeenn Move OK E • Contrast 100 • Brightness 50 • Sharpness 70 • Colour 70 • Tint 0R G • Advanced Control •...

User Manual
Page 31
...**) Installing Batteries FAV Q.MENU INFO i GUIDE I Install two 1.5V AAA batteries. I Close cover. Programme Selects a programme. MENU Select the desired quick menu source. (Aspect Ratio, Picture Mode, Sound Mode, Audio, Sleep Timer, USB Eject.)(G p.33) INFO i Shows the present screen information. GUIDE Shows programme schedule.(G p.67) FAV Displays the selected favourite...
...**) Installing Batteries FAV Q.MENU INFO i GUIDE I Install two 1.5V AAA batteries. I Close cover. Programme Selects a programme. MENU Select the desired quick menu source. (Aspect Ratio, Picture Mode, Sound Mode, Audio, Sleep Timer, USB Eject.)(G p.33) INFO i Shows the present screen information. GUIDE Shows programme schedule.(G p.67) FAV Displays the selected favourite...

User Manual
Page 32
MENU Select the desired quick menu source. (Aspect Ratio, Picture Mode, Sound Mode, Audio, Sleep Timer, USB Eject.)(G p.33) MENU Selects a menu. INFO i Shows the present screen information. When you select and set images and .... AV MODE It helps you toggle this button, the Simplink menu appears at the screen.(G p.47) FREEZE Pause the present picture at the screen. RETURN(EXIT) Allows the user to your desired picture format.(G p.71) POWER Switches the TV on TELETEXT buttons models only) , Programme edit. 1 TELETEXT These buttons are used for...
MENU Select the desired quick menu source. (Aspect Ratio, Picture Mode, Sound Mode, Audio, Sleep Timer, USB Eject.)(G p.33) MENU Selects a menu. INFO i Shows the present screen information. When you select and set images and .... AV MODE It helps you toggle this button, the Simplink menu appears at the screen.(G p.47) FREEZE Pause the present picture at the screen. RETURN(EXIT) Allows the user to your desired picture format.(G p.71) POWER Switches the TV on TELETEXT buttons models only) , Programme edit. 1 TELETEXT These buttons are used for...

User Manual
Page 35
... viewing. • Press the RETURN button to move to eject USB device. (Except for 42/50PQ10**, 42/50PQ11**) Q.Menu Aspect Ratio Picture Mode Sound Mode Audio Sleep Timer 16:9 Zoom Setting Standard Standard L+R Off USB Eject Eject Close (Except for the images being watched. For... set the sound combination which users might use frequently. • Aspect Ratio: Selects your desired Picture Mode. • Sound Mode : It is a feature to Q.Menu. • Picture Mode : Selects your desired picture format. Q.Menu (Quick Menu) is a menu of features which it deems the best for 42...
... viewing. • Press the RETURN button to move to eject USB device. (Except for 42/50PQ10**, 42/50PQ11**) Q.Menu Aspect Ratio Picture Mode Sound Mode Audio Sleep Timer 16:9 Zoom Setting Standard Standard L+R Off USB Eject Eject Close (Except for the images being watched. For... set the sound combination which users might use frequently. • Aspect Ratio: Selects your desired Picture Mode. • Sound Mode : It is a feature to Q.Menu. • Picture Mode : Selects your desired picture format. Q.Menu (Quick Menu) is a menu of features which it deems the best for 42...
User Manual
Page 36
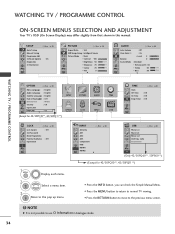
SETUP Auto Tuning Manual Tuning Programme Edit Software Update Diagnostics CI Information Move OK : On PICTURE Move Aspect Ratio : 16:9 Energy Saving : Intelligent Sensor Picture Mode : Vivid • Contrast 100 • Brightness 50 • Sharpness 70 • Colour 70 • Tint E 0R OK G AUDIO Move... I : On • Level 3- Code Deactivation Move OK (Only 42/50PQ60**, 50PS60**) (Except for 42/50PQ10**, 42/50PQ11**) SETUP OPTION PICTURE LOCK AUDIO INPUT TIME USB TIME Move OK Clock Off Time On Time Sleep Timer : Off : Off : Off LOCK Move OK Lock System Set...
SETUP Auto Tuning Manual Tuning Programme Edit Software Update Diagnostics CI Information Move OK : On PICTURE Move Aspect Ratio : 16:9 Energy Saving : Intelligent Sensor Picture Mode : Vivid • Contrast 100 • Brightness 50 • Sharpness 70 • Colour 70 • Tint E 0R OK G AUDIO Move... I : On • Level 3- Code Deactivation Move OK (Only 42/50PQ60**, 50PS60**) (Except for 42/50PQ10**, 42/50PQ11**) SETUP OPTION PICTURE LOCK AUDIO INPUT TIME USB TIME Move OK Clock Off Time On Time Sleep Timer : Off : Off : Off LOCK Move OK Lock System Set...

User Manual
Page 44
... the Y E S using the remote control or local key. The new software is available. When the power is turned on the TV will see the following picture. ? Select Software Update. 3 OK 4 OK Save. Select O n or O f f. • If you like to "O n" appears. - SETUP Auto Tuning Manual Tuning Programme Edit Software Update Diagnostics CI...
... the Y E S using the remote control or local key. The new software is available. When the power is turned on the TV will see the following picture. ? Select Software Update. 3 OK 4 OK Save. Select O n or O f f. • If you like to "O n" appears. - SETUP Auto Tuning Manual Tuning Programme Edit Software Update Diagnostics CI...


