Owner's Manual
Page 6
... Reset 74 Demo Mode 74 Image Sticking Minimization (ISM) Method 75 6 CONTENTS WARNING / CAUTION 2 SAFETY INSTRUCTIONS 3 FEATURE OF THIS TV 8 PREPARATION Accessories 9 Front Panel Information 10 Back Panel Information 13 Stand Instruction 15 Cable Management 17 Desktop Pedestal Installation 18 Swivel Stand ... TV 38 Channel Selection 38 Volume Adjustment 38 Initial Setting 39 On-Screen Menus Selection 40 Quick Menu 42 Channel Setup - Channel Editing 45 Channel List 46 Favorite Channel Setup 47 Favorite Channel List 47 Brief Information 48 Input List 49 Input Label 50...
... Reset 74 Demo Mode 74 Image Sticking Minimization (ISM) Method 75 6 CONTENTS WARNING / CAUTION 2 SAFETY INSTRUCTIONS 3 FEATURE OF THIS TV 8 PREPARATION Accessories 9 Front Panel Information 10 Back Panel Information 13 Stand Instruction 15 Cable Management 17 Desktop Pedestal Installation 18 Swivel Stand ... TV 38 Channel Selection 38 Volume Adjustment 38 Initial Setting 39 On-Screen Menus Selection 40 Quick Menu 42 Channel Setup - Channel Editing 45 Channel List 46 Favorite Channel Setup 47 Favorite Channel List 47 Brief Information 48 Input List 49 Input Label 50...
Owner's Manual
Page 8
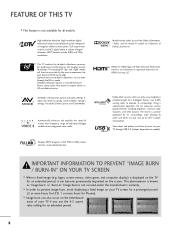
... menus, video game, and computer display) is displayed on model). I In order to 50% in ." This TV contains the detailed calibrations necessary for professional certification by the user to experience the best their LG HDTV has to music on your TV screen for a prolonged period (2 or more hours for LCD, 1 or more pleasing to...
... menus, video game, and computer display) is displayed on model). I In order to 50% in ." This TV contains the detailed calibrations necessary for professional certification by the user to experience the best their LG HDTV has to music on your TV screen for a prolonged period (2 or more hours for LCD, 1 or more pleasing to...
Owner's Manual
Page 10
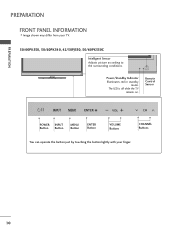
Remote Control Sensor ENTER VOL CH POWER INPUT Button Button MENU Button ENTER Button VOLUME Buttons CHANNEL Buttons ENTER You can operate the button just by touching the button lightly with your TV. 50/60PK550, 50/60PK540, 42/50PJ550, 50/60PK550C Intelligent Sensor Adjusts picture according to the surrounding conditions. The LED is off while the TV remains on. PREPARATION PREPARATION FRONT PANEL INFORMATION I Image shown may differ from your finger. 10 ENTER VOL CH Power/Standby Indicator Illuminates red in standby mode.
Remote Control Sensor ENTER VOL CH POWER INPUT Button Button MENU Button ENTER Button VOLUME Buttons CHANNEL Buttons ENTER You can operate the button just by touching the button lightly with your TV. 50/60PK550, 50/60PK540, 42/50PJ550, 50/60PK550C Intelligent Sensor Adjusts picture according to the surrounding conditions. The LED is off while the TV remains on. PREPARATION PREPARATION FRONT PANEL INFORMATION I Image shown may differ from your finger. 10 ENTER VOL CH Power/Standby Indicator Illuminates red in standby mode.

Owner's Manual
Page 11
Remote Control Sensor ENTER VOL CH POWER INPUT Button Button MENU Button ENTER Button VOLUME Buttons CHANNEL Buttons ENTER You can operate the button just by touching the button lightly with your finger. 11 The LED is off while the TV remains on. PREPARATION 50/60PK250, 42/50PJ250, 60PK280, 60PK290 Intelligent Sensor Adjusts picture according to the surrounding conditions. ENTER VOL CH Power/Standby Indicator Illuminates red in standby mode.
Remote Control Sensor ENTER VOL CH POWER INPUT Button Button MENU Button ENTER Button VOLUME Buttons CHANNEL Buttons ENTER You can operate the button just by touching the button lightly with your finger. 11 The LED is off while the TV remains on. PREPARATION 50/60PK250, 42/50PJ250, 60PK280, 60PK290 Intelligent Sensor Adjusts picture according to the surrounding conditions. ENTER VOL CH Power/Standby Indicator Illuminates red in standby mode.
Owner's Manual
Page 13
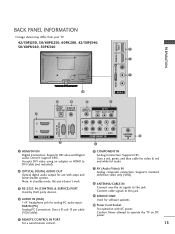
R VIDEO L/MONO AUDIO R HDMI IN 3 SERVICE ONLY R R PREPARATION BACK PANEL INFORMATION I Image shown may differ from your TV. 42/50PJ250, 50/60PK250, 60PK280, 42/50PJ340, 50/60PK540, 50PK340 9 1 7 10 AV IN 2 2 4 5 7 OPTICAL DIGITAL AUDIO OUT AUDIO IN (RGB/DVI) REMOTE CONTROL IN AV IN 1 VIDEO /MONO AUDIO 1 ... video and Digital audio. Supports HD. Supports standard definition video only (480i). 8 ANTENNA/CABLE IN Connect over-the air signals to operate the TV on DC power. 13 Caution: Never attempt to this port doesn't work. 3 RS-232C IN (CONTROL & SERVICE) PORT Used by third ...
R VIDEO L/MONO AUDIO R HDMI IN 3 SERVICE ONLY R R PREPARATION BACK PANEL INFORMATION I Image shown may differ from your TV. 42/50PJ250, 50/60PK250, 60PK280, 42/50PJ340, 50/60PK540, 50PK340 9 1 7 10 AV IN 2 2 4 5 7 OPTICAL DIGITAL AUDIO OUT AUDIO IN (RGB/DVI) REMOTE CONTROL IN AV IN 1 VIDEO /MONO AUDIO 1 ... video and Digital audio. Supports HD. Supports standard definition video only (480i). 8 ANTENNA/CABLE IN Connect over-the air signals to operate the TV on DC power. 13 Caution: Never attempt to this port doesn't work. 3 RS-232C IN (CONTROL & SERVICE) PORT Used by third ...

Owner's Manual
Page 14
...for use with AC power. Supports standard definition video only (480i). 8 ANTENNA/CABLE IN Connect over-the air signals to operate the TV on DC power. 14 RGB IN (PC) Analog PC Connection. R VIDEO L/MONO AUDIO R HDMI IN 3 USB IN R R PREPARATION 42/50PJ350,... 50PK350, 50/60PK550, 42/50PJ550, 60PK290, 42/50PJ350C, 50/60PK550C 9 1 PREPARATION 7 10 AV IN 2 2 4 5 7 OPTICAL DIGITAL AUDIO OUT AUDIO IN (RGB/DVI) REMOTE CONTROL IN AV IN 1 VIDEO /MONO ...
...for use with AC power. Supports standard definition video only (480i). 8 ANTENNA/CABLE IN Connect over-the air signals to operate the TV on DC power. 14 RGB IN (PC) Analog PC Connection. R VIDEO L/MONO AUDIO R HDMI IN 3 USB IN R R PREPARATION 42/50PJ350,... 50PK350, 50/60PK550, 42/50PJ550, 60PK290, 42/50PJ350C, 50/60PK550C 9 1 PREPARATION 7 10 AV IN 2 2 4 5 7 OPTICAL DIGITAL AUDIO OUT AUDIO IN (RGB/DVI) REMOTE CONTROL IN AV IN 1 VIDEO /MONO ...
Owner's Manual
Page 22
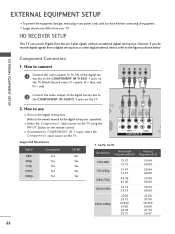
...box. However, if you have finished connecting all equipment. operation) I Select the Component1 input source on the TV using the INPUT button on the TV. Y PB PR L R 2 Connect the audio output of the digital settop box to the COMPONENT IN VIDEO... 1 jacks on the remote control. I If connected to the COMPONENT IN AUDIO 1 jacks on the TV. 1 2 O IN /DVI) REMOTE CONTROL IN AV IN 1 VIDEO /MONO AUDIO 2 L R 1 VIDEO AUDIO COMPONENT IN ...47 31.47 44.96 45.00 33.72 33.75 27.00 33.75 67.432 67.50 26.97 33.71 59.94 60.00 59.94 60.00 59.94 60.00 59....
...box. However, if you have finished connecting all equipment. operation) I Select the Component1 input source on the TV using the INPUT button on the TV. Y PB PR L R 2 Connect the audio output of the digital settop box to the COMPONENT IN VIDEO... 1 jacks on the remote control. I If connected to the COMPONENT IN AUDIO 1 jacks on the TV. 1 2 O IN /DVI) REMOTE CONTROL IN AV IN 1 VIDEO /MONO AUDIO 2 L R 1 VIDEO AUDIO COMPONENT IN ...47 31.47 44.96 45.00 33.72 33.75 27.00 33.75 67.432 67.50 26.97 33.71 59.94 60.00 59.94 60.00 59.94 60.00 59....
Owner's Manual
Page 23
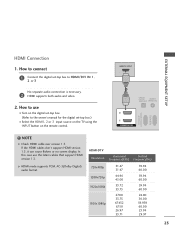
... cause flickers or no screen display. In this case use I Turn on the digital set -top box.) I Select the HDMI1, 2 or 3 input source on the TV using the INPUT button on the remote control. G HDMI mode supports PCM, AC-3(Dolby Digital) audio format. HDMI-DTV Resolution Horizontal Vertical Frequency(KHz) Frequency...(Hz) 720x480p 1280x720p 1920x1080i 1920x1080p 31.47 31.47 44.96 45.00 33.72 33.75 27.00 33.75 67.432 67.50 26.97 33.71 59.94 60.00 59.94 60.00 59.94 60.00 24.00 30.00 59.939 60.00 23...
... cause flickers or no screen display. In this case use I Turn on the digital set -top box.) I Select the HDMI1, 2 or 3 input source on the TV using the INPUT button on the remote control. G HDMI mode supports PCM, AC-3(Dolby Digital) audio format. HDMI-DTV Resolution Horizontal Vertical Frequency(KHz) Frequency...(Hz) 720x480p 1280x720p 1920x1080i 1920x1080p 31.47 31.47 44.96 45.00 33.72 33.75 27.00 33.75 67.432 67.50 26.97 33.71 59.94 60.00 59.94 60.00 59.94 60.00 24.00 30.00 59.939 60.00 23...

Owner's Manual
Page 28
...to connect 1 Connect the AUDIO/VIDEO jacks between TV and external equipment. How to use I Select the A V 2 input source on the TV using the INPUT button on the remote control. For 42/50PJ350, 50PK350, 42/50PJ550, 50/60PK550, 60PK290, 42/50PJ350C, 50/60PK550C models 1. Match the jack colors. (...Video = yellow, Audio Left = white, and Audio Right = red) 2. I If connected to AV IN 1 input, select the A V 1 input source on the side of TV. 2. How to the USB I ...
...to connect 1 Connect the AUDIO/VIDEO jacks between TV and external equipment. How to use I Select the A V 2 input source on the TV using the INPUT button on the remote control. For 42/50PJ350, 50PK350, 42/50PJ550, 50/60PK550, 60PK290, 42/50PJ350C, 50/60PK550C models 1. Match the jack colors. (...Video = yellow, Audio Left = white, and Audio Right = red) 2. I If connected to AV IN 1 input, select the A V 1 input source on the side of TV. 2. How to the USB I ...
Owner's Manual
Page 36
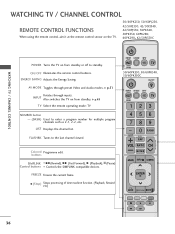
...When using the remote control, aim it at the remote control sensor on the TV. 50/60PK250, 50/60PJ250, 42/50PJ350, 42/50PJ340, 42/50PJ550, 50PK340, 50PK350, 60PK280, 60PK290, 42/50PJ350C POWER Turns the TV on from standby or off to standby. LIST Displays the channel list. FLASHBK ...Video and Audio modes. A (Stop) Stops processing of time machine function. (Playback, Rewind etc) ENERGY AV MODE INPUT TV SAVING 50/60PK550, 50/60PK540, 50/60PK550C ON/OFF ENERGY AV MODE INPUT TV SAVING 123 456 789 LIST VOL 0 MARK FAV RATIO FLASHBK P CH A G E MUTE MENU INFO Q.MENU ENTER BACK...
...When using the remote control, aim it at the remote control sensor on the TV. 50/60PK250, 50/60PJ250, 42/50PJ350, 42/50PJ340, 42/50PJ550, 50PK340, 50PK350, 60PK280, 60PK290, 42/50PJ350C POWER Turns the TV on from standby or off to standby. LIST Displays the channel list. FLASHBK ...Video and Audio modes. A (Stop) Stops processing of time machine function. (Playback, Rewind etc) ENERGY AV MODE INPUT TV SAVING 50/60PK550, 50/60PK540, 50/60PK550C ON/OFF ENERGY AV MODE INPUT TV SAVING 123 456 789 LIST VOL 0 MARK FAV RATIO FLASHBK P CH A G E MUTE MENU INFO Q.MENU ENTER BACK...
Owner's Manual
Page 40
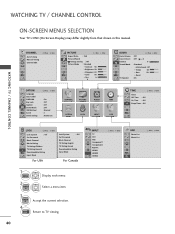
... Photo List Music List Move Enter WATCHING TV / CHANNEL CONTROL CHANNEL Auto Tuning Manual Tuning Channel Edit Move Enter PICTURE Move Aspect Ratio : 16:9 Picture Wizard Energy Saving : Off Picture Mode : Standard • Contrast 90 • Brightness 50 • Sharpness 60 • Color ... • Tint E 0R Enter G AUDIO Auto Volume Clear Voice II Balance Sound Mode TV Speaker Move : Off : Off + 3 0L : Standard • Infinte Sound: Off • Treble 50 • Bass 50 • Reset : On Enter R OPTION Language Input Label SIMPLINK Key Lock Caption Demo Mode...
... Photo List Music List Move Enter WATCHING TV / CHANNEL CONTROL CHANNEL Auto Tuning Manual Tuning Channel Edit Move Enter PICTURE Move Aspect Ratio : 16:9 Picture Wizard Energy Saving : Off Picture Mode : Standard • Contrast 90 • Brightness 50 • Sharpness 60 • Color ... • Tint E 0R Enter G AUDIO Auto Volume Clear Voice II Balance Sound Mode TV Speaker Move : Off : Off + 3 0L : Standard • Infinte Sound: Off • Treble 50 • Bass 50 • Reset : On Enter R OPTION Language Input Label SIMPLINK Key Lock Caption Demo Mode...
Owner's Manual
Page 41
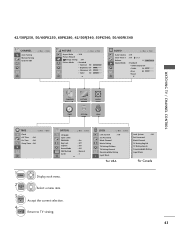
...Edit Move Enter PICTURE Move Enter Aspect Ratio : 16:9 Picture Wizard Energy Saving : Off Picture Mode : Standard • Contrast 90 • Brightness 50 • Sharpness 60 • Color 60 E AUDIO Move Auto Volume Clear Voice II Balance Sound Mode : Off : Off + 3 0L : ...Standard • Infinite Sound: Off • Treble 50 • Bass 50 • Reset E Enter R WATCHING TV / CHANNEL CONTROL CHANNEL PICTURE AUDIO TIME OPTION LOCK TIME Clock Off Time : Off On Time : Off Sleep Timer : Off ...
...Edit Move Enter PICTURE Move Enter Aspect Ratio : 16:9 Picture Wizard Energy Saving : Off Picture Mode : Standard • Contrast 90 • Brightness 50 • Sharpness 60 • Color 60 E AUDIO Move Auto Volume Clear Voice II Balance Sound Mode : Off : Off + 3 0L : ...Standard • Infinite Sound: Off • Treble 50 • Bass 50 • Reset E Enter R WATCHING TV / CHANNEL CONTROL CHANNEL PICTURE AUDIO TIME OPTION LOCK TIME Clock Off Time : Off On Time : Off Sleep Timer : Off ...
Owner's Manual
Page 42
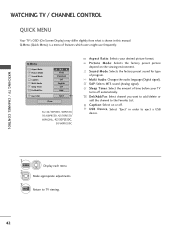
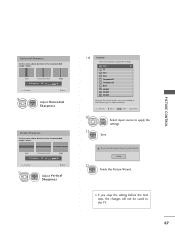
.../Add/Fav F 16:9 G Vivid Standard Off English Off Add Eject USB Eject Close For 42/50PJ350, 50PK350, 50/60PK550, 42/50PJ550, 60PK290, 42/50PJ350C, 50/60PK550C Aspect Ratio: Selects your TV turns off . CH Del/Add/Fav: Select channel you want to add/delete or add the channel to the... Favorite List. WATCHING TV / CHANNEL CONTROL QUICK MENU Your TV's OSD (On Screen Display) may differ slightly from what is ...
.../Add/Fav F 16:9 G Vivid Standard Off English Off Add Eject USB Eject Close For 42/50PJ350, 50PK350, 50/60PK550, 42/50PJ550, 60PK290, 42/50PJ350C, 50/60PK550C Aspect Ratio: Selects your TV turns off . CH Del/Add/Fav: Select channel you want to add/delete or add the channel to the... Favorite List. WATCHING TV / CHANNEL CONTROL QUICK MENU Your TV's OSD (On Screen Display) may differ slightly from what is ...
Owner's Manual
Page 50
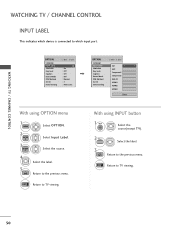
.... With using OPTION menu 1 MENU Select OPTION. 2 ENTER Select Input Label. 3 ENTER Select the source. 4 5 BACK Select the label. Return to TV viewing. 50 EXIT Return to the previous menu. OPTION Language Input Label SIMPLINK Key Lock Caption Demo Mode ISM Method Set ID Initial Setting Move Enter : On : ...
.... With using OPTION menu 1 MENU Select OPTION. 2 ENTER Select Input Label. 3 ENTER Select the source. 4 5 BACK Select the label. Return to TV viewing. 50 EXIT Return to the previous menu. OPTION Language Input Label SIMPLINK Key Lock Caption Demo Mode ISM Method Set ID Initial Setting Move Enter : On : ...
Owner's Manual
Page 54
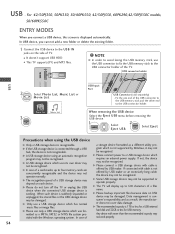
...TV. If not, the device may not be supported or operate properly. G Please backup important files because data on the side of a storage device formatted as a different utility program which was formatted as a result, the manufacturer does not cover data damage. USB - For 42/50PJ350, 50PK350, 50... 32GB or less for USB memory. G Please connect a USB storage device with more than the recommended capacity may be damaged. G The TV will display up to 128 characters of a USB storage device may not operate normally. Data management is working. G The recommended capacity is...
...TV. If not, the device may not be supported or operate properly. G Please backup important files because data on the side of a storage device formatted as a different utility program which was formatted as a result, the manufacturer does not cover data damage. USB - For 42/50PJ350, 50PK350, 50... 32GB or less for USB memory. G Please connect a USB storage device with more than the recommended capacity may be damaged. G The TV will display up to 128 characters of a USB storage device may not operate normally. Data management is working. G The recommended capacity is...
Owner's Manual
Page 67
...Vertical Sharpness Set the screen above identical to apply the settings. Close 12 ENTER Finish the Picture Wizard. Low Recommended E • H Sharpness 50 Previous E High Next 8 ENTER Adjust Horizontal S h a r p n e s s. E Previous E Move MARK Mark Confirm 10 MARK...Recommended sample below . Horizontal Sharpness Set the screen above identical to the TV. 67 Low Recommended E • V Sharpness 50 E High Previous Next 9 ENTER Adjust V e r t i c a l S h a r p n e s s. DTV TV AV1 AV2 Component1 Component2 RGB HDMI1 HDMI2 HDMI3 Warning: The picture quality may...
...Vertical Sharpness Set the screen above identical to apply the settings. Close 12 ENTER Finish the Picture Wizard. Low Recommended E • H Sharpness 50 Previous E High Next 8 ENTER Adjust Horizontal S h a r p n e s s. E Previous E Move MARK Mark Confirm 10 MARK...Recommended sample below . Horizontal Sharpness Set the screen above identical to the TV. 67 Low Recommended E • V Sharpness 50 E High Previous Next 9 ENTER Adjust V e r t i c a l S h a r p n e s s. DTV TV AV1 AV2 Component1 Component2 RGB HDMI1 HDMI2 HDMI3 Warning: The picture quality may...
Owner's Manual
Page 68
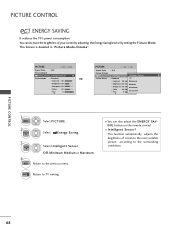
.... PICTURE Move Aspect Ratio : 16:9 Picture Wizard Energy Saving : Intelligent Sensor Picture Mode : Standard • Contrast 90 • Brightness 50 • Sharpness 60 • Color 60 • Tint 0R E Enter G PICTURE Move Enter Aspect Ratio : 16:9 Picture Wizard Energy... PICTURE. PICTURE CONTROL 68 Select Energy Saving. 3 ENTER 4 BACK Select Intelligent Sensor, O f f, Minimum, Medium or Maximum. Return to TV viewing. EXIT Return to the previous menu. I Intelligent Sensor? You can also adjust the ENERGY SAVI N G botton on the remote control....
.... PICTURE Move Aspect Ratio : 16:9 Picture Wizard Energy Saving : Intelligent Sensor Picture Mode : Standard • Contrast 90 • Brightness 50 • Sharpness 60 • Color 60 • Tint 0R E Enter G PICTURE Move Enter Aspect Ratio : 16:9 Picture Wizard Energy... PICTURE. PICTURE CONTROL 68 Select Energy Saving. 3 ENTER 4 BACK Select Intelligent Sensor, O f f, Minimum, Medium or Maximum. Return to TV viewing. EXIT Return to the previous menu. I Intelligent Sensor? You can also adjust the ENERGY SAVI N G botton on the remote control....
Owner's Manual
Page 70
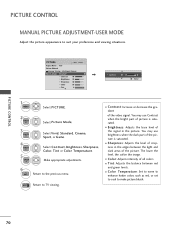
Make appropriate adjustments. 6 BACK Return to TV viewing. I Brightness: Adjusts the base level of the signal in the edges between red and green levels. I Color Temperature: Set to warm to enhance ... appearance to make picture bluish. 70 E PICTURE Move Aspect Ratio : 16:9 Picture Wizard Energy Saving : Intelligent Sensor Picture Mode : Standard • Contrast 90 • Brightness 50 • Sharpness 60 • Color 60 • Tint 0R E Enter G E • Contrast 80 E Enter 1 MENU Select PICTURE. 2 ENTER Select Picture Mode. 3 ENTER 4 ENTER 5 ENTER ...
Make appropriate adjustments. 6 BACK Return to TV viewing. I Brightness: Adjusts the base level of the signal in the edges between red and green levels. I Color Temperature: Set to warm to enhance ... appearance to make picture bluish. 70 E PICTURE Move Aspect Ratio : 16:9 Picture Wizard Energy Saving : Intelligent Sensor Picture Mode : Standard • Contrast 90 • Brightness 50 • Sharpness 60 • Color 60 • Tint 0R E Enter G E • Contrast 80 E Enter 1 MENU Select PICTURE. 2 ENTER Select Picture Mode. 3 ENTER 4 ENTER 5 ENTER ...

Owner's Manual
Page 71
... Return to each video mode, execute the "Reset" function for each input. PICTURE Move E • Contrast 90 • Brightness 50 • Sharpness 60 • Color 60 • Tint 0R • Color Temperature 0 W • Advanced Control • ...Reset Screen(RGB-PC) Enter G C PICTURE Screen(RGB-PC) Move Enter E • Contrast 90 Dynamic Contrast • Brightness 50 Dynamic Color • Sharpness 60 • Color 60 Noise Reduction • Tint 0 RGamma G • Color TemperatuBlraeck Level •...can set the video value according to TV viewing. 71
... Return to each video mode, execute the "Reset" function for each input. PICTURE Move E • Contrast 90 • Brightness 50 • Sharpness 60 • Color 60 • Tint 0R • Color Temperature 0 W • Advanced Control • ...Reset Screen(RGB-PC) Enter G C PICTURE Screen(RGB-PC) Move Enter E • Contrast 90 Dynamic Contrast • Brightness 50 Dynamic Color • Sharpness 60 • Color 60 Noise Reduction • Tint 0 RGamma G • Color TemperatuBlraeck Level •...can set the video value according to TV viewing. 71

Owner's Manual
Page 79
... - AUDIO Move Enter Auto Volume : Off Clear Voice II : Off +3 Balance 0L R Sound Mode : Standard • Infinite Sound: Off • Treble 50 • Bass 50 • Reset TV Speaker : On 1 MENU 2 ENTER 3 ENTER 4 ENTER Select AUDIO. Select Standard, Music, Cinema, Sport, or Game. AUDIO Move Enter Auto Volume : Off... Clear Voice II : Off +3 Balance 0L R Sound Mode : Standard • Infinite Sound: Off Infinite Sound Off • Treble 50 • Bass 50 Treble 50 • Reset Bass 50 TV Speaker : On Close 79 Select Sound Mode.
... - AUDIO Move Enter Auto Volume : Off Clear Voice II : Off +3 Balance 0L R Sound Mode : Standard • Infinite Sound: Off • Treble 50 • Bass 50 • Reset TV Speaker : On 1 MENU 2 ENTER 3 ENTER 4 ENTER Select AUDIO. Select Standard, Music, Cinema, Sport, or Game. AUDIO Move Enter Auto Volume : Off... Clear Voice II : Off +3 Balance 0L R Sound Mode : Standard • Infinite Sound: Off Infinite Sound Off • Treble 50 • Bass 50 Treble 50 • Reset Bass 50 TV Speaker : On Close 79 Select Sound Mode.


